This Part 7 of a series of a fair few posts, Part 1 (link here) gives an overview and the philosophy applied to the series – cheap, simple and fun.
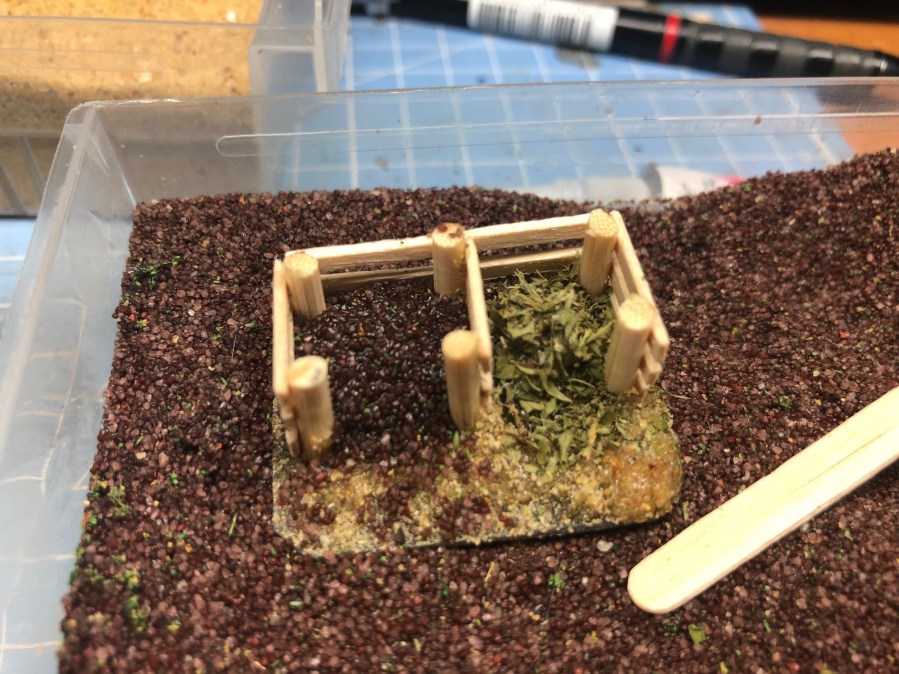
A Composter
Well a environmental friendly way of dealing with kitchen and garden waste is to use a composter that also produces an excellent soil improver. Of course we had a little composter when I grew up, where else would we get the worms from when we went fishing? I remember getting the little container and a small spade and digging for worms,
Anyway for our rural composter I am looking at something like this.
Not to tough project today then, let us get on with it.
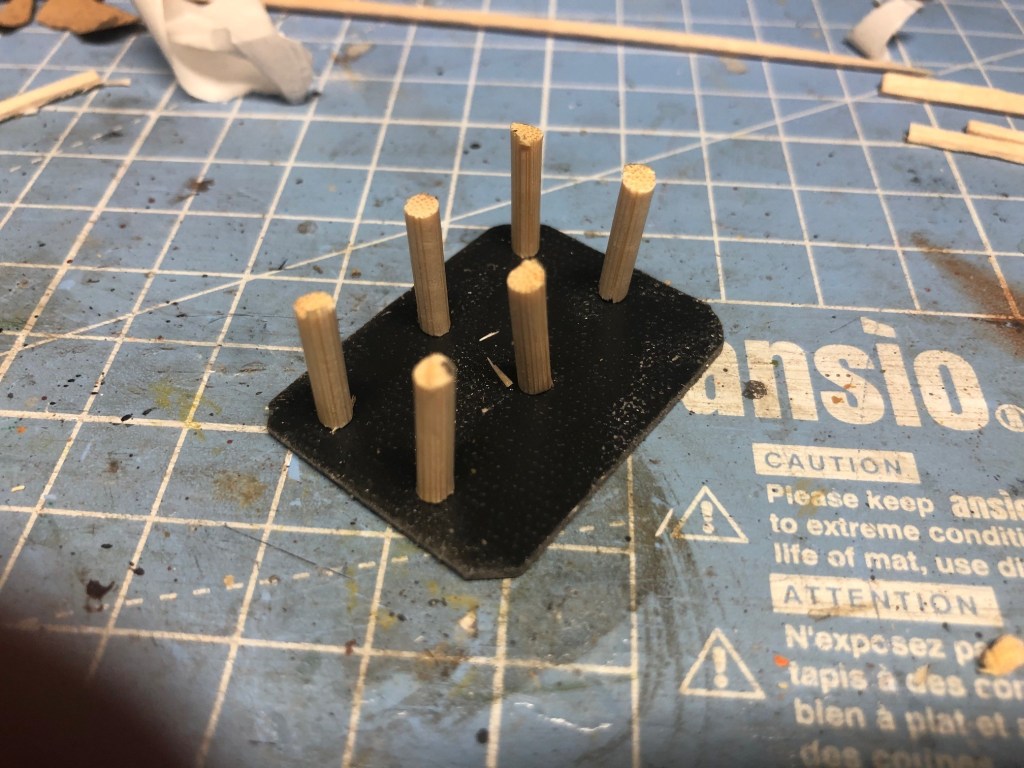
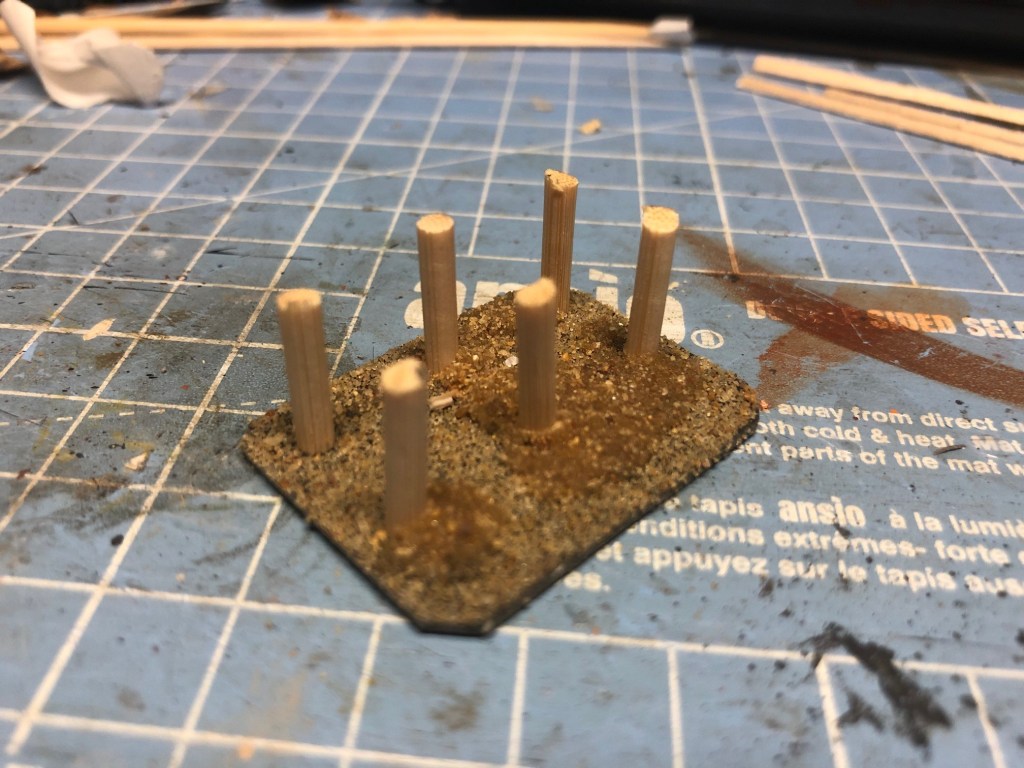
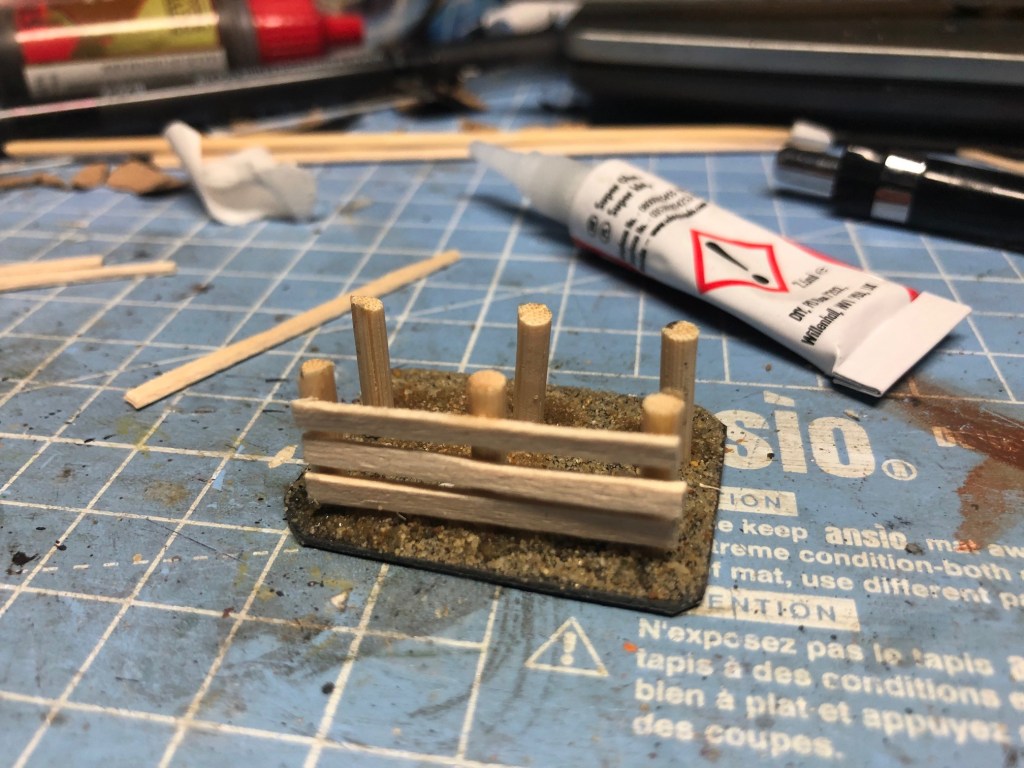
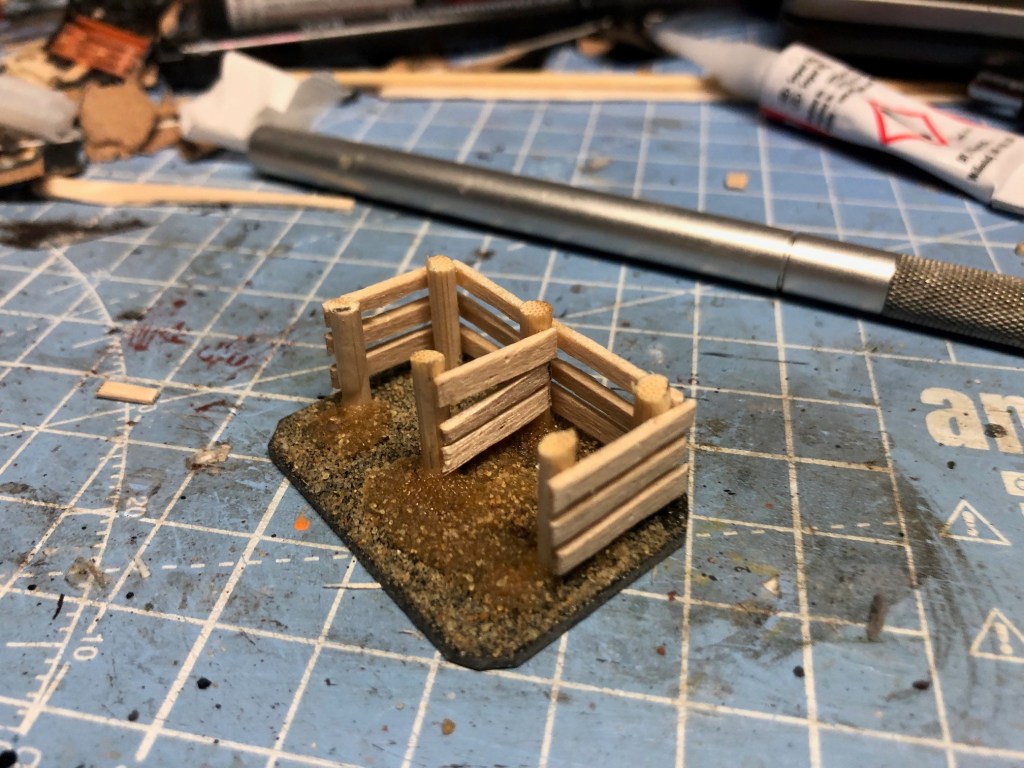
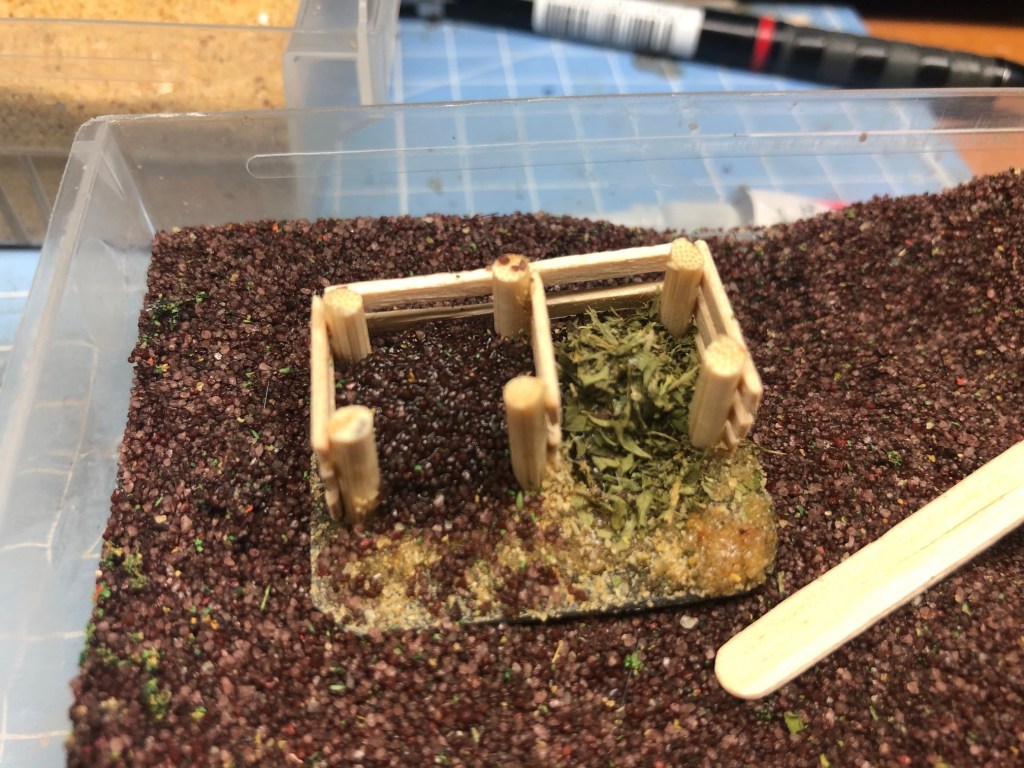
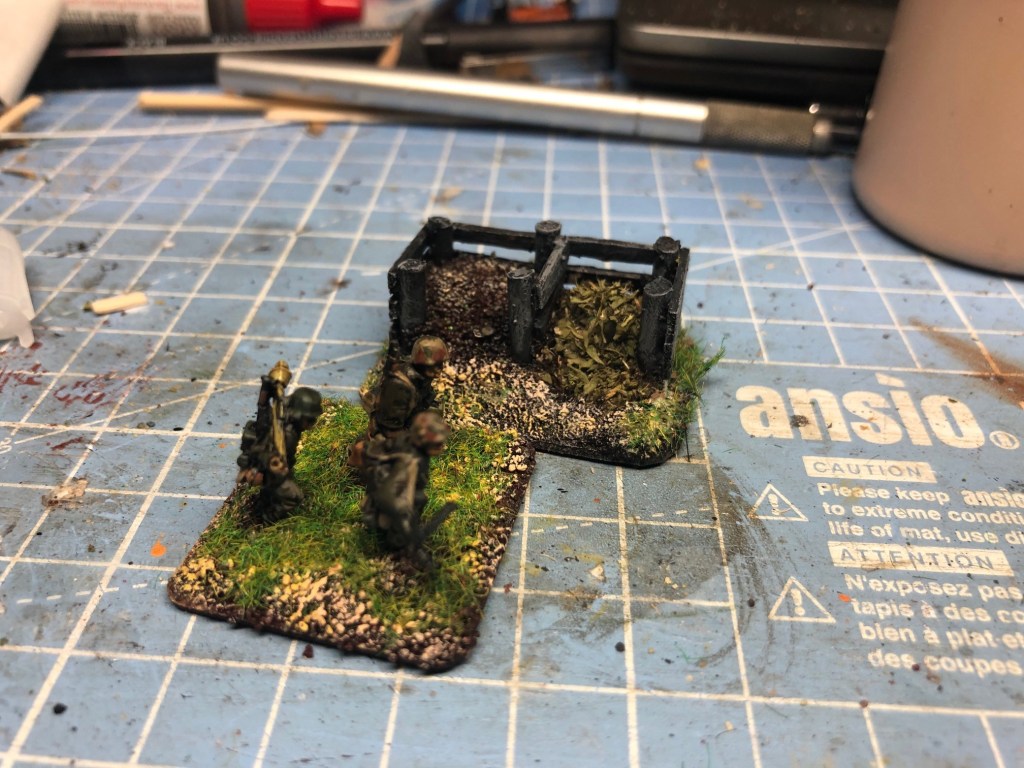
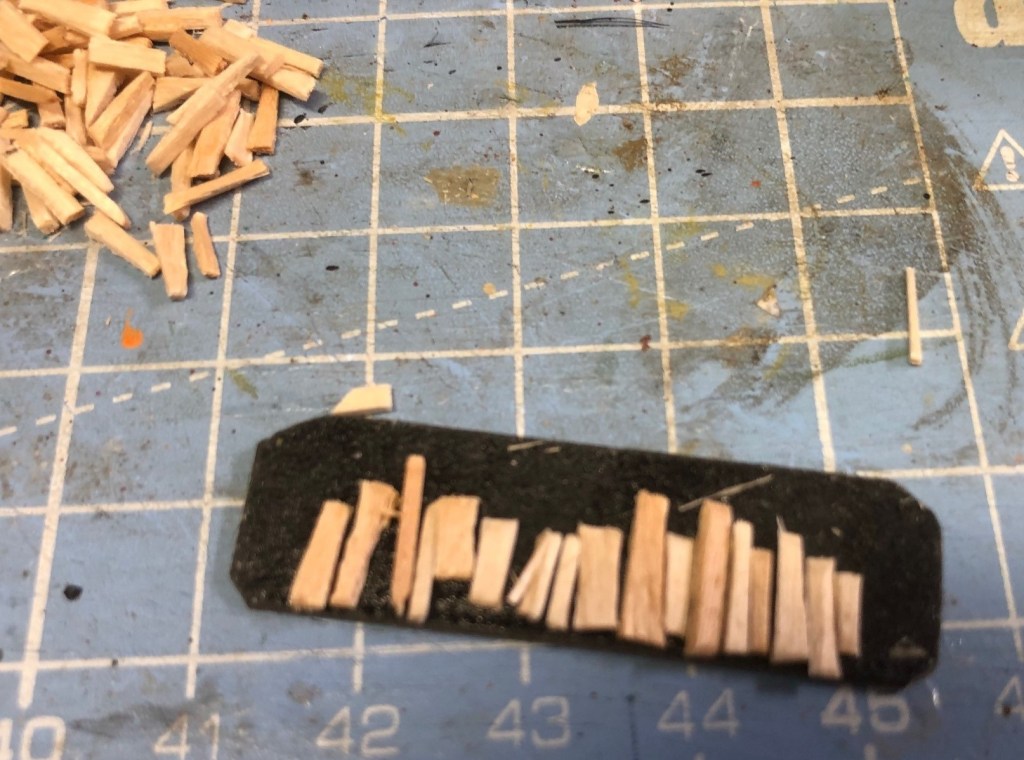
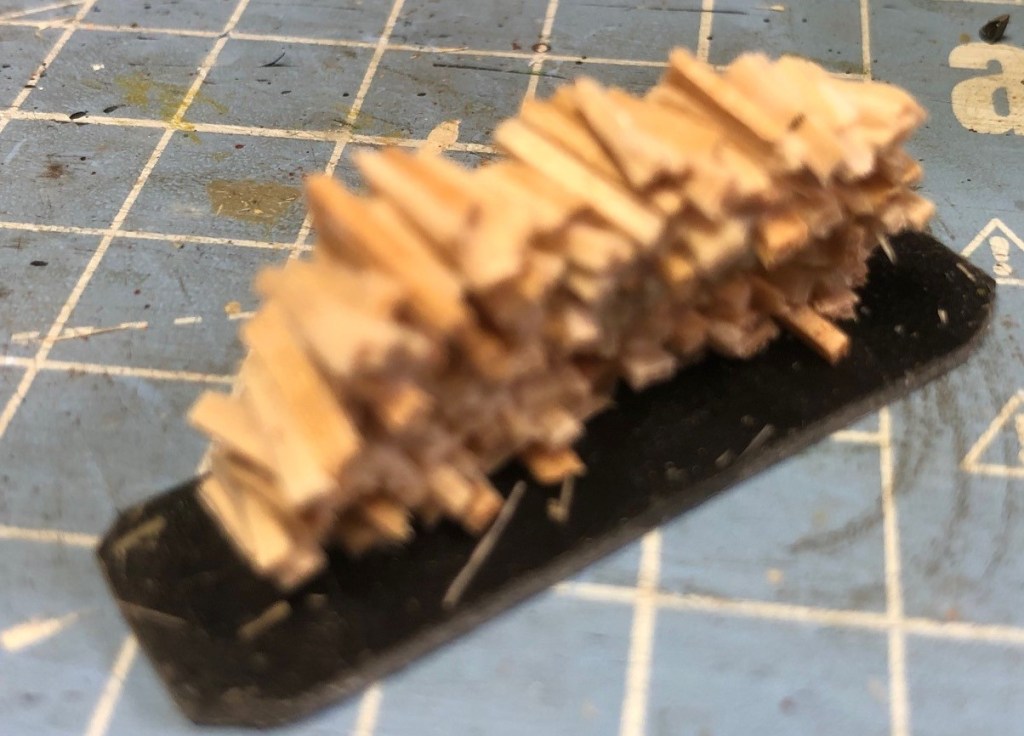
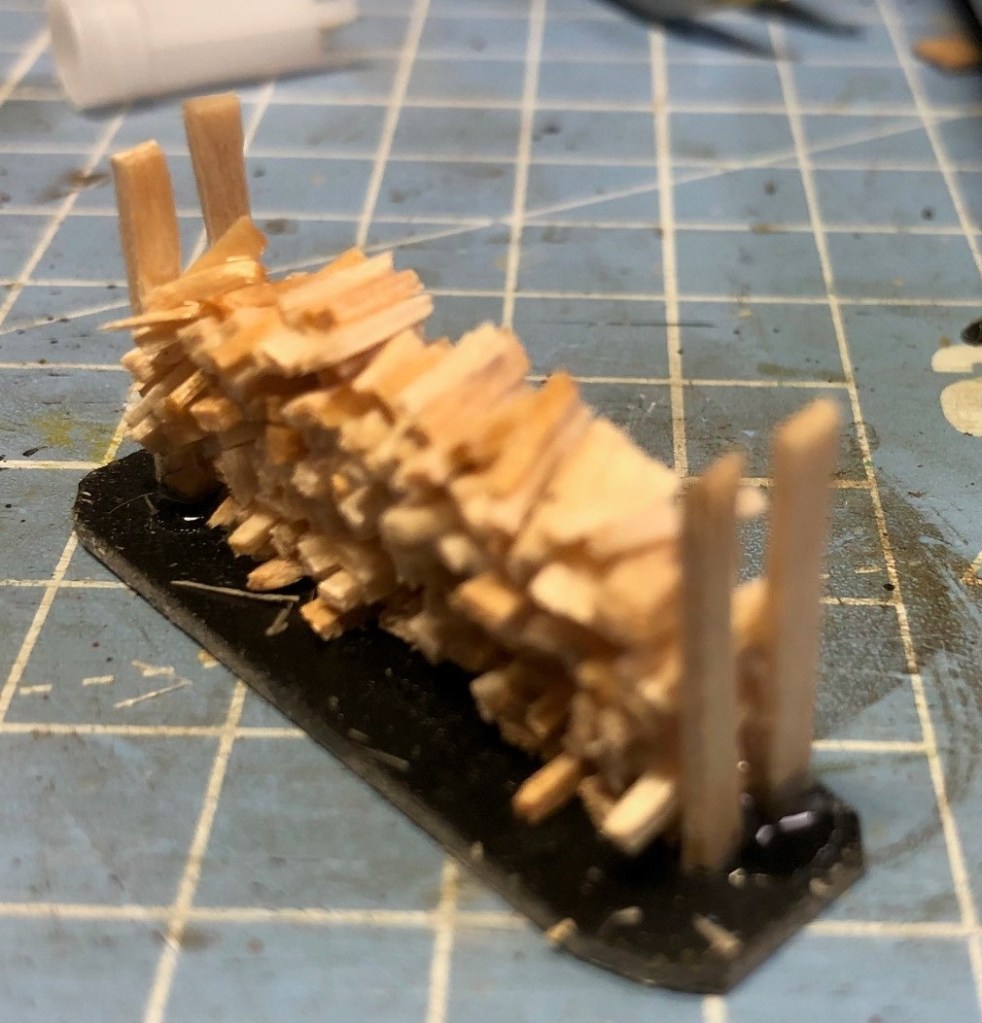
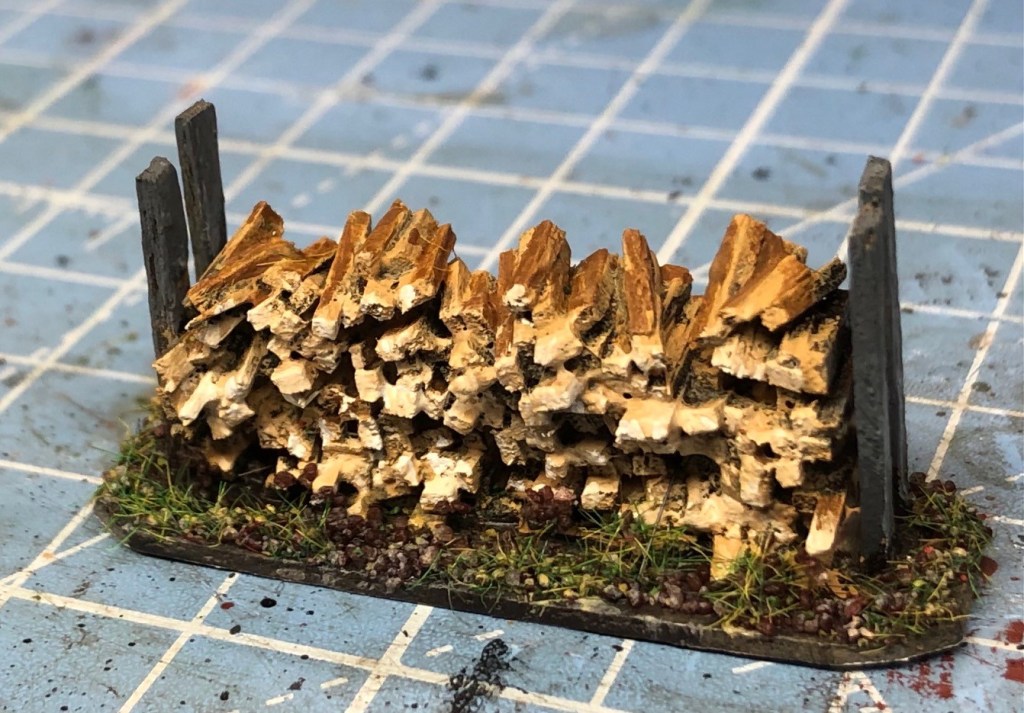
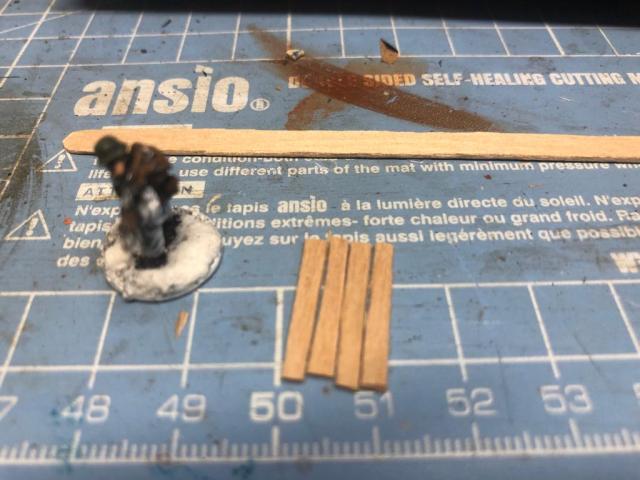
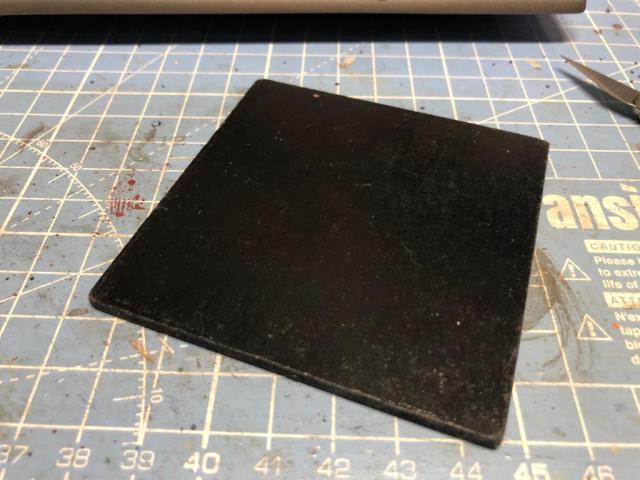
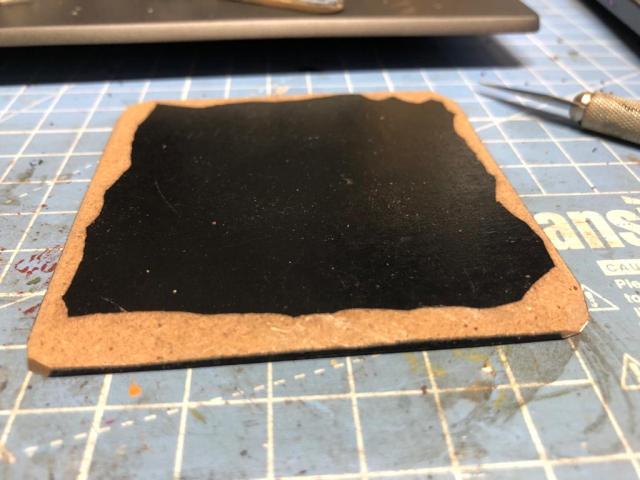
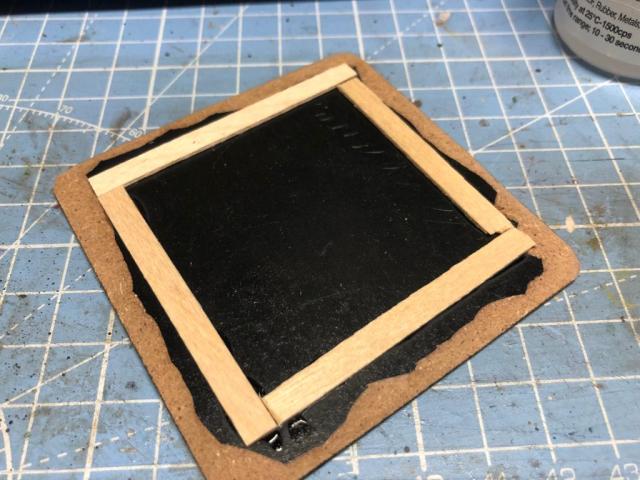
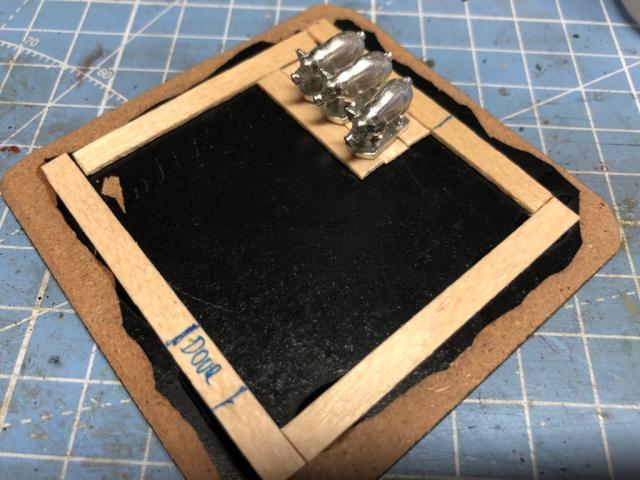
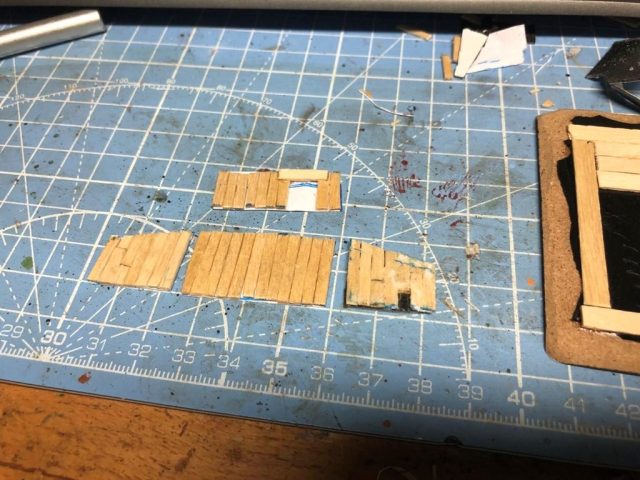
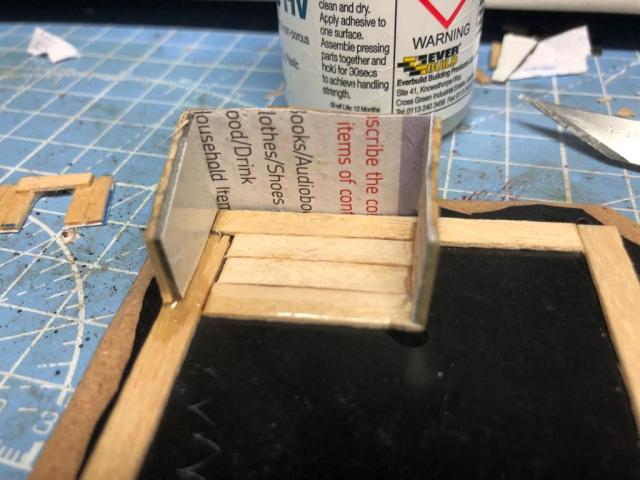
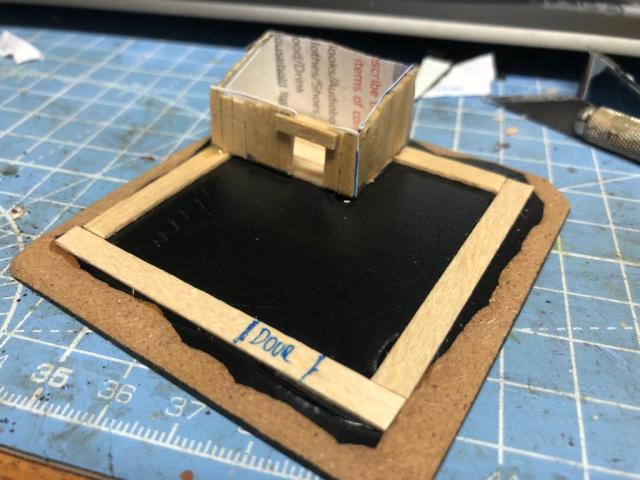
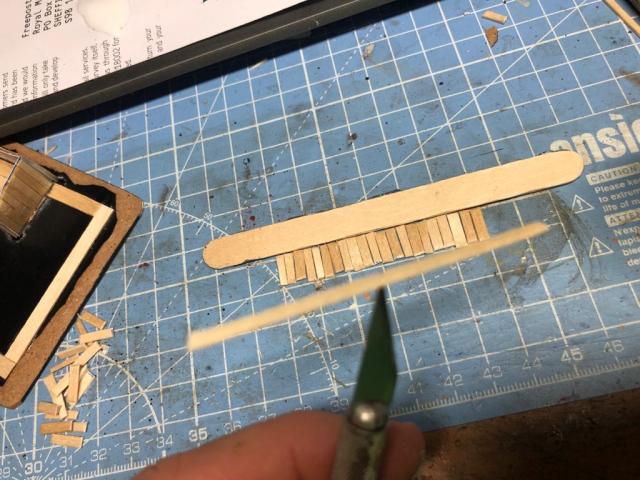
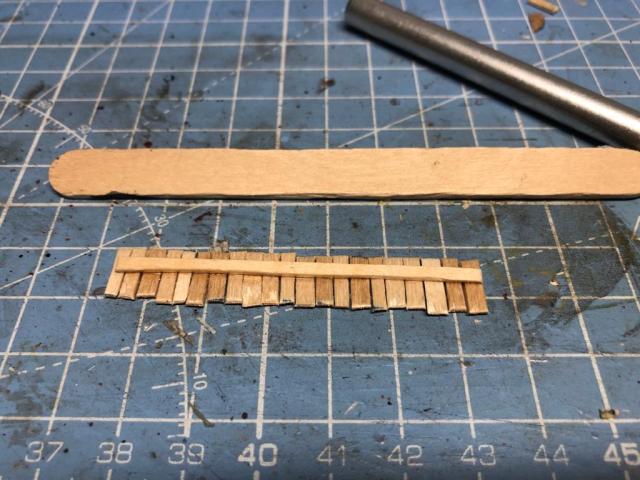
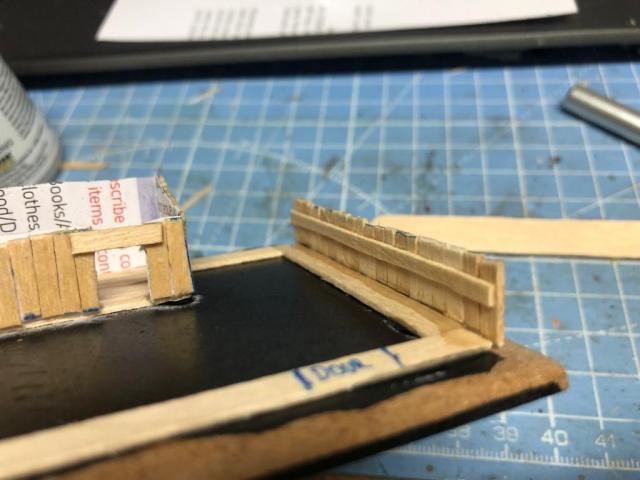
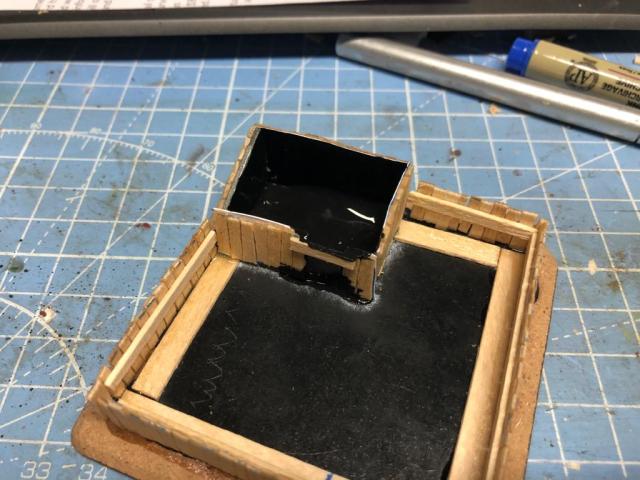
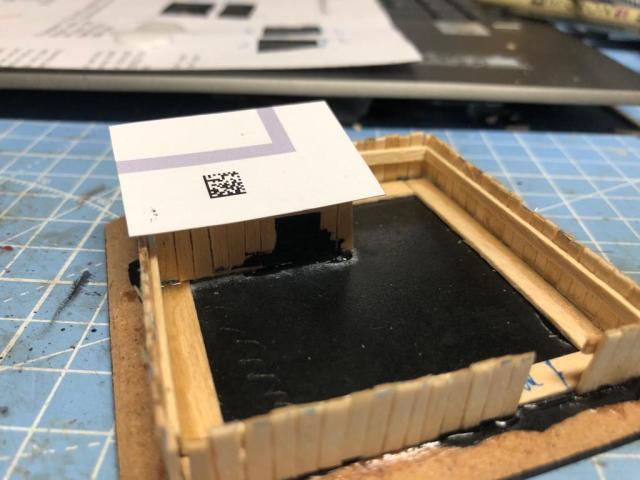
Cut some 15mm long sticks from a kebab stick/skewer add glued them on a base.I Added some sand, it can help with the strength of the adhesion and works for this buildBuild up the walls (leave some space)DoneI addd sand in one put some on and then add some runny super glue then add more until you are happy, the other side I filled with oregano herbs, this is the fresher side.Then just paint the wood, it is a little bit lighter than it looks.
And that budget, well we are still at £17.93 as these were all free issue material (well bought for the monies we already spent), but we have a long way to go, will the stirrers last?
Tomorrow we are making a small pond, see you then.
This Part 6 of a series of a fair few posts, Part 1 (link here) gives an overview and the philosophy applied to the series – cheap, simple and fun.
A Cellar Entrance
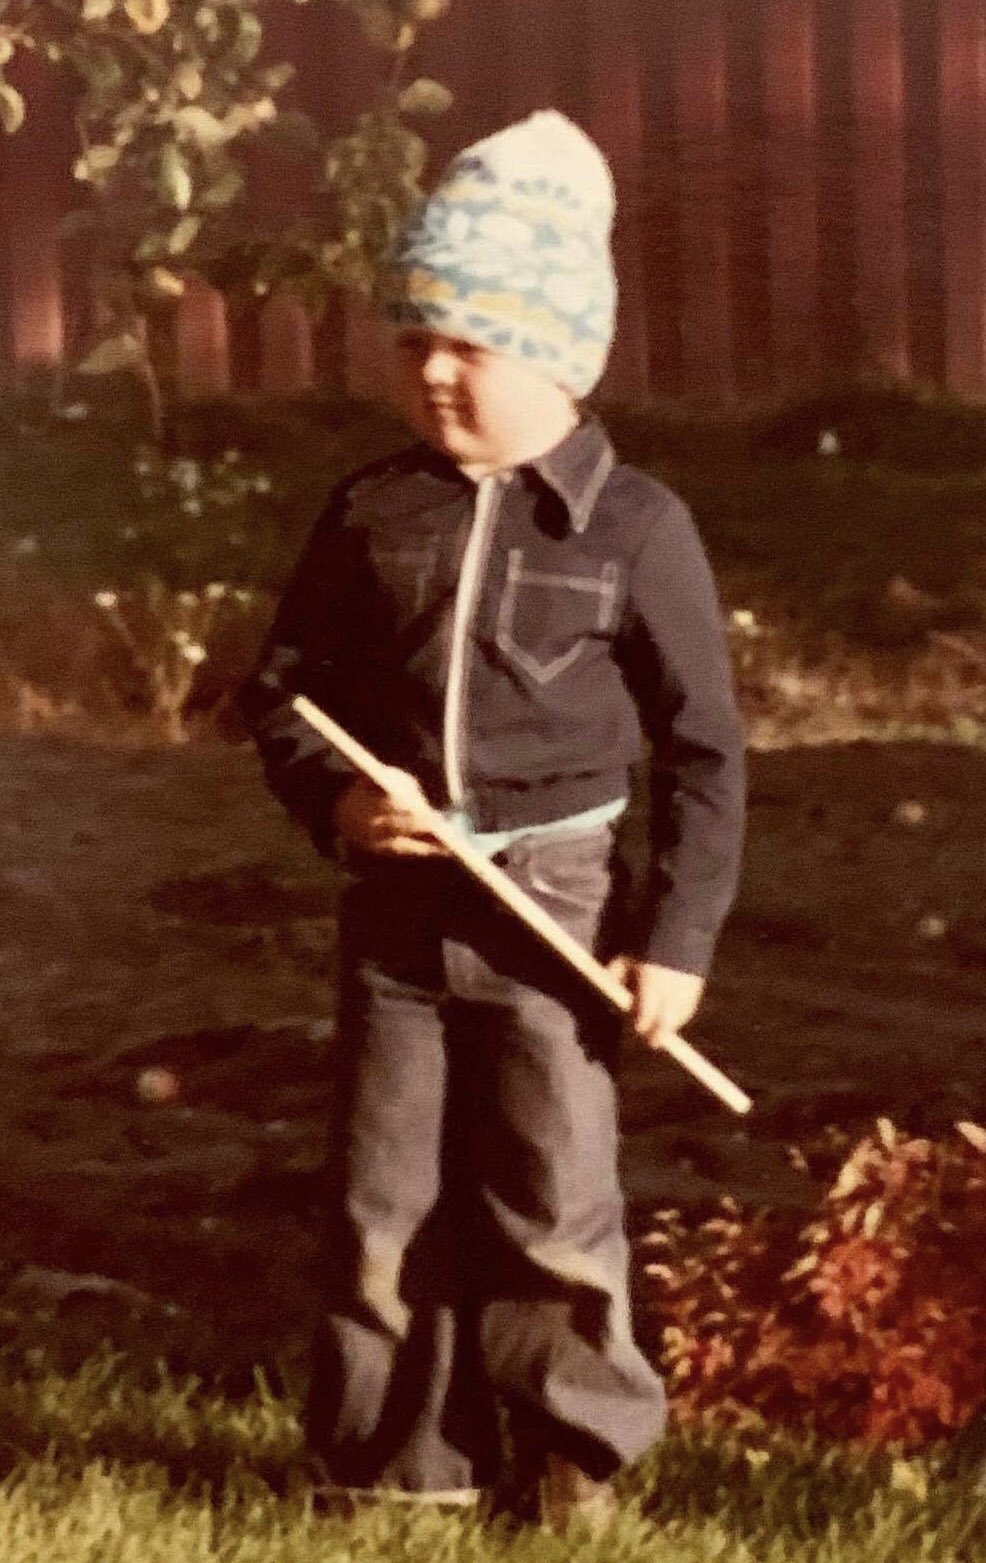
The old house I grew up in had a large and dark cellar. Sometimes Mum would send me down to get some potatoes or jam. I always used to talk loud with her as I moved slowly down the stairs, never telling her I was really scared of it all, you see there was an alternative entrance and although it was always locked I always feared someone having broken in and was waiting there to scare the shit out of me. But I was too tough to tell Mum. I used to arm myself with my favourite stick, it could pretty much be anything from a lightsaber to a full fledged Mauser Rifle – they do not do sticks like that anymore.
Well I guess any intruder would have been quickly scared off at the sight of this tough Norse warrior.
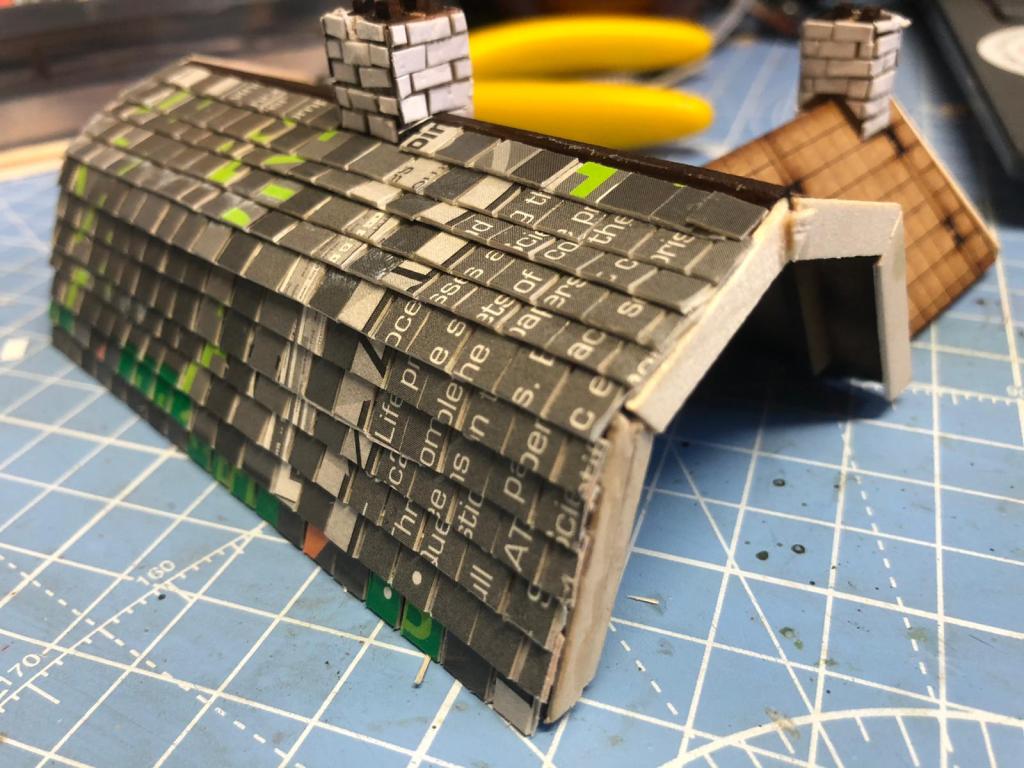
Today we are are doing a piece of clutter to allow the creation of added interest to a house by doing an external cellar entrance. Something like the pictures below.
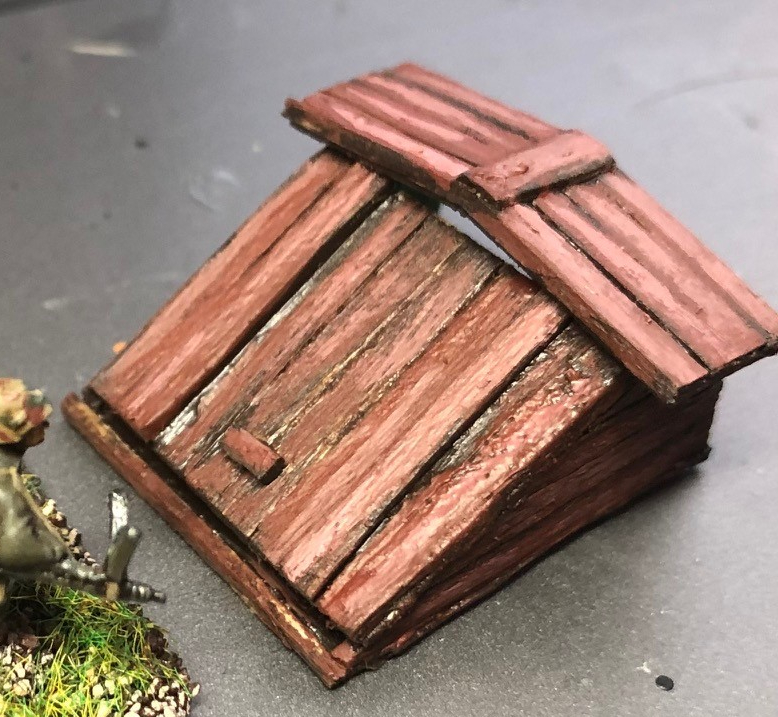
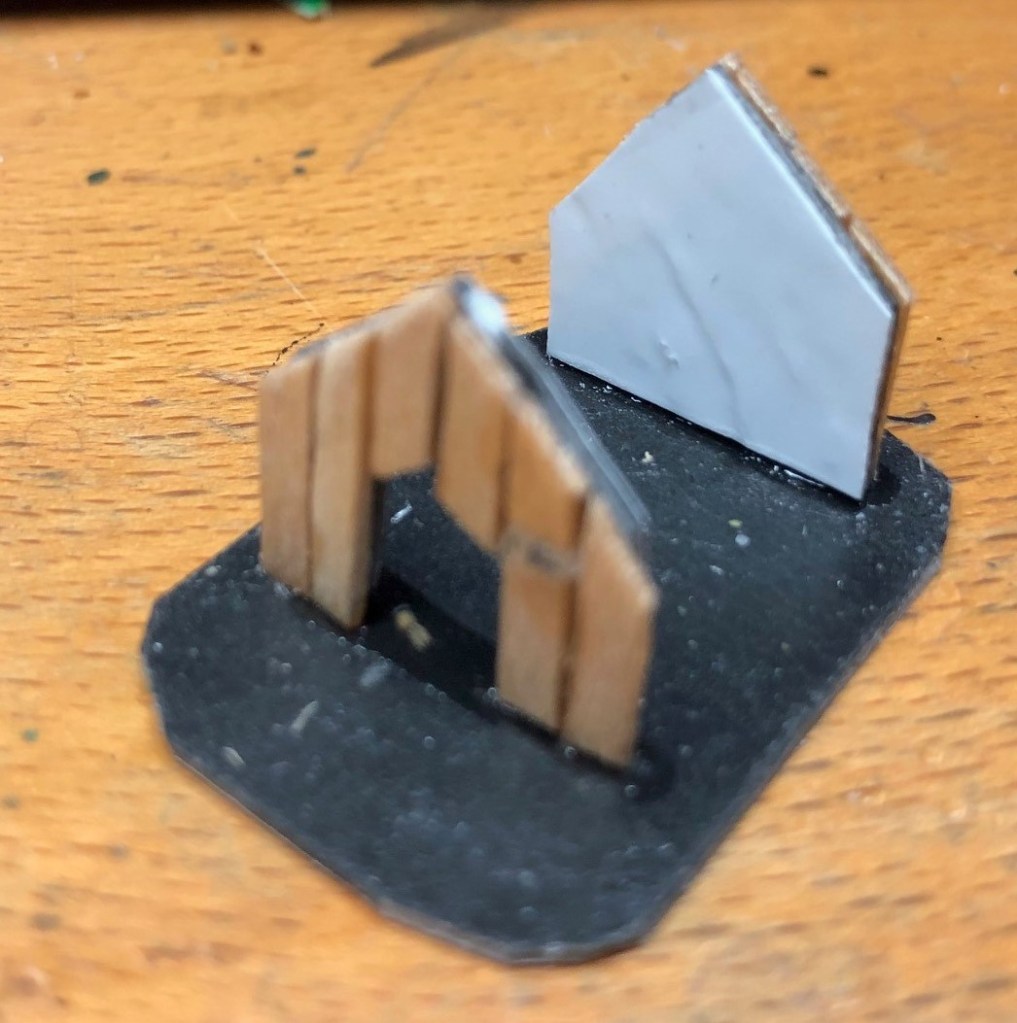
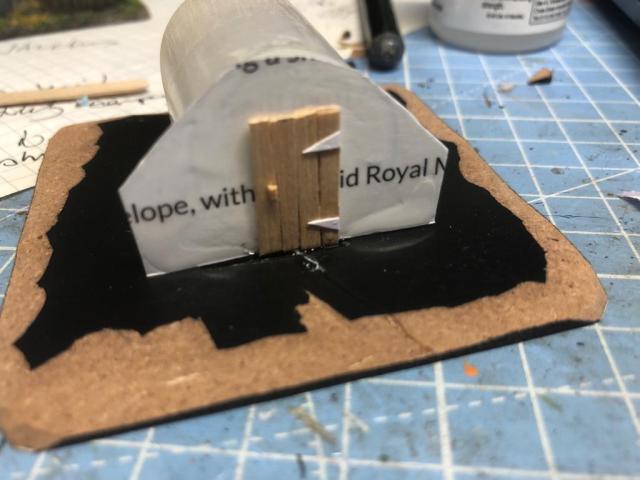
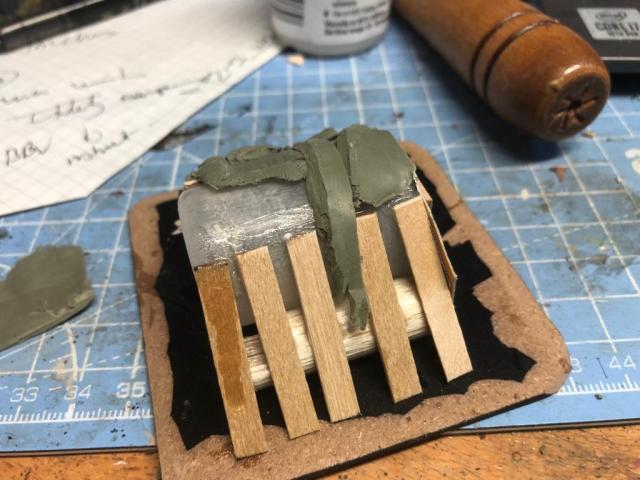
First I cut out (15mm scale) some pieces on cardboard to do the planking on. I did them about 40mm long with a slope up to to 10mm tall as seen in the picture with a roof.
Basically the walls and the roof ready for planking
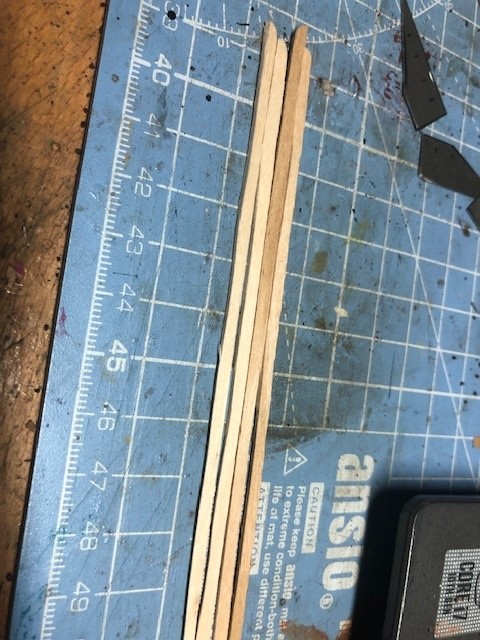
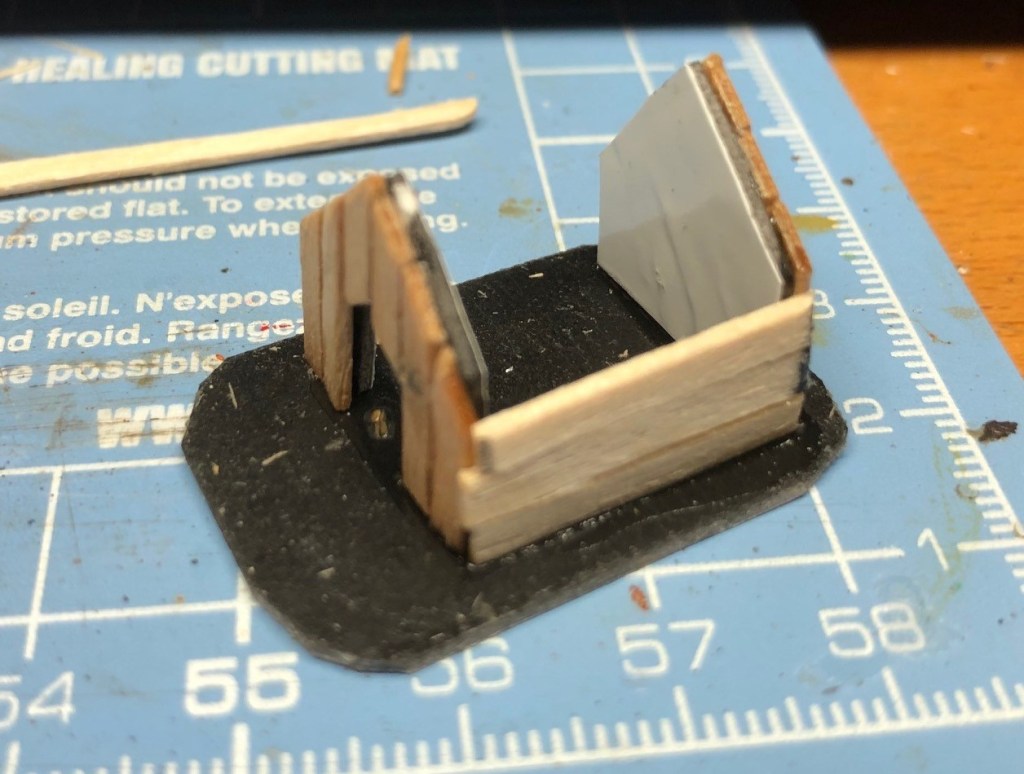
Cut your coffee stirrers lengthwise to get some planks
Glue on the carboard pieces (not I messed up one of the sides and glued it the wrong way around, I did fix it later though)
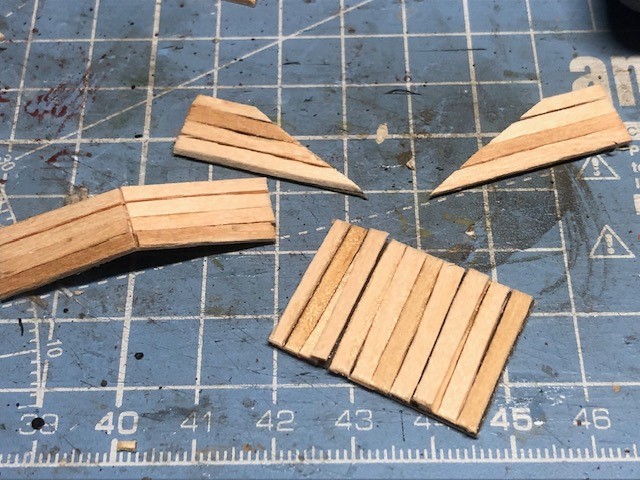
Then do the same with the front part
You will end up with the following parts. Note the front part has two added planks to define the door.
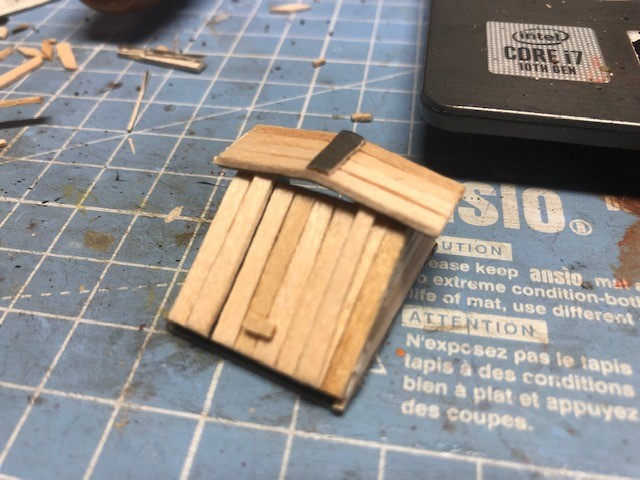
Glue them together and cut out a base
Add a handle and some detail on the roof, done
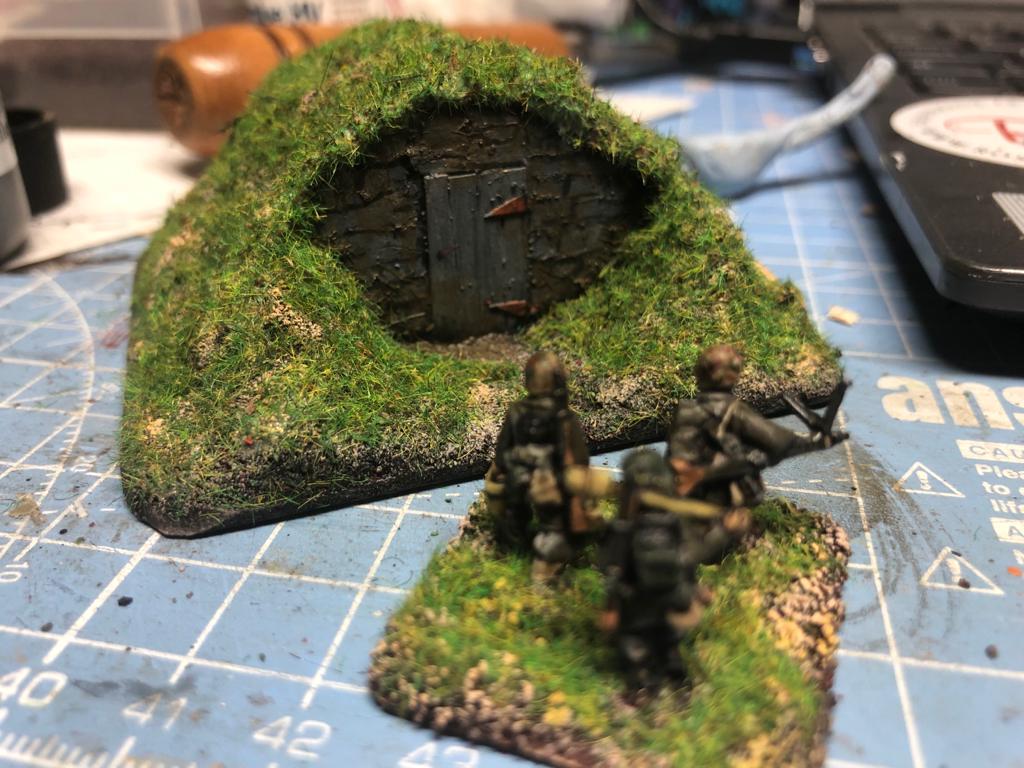
Paint it to fit your real estate, just put it next to your building and you have an instant cellar.
And that budget, well we were at £17.93 yesterday and this project did not add any additional costs, so we are still within the overall budget!
Tomorrow we are making a compost unit, see you then.
This Part 5 of a series of a fair few posts, Part 1 (link here) gives an overview and the philosophy applied to the series – cheap, simple and fun.
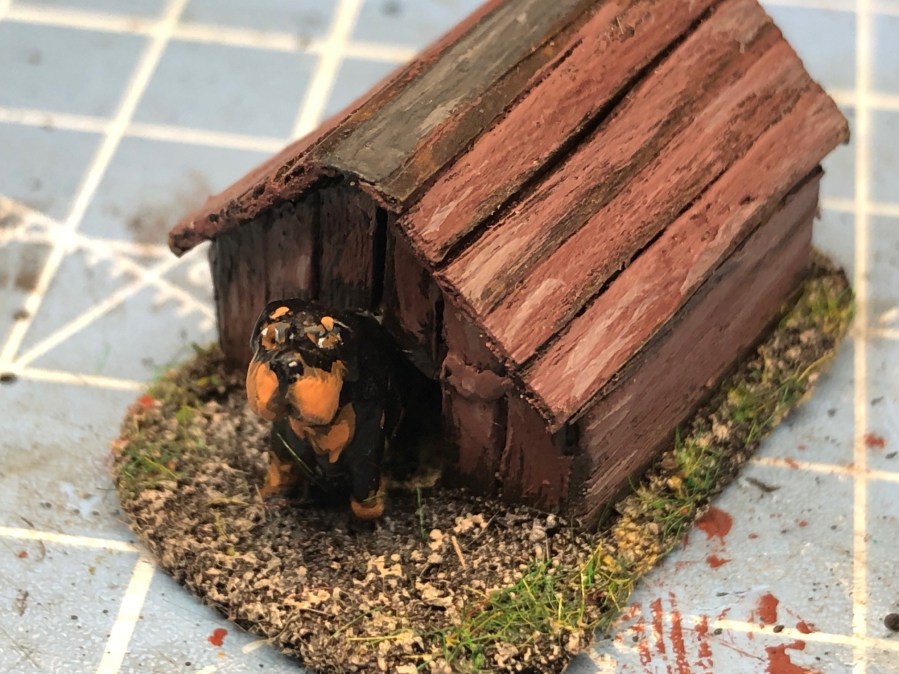
Dog Kennel
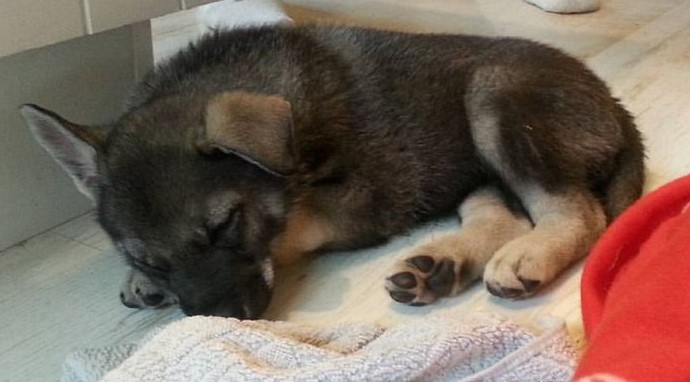
Ares might might be the name of the Greek god of courage and war, one of the Olympians and son of Zeus and Hera. But it is also my sisters dog and loves his main job which is to assist in the hunting of moose.
Now a big and eager dog but I still prefer this picture from his youth, nice and peaceful on the kitchen floor – wonder what thoughts might go through his head.
Anyway let us step up the game slightly from a few pieces of wood piled on top of each other that we had yesterday and the day before, to actually building a structure albeit small. Today we are doing a dog Kennel.
Just like in Part 1 I cut out piece of cardboard that I glue coffee stirrers on (these were cut lengthwise in half) and then glue on the cardboard, then trimmed with side cutters. Then superglue them on the base.Add some “planks” for side walls.Then add a roof, just put planks on and trim once dry and put the dog halfway out, and base the whole thing with sand.As for the paiting I went for a red Kennel as this fits with he Sweden 1943 theme I am working towards, and the dog, well not sure what kind it ended up being but I think it worked out.Maybe I try to do something to represent a bowl or something and perhaps a bone (but that will do for now). You could also take some sandpaper and add to the roof, it really looks good painted black (not the coarse one but the fine one).
And that budget, well we were at £14.93 yesterday and we added the Dog, this was from a packet of 15mm dogs from Museum miniatures and set us back £3, so we have now spent £17.93 (But a good investment and some dogs in our back pocket for another project).
Tomorrow we are making an instant cellar, see you then.
This Part 4 of a series of a fair few posts, Part 1 (link here) gives an overview and the philosophy applied to the series – cheap, simple and fun.
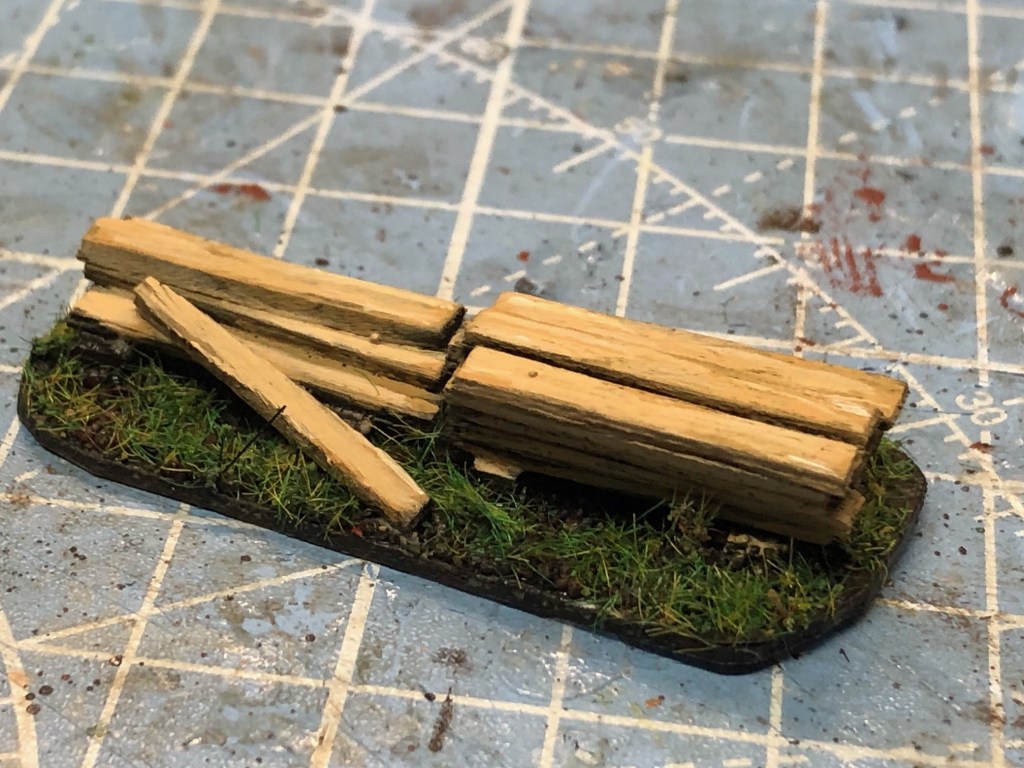
Pile of Planks
My cousin and I borrowed some planks from Dad’s pile one day and took them to the steep slope between the two parts of the garden, the Garden was on two levels and we arranged two or perhaps three 8 feet planks in a way that we could use them as a slide.
We thought it was a great idea and I had the first go. The planks were very rough and that first go became the only go as I ended up with severe splinters in the part normally in contact with the slide. It hurt and Mum was not very impressed but a good laugh in retrospect – I suppose it reinforced the idea that you should let guests have a go first, or something like that.
So following on Part 3 The Log Pile, we are now doing another really easy piece of clutter, this time some planks. Perhaps some repairs are being planned of the house or the barn and a pile of planks have been made somewhere on the table.
Cut Coffee stirrers lengthwise in the middle and then cut them in 20mm lengths, this gives about 2m long planks in 15mm.Just get a base and do some shorter planks as a foundationGlue them on top of each other, you can make a perfect pile, I prefer it to be a little bit wonky and plank having fallen off. More drama.I painted it up to look like fresh planks
And that budget, well we were at £14.93 yesterday and did not really spend any additional resources on this than those allowed or already bought. So we are still at £14.93.
Tomorrow we are making a dog Kennel, see you then.
This Part 3 of a series of a fair few posts, Part 1 (link here) gives an overview and the philosophy applied to the series – cheap, simple and fun.
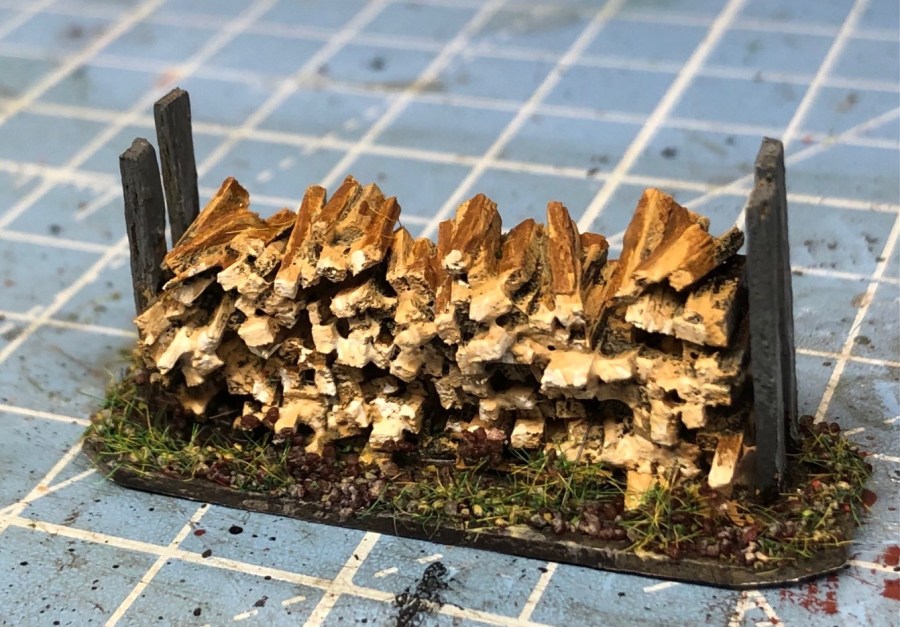
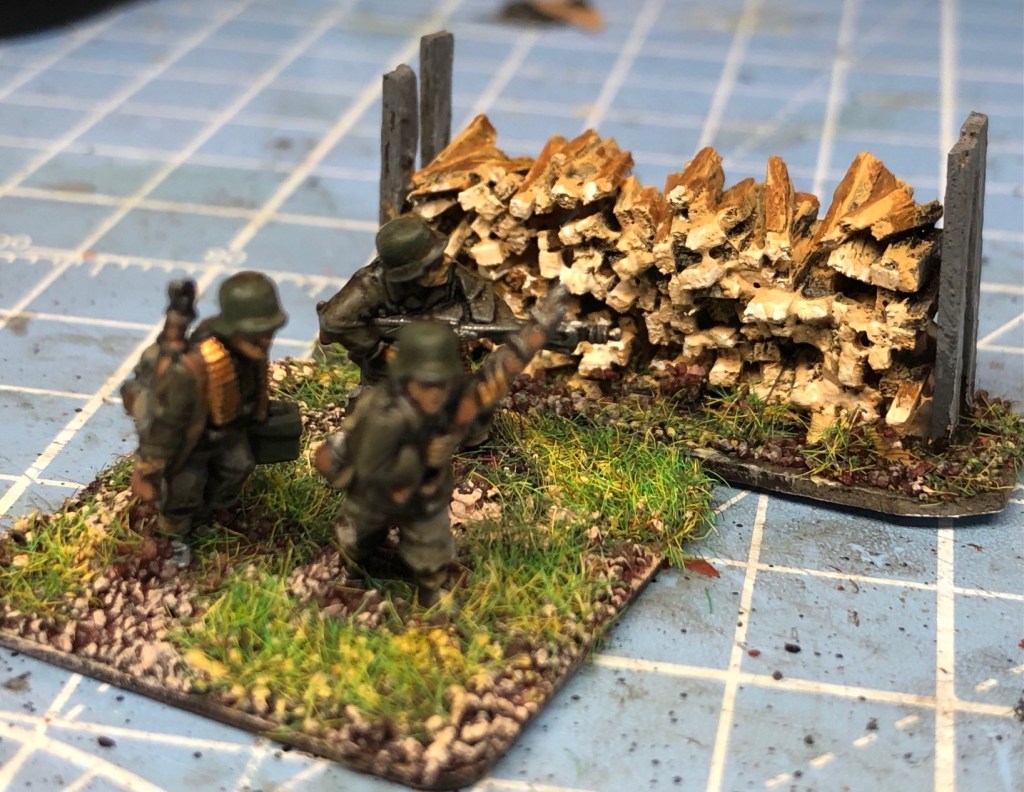
Log Piles
I found this old picture of my Dad from the end of the seventies. The Log pile was from a birch that he hated on the plot and he certainly looks happy to have taken it down and made some fire wood of it. He took great delight in chucking each log into the open fire piece by piece during the winter months, “Here another piece of you Mr Birch goes into the eternal fire!”
So after some more involved pieces in the pig sty and the Root Cellar, today we have a very simple but good addition to your clutter, the Log Pile.
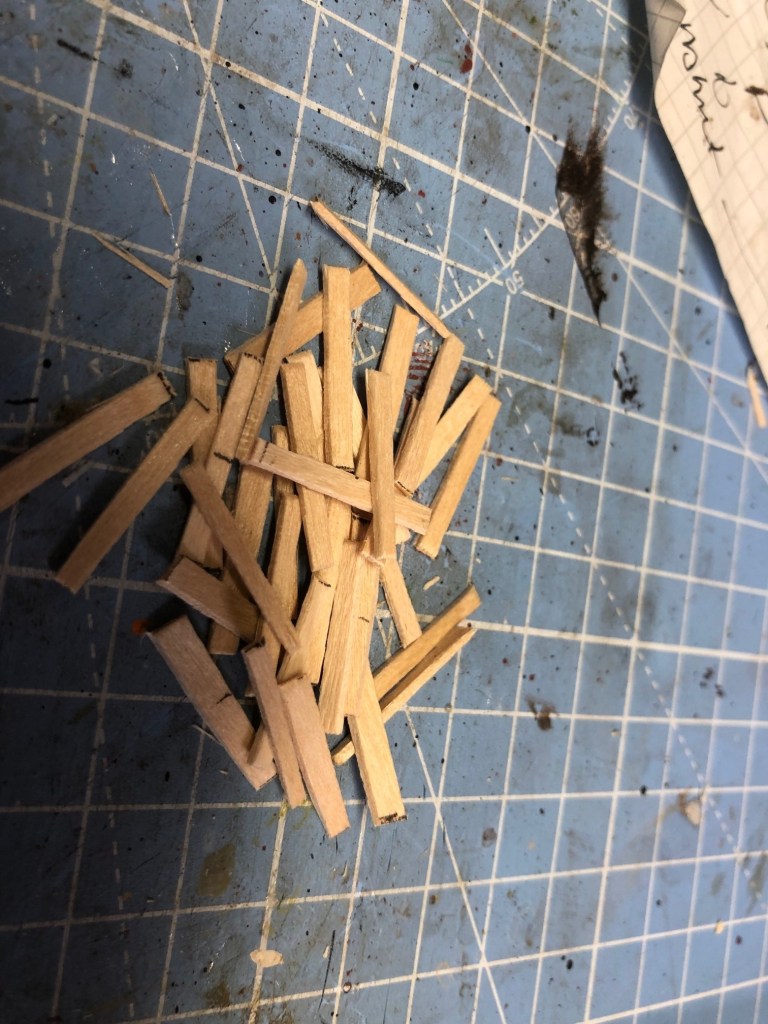
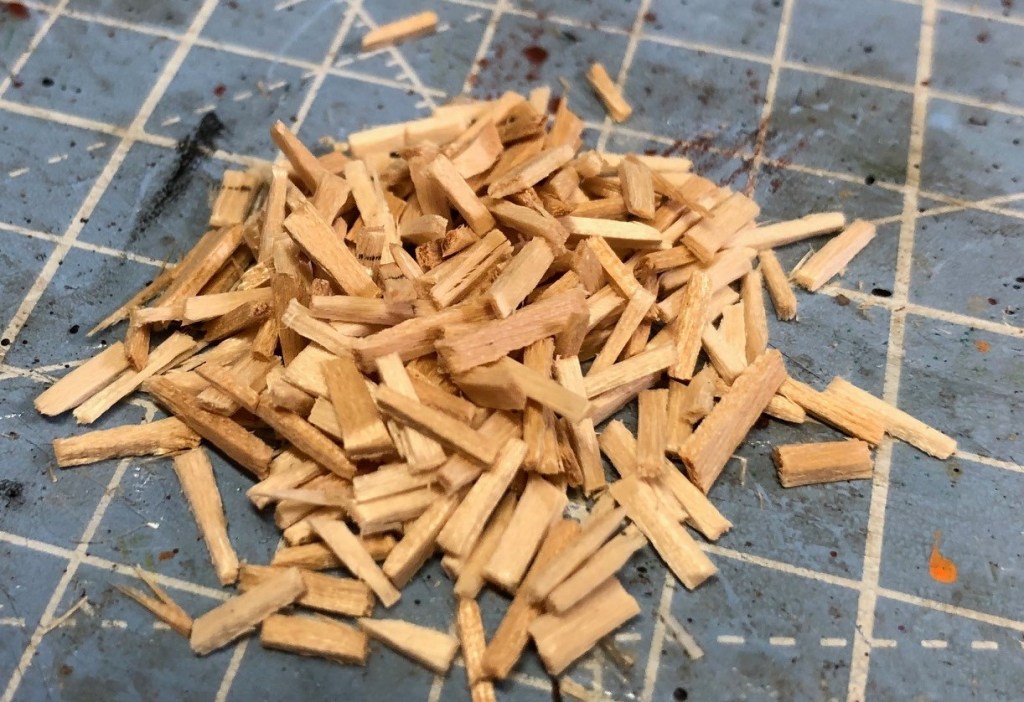
First I cut up some coffee stirers lengthwise in three parts, uniformity is not required so just do it roughly, cut them in (for 15mm scale in 3 to 6mm lengths, again roughly)
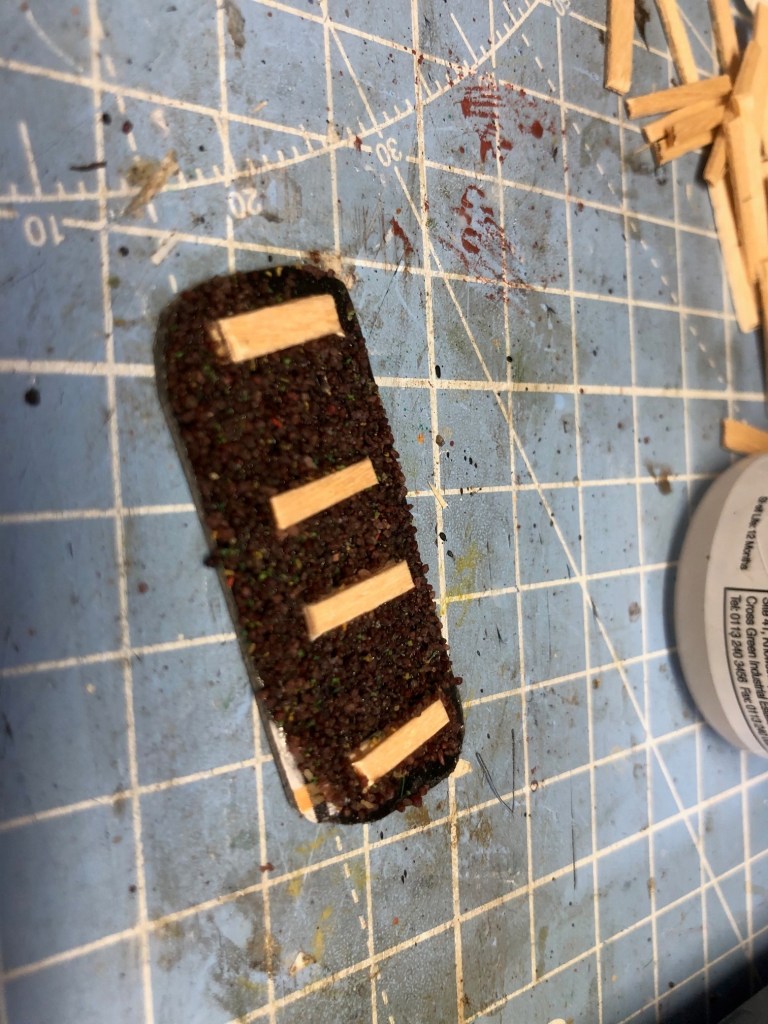
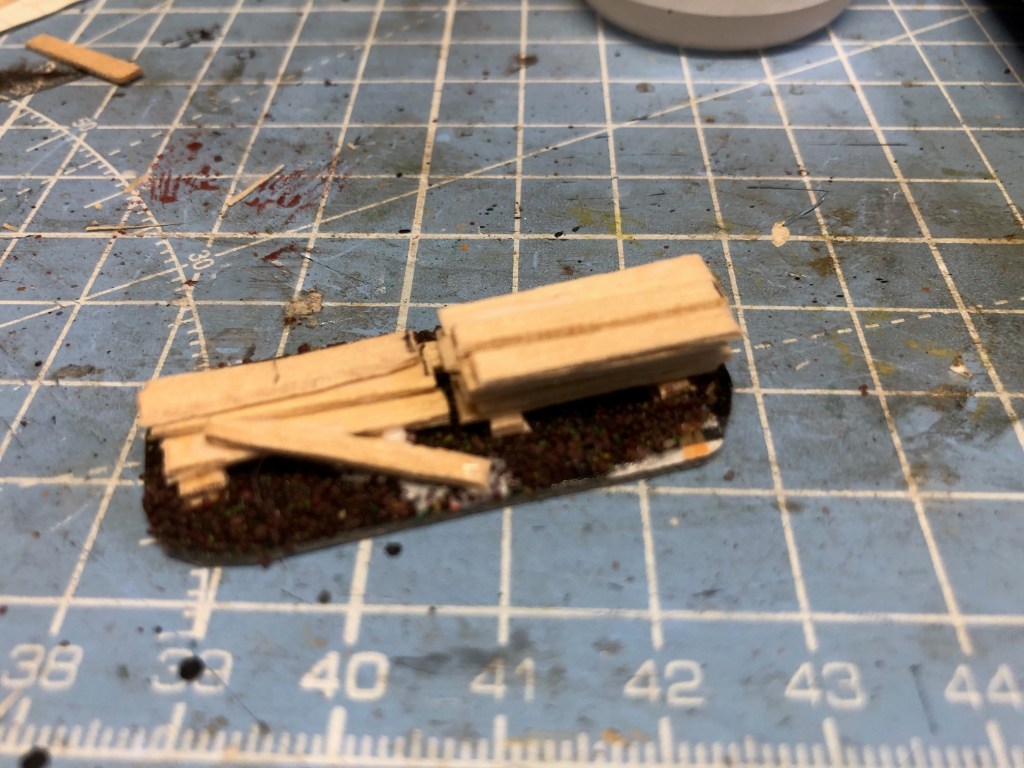
Then take or cut a base, this one is about 40mm or so, start with a bottom row and add PVA or Superglue as you add layer on layer. I recommend PVA and to take some time on this one. Note that I have the back of the base flat, this can then be put along the wall on a building.Build up the pileAdd some coffee stirrers on the side fill up the gaps, wood pile done. Ready for paiting.Painting wise I wanted the side woods to be old and the pile somewhat fresher, tried to give the look of being relatively newly cut. Ok not as nice as Dads pile but I think good enough, a very easy but pleasing project.
You could of course build a more elaborate structure around it like adding a roof.
With some 15mm soldiers next to it.
And that budget, well we were at £14.93 yesterday and did not really spend any additional resources on this than those allowed or already bought. So we are still at £14.93.
Tomorrow we are making another simple one – a pile of planks.
This Part 2 of a series of a fair few posts, Part 1 (link here) gives an overview and the philosophy applied to the series – cheap, simple and fun.
The Root Cellar
Today we are looking at a common feature in the Swedish, and other, landscapes of old and still being used in many places- the root cellar. This, like the pigsty yesterday, will be brilliant in my rural games.
A root cellar (American English) or earth cellar (British English) is a structure, usually underground or partially underground, used for storage of vegetables, fruits, nuts or other foods. Its name reflects the traditional focus on root crops stored in an underground cellar, which is still often true. A wide variety of foods can be stored for weeks to months, depending on the crop and conditions. The structure may not always be underground. (from Wikipedia, more here)
I remember at my cousins family place there was a root cellar just a little bit away from the main house, behind some bushes. It served as a command post during the fighting against the evil empire when we were rebels on the jungle planet Zargosa, or something similar, and also provided cover whilst we were fighting each others with our peashooters (have not seen anyone playing with one of those for a very long time).
So there are many versions of these and I browsed on the net and wanted to make something similar to this one.
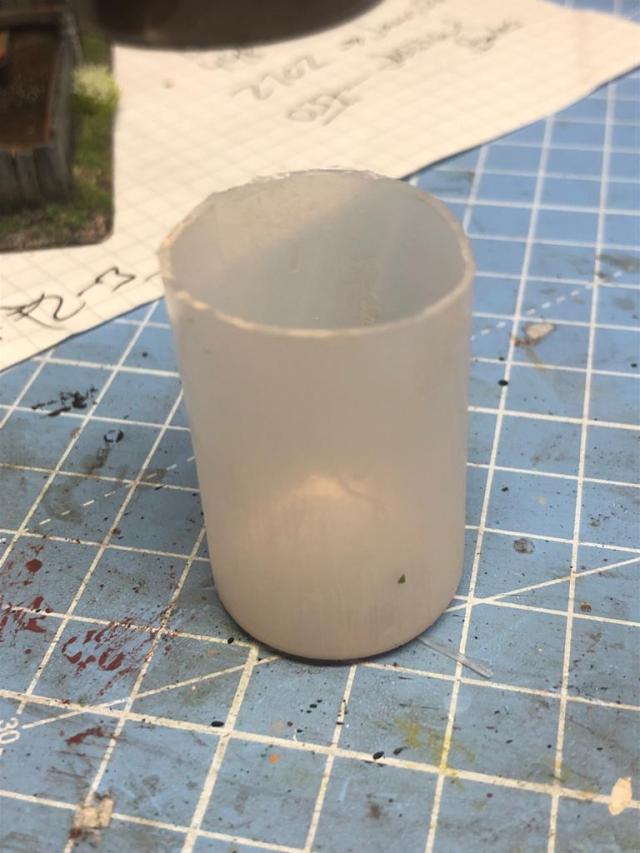
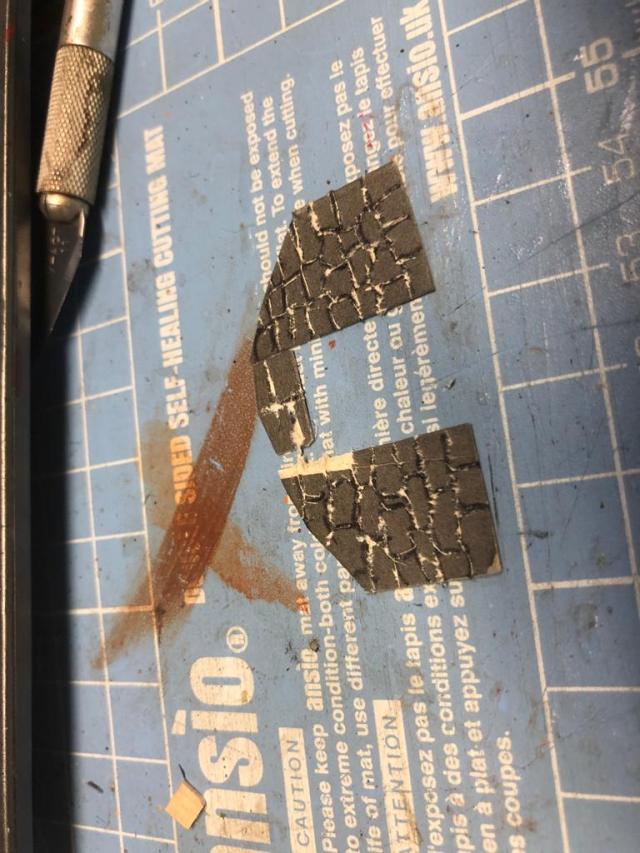
To do this project you need a cylinder of some kind, I used an old paint bottle (Vallejo type) that works brilliant at the scale I am working at 15mm (for 28mm you might want to consider using one of those new 33cl longer soda cans), some modelling clay apart from the standards stuff we discussed in Part 1.
Anyway a high level discussion on how I went about this project.
I had this old bottle that was just full of very tired paint (it has a 25mm diameter or an inch if you prefer). More or less similar to a Vallejo Paint bottle.
I cleaned it and cut of the top bit
Then I got a 75m by 75mm base that I had cut down the sides on to avoid too much of the border to be seen.
Then I glue the bottle on top
Mark out a piece like this on a piece of cardboard – the circle having the same dimensions as the bottle. I then cut out the shape and glued it on the front of the bottle.
Then using a miniature measure the height you want for the door, then cut out some pieces from a coffee stirer. Note that I cut them in half lenghtwise (in 28mm you probably get away with the width as they are).
Forgot to take photos but basically glue the cutout on front of the bottle (note I trimmed the side), then glue the planks that will form the door, I also added two pieces of cardboard to represent hinges and a little door knob (You will note it falls off later but then as by magic reappears later).
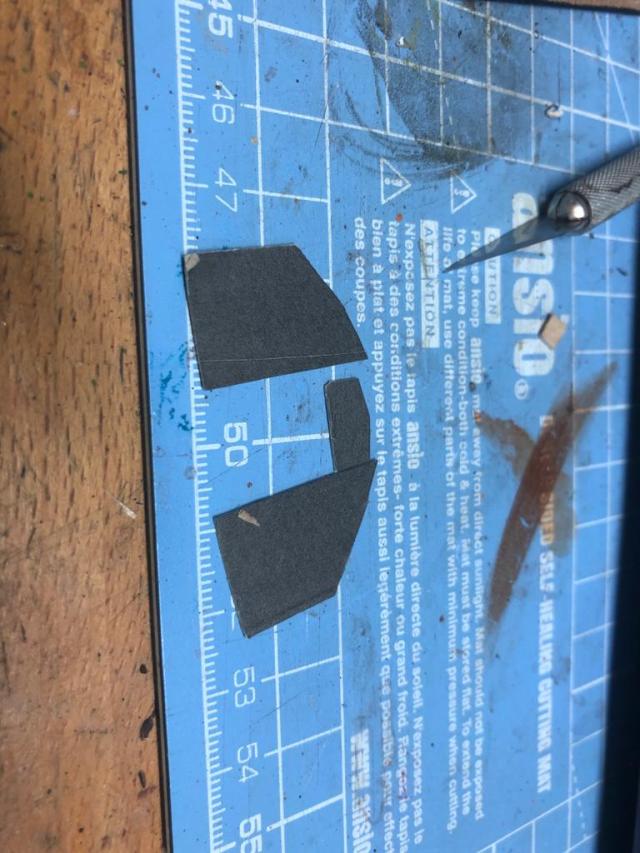
Now cut out the following pieces from the cardboard (these will go around the door)
Draw a stone pattern, make it irregular
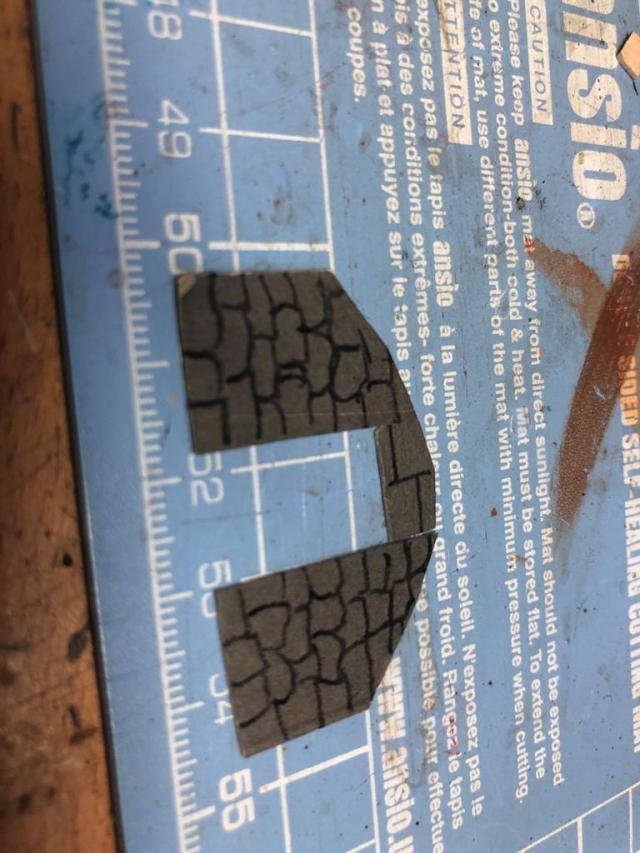
Use a knife to carefully drag along the lines to create some structure – it won’t look great now but later it will
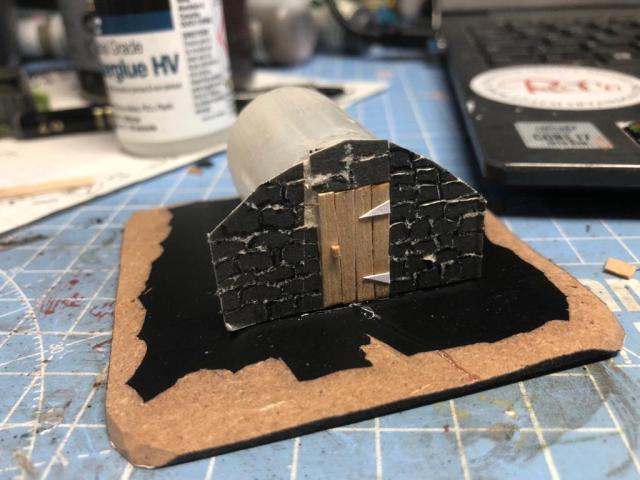
Glue the pieces on
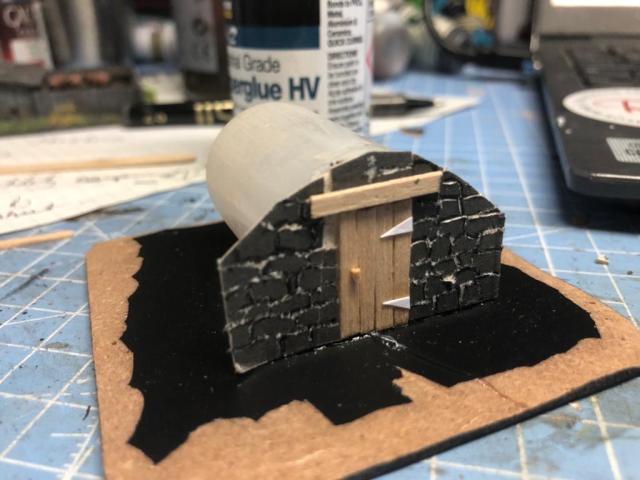
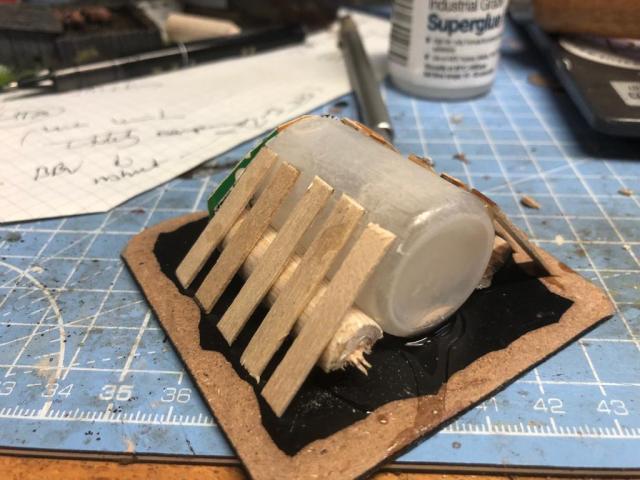
I added a beam on top (but watch that space too)
Then I add pieces of wood and coffeee stirrers all around
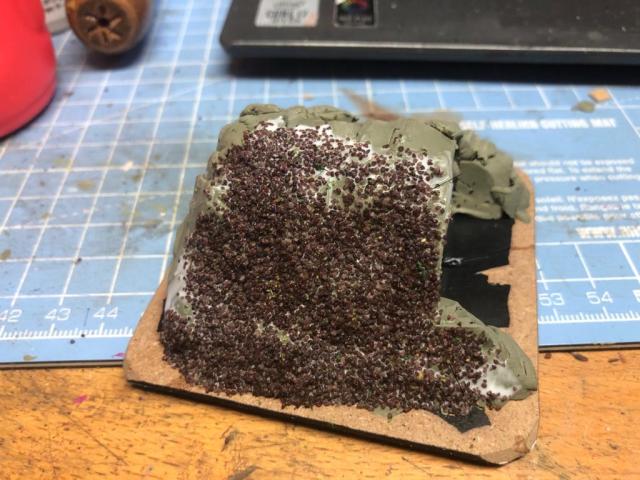
Then I covered it with clay (I have some old clay I use all the time), you could perhaps use some modelling clay like DAS or something like that (it is relatively cheap). The idea is to cover the whole thing, apart from the front.
Something like this, note the knob and the beam has fallen off (also build some natural fall on the back too),
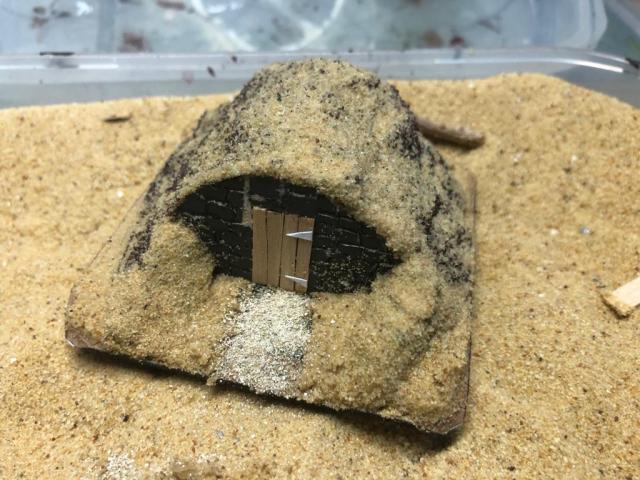
The glue and sand everywhere apart from the stone part on the front with the door.
Ending up looking like this and the build is more or less done (just wait for it to dry).
When dry just paint it brown, drybrush the front in grays, add some rust colour to the hinges and a bit of weathering, then flock it with your normal grass basing mix. Good to go. I think it will be a good thing to put on the table, and perhaps it could be used for a halfling house in 28mm?
Maybe I should have made a little more contrast between the door and the wall – well life is not over yet so maybe later.
And that budget, well we were at £14.93 yesterday and did not really spend any additional resources on this than those allowed or already bought. So we are still at £14.93.
For me terrain is really important for a full on wargames experience and I rather play with average miniatures on a decent wargames table with immersive terrain than with top notch Golden Demon winning miniatures on a piece of felt with flat terrain features – but your Glorantha may vary.
Good friend Alex who runs the fantastic Youtube channel Storm of Steel wargaming with reviews of wargame rules, playthroughs, historical overviews, paint and chats has started an initiative on twitter #Terraintober which consist on doing terrain and post it October (for those who did not see what the did there).
You can find out more about his channel here. It is well worth a look, here is one of his many videos.
I recently decided to do some more clutter for my WW2 15mm wargaming project set in Sweden (yes long story and of course a what-if) and I wanted to take the opportunity to add some more clutter to the table. This is like the stuff you can see in the picture above. Look at the lonely barrel and the bicycle, immediately adding some immersion to the game. There are of course many other examples of this and I daily see fantastic stuff being presented by wargamers all over the world including the Too Fat Lardies, Adam Bengtsson (we game 15mm like it is 28mm mate!), Joe Bilton, Ken the Eccentric Man, Mark Morin, Adam Preston, Des Darkin, John Emmet, Gareth Lane, Alan Sheward, Dan Hodgson and all my mates from the Saturday Painting club just to randomly but with some bias mention a fair few.
These pieces of clutter more than often do not really add anything to the actual game (but sometimes could turn an area into rough going and/or break line of sight), but enhancing the experience of playing it. I call these immersion markers and I will be showing a piece of clutter every day during October and do a little blog post about it. The idea is simple projects ideally from scratch using accessible and cheap material (where I have used some commercial products like models as part of the clutter, you could easily in most cases leave these out, you do not need pigs in the pigsty, perhaps they have been taken away or are hidden by the farmer as war is raging in the land, or maybe they are inside the den having a nap). The actual pieces will vary in terms of complexity from dead easy to easy.
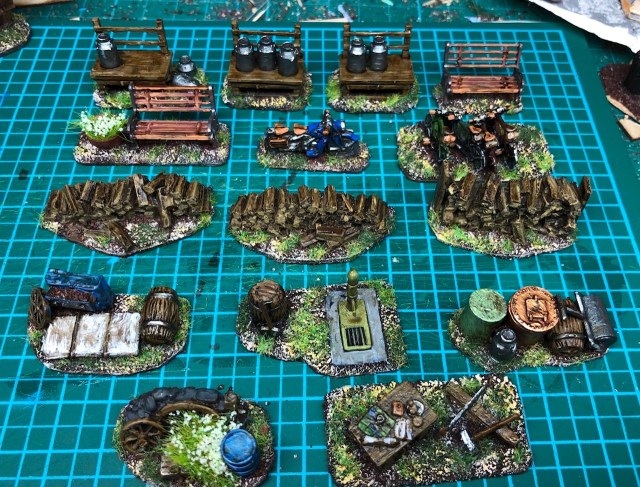
Below some of the clutter I have done before for the project, including more commercially available products as opposed to scratch builds.
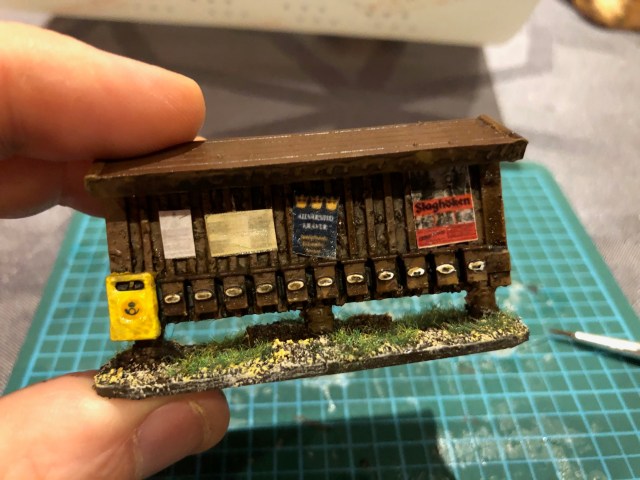
This is my favourite piece of clutter, a 3D model of a typical Swedish row of Post boxes also servicing as notice board. Paul Edward did for me, you can ask him to do one for you (more here) or something else. He is really good at getting you what you want and realising that little 3d dream of yours.
A mixture of clutter from the collection so far
This is the current plan, every number a date in October (as I did the various entries I have put in links here to the posts).
As stated before nothing I will be doing is particularly original or difficult to do and I hope it will have some use and give some kind of inspiration to do some immersion markers yourself. I will try to discuss how I did each piece but it is really mostly about splicing some coffee stirrers, eyeballing it and Rock and Roll a One modelling. Some items will be more specific to the theatre I am aiming for, a rural Sweden in 1943, but I think you will find most items useful as generic clutter anywhere with a few modifications. If there is something available to buy that I have found that is doing the same job I will include it in the posting, not everyone loves the idea of splitting matchstick logs and coffee stirrer planking.
If you are into 28mm, I guess you just need to double everything, well if I do give any measurements, the best way of modelling is to grab one or your miniatures and measure from there, for how high a door or a a fence needs to be to look right. For other scales you should be well versed with compromises and not needing much handholding, good luck from someone who used to do 6mm (well I still do, just waiting for the release of the new 6mm Great Northern War range from Baccus).
There is another catch and that is the total cost of the 30 items will be constrained at a maximum of £30 , but with a few exceptions not counting towards the cost (the item below I assume being a basic set of items you would have anyway).
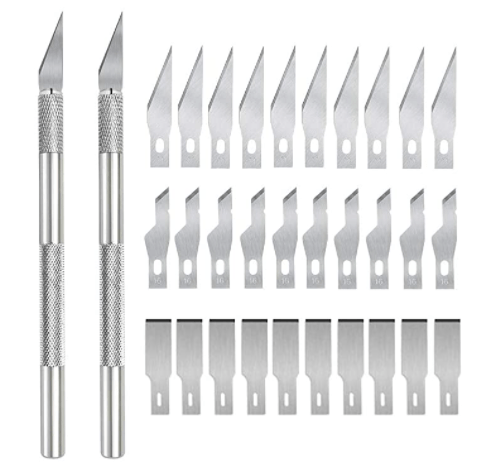
Tools – I use a side cutter and an exacto/precision knife for all my projects, these are the types I am using. It could be worth to have a good supply of spare blades, I tend to have two running at the same time – Sharp’s Peril and Blunt trauma. Please use the tools carefully.
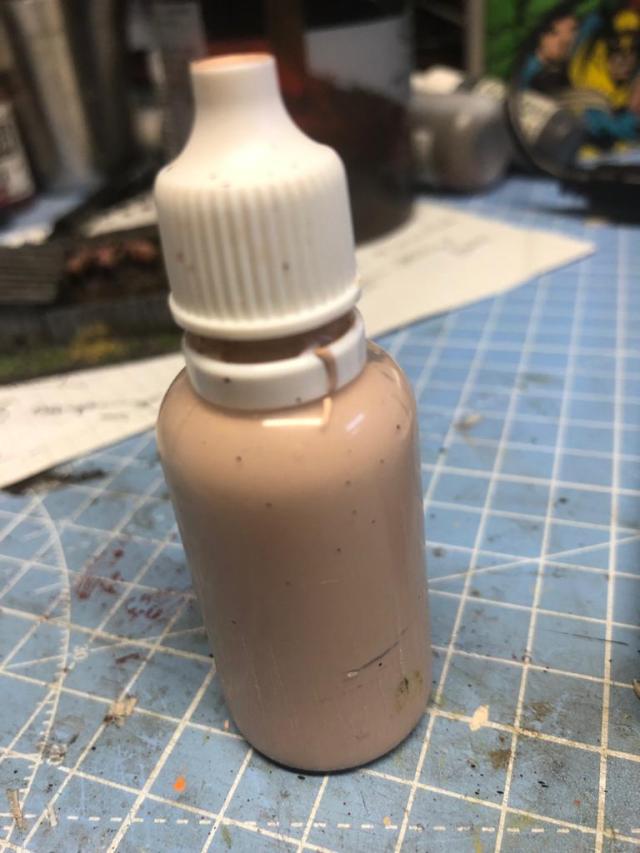
Paints and brushes, this includes varnishes and some gloss we use for some of the projects. I tend to use a shit brown (as this come in 50 shades, it can sometimes be referred to differently with names like Chocolate Brown or Burnt Umber) as a base colour for my terrain pieces. This is the one I have been using the last few years.
Scatter material (grass, flocks, sand or a whatever you use to base your figures with). I tend to use a base set of two static grass for all my miniatures stuff (a light and a dark one). This means it all kind of fits together.
Superglue, I am a big fan of superglue (be careful though, with handling it and also having adequ) – I find that the gel version works (high viscosity) best rather than the runny one (general type of low viscosity superglue). I have found Everbuild’s Industrial Strenght Glue particulary useful but of course there are others. Did I say be careful?
PVA glue, for the more civilized modeller and with more time up their a**e. Joke aside I have spent half of my life applying PVA glue to things and sprinkled sand on it. I buy it in large containers from DIY shops.
Bases, you can use MDF bases, or self adhesive vinyl tiles or whatever else you are using, I have cut away the cover side of DVD cases sometimes or used old CDs/DVDs. I will use self adhesive tiles for a number of projects therefore I have included a pack in the cost below.
Cardboard, Cereal packs are good and have a fine side and a rough side that you can take advantage off.
Some items mentioned specifically for each project.
I bought the following at the start of the project
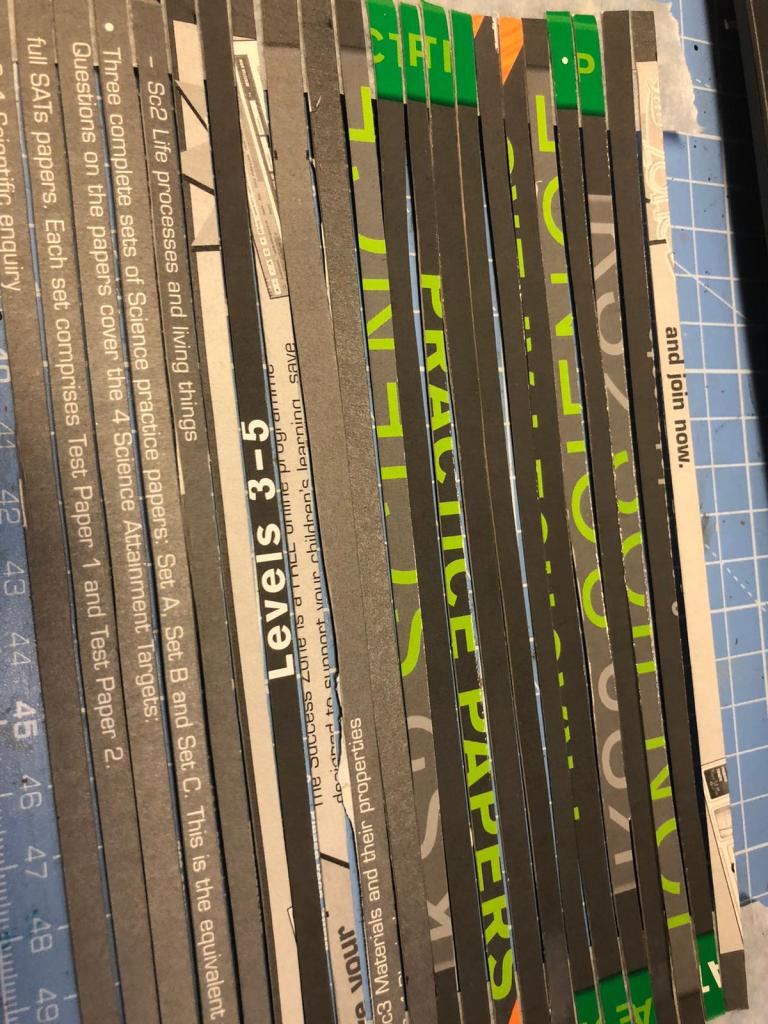
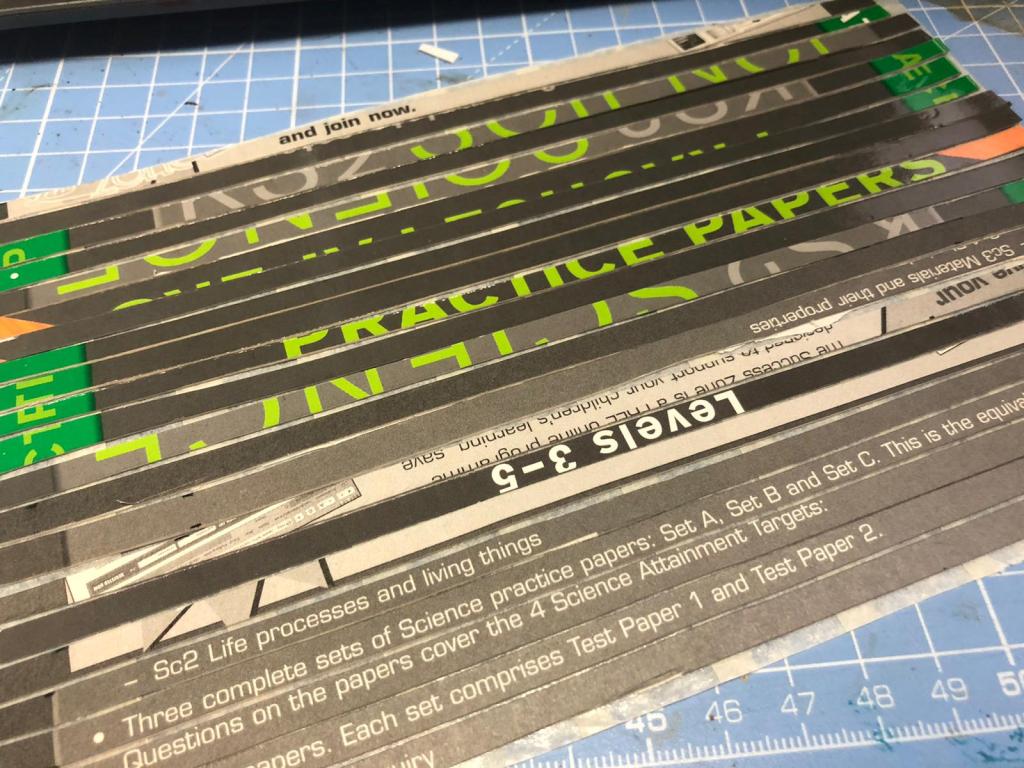
Coffee stirrers (300 No. in wood) – £4.29
A pack of bamboo skewers (a handful) – £1.99
Self adhesive vinyl tiles – £4.95
So that is total of £11.23 at the starting block.
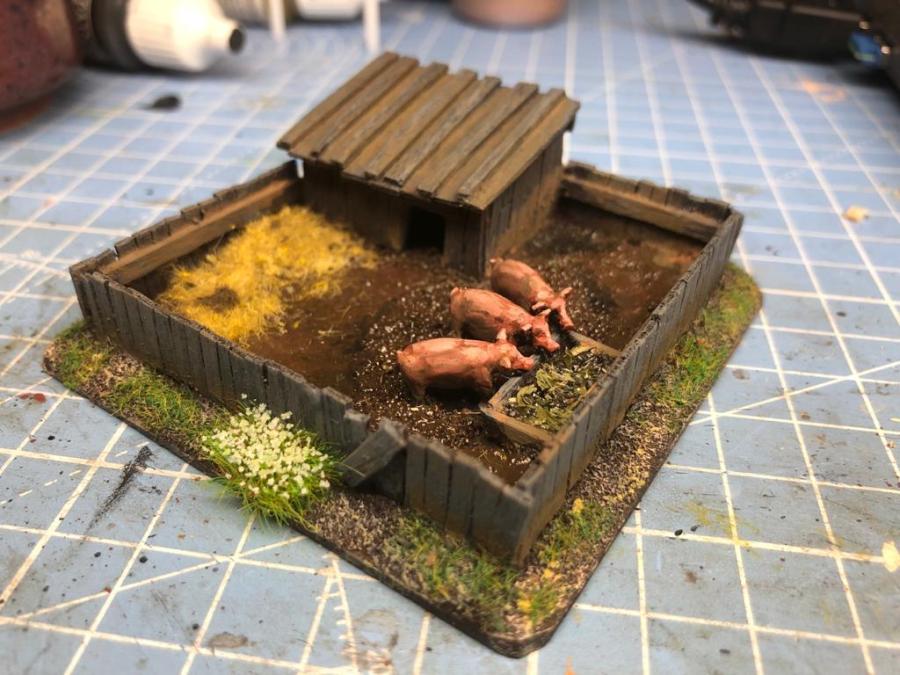
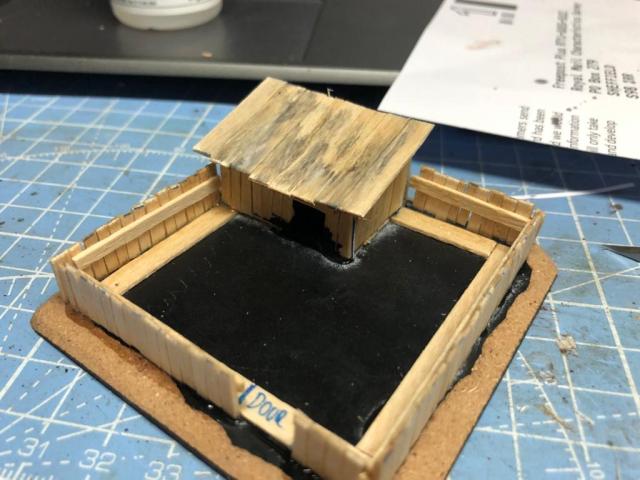
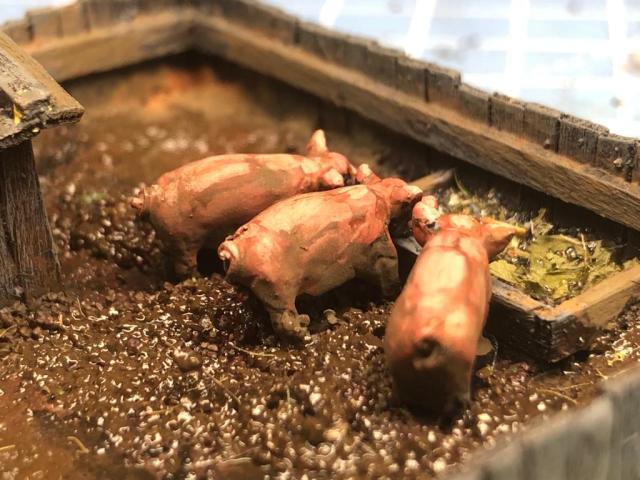
Pig Sty
On the farm where my father grew up they had many pigs but he told me about a special one he called Alfred. He had named it after the famous Swedish inventor and business man Alfred Nobel who invented Dynamite and of course of the Nobel Price fame. I asked Dad if it was a smart pig, “No way son, but he could fart as loud as a fire cracker.
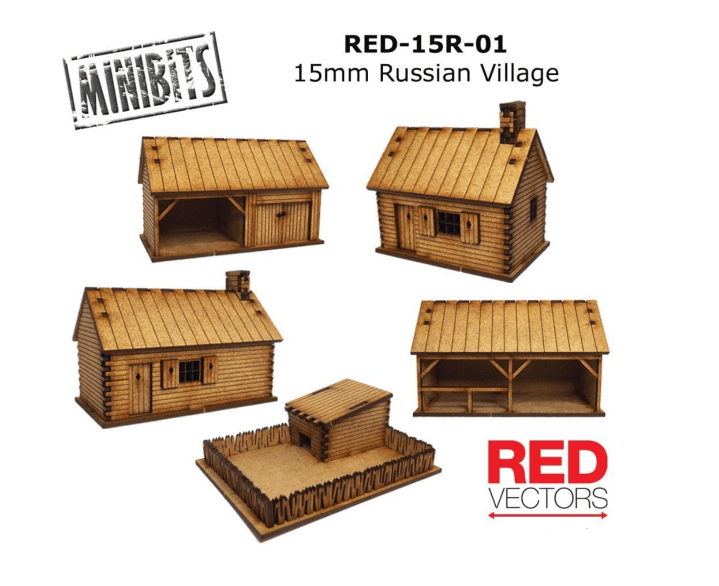
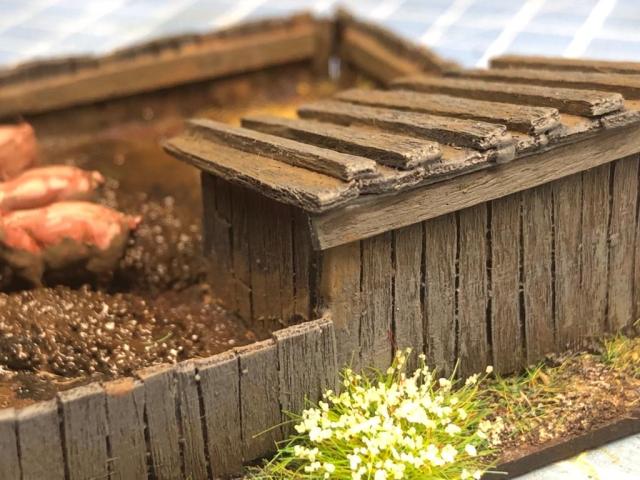
Anyway today we want to do Pig Sty to add that little bit of flair to your farm setting, you could buy these in 15mm (and other scale pig stys from various places), like these.
From Blotz miniatures at £3, link here. The pigs will not go through that fence!
From Pendraken at £18 for the set (yes they do other stuff than 10mm), link here. A nice all-round set.
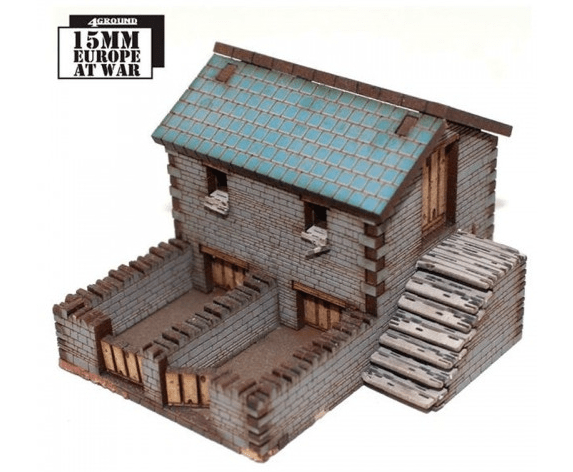
This is rather cool from 4Ground at £19 on the 4Ground homepage, strangely the 20mm version is cheaper at least when I checked (more here)
All are perfect for the job, the first two fits the “standard” pig den and sty model for the wargames table, a small fenced square base, with a fence and a building with a forward sloping roof. The 4Ground model was not really what I was looking for with regards to the Swedish 1943 table.
However, I am on a budget here, with a pile of coffee stirrers rotting in the back yard, so I better get my tools out and crack on with it.
Here is how I did it
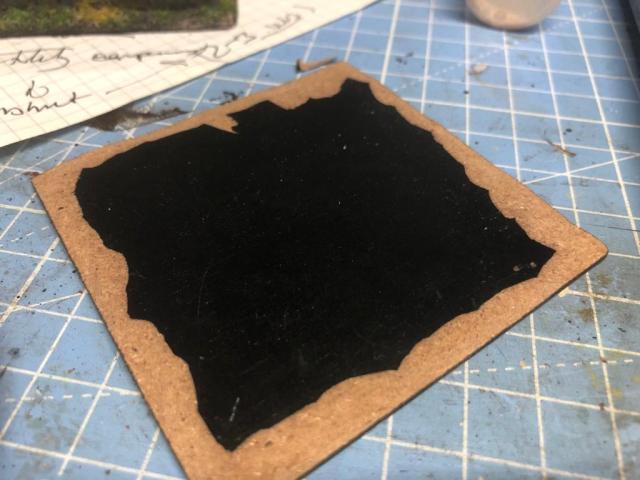
First I took a base, this one was a square 75mm
I used a sharp craft knive (as seen) and carefully cut down the sides of the base, this to make the border less obvious.
I then make a frame using the wooden coffee stirers, I attach these using superglue. Give it a little tap and and you will be good to go quickly. Please ensure adequate ventilation or use PVA glue and wait a little bit longer. Your health is more important than this crappy piece of terrain being completed.
Add a few stirps to mark where the little building will go, I also marked the fence door (or gate).
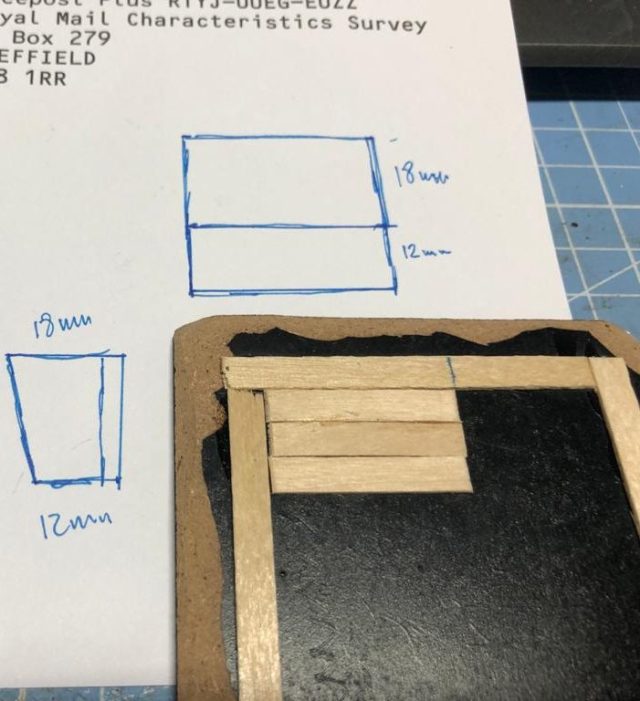
Now take your pience of cardboard and mark mark out your sides (you need to make two, only one is shown here, mirror image of the other), I made mine 18mm going down to 12mm the same lenght as the I had marked off for the building same, for the back 18mm tall and the front 12mm.
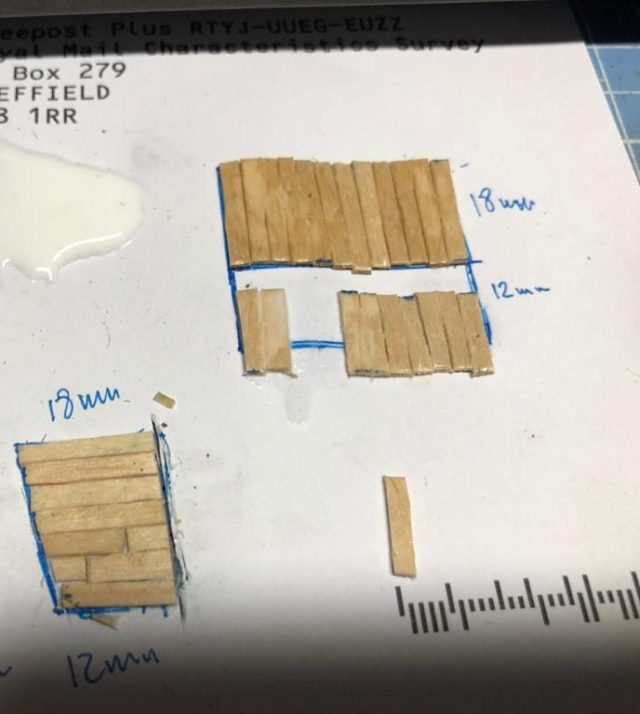
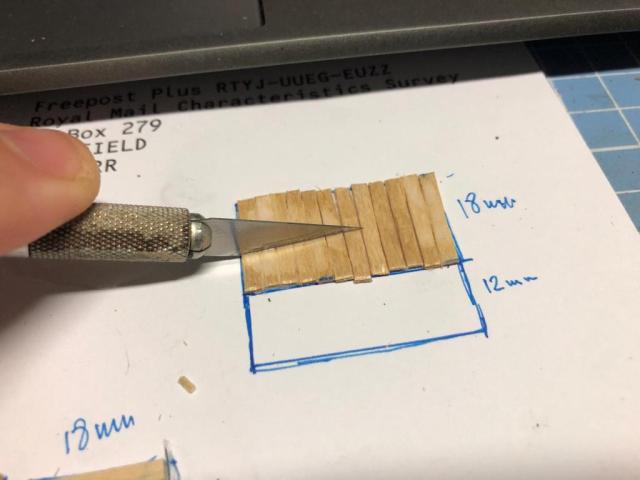
Now you need to cut your coffee stirers length wise and then cut them to fit the shape you need and glue them directly onto the cardboard (USE PVA GLUE FOR THIS). Note I left an opening to get into the building.
Sometimes they go a little bit wonky press down with your knife and eventually it will go straight
Cut out the pieces, keeping the paper on (note this shows the two pieces this idiot did first, the other one should be a mirror image of the other, like shown below).
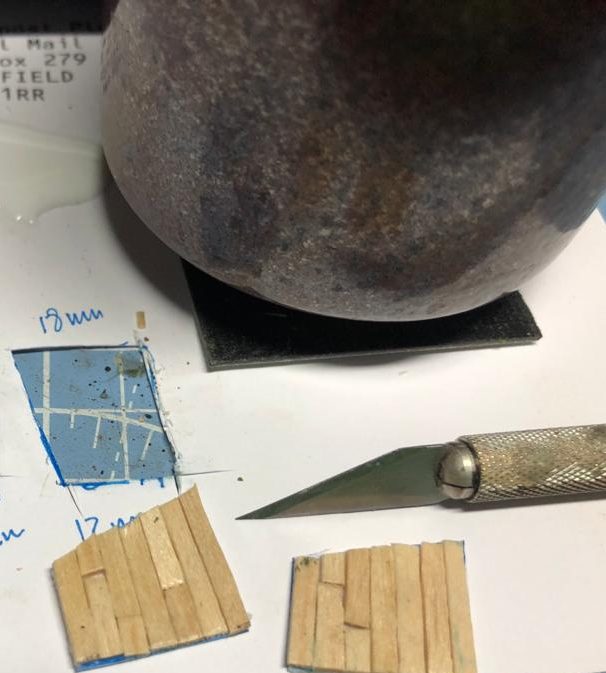
You end up with the following four pieces, note I have added a piece of wood on top of the opening (after this is dry cut out the paper that can be see so the opening is clear..
Then just glue the pieces together using superglue
Nice and easy. If the joint are looking to bad, you can also cut a small slice of wood and glue over them.
Measure up the sides and use 10mm tall pieces (again having cut the coffee stirer in half lengthwise). Cut a peice as long as the fence side and add some superglue to it (I do this whilst it being held by the knife).
Press down
Glue on the fence using the outer part of the frame as a guide
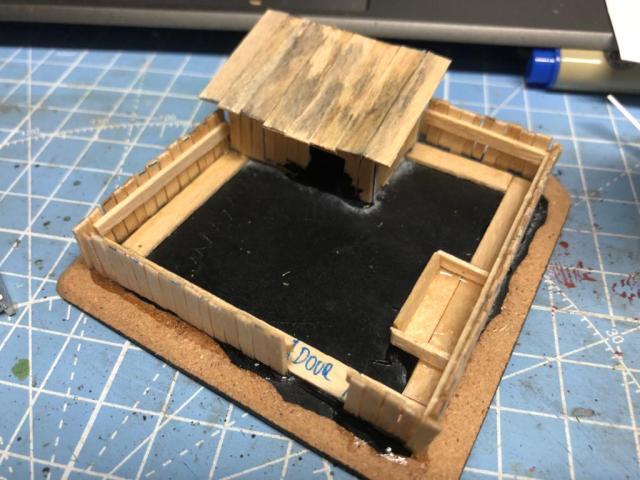
Same principle all around, as before if the joint becomes dodgy just glue some extra wood to cover it up (maybe they are just repairs?). I also have painted the inside of the house black as we will add the roof and attach it, this means it that it will look dark in the building.
Cut of a piece of cardboard and fit until your are happy.
Clad the piece of cardboard with some overhang of the wood and glue it on top of the house.
I added a few planks to represent where the food would be thrown for the pigs
Then a few plans symbolising the gate, not great but I was in a rush. I also included my Pigs to set the scene. This is job done, only painting and basing left to do.
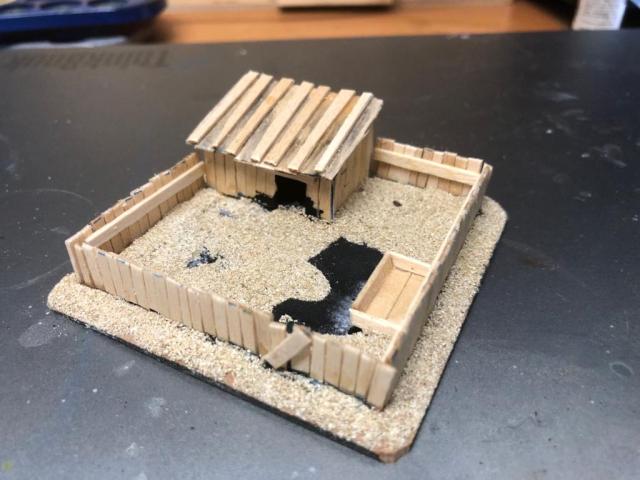
I added pva glue and then put some sand on top, shook of the excess and let it dry. I also added some additional planks on top of the roof to give it some more character.
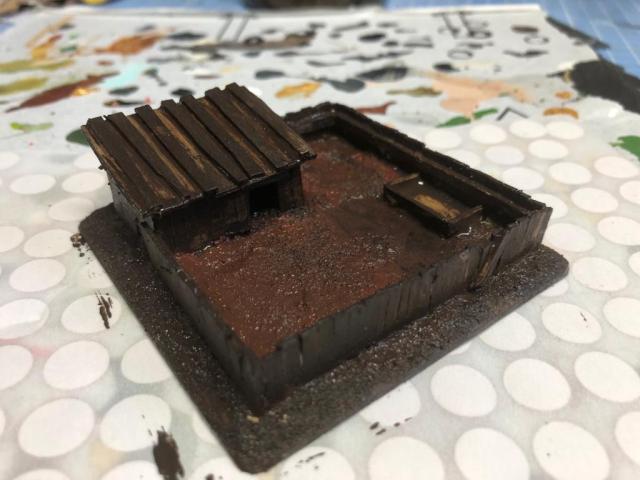
I then painted the whole thing shit brown and it was ready for detailing. After this I also glued the pigs in place and added some glue and sand around them to blend them into the piece. I drybrushed the wood in various greys and added some weathering washes. I decorated the base outside the fence with my normal basing method, drybrush and grass as well as a few tufts. Inside I used a flat earth colour and then some gloss varnish (wet mud) as well as some static grass I had to simulate some hay. In the food bowl I added some herbs. I painted the pigs using blends of red, white and mahogny brown.
Happy with that!
Love that picture of the pigs having some food and being suitably muddy (I used a Flory Models Grime weathering wash), I also think that fence looks really good and I do not regret not going for the MDF options. I find MDF stuff are great but best used as a canvas for additional layers of decoration (e.g. planking or filler, etc), this can be difficult with small items and in 15mm. Anyway, I think of the guy in the middle as Alfred the farting pig, the others I leave for you to name.
So we were at £11.23, the only additional item not part of the standard pack or the items bought are the pigs. You could of course, as said before, do it without them but to me they really need to for part of this to leave no doubt what it is. So Pigs can be bought from many places in 15mm, e.g. like Peter Pig (no pun intended), Pendraken and Museum miniatures. I used some pigs from Peter Pig and I think a full pack of 8 pigs cost about £3.70. So I suppose we need to add that to the overall cost giving us a total of £14.93 (this gives us a few more pigs to make a few of these at a later date, or painting them and basing them up to be scattered around).
In other news I have really enjoyed the Gods Own Scale podcast covering the upcoming rule set by Mark Backhouse, “Strength and Honour”,
It will be interesting to see how this gets picked up as the time to do the 2mm models will be quick in terms of painting them and getting armies ready. I have seen some of the offerings from various manufacturers and it really looks smashing with the big block of troops. But more on that some other time.
/ I hope that was of some interest, you can follow this adventure by joining on twitter, facebook or sign up here. Thanks for stopping by.
Inspiration for tomorrow’s project – the Root Cellar
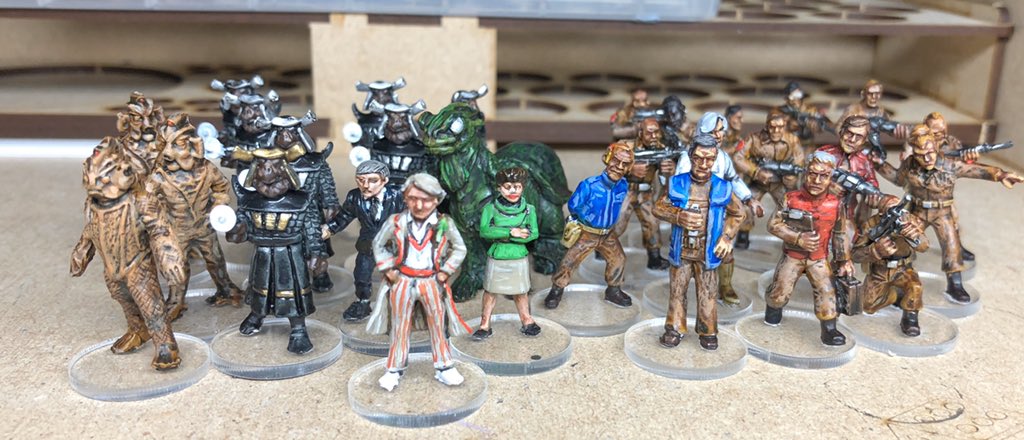
A lot on at the moment with work and the fact that No. 2 daughter is heading off to University soon. However I have been progressing a lot with smaller stuff, doing 30 minutes here and there and taking a little bit or extra time on a few models I have been intending to do for some time. It is impressive though how it all kind of adds up doing a little bit here and there – I might be able to tackle this lead (and other materials) mountain before my 154th birthday. Talking about the lead mountain, I did take a hike on it and found some old Doctor Who miniatures I had bought at some point in 2019, and as happens it provoked me to buy a few more (funny how that always works, one down, two more bought, like one step forward, two step back).
Being a hard core fun of the series and remembering fondly watching the fourth Doctor a few years after their original airings on some early satellite channels back in Sweden. I was working weekend distributing leaflets and selling a Sunday broadsheet newspaper (Dagens Nyheter) to one of the poshest areas in my hometown – guaranteed sales and plenty of tip. I was 12 and it was a great Sunday earner for a fair few years. Doctor Who use to air early in the morning and I used to set the clock early to wake up, collect my leaflets and the newspapers and then watch the Doctor Who whilst having my breakfast then off to earn some monies to buy RPGs, adventure books and comics – amazing times.
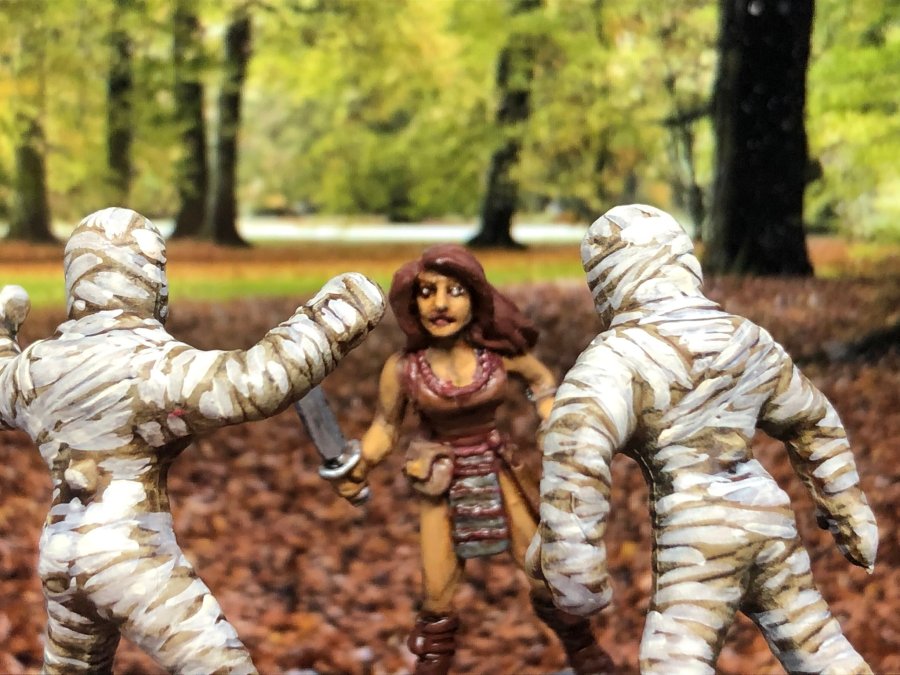
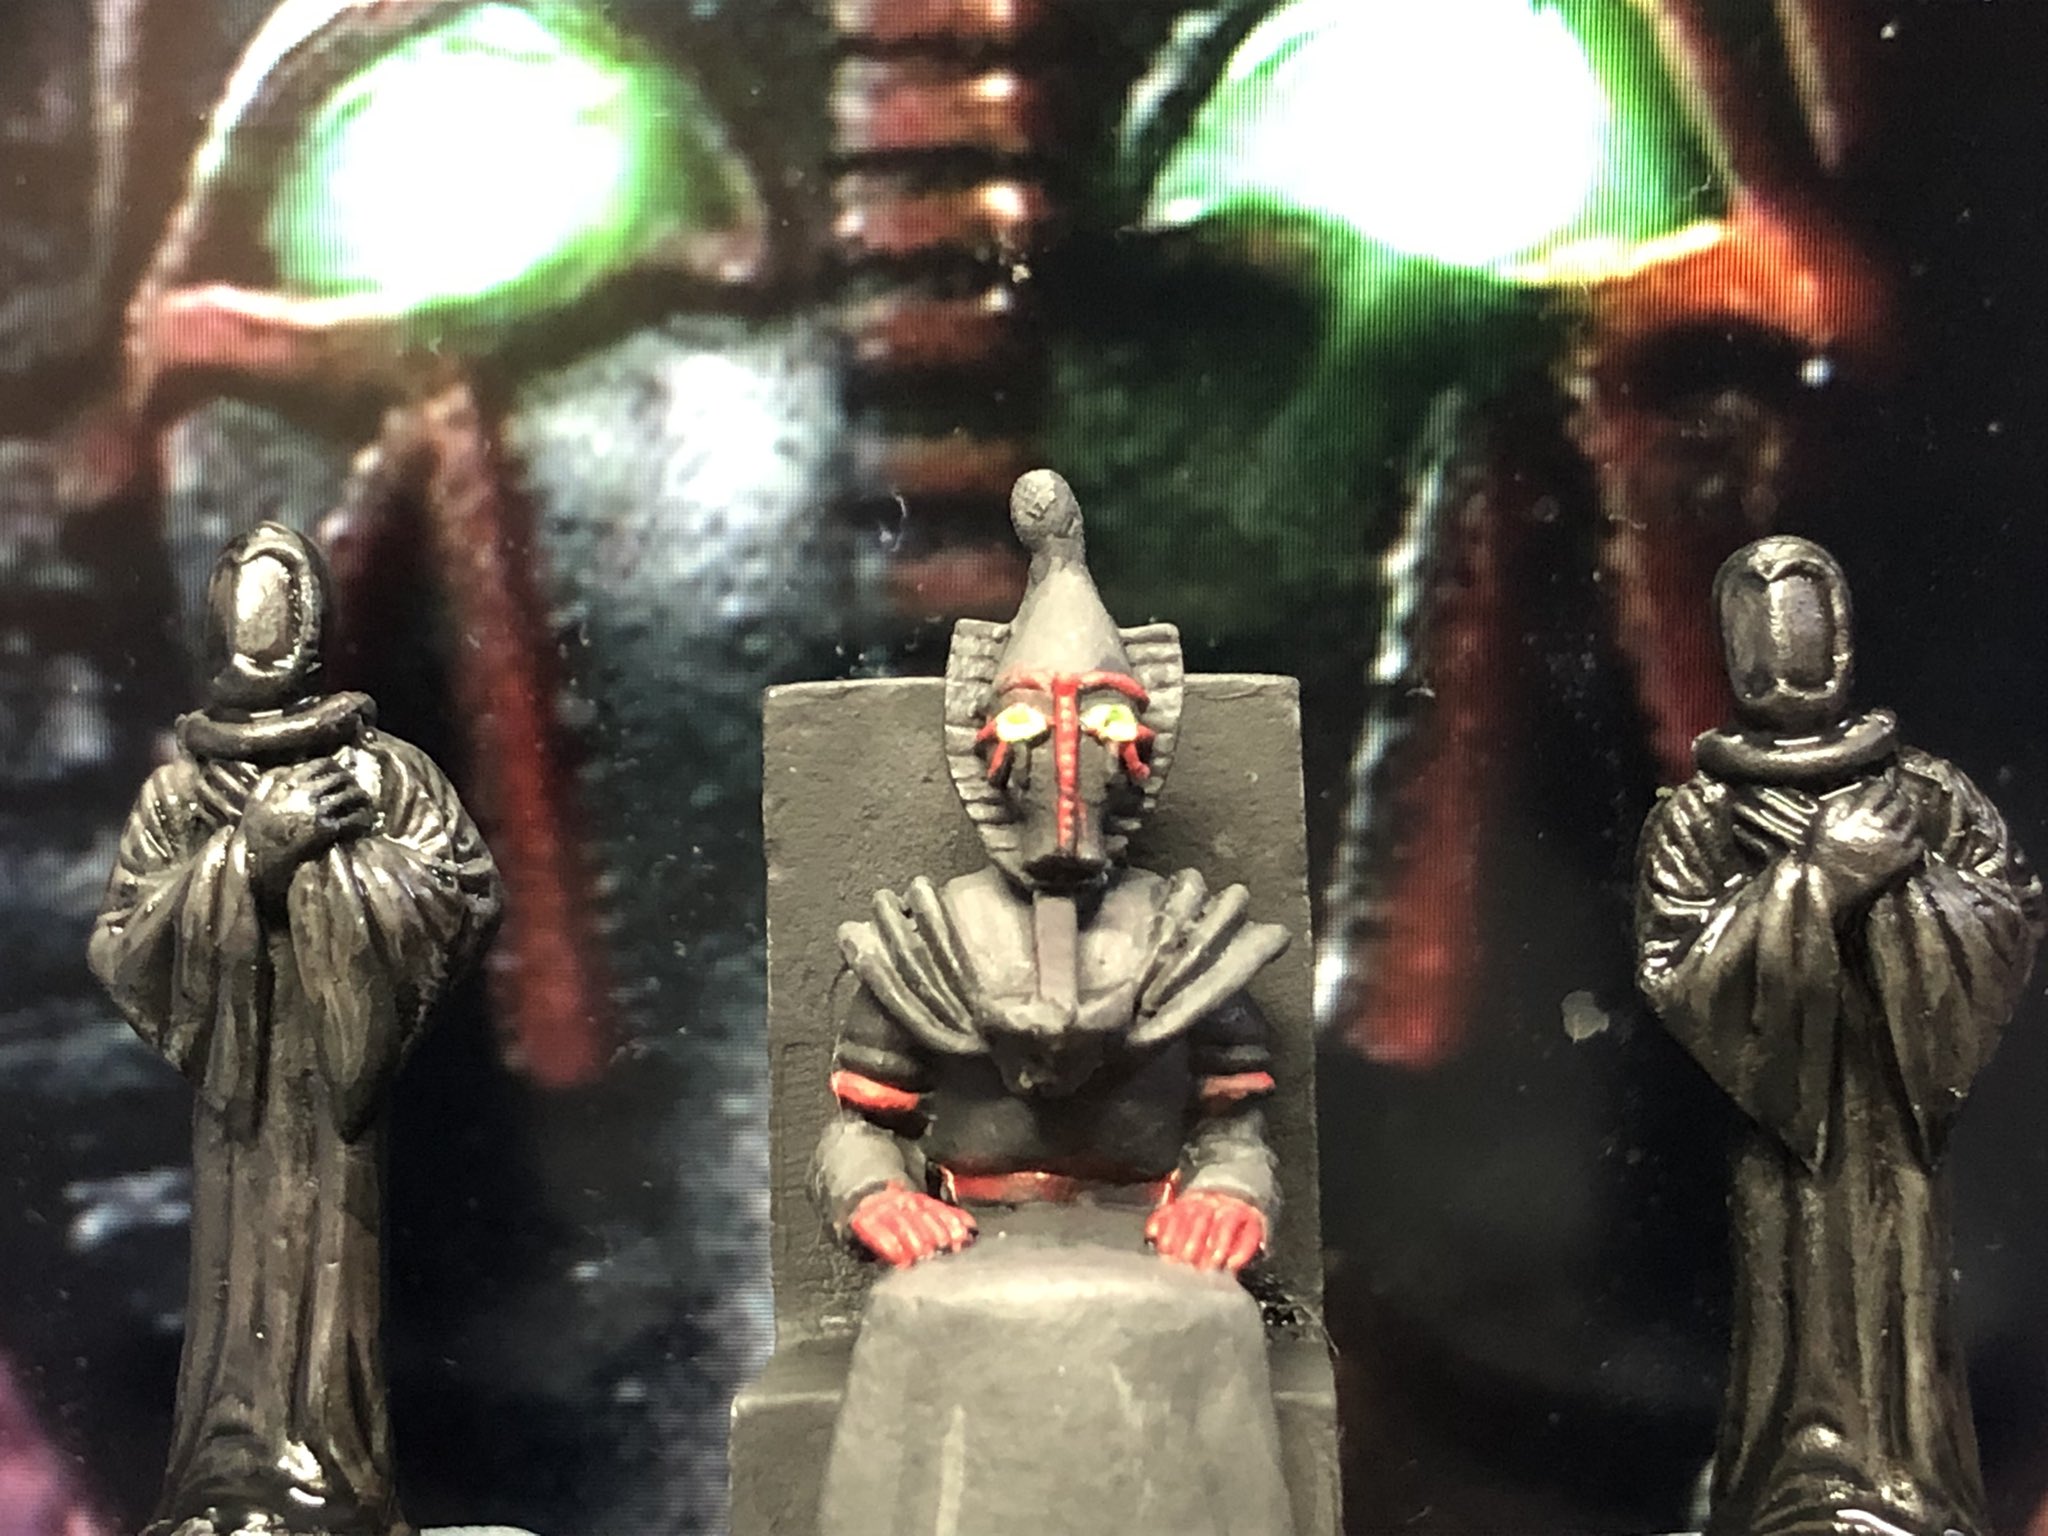
Doctor Who – Pyramids of Mars
This is one of my all time favourite Doctor Who adventure, evocative, scary and bloody brilliant. Here are few shots from the adventure.
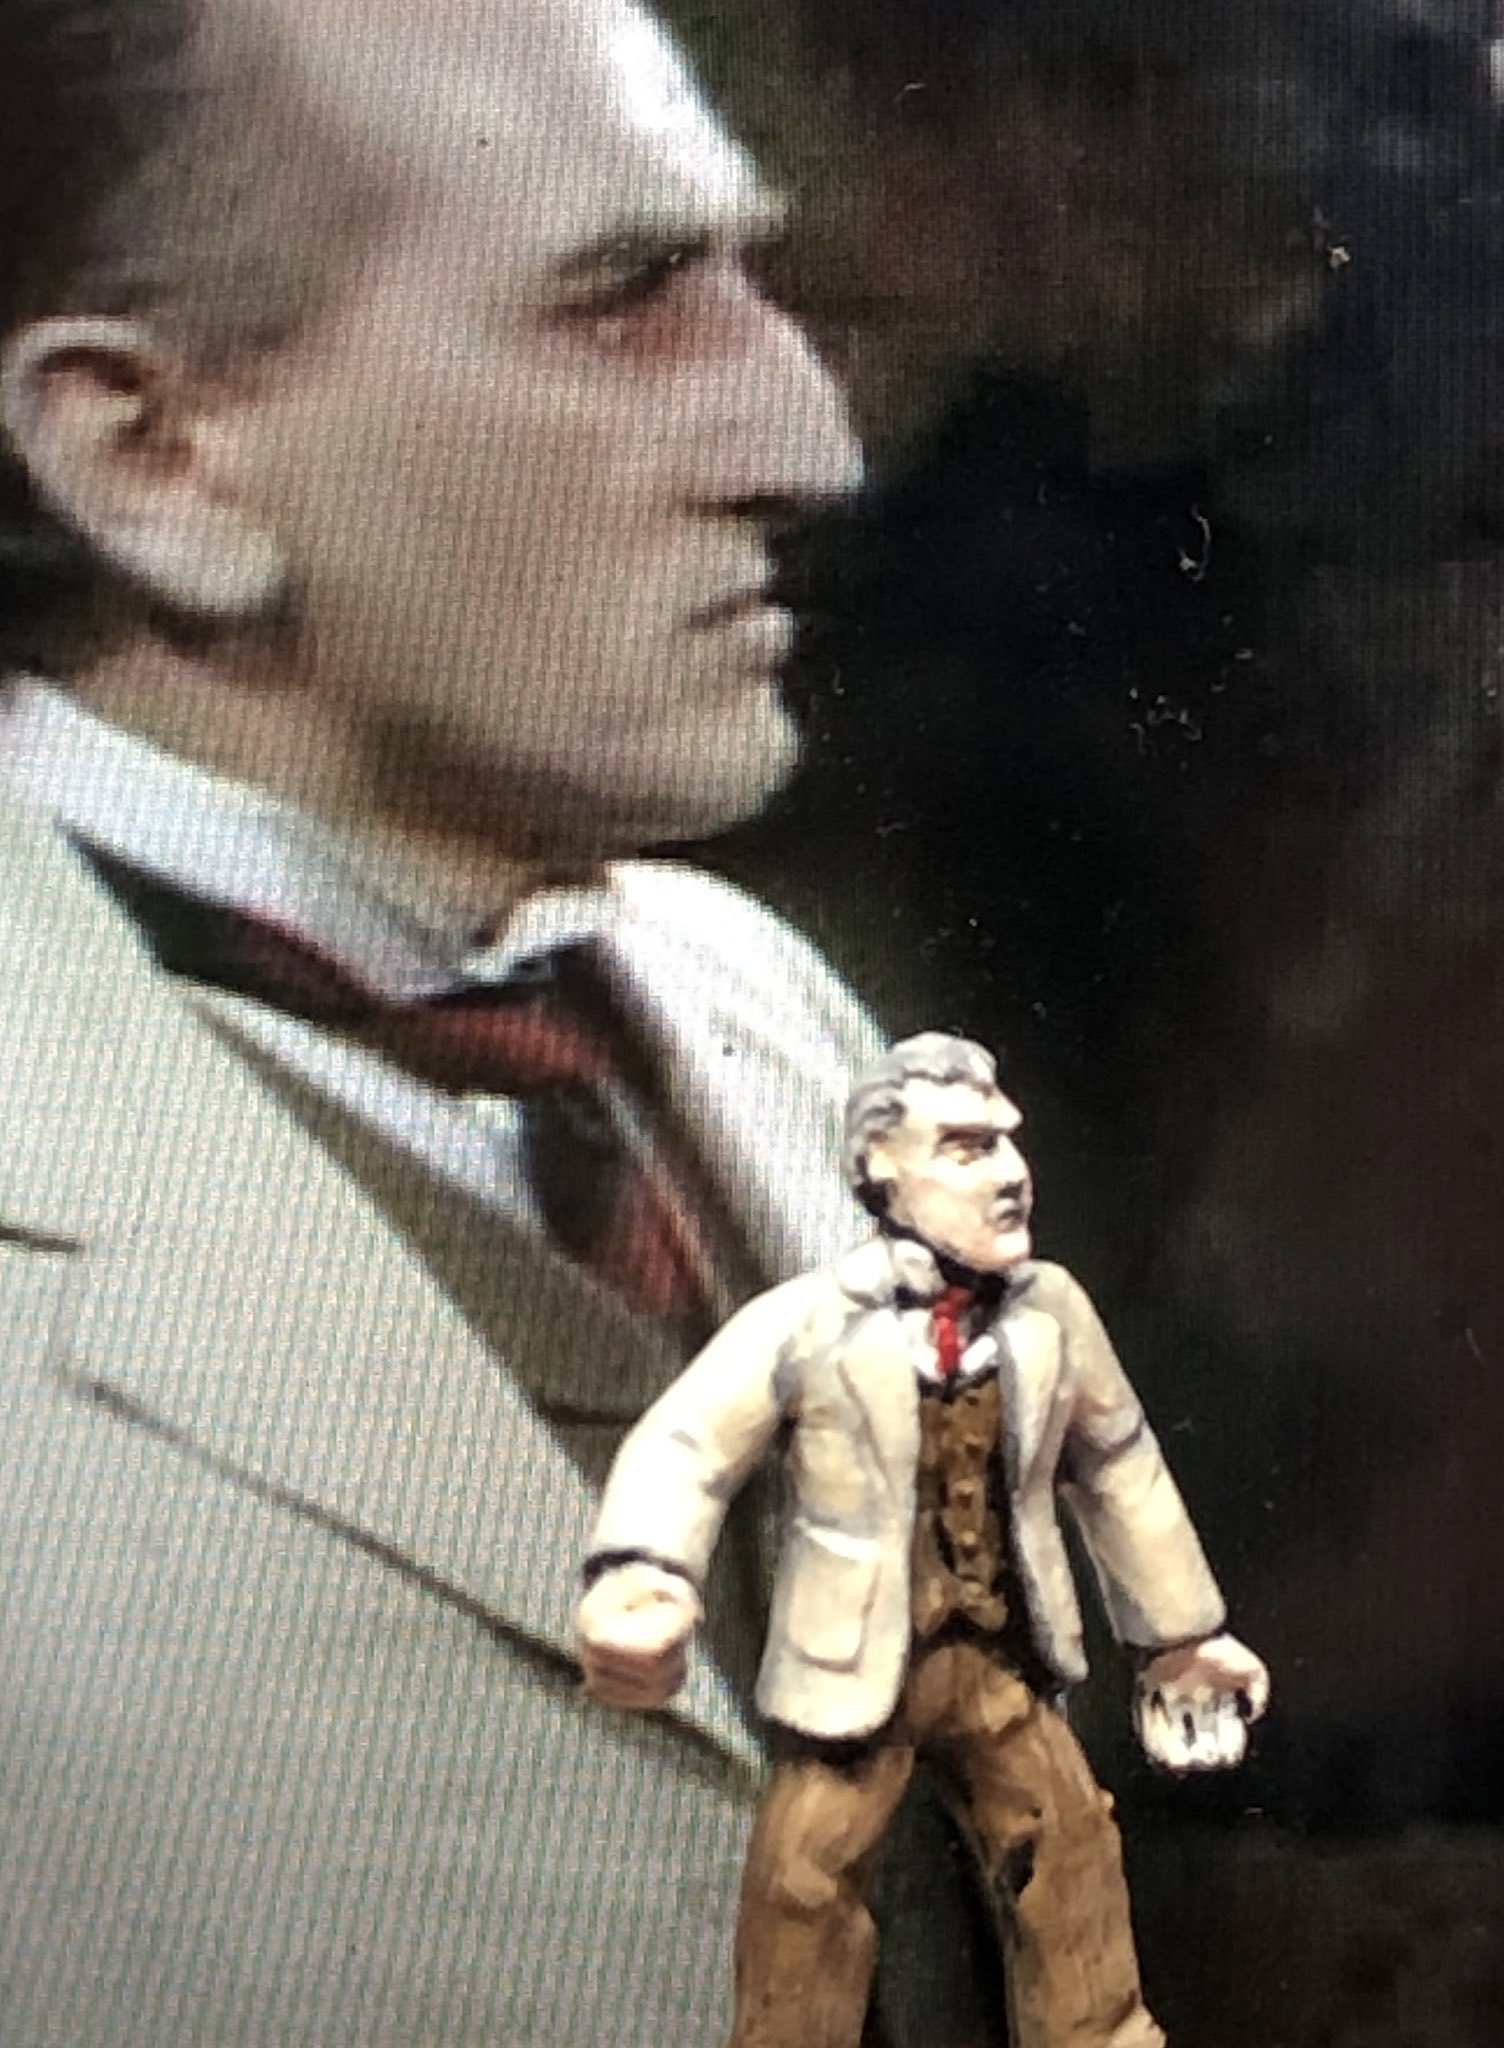
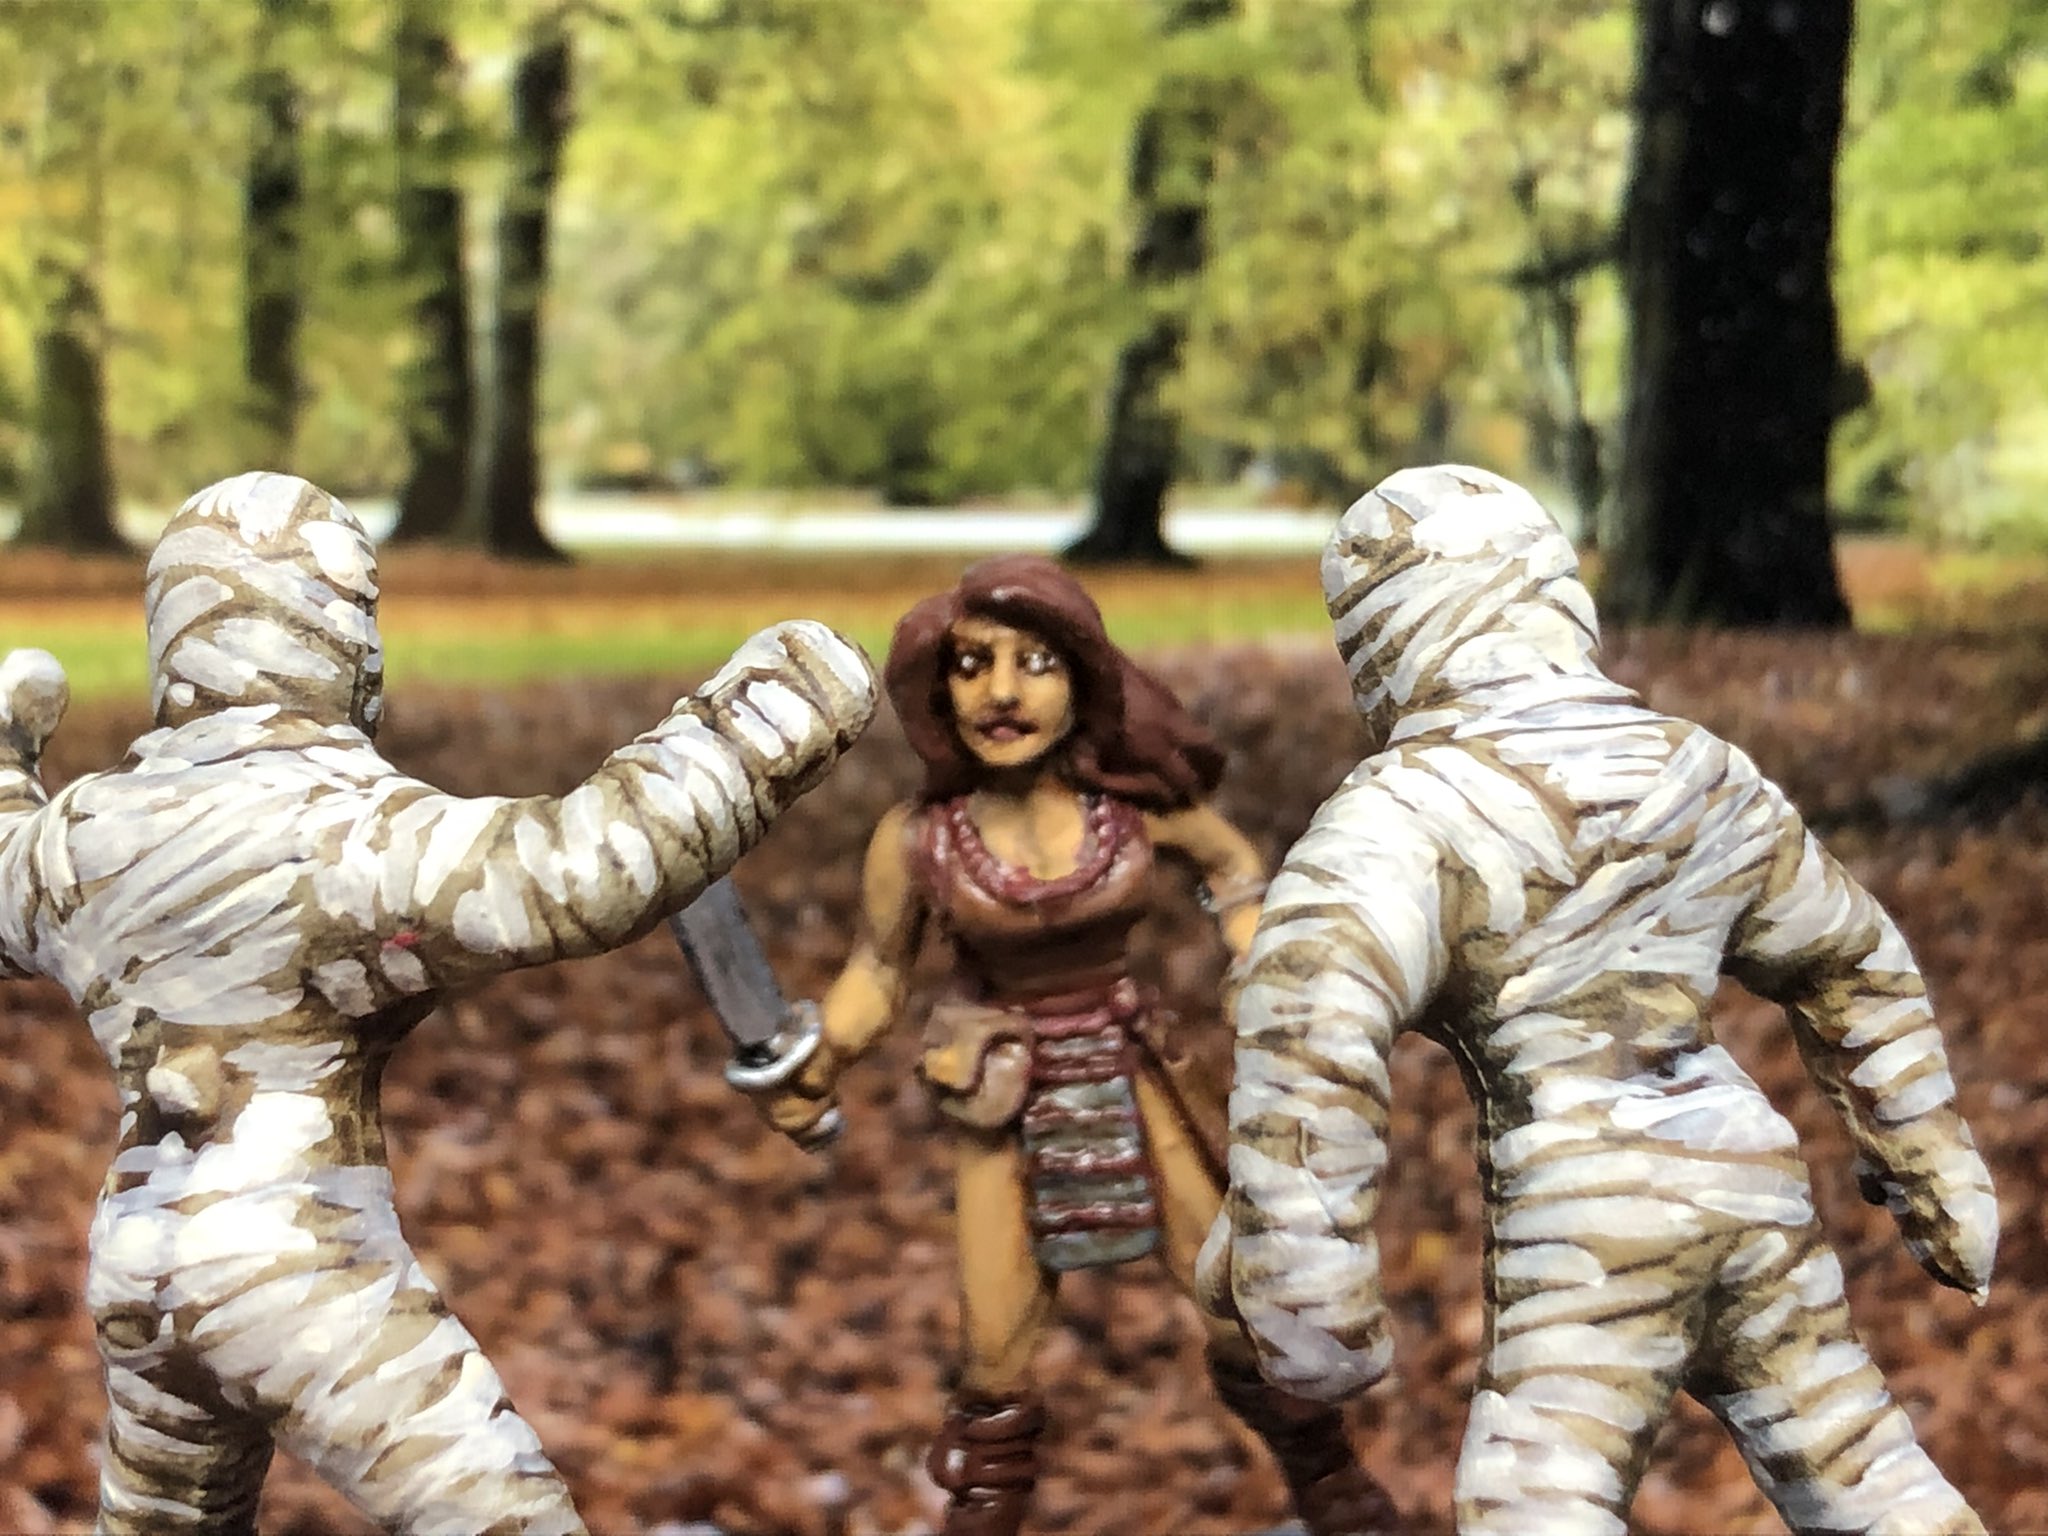
I did the Mummies, Suketh on his throne, two of his servants, Namin and Marcus Scarman. I already have the Doctor somewhere. I also painted Leela, standing in for Sarah Jane, who was originally in the adventure. All models are from Black Tree design – I really like these.
Marcus Scarman – the ArchaeologistIbrahim Namin – the mysterious EgyptianSuketh with his ServantsMummies, here in a fight with Leela (I painted three of them, one has probably gone to ground)
I intend to use these playing some scenarios using the Doctor Who miniatures games (I think it was produce in 2010). It was available free for a while and I managed to get hold of the game and a fair few Scenarios.
I believe the system is very similar to the current 7TV ruleset by Crooked Dice. There are scenarios for a number of different Doctors, I have ordered miniatures for Black Tree for the following scenarios. These are also scary and atmospheric.
These were the codes I got from Black Tree, but will have to get some additional fillers from other ranges, like the Tong Cultists, a Range Rover for the Unit soldiers, etc.
DW462 – 4th Doctor in Sherlock Holmes Hat
DW311 – The Master
DW702 – Brigadier
DW322 – Capt Mike Yates
DW323 – Sgt Benton
DW1003 – Unit Patrol (7)
DW314 – Bok
DW327 – Azal the Daemon
DW413 – Weng Chiang
DW414 – Mr Sinn
DW418 – Lih, Sen Chang
And I did do the miniatures I would need for the Warriors of the Deep last year, but I do think I ever wrote a blog about it, well another time – this is my second favourite Doctor Who episode (and there is no Tom Baker in sight!).
So loads of Whovian fun lined up with some of the finest episodes.
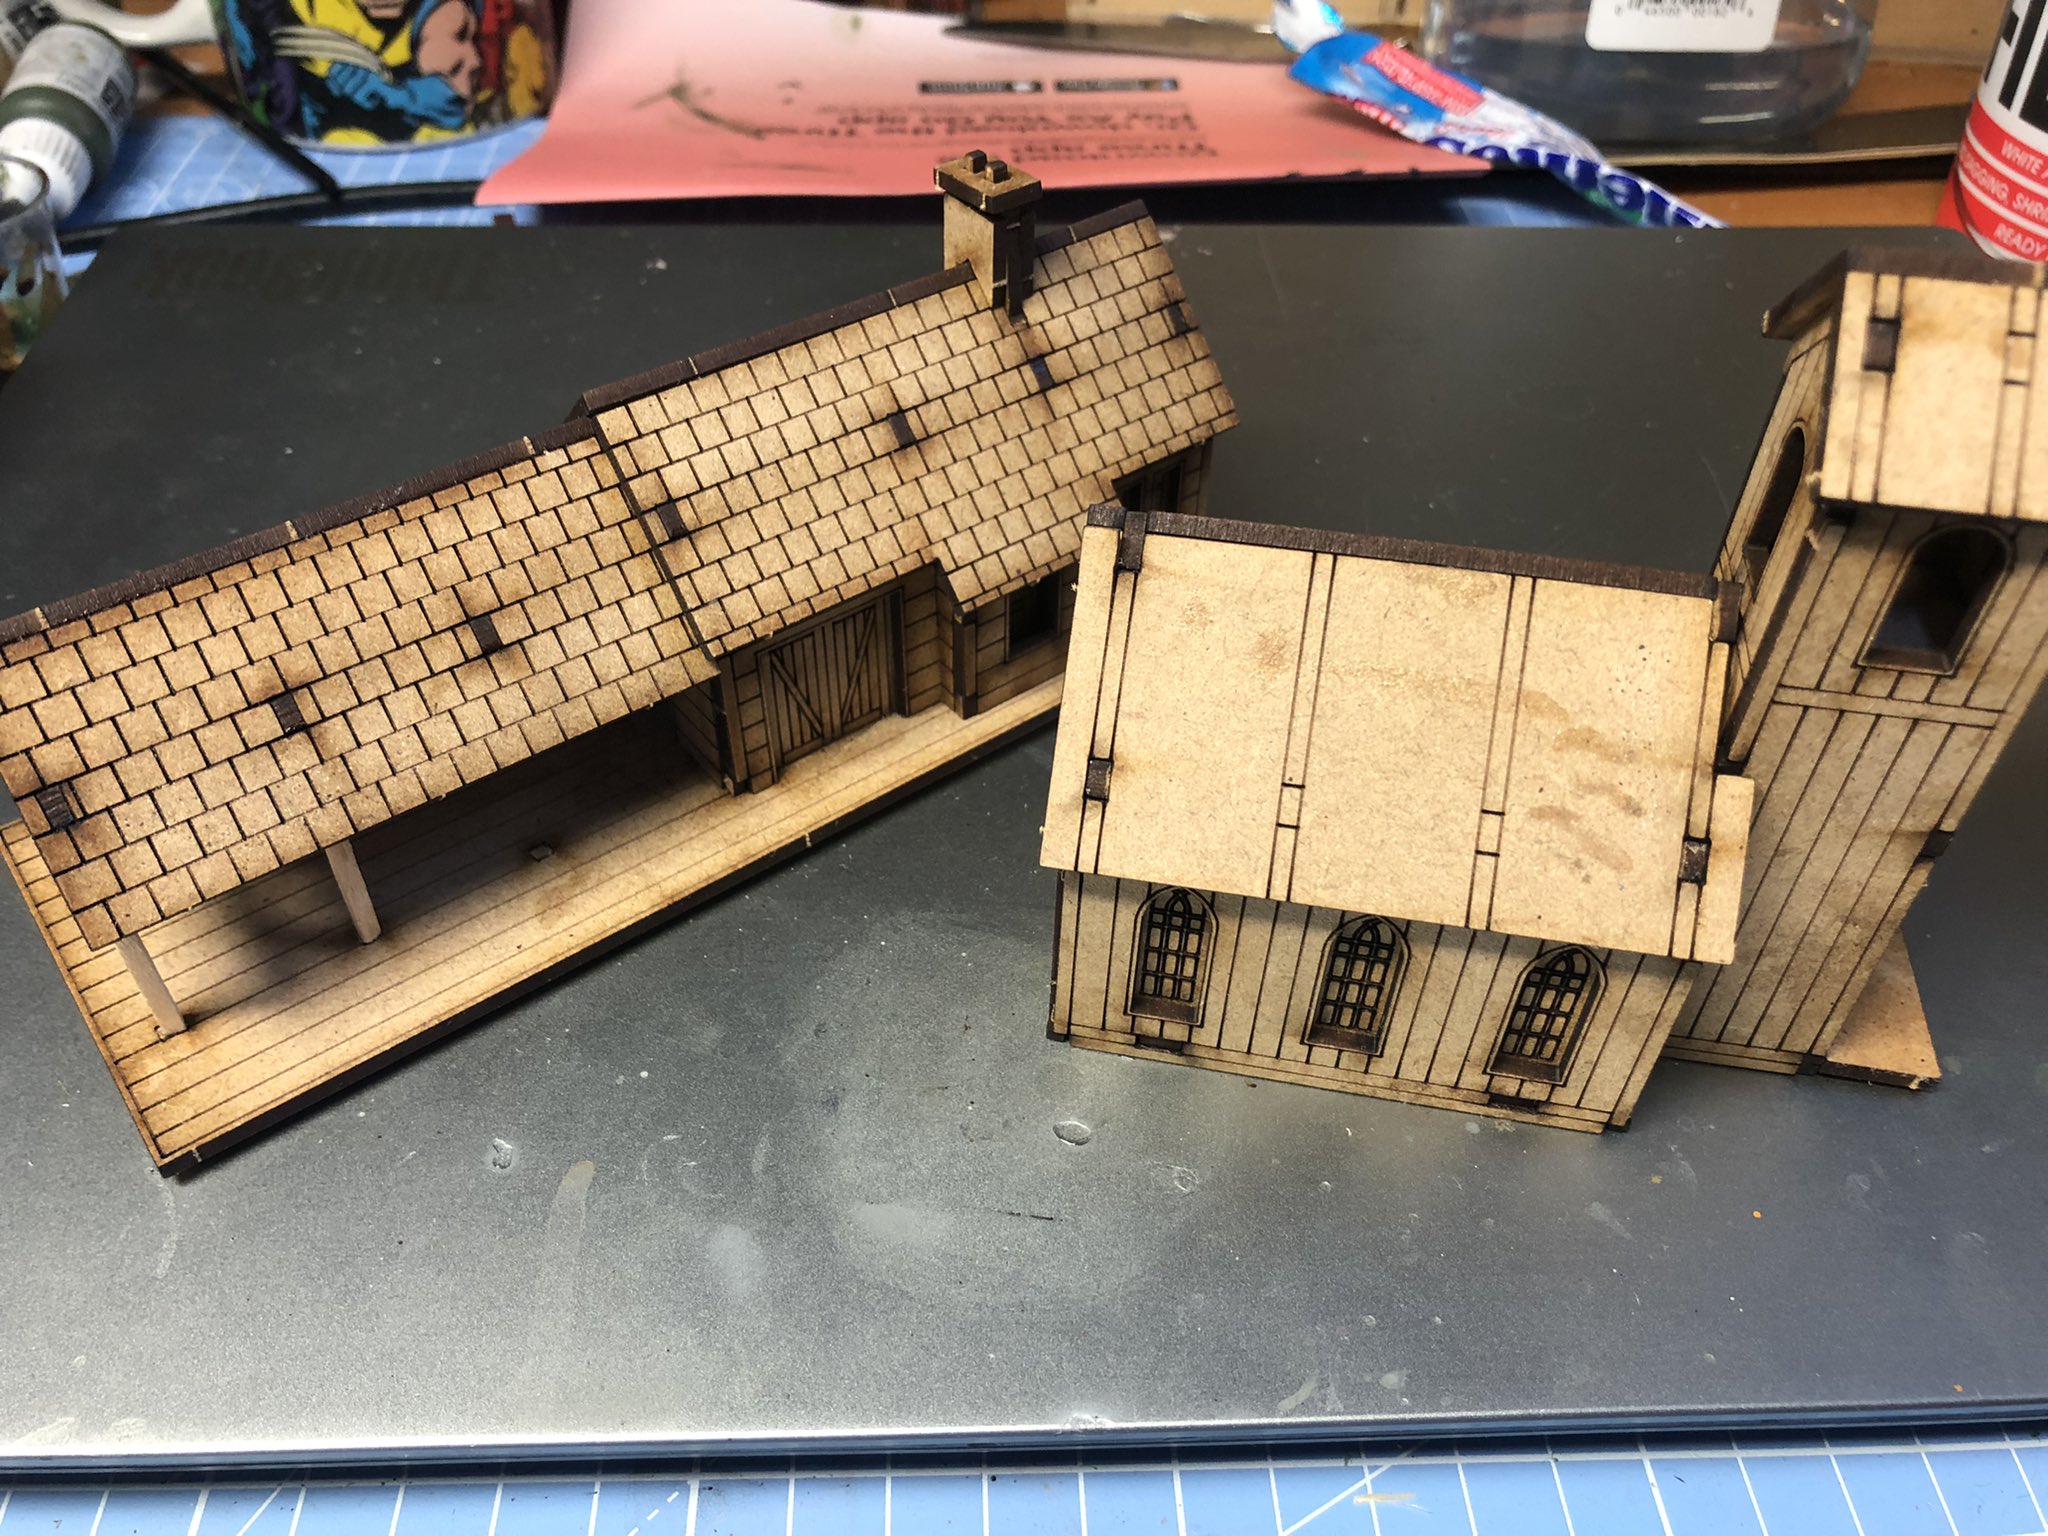
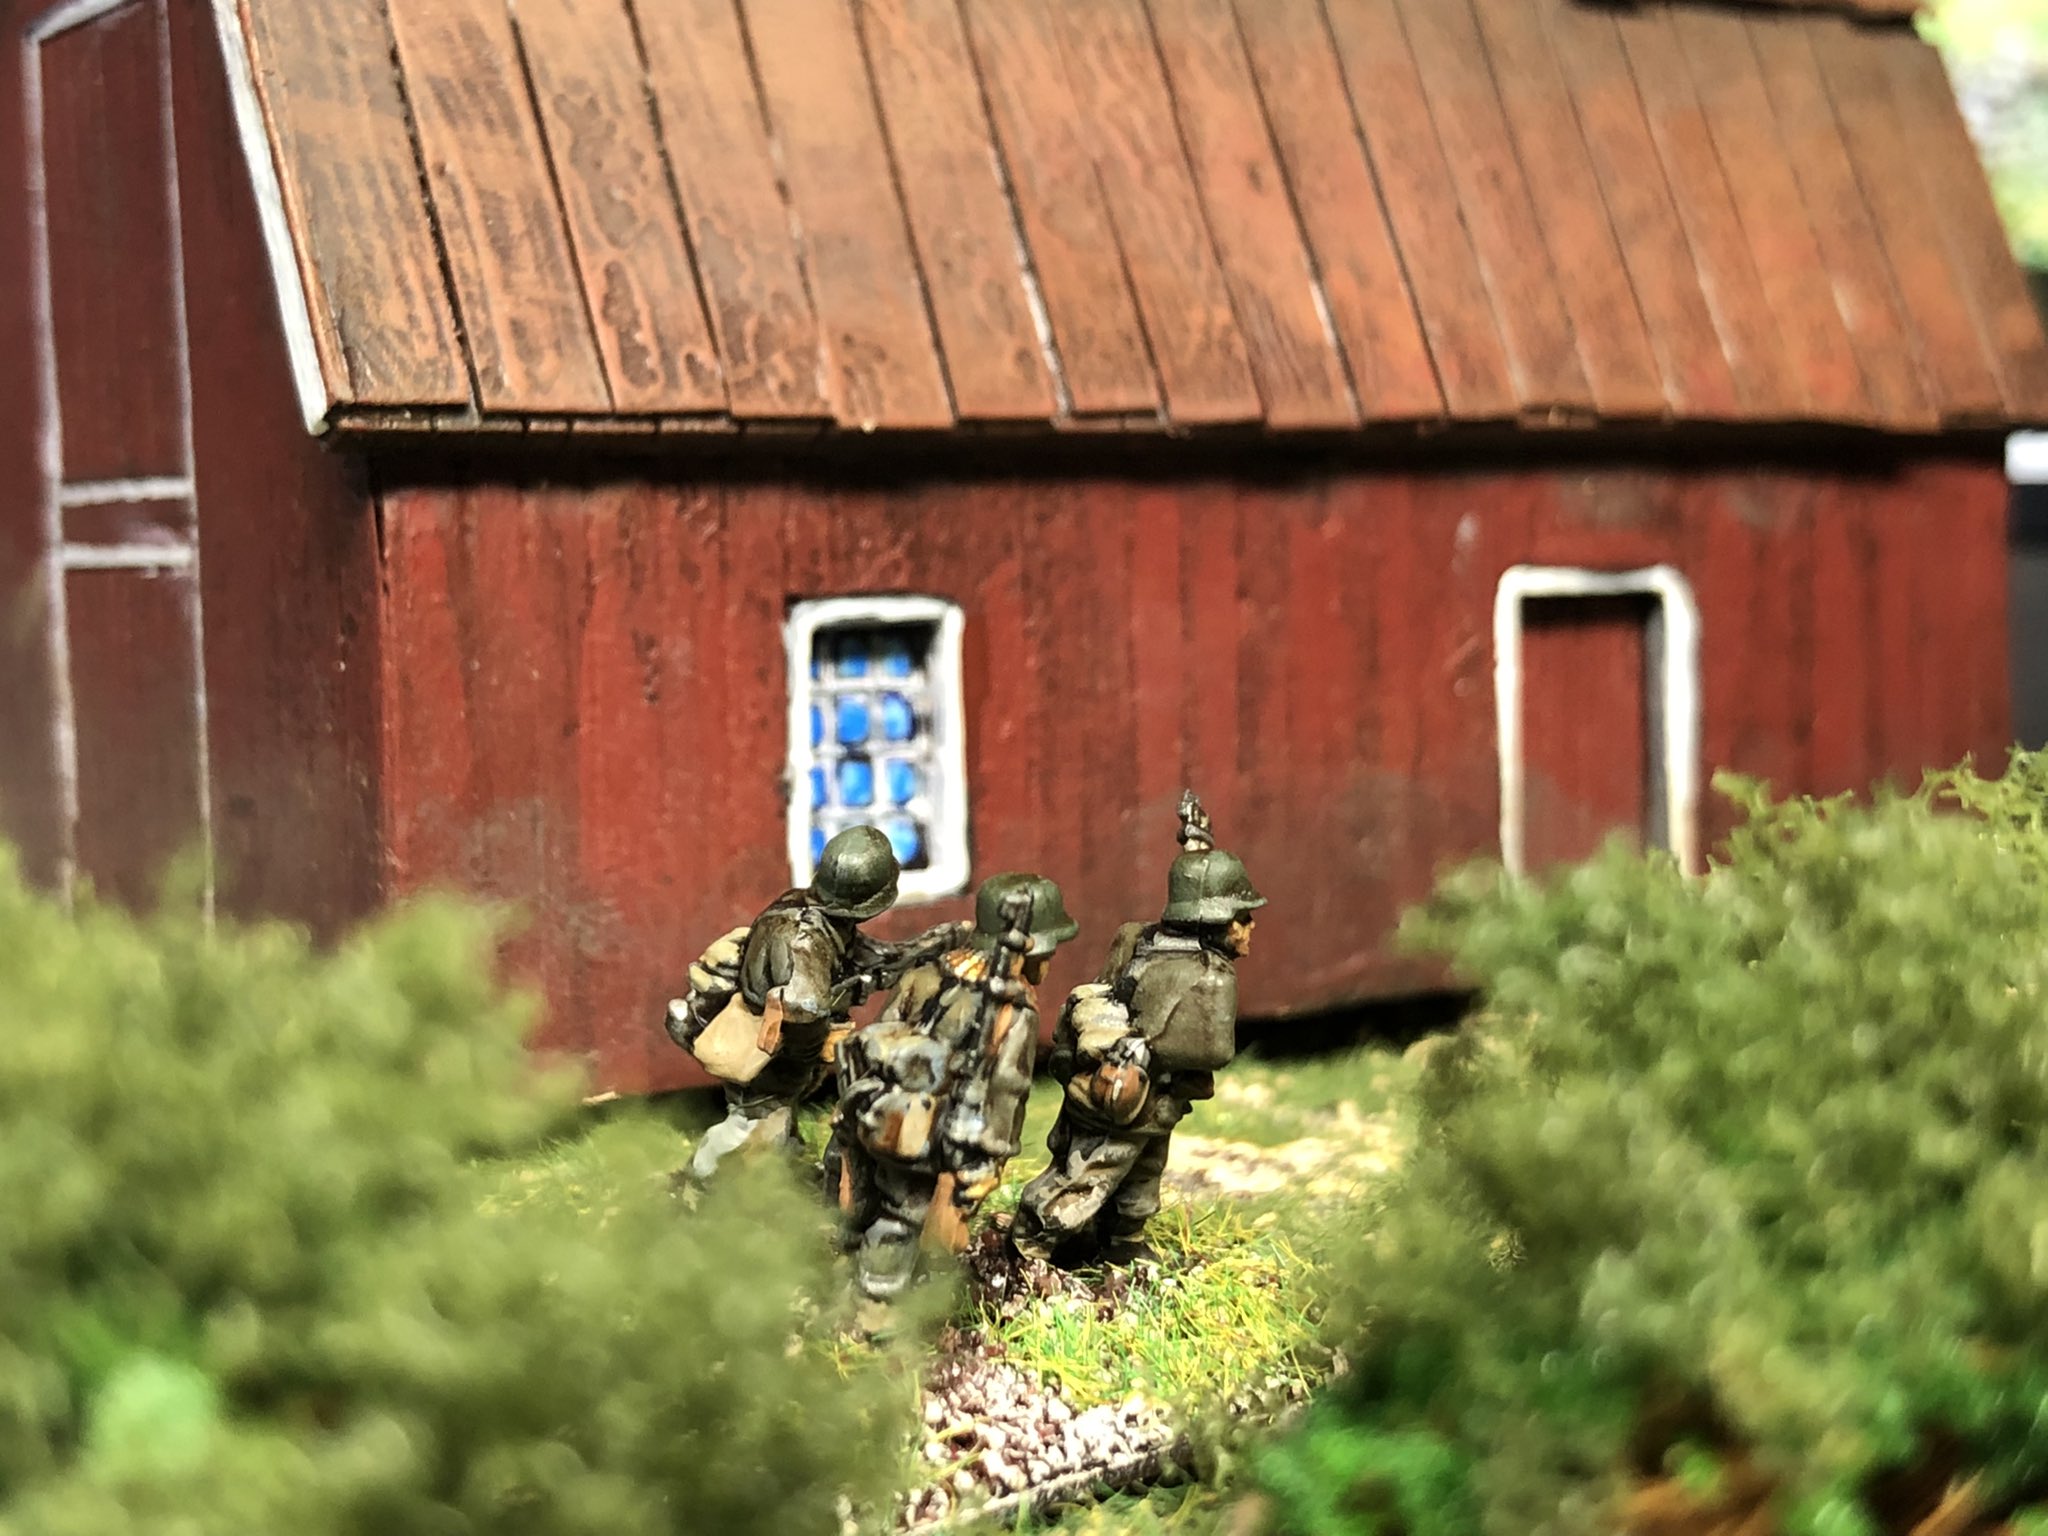
Spent this weekend pimping up some MDF buildings from Sarissa precision (more here) to fit into my Swedish 1943 project, that I have been working on slowly over the last few years – exploring a what-if invasion by Germany in 1943 through Norway. It is a passion project and I have enough buildings to create a few farms but wanted to add some more.
This is the village so far
A very immersive look for anyone with a hint of how Dalarna might have looked in 1943 (yes the number of cars is more than excessive). With the Country Shop (Lanthandel – in the bottom and the Petrol Station and some farm houses.
These were the houses I bought this time around.
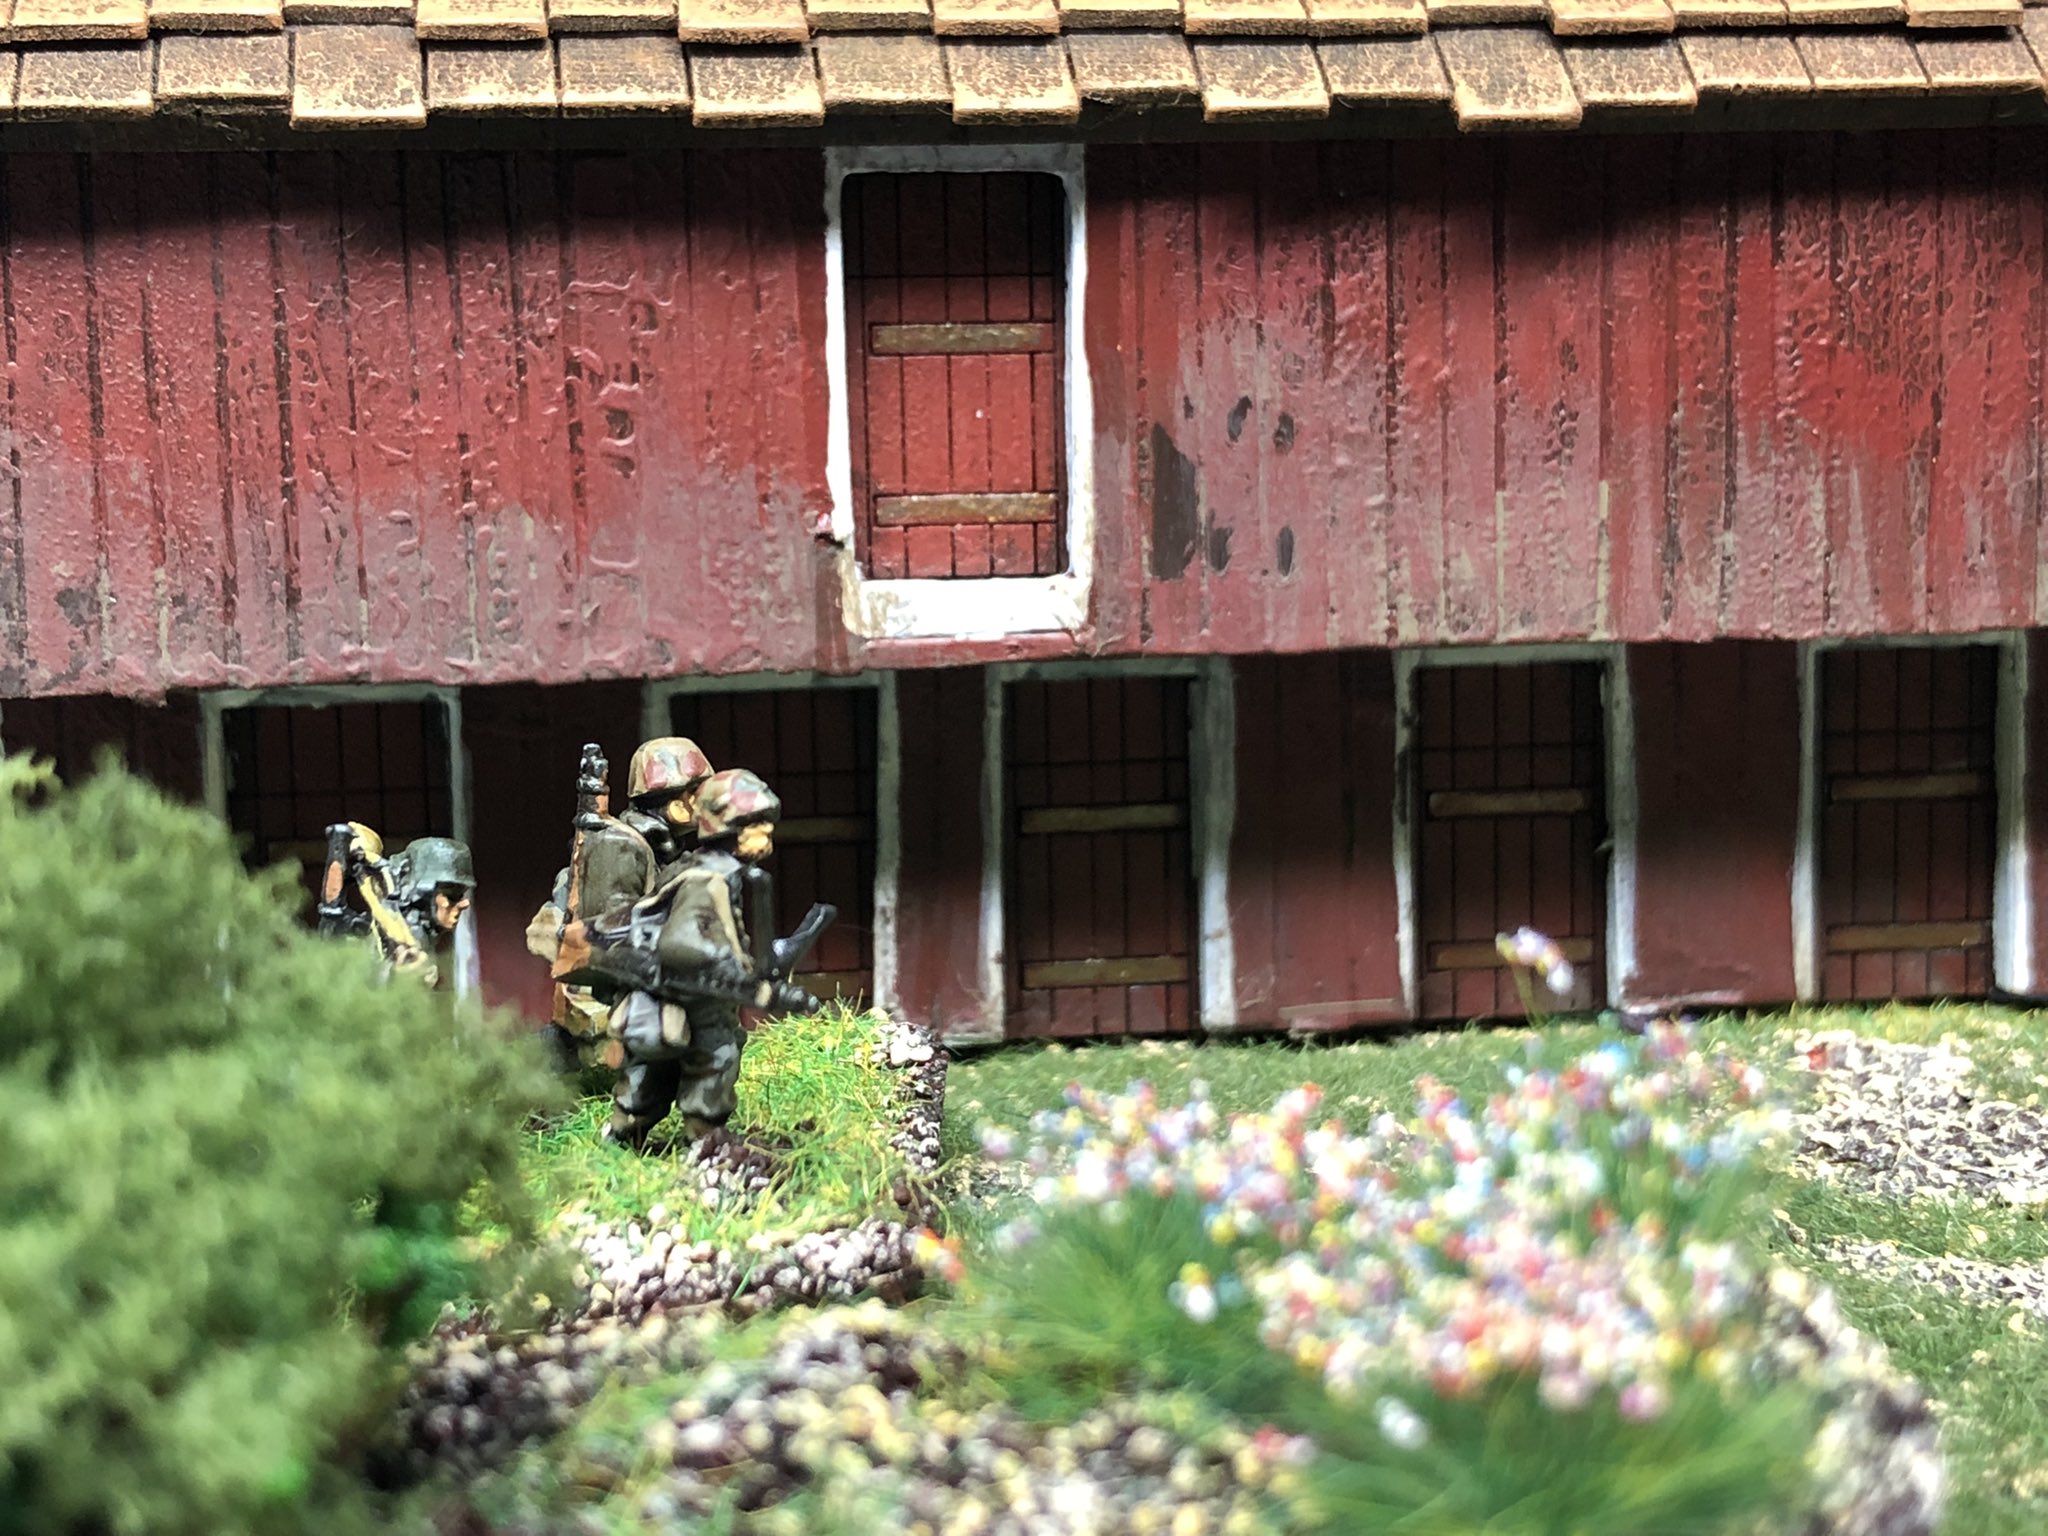
A Railway Station (Wild West Range) and a Church, I think from the ACW rangeTwo houses from the ACW Gettysburg Range – first Slyder Stable Barn and Dunkers ChurchAnd a Dutch House and a Dutch Barn
As I have explained before I want to create a certain look to make the building fit into the environment so a Normandy type building will not really do. In Sweden most house at this time, and still are in Dalarna, are made of wood and painted either Red or Brown (most commonly red). I have opted to go hard on the red with white details as a unifying and most common look.
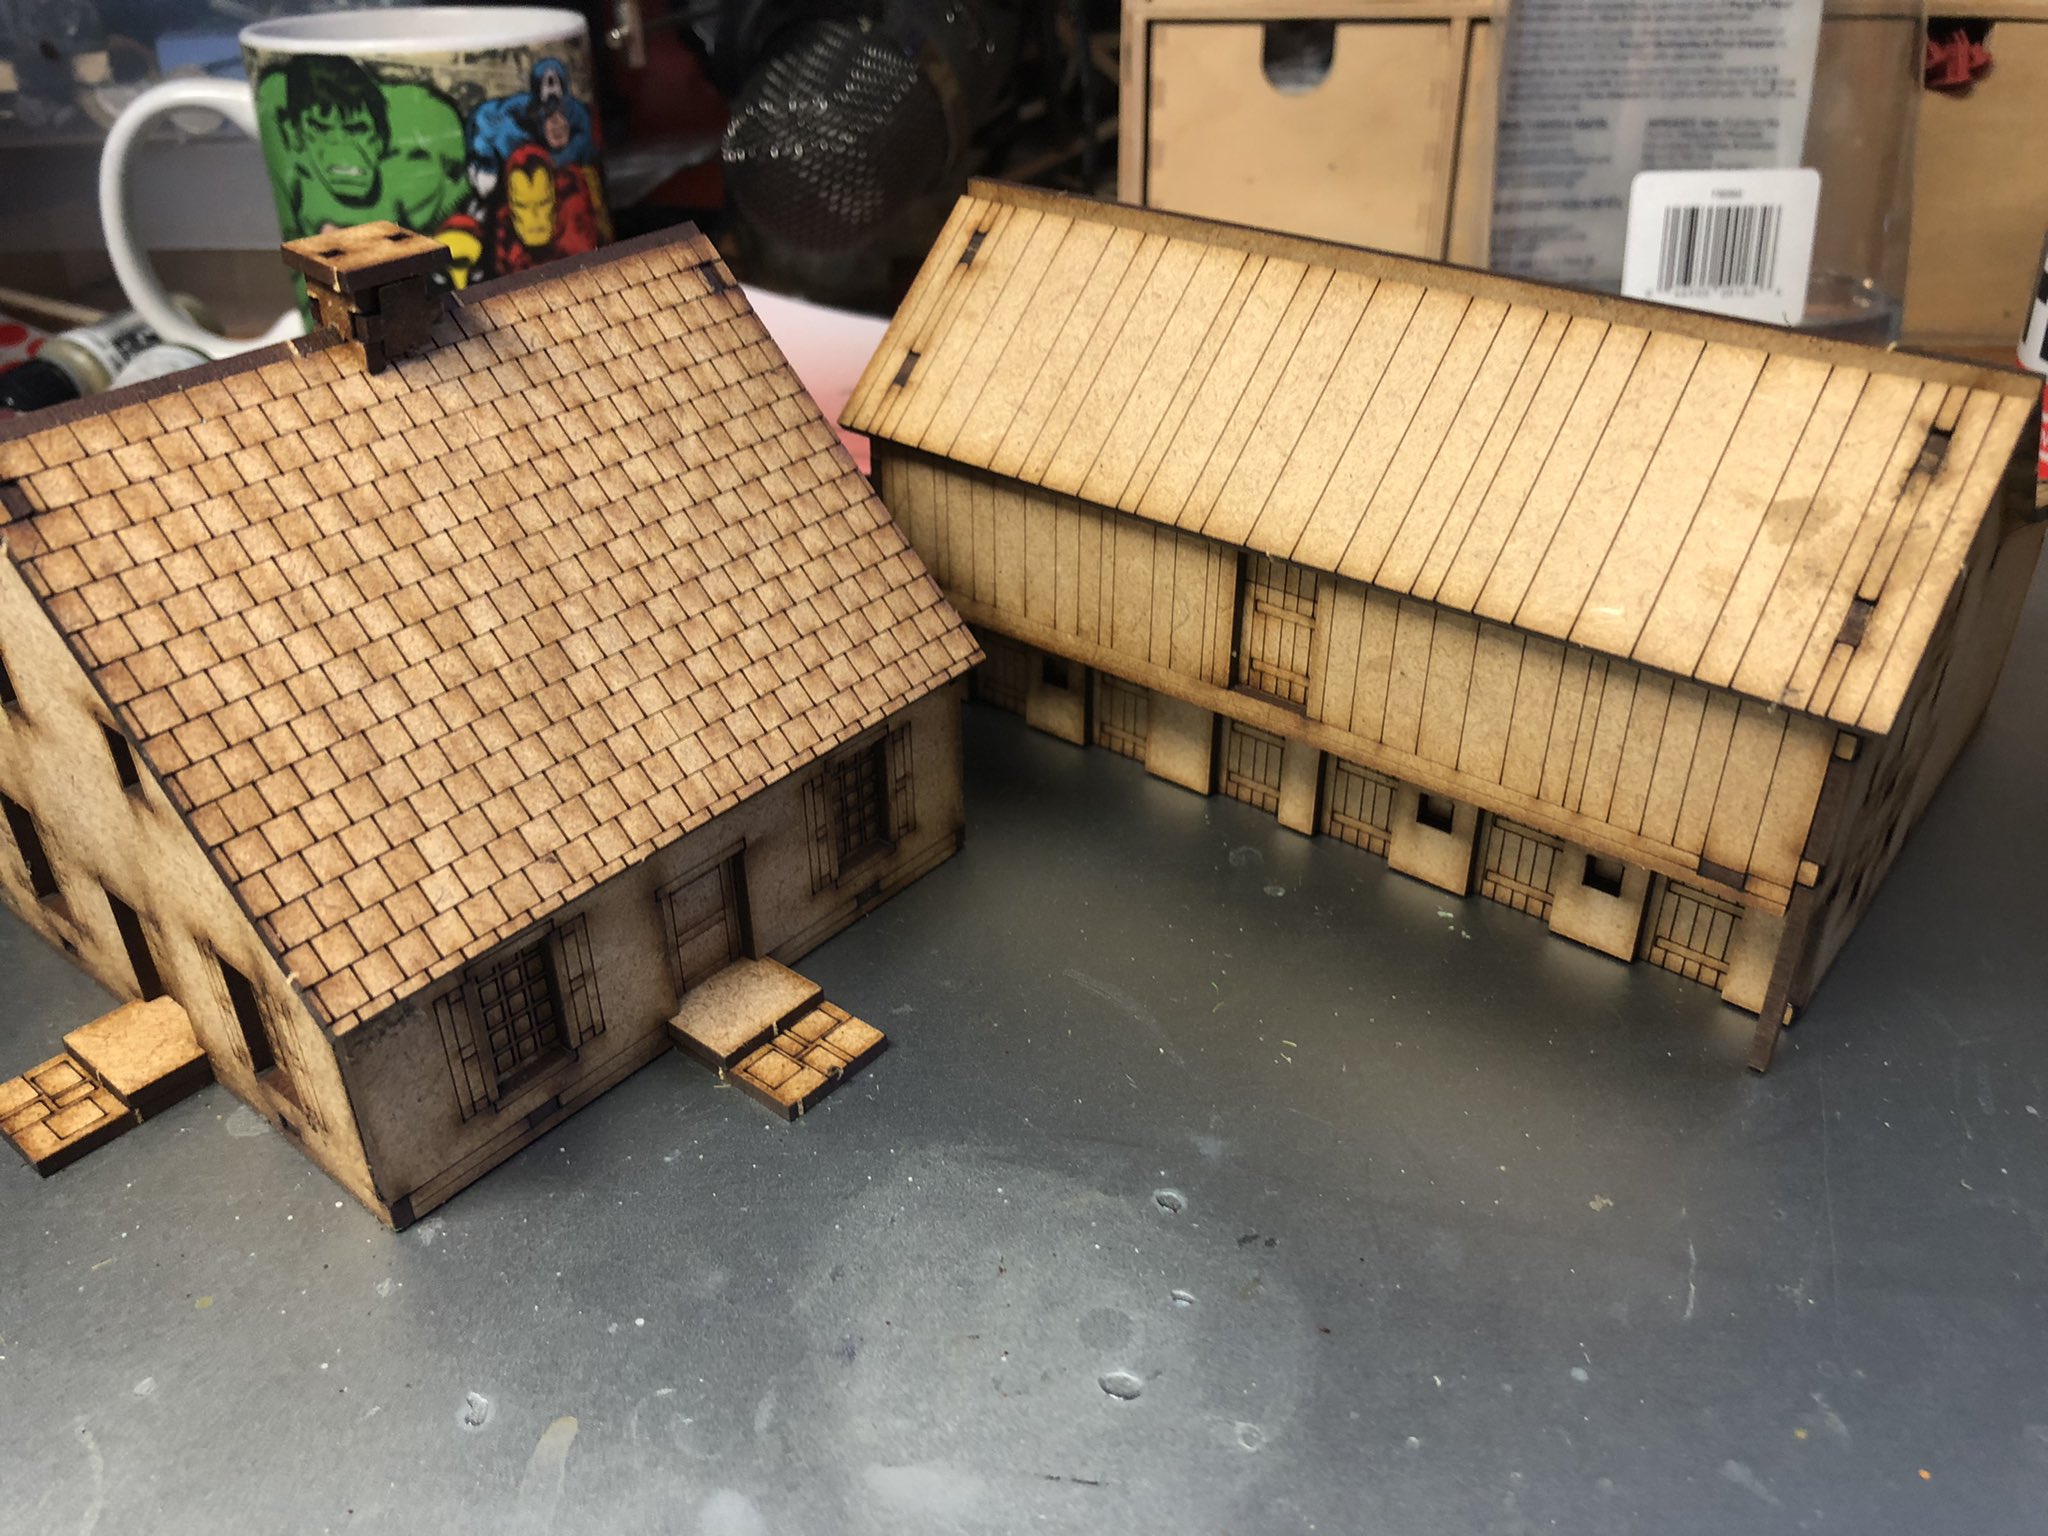
The first two buildings were the stable and the barn and the first step on these was to plank them and add tiles/roof, I did this using thick paper/card. This is just to create a little bit of structure to allow a plank pattern to show throgh as opposed to a flatish MDF surface. Note that I plank vertical.
This leaves them looking like this.
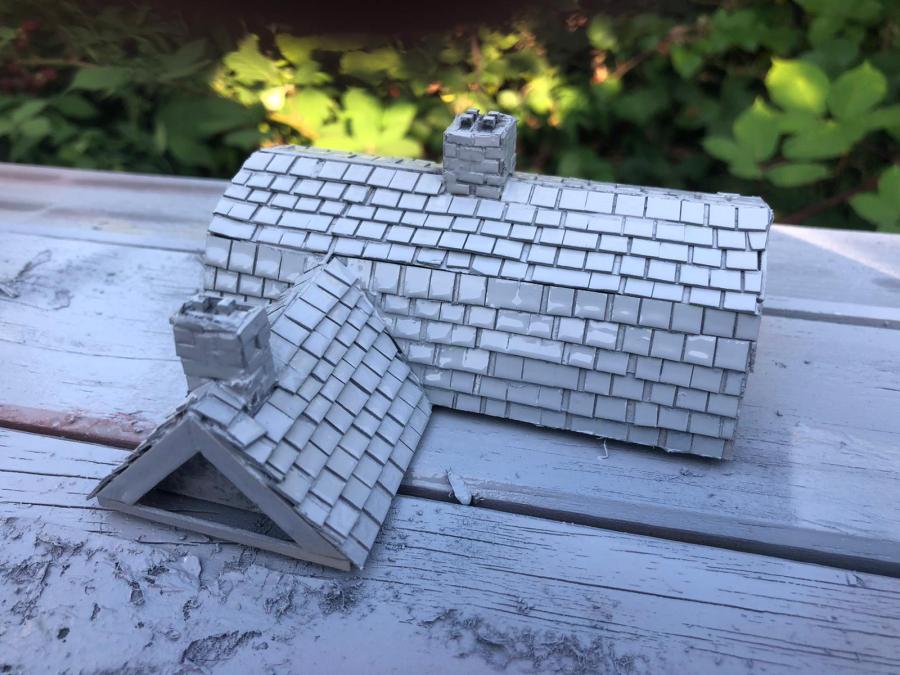
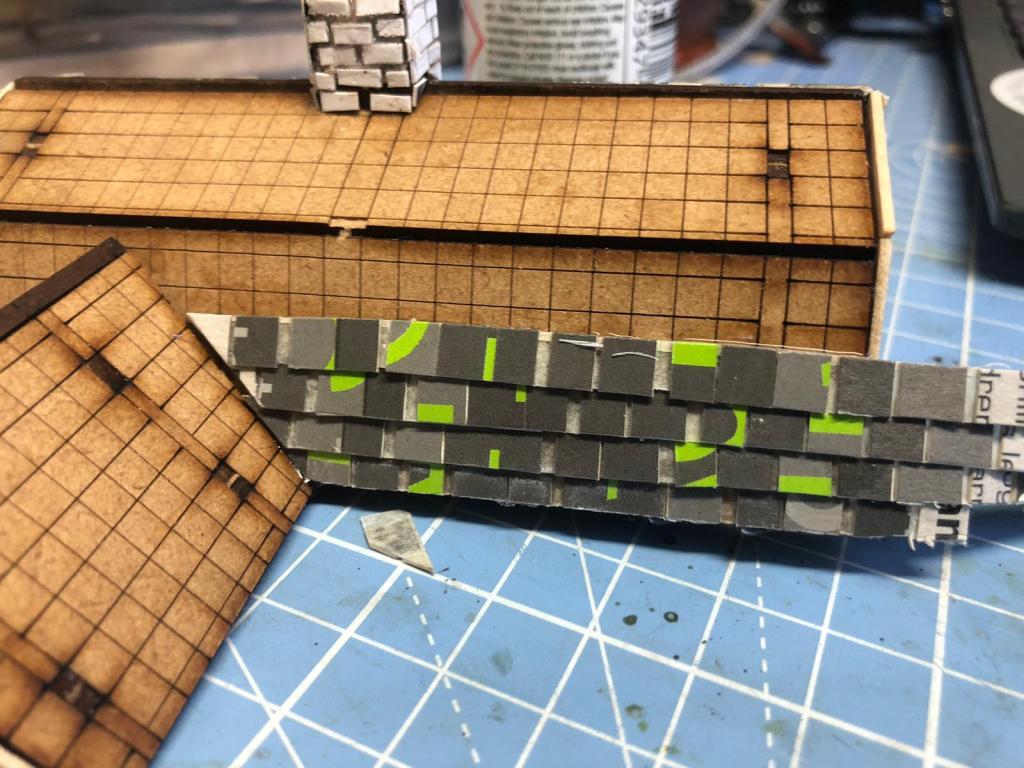
I use some harder cardboard from a cereal packet for the roof planks and for the tiles I bought a tile set from Sarissa (but there is an alternative presented lated on how to do something similar). You basically cut them with a craft knife into strips pva the building and work your way through it – it takes a while but it is really worth the time invested.
I painted them in Hull red and then another layer of red mixed with hull red (vallejo paint) added some white detail and quick weathering. They really look the deal, if I can say so myself.
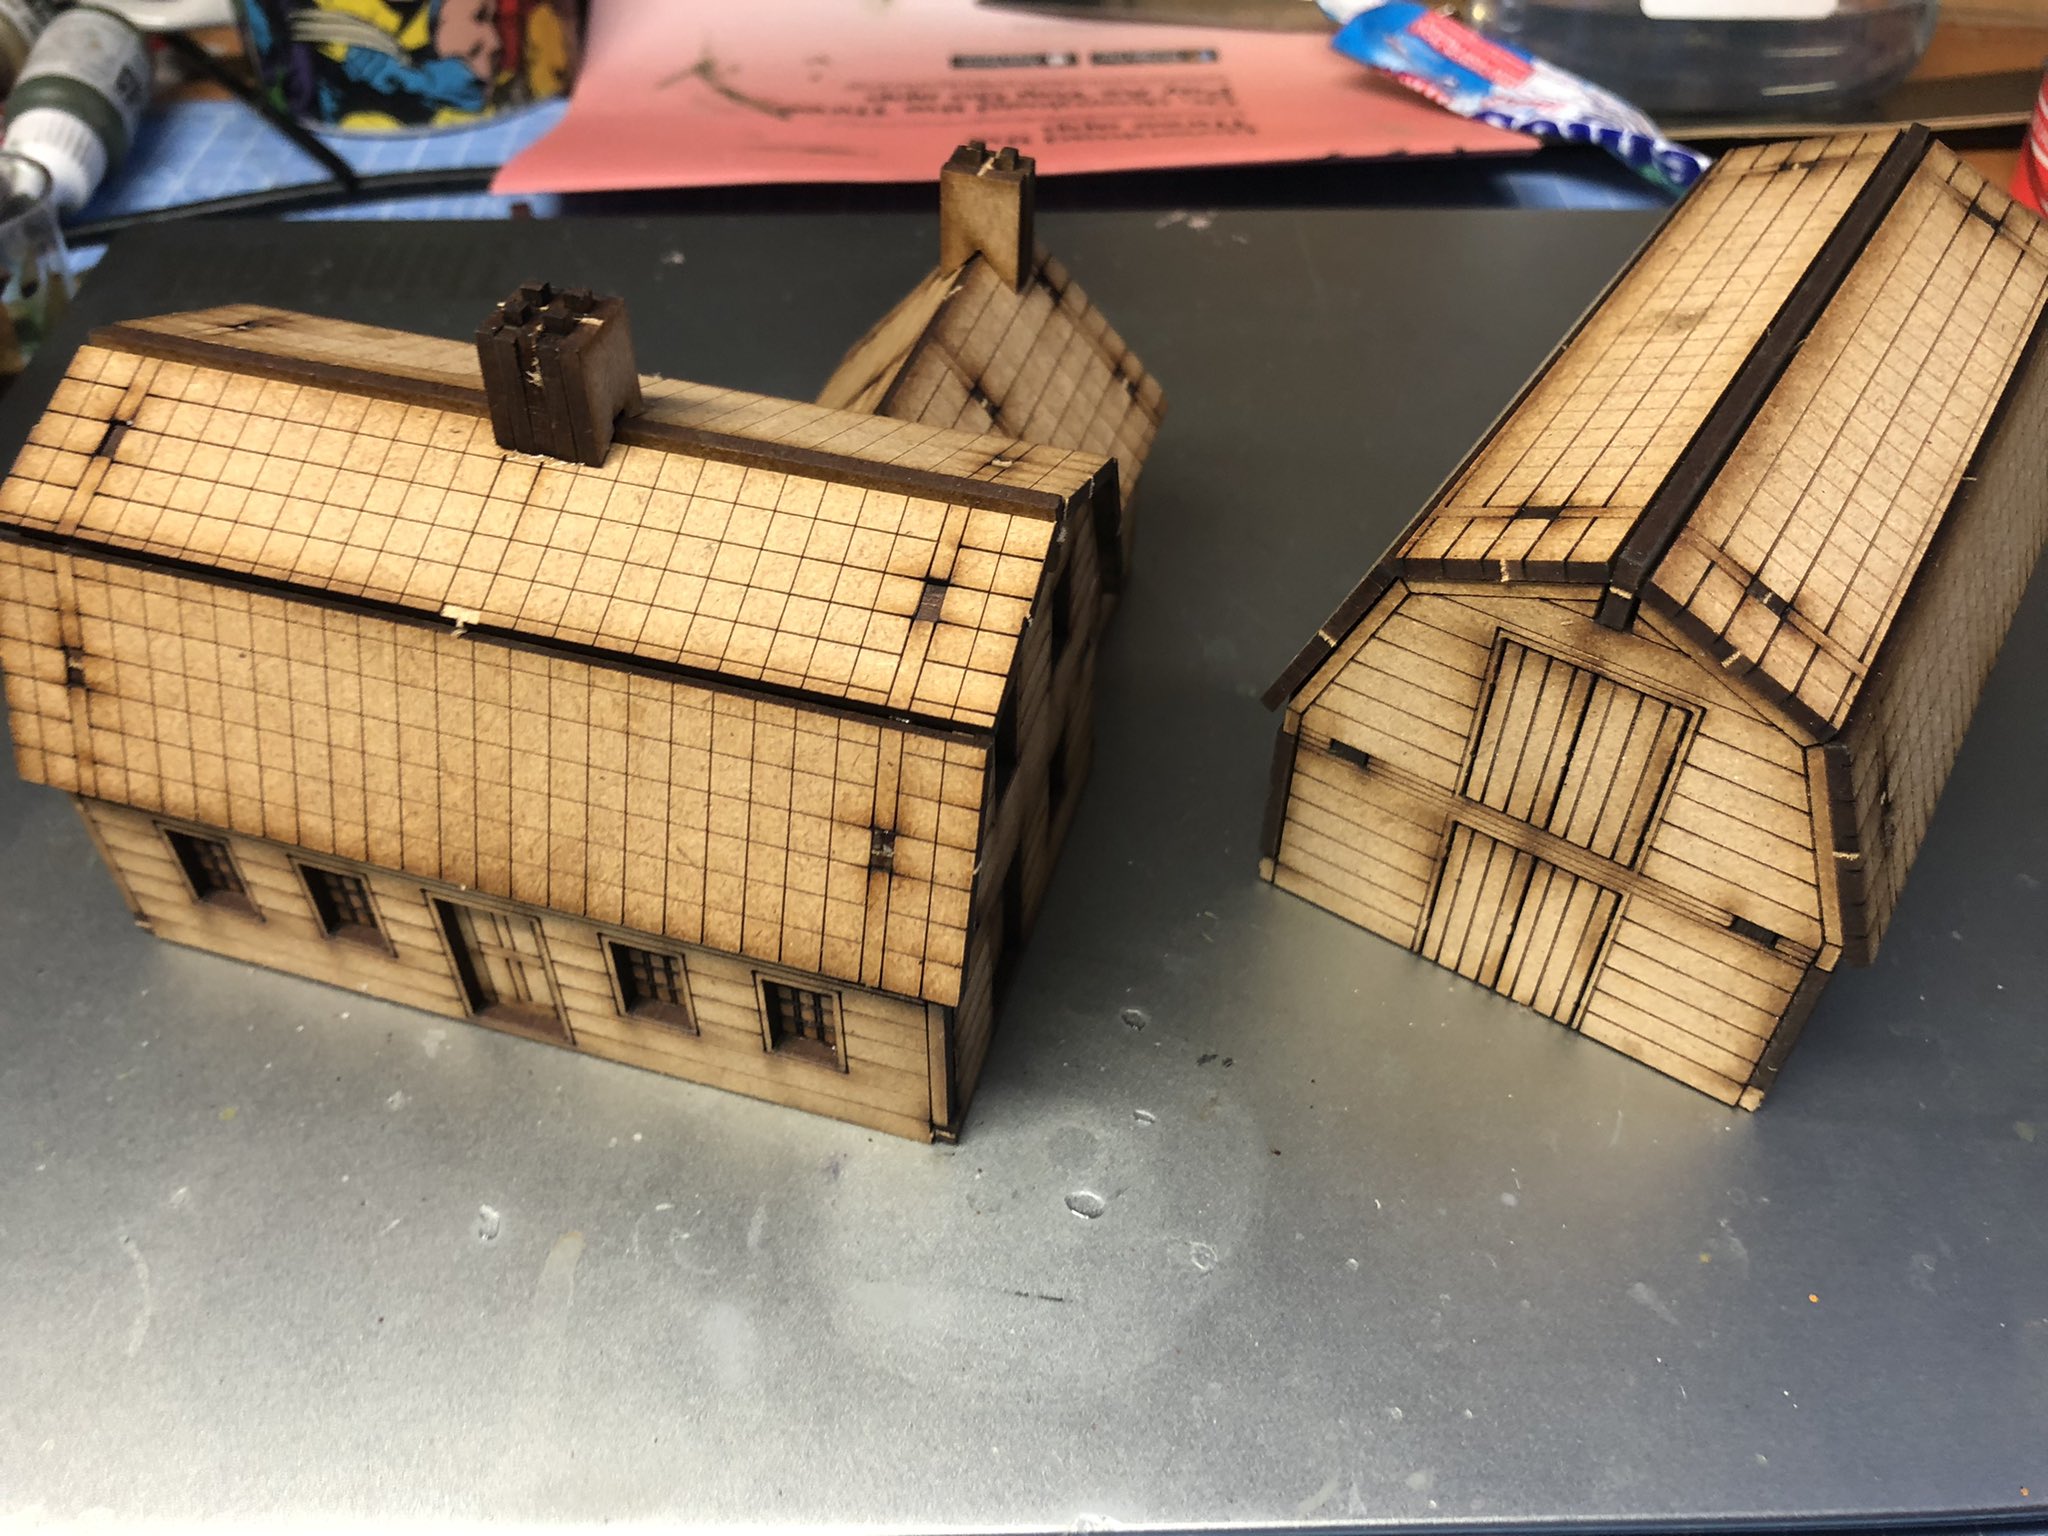
Next up the two houses
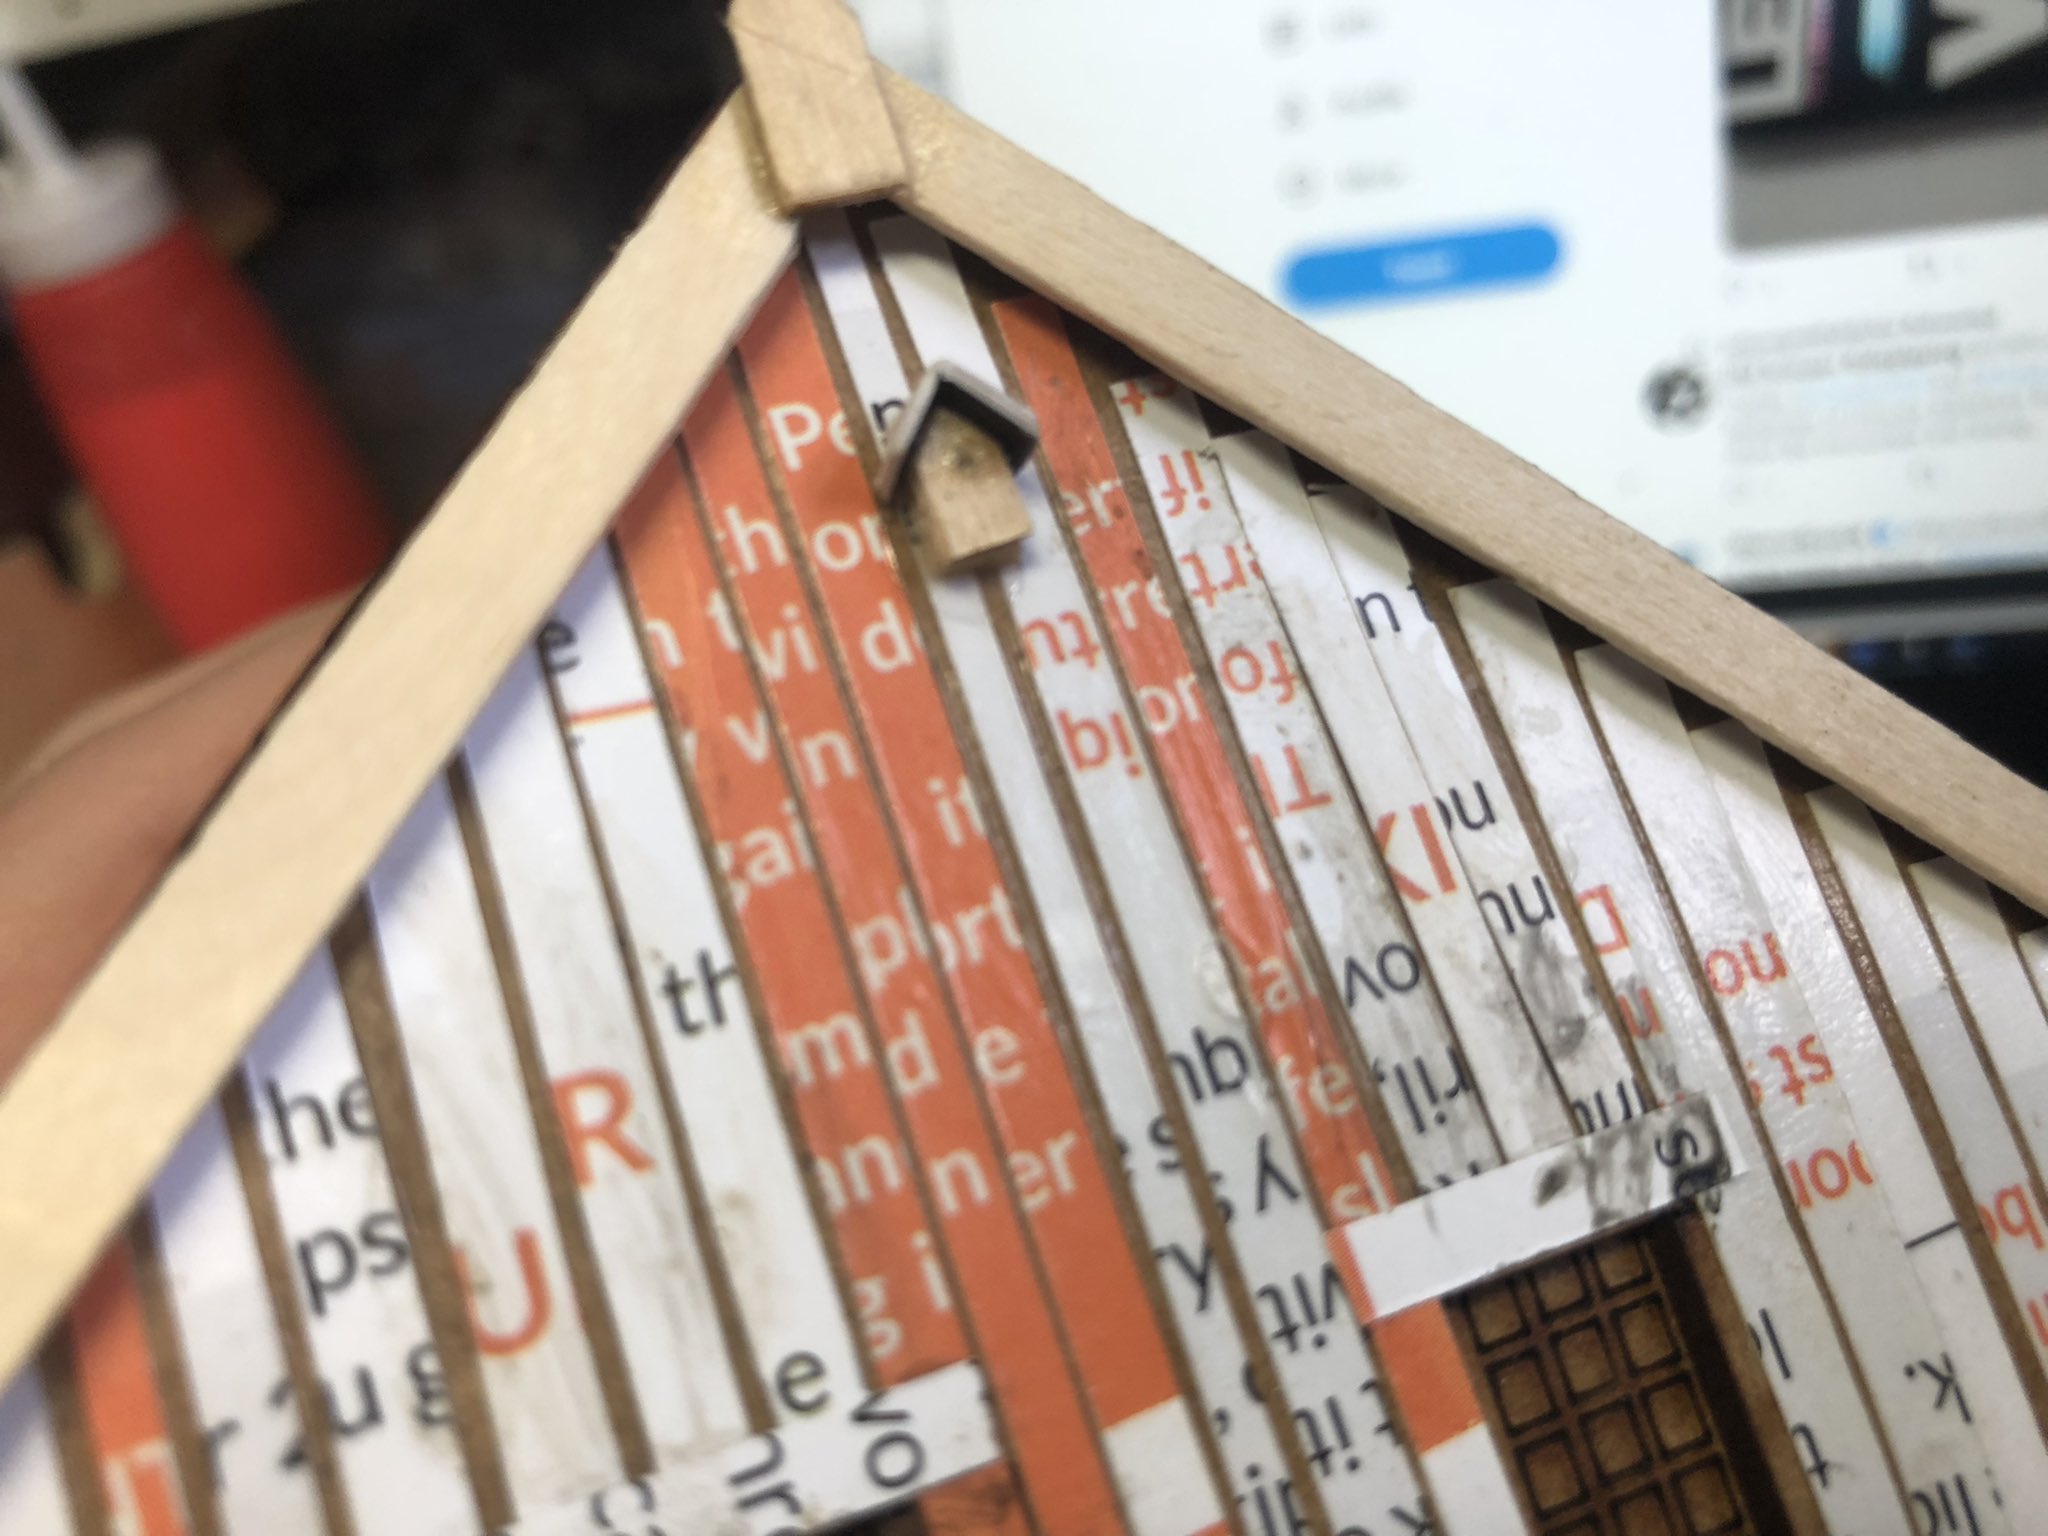
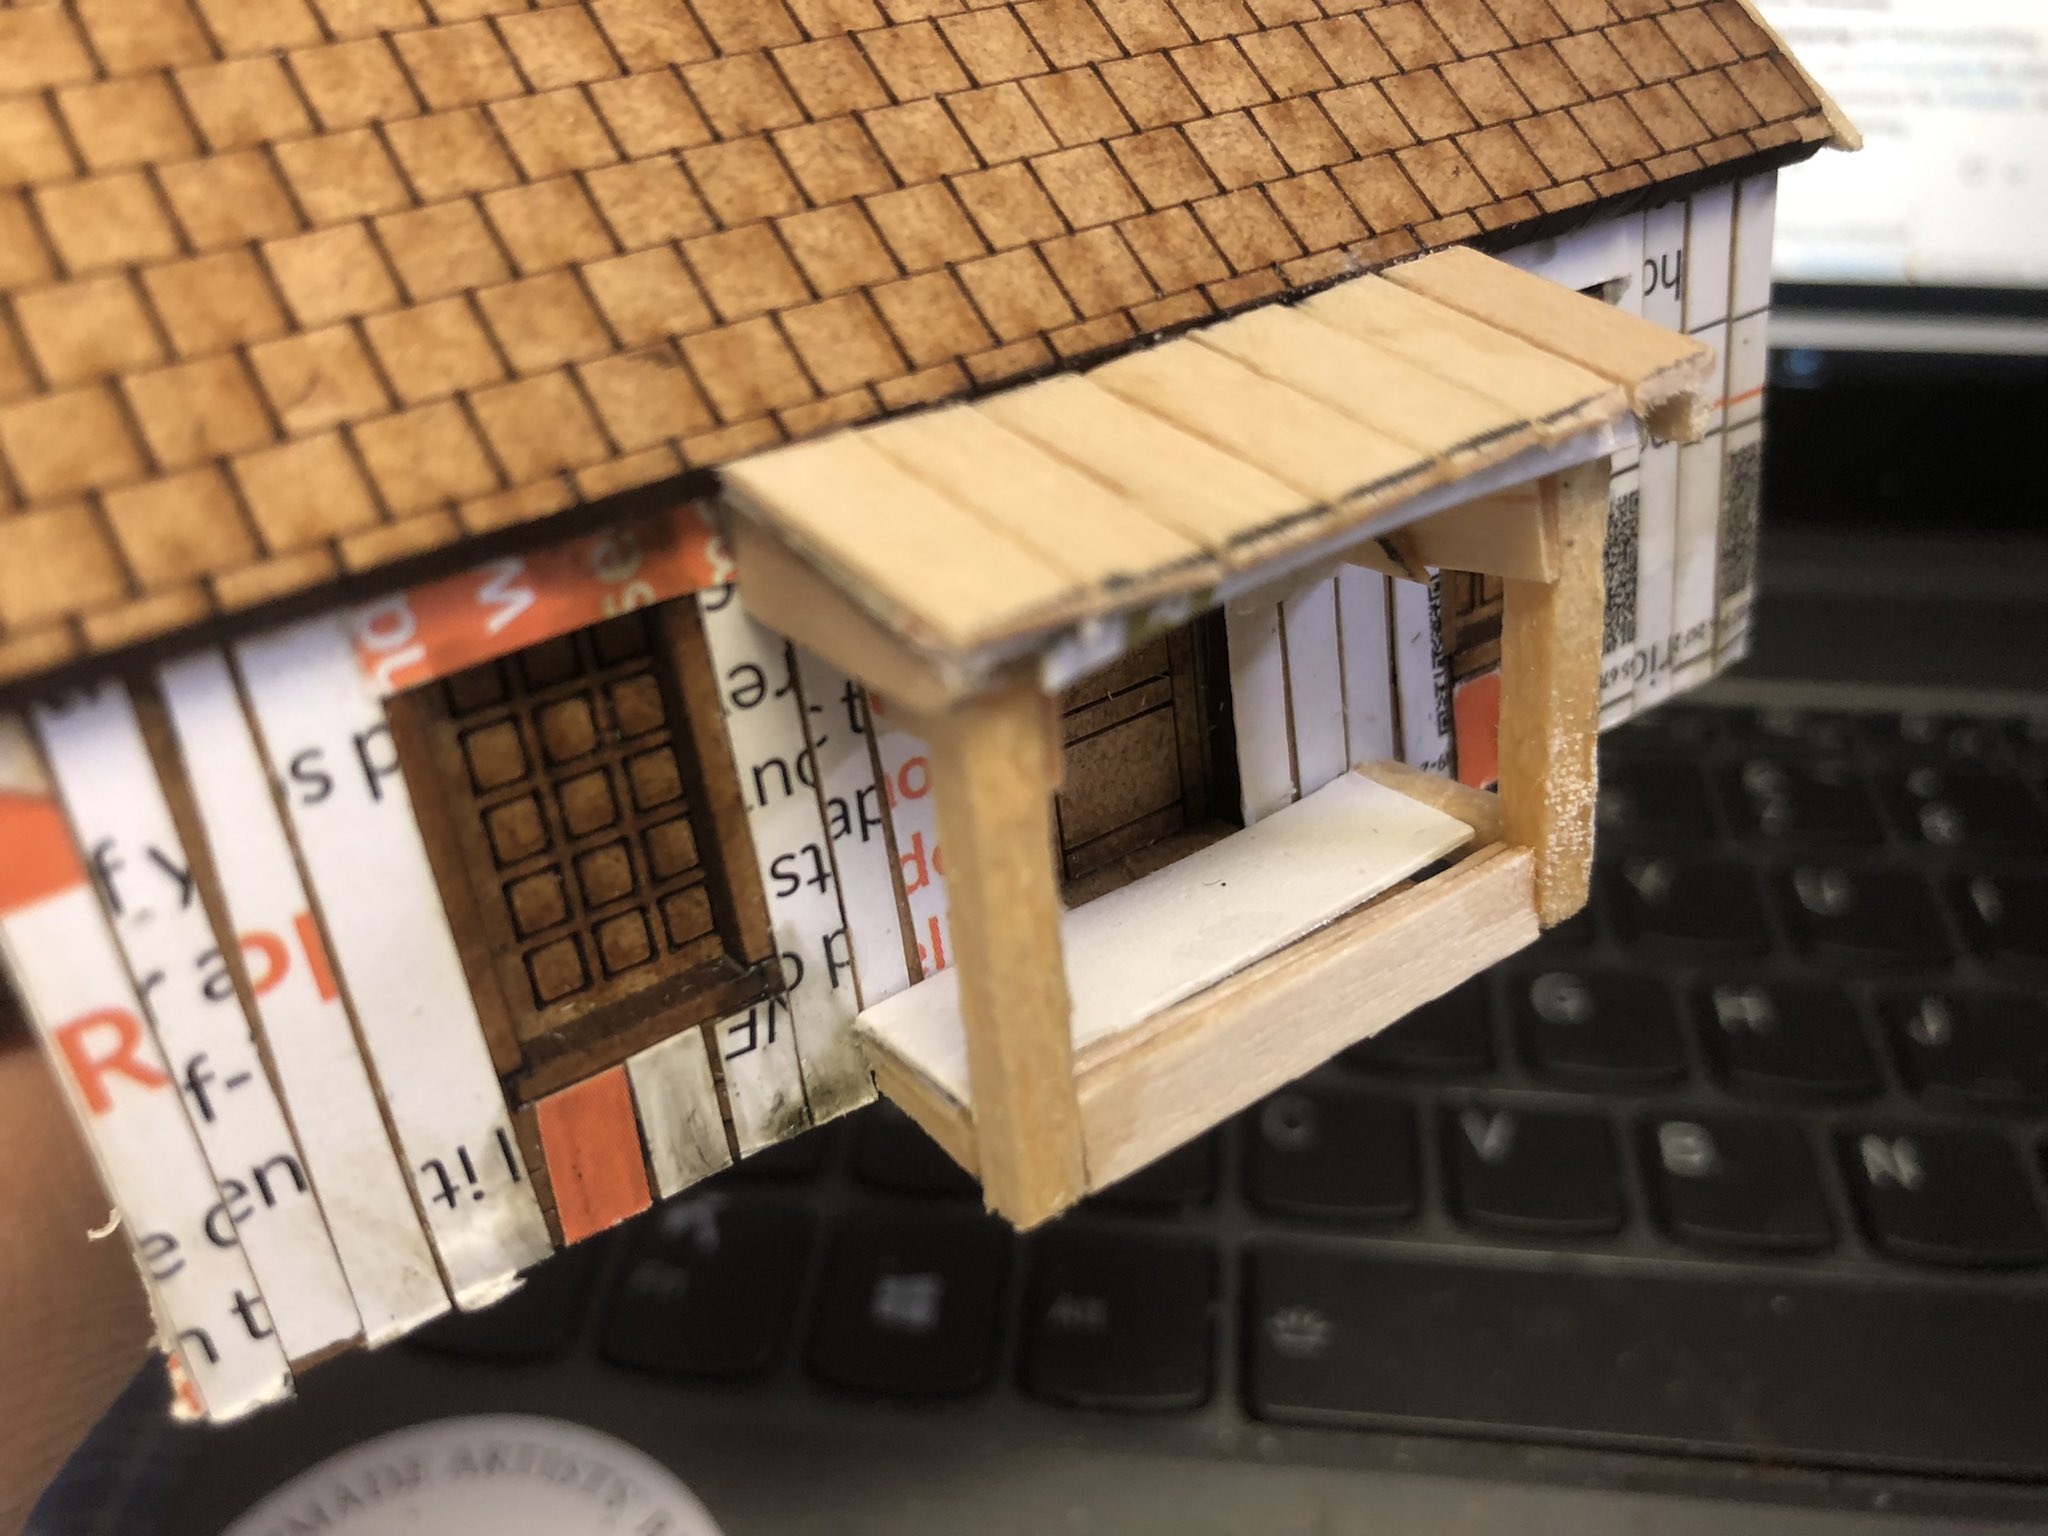
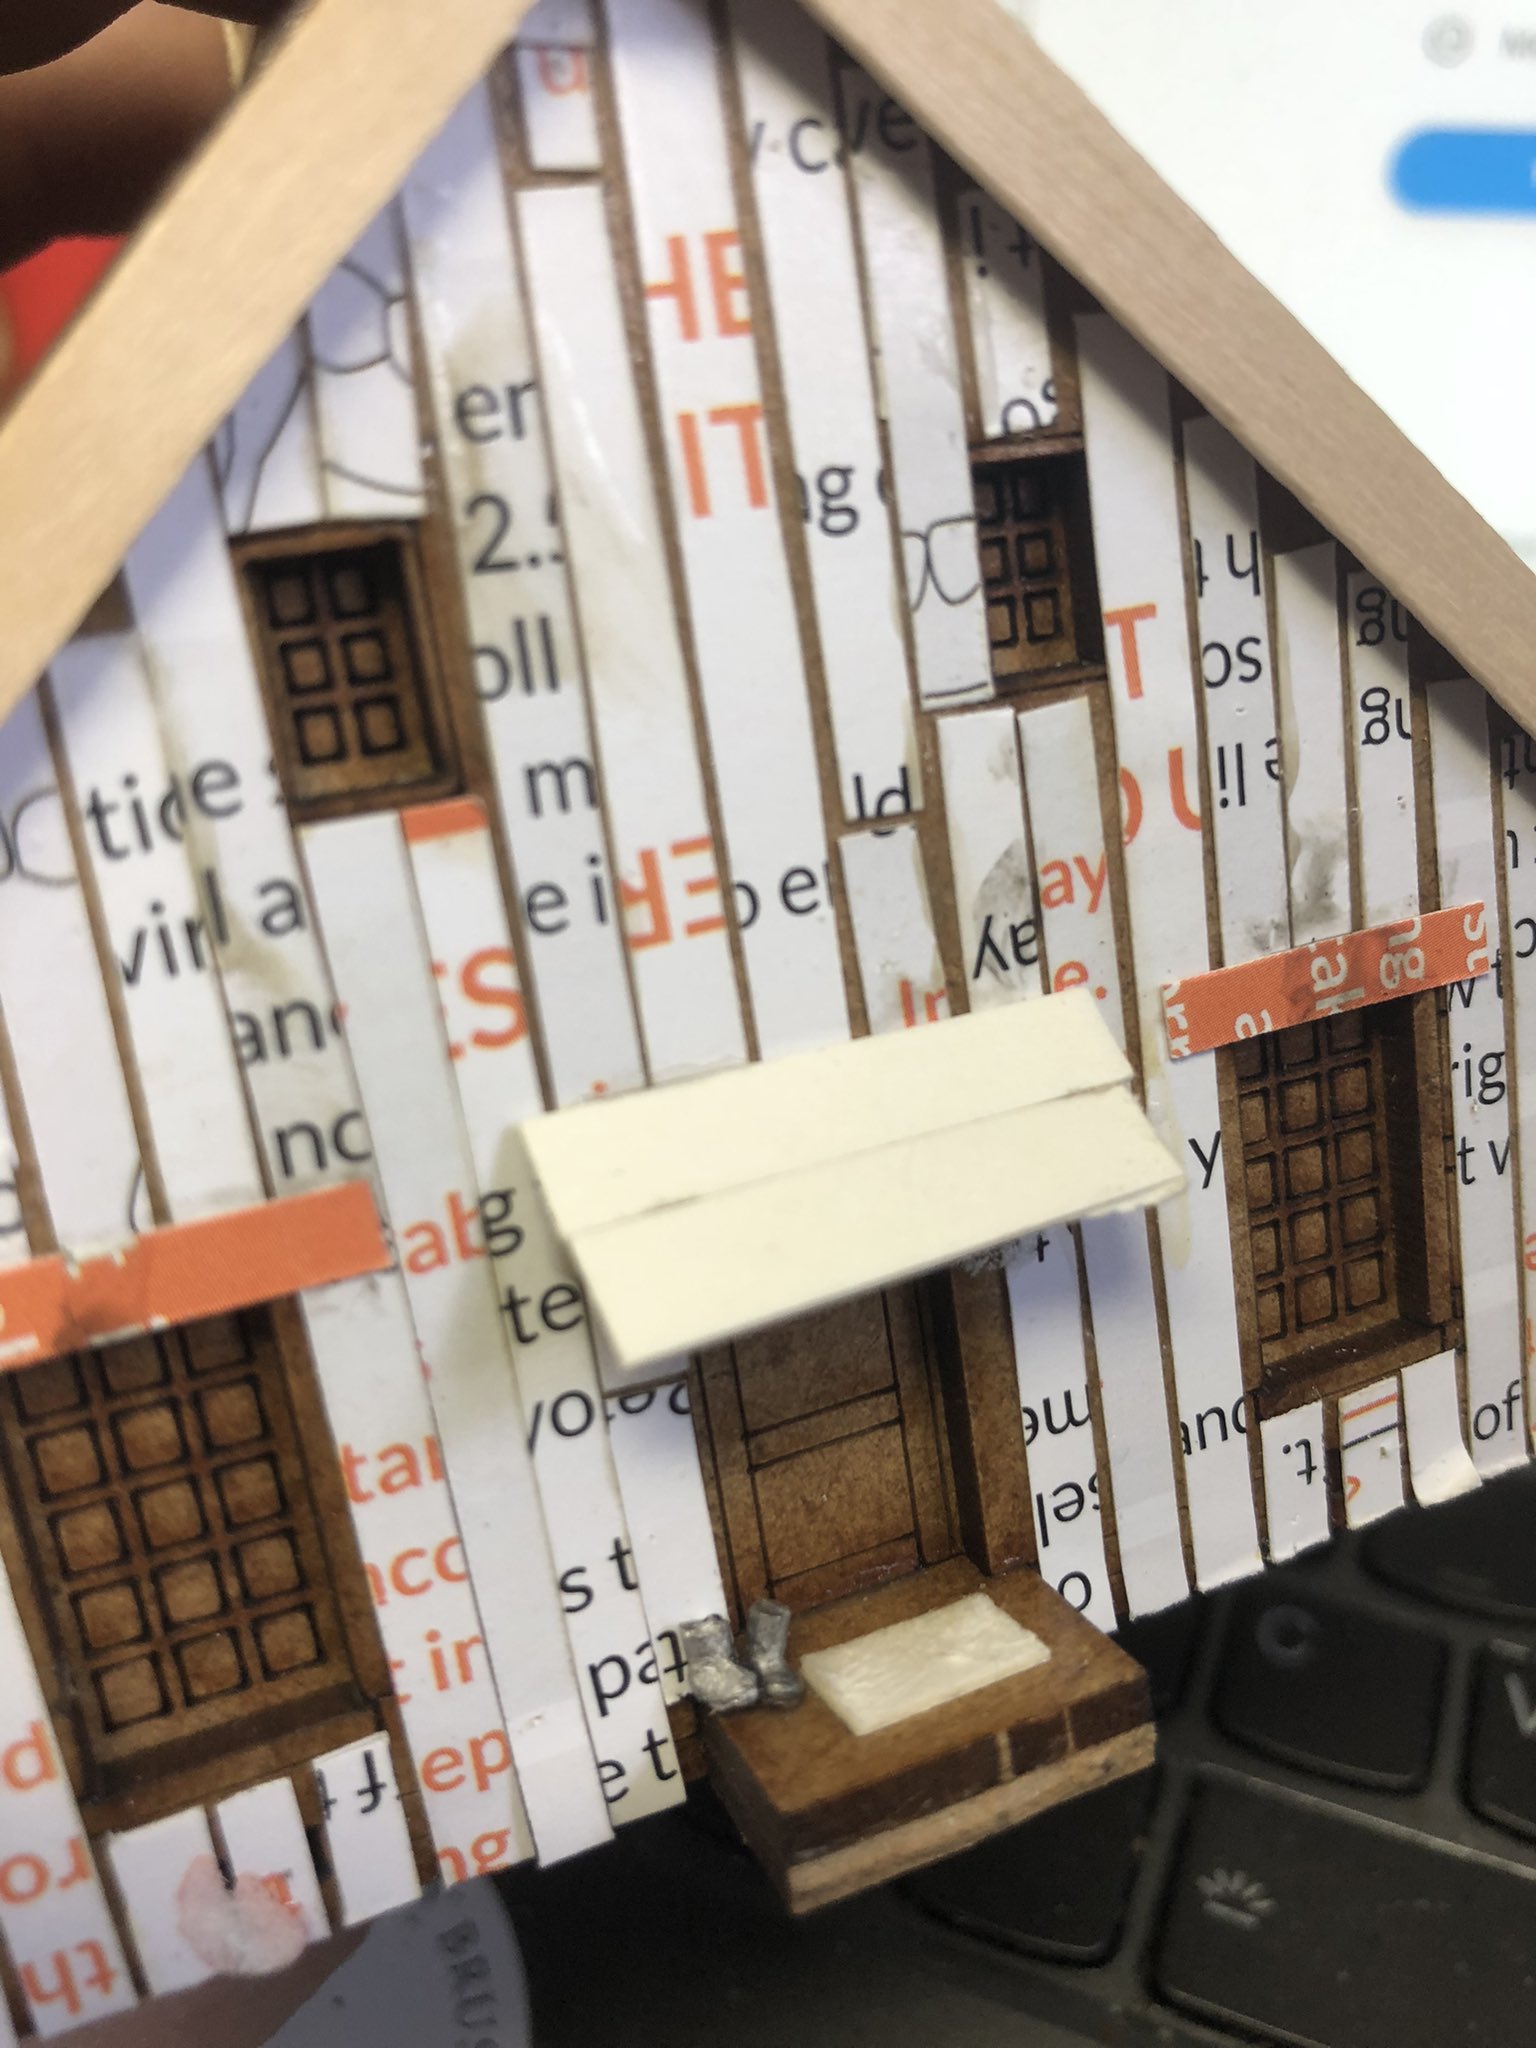
First the “Dunkers Church”, with some detail being added after planking and coffee stirer detailing, including a bird house (My great Grandad apparently had a bird house on the back of this house that he was very fond of)….
Some planters outside the windows (these will be filled with plants later).
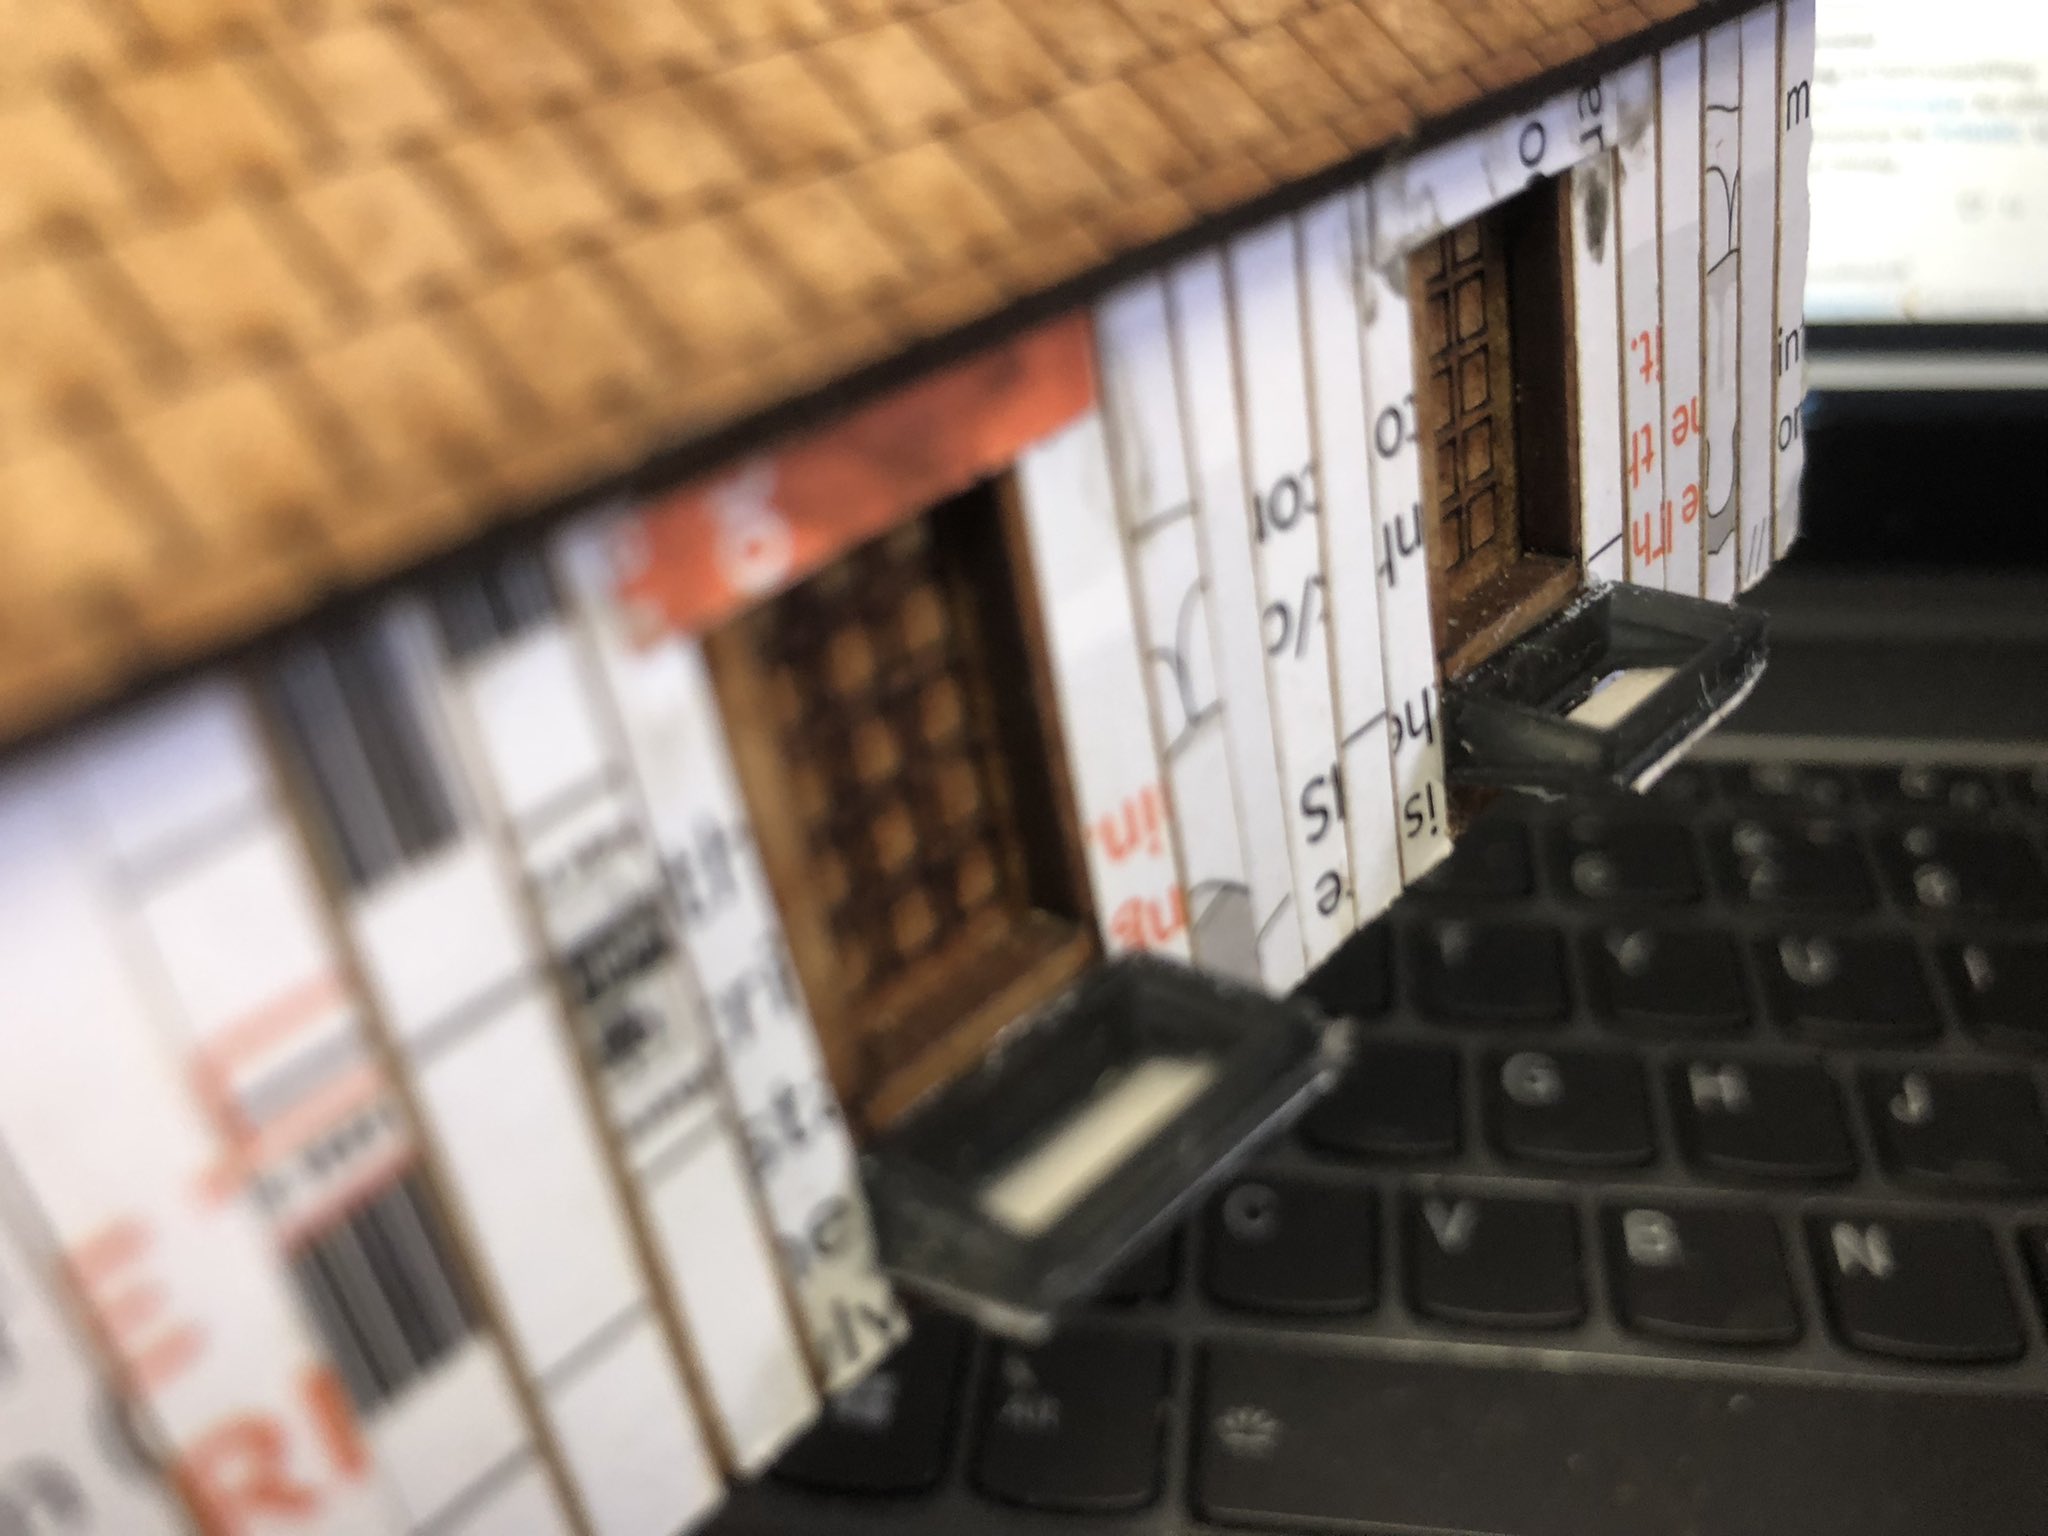
A front porchA roof on the back (well side) door and some boots and carpet to wipe them clean before entering.
The house will need some roof tiling – I am waiting for some from Sarissa, so it will be painted next time.
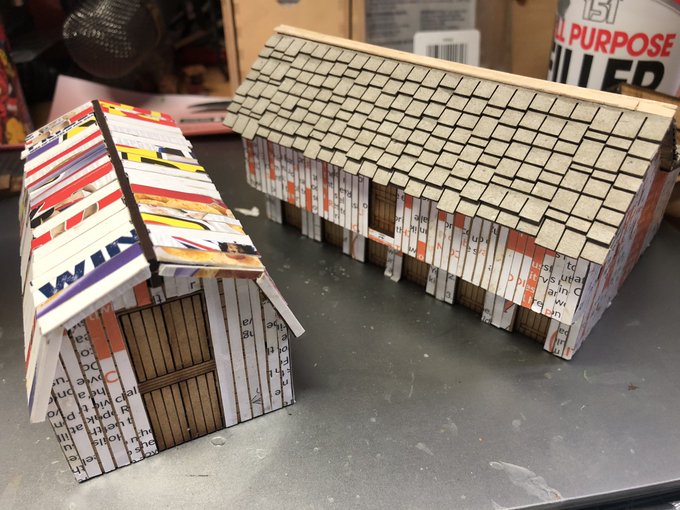
As for the Dutch House (done in the same way as the others), I wanted to use this one to illustrated how you can make tiling a roof a little bit quicker than adding tile by tile, as I used to do. You can of course get tiling cardboard from Sarissa for about £4.5 per roof as was used for one of the barns as shown before. Anyway here is how I do it, you need cardboard (like a cereal pack), a sharp knife/scissors, ruler (metal works best), masking tape and a little bit of time.
First take a piece of cardboard and mark up the width of the tile you require, I used 5mm for 15mm (this is actually a 0.5 meter tile in scale but it kind of works you might want to go finer)
Cut out strips with hobby knife or scissors
Put the strips together between two strips of masking tape, leaving a very small gap between the tiles.
Thne turn it around and add tape all overTurn it around again – you now have a “sheet” of cardboard strips (I used a similar technique when I did a chess board in woodworking many years ago).
Use scissors or a sharp hobby knife with a ruler firmly pressed against the sheet and cut strips the other way to create strips like this (a row of tiles being held together by the masking tape, as shown below).
Now use this to clad your house (use Superglue due to the masking tape not being that PVA compatiable), start from the bottom and pretest each level before you glue it. DID I SAY USE SUPER GLUE. Have good ventilation with the glue.
This with trimmed borders.
It will look funny depending of what cardboard you are using but it gets all painted over in the end so it is totally irrelevant. This is how the roof looks like when finished – you could make your tiles tighter and also cut more precise than I did but the point is that the masking tape allows you to do this really quick as you add strip by strip instead of brick (I mean tile) by brick.
Next time we will paint the two houses, after I added some of Sarissa tiles on the other one.
Not really 1943, more like 1973, Dad on the left with his mates playing badminton on a nice sunny day. Note the houses in the background, that is Dalarna folks.
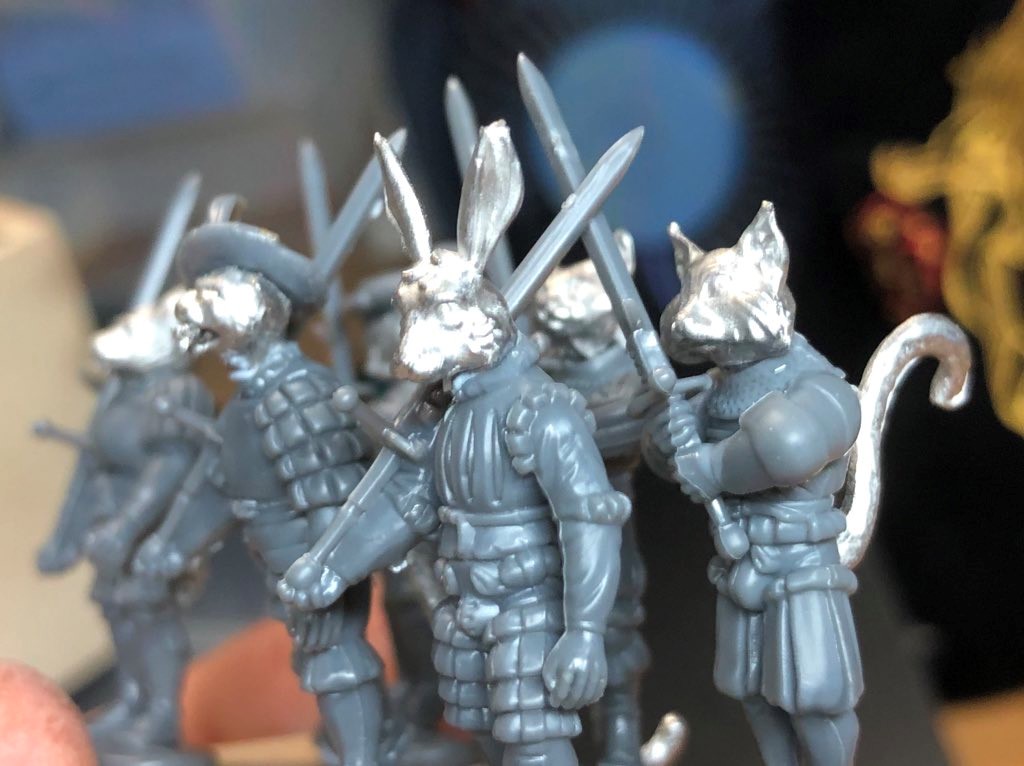
I have been buying things from Ian at Fenris Games for some time, and some of my favourite models have been bought there. Ian’s products are of high quality and never disappoints – he is also a jolly good fellow.
If you are in a rush go and check out his new kickstarter whether you like anthromorphic animals for you fantasy or your sci-fi/postapocalytpic settings here.
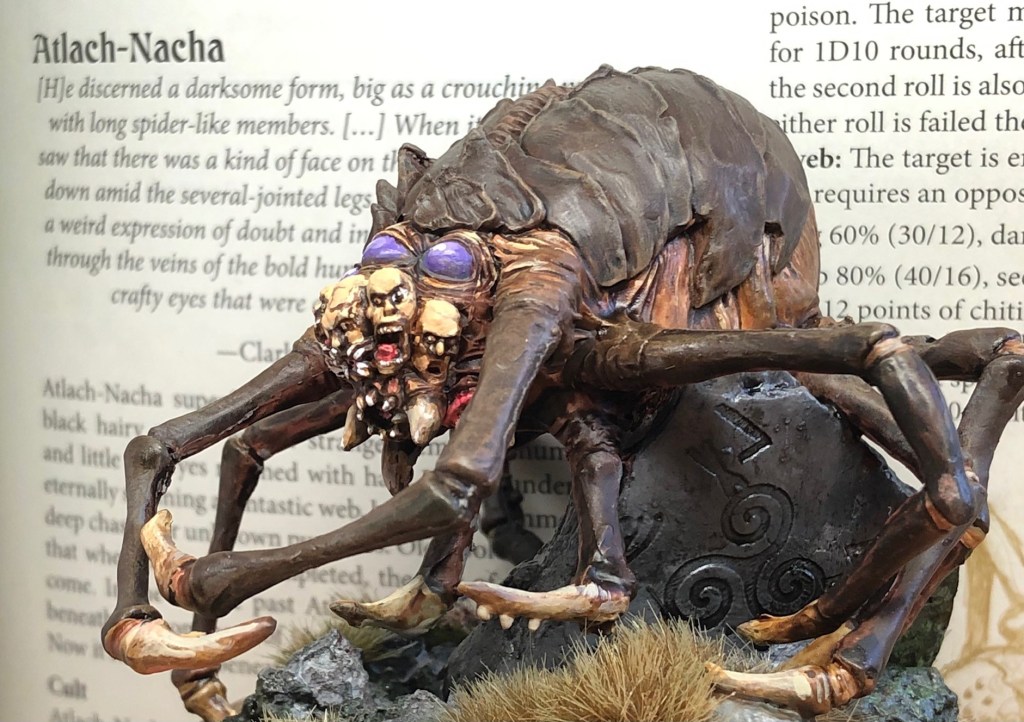
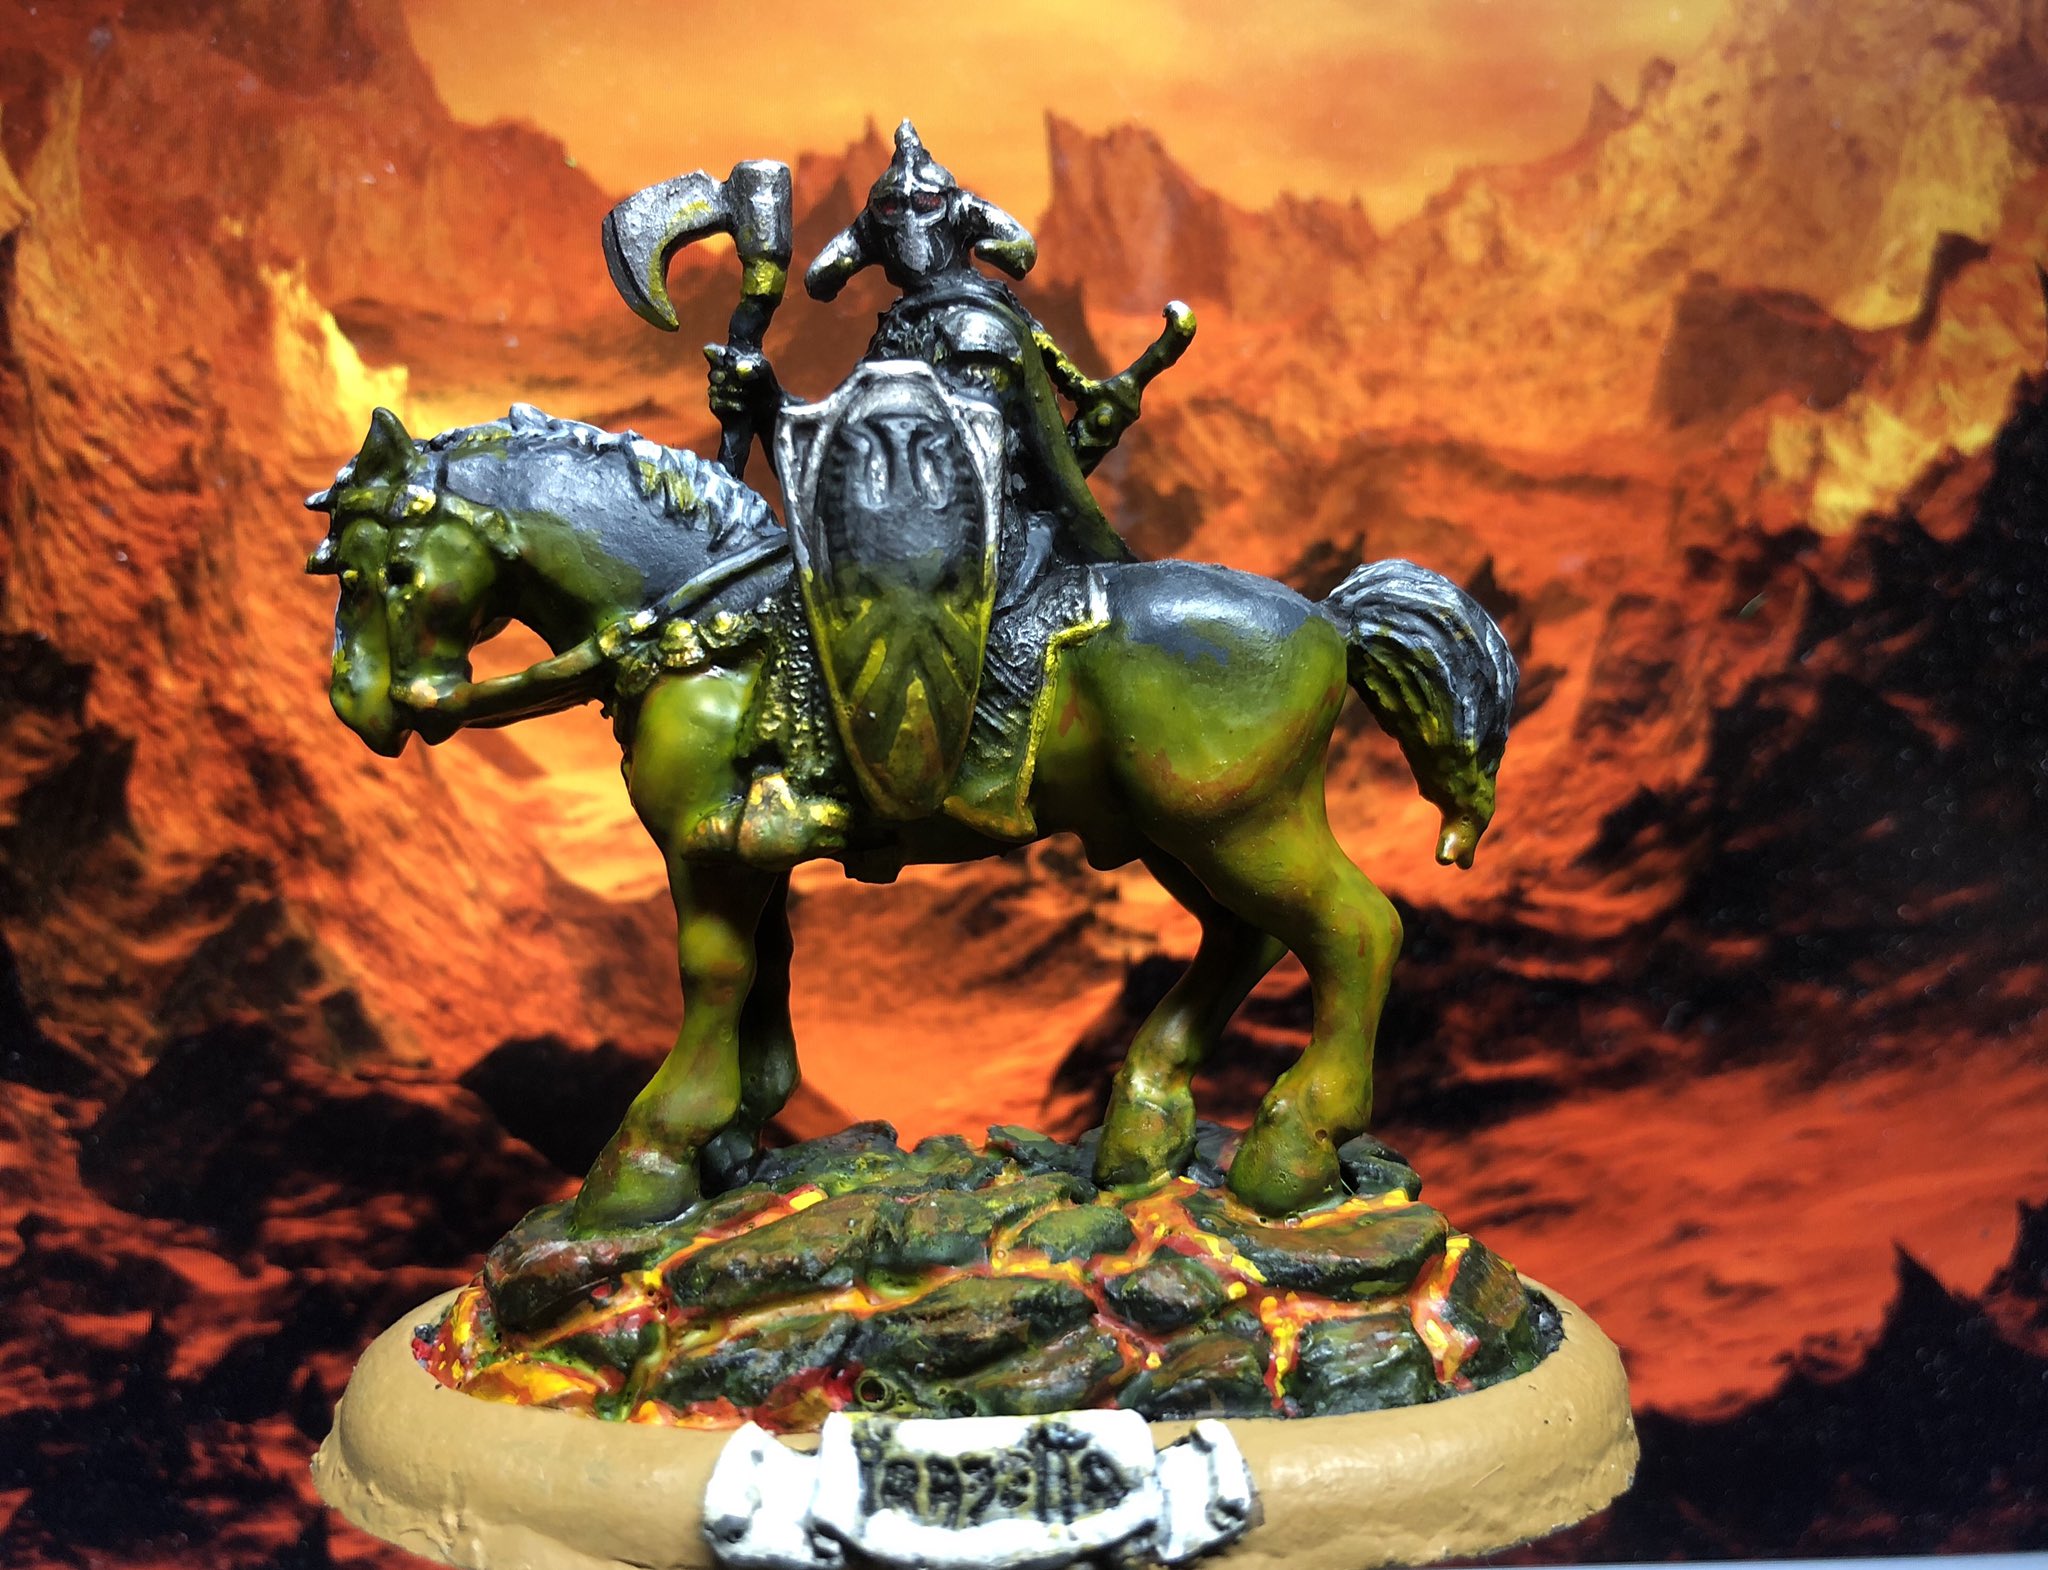
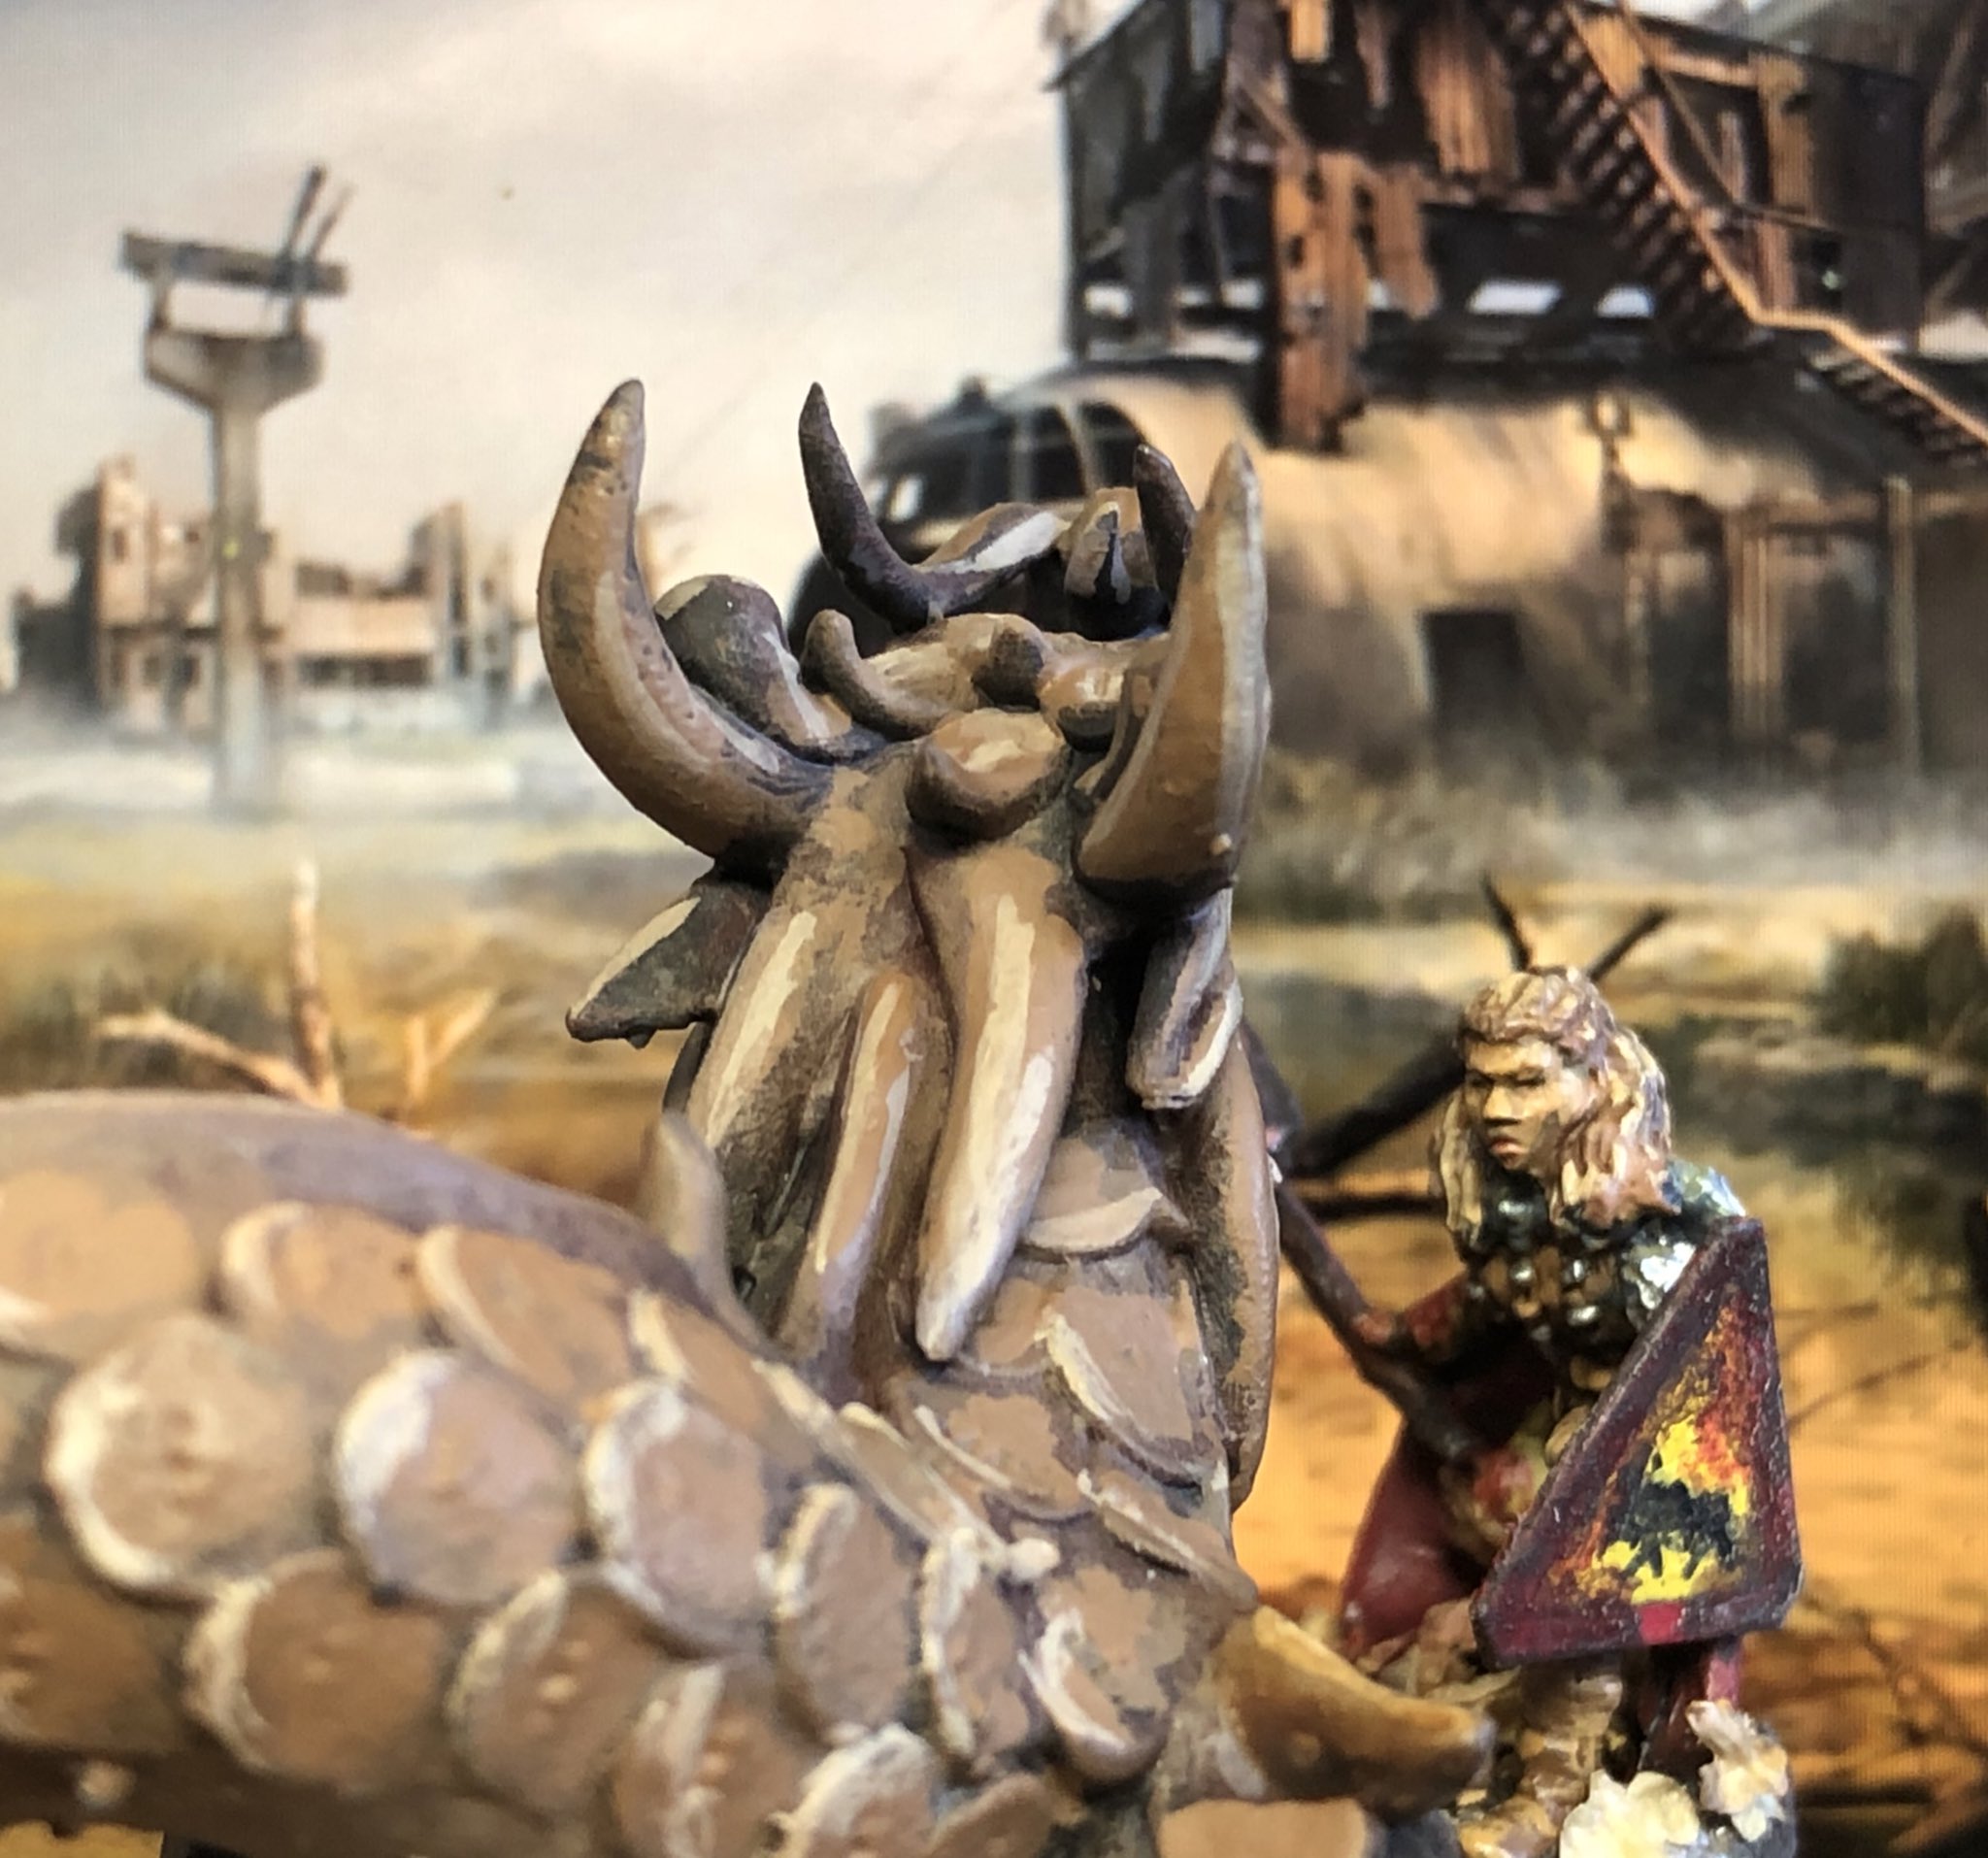
Here are some of the many amazing models I have done over the years, like this one of Atlach-Nacha (more here) which was a joy to build and paint.
Atlach-Nacha
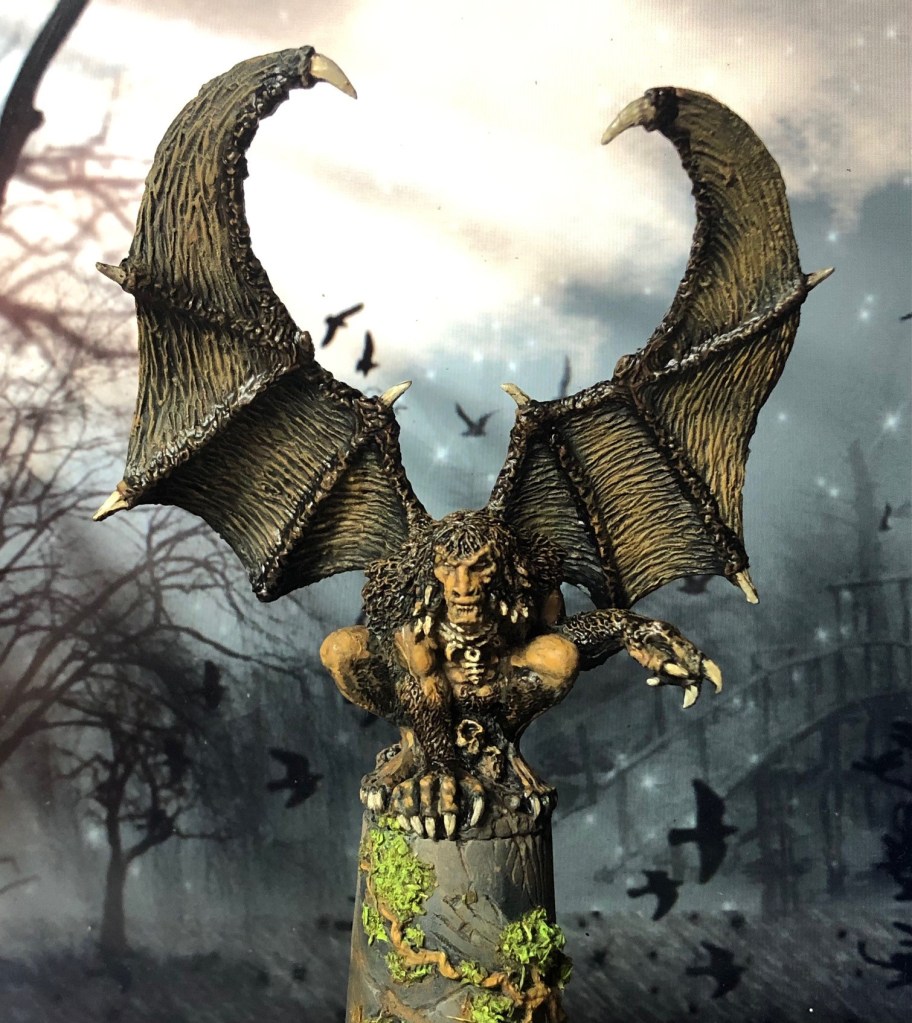
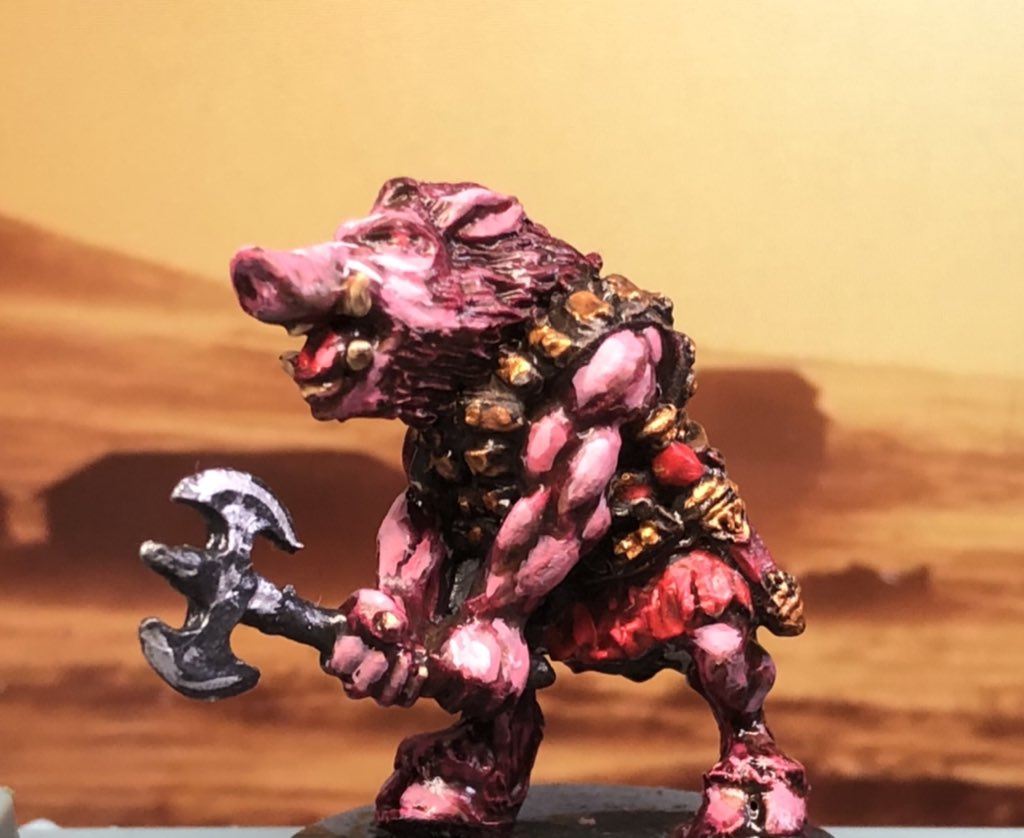
Or this one “The Dweller in the Ruins” (more here), simple paintjob but with a character just shining through.
The Deathdealer, not sure how many layers of yellow wash I applied!
Or the Dark Young of Shub Niggurath – or the Murder Tree in my World.
And there are more done and waiting on the lead (and Resin) pile from Fenris.
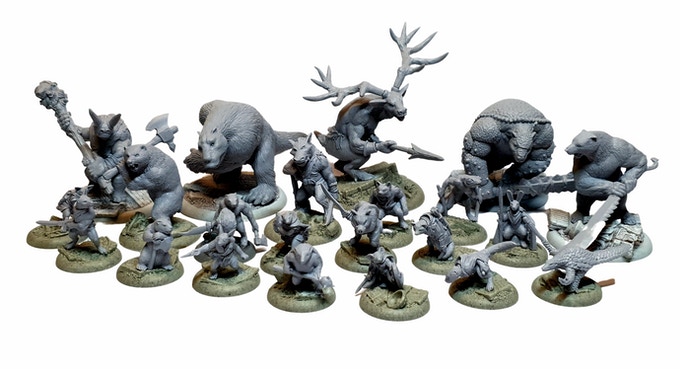
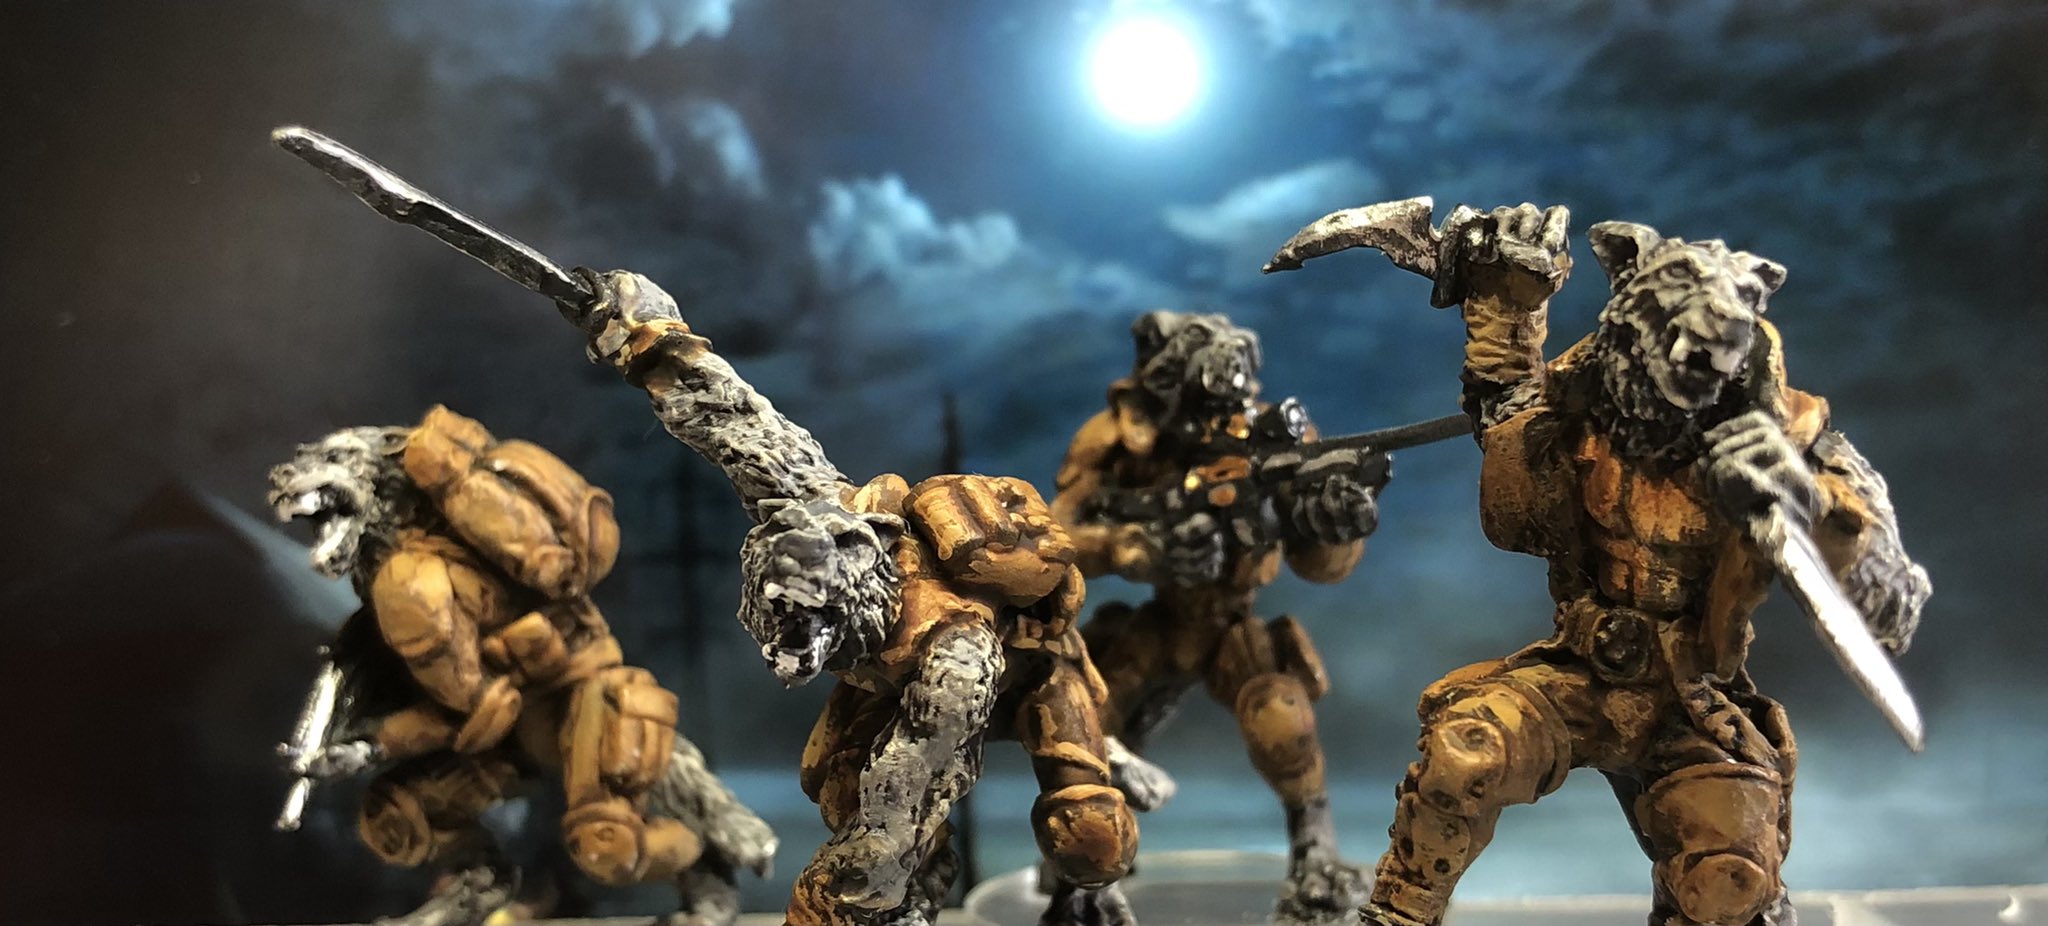
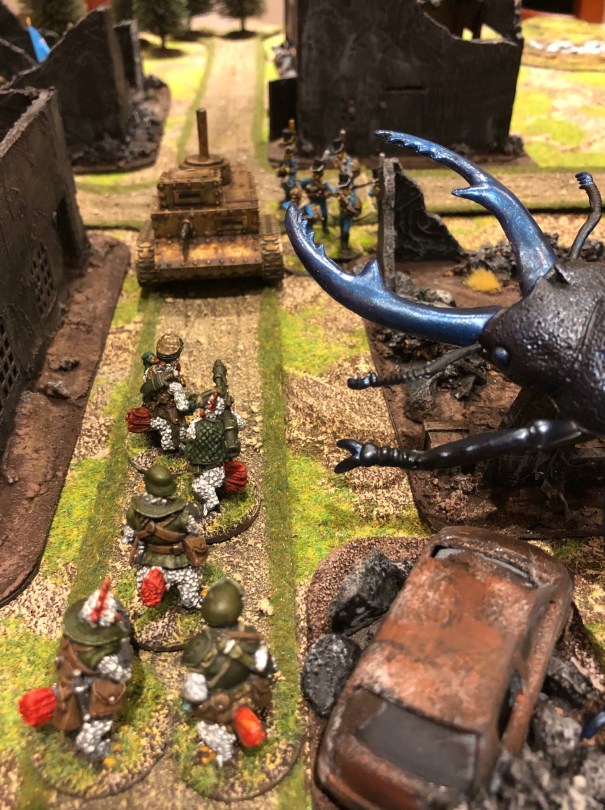
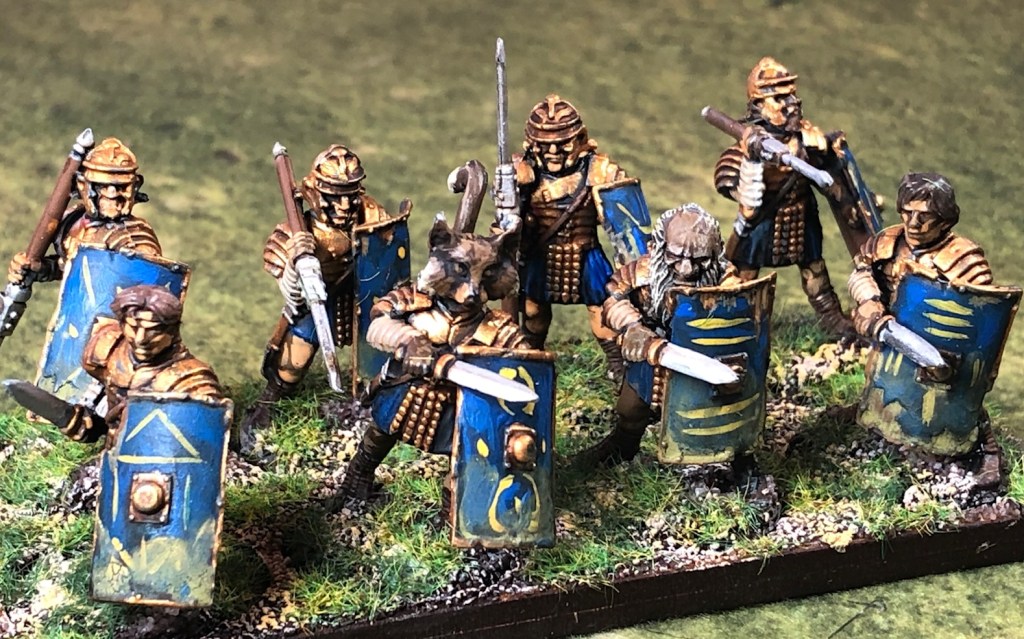
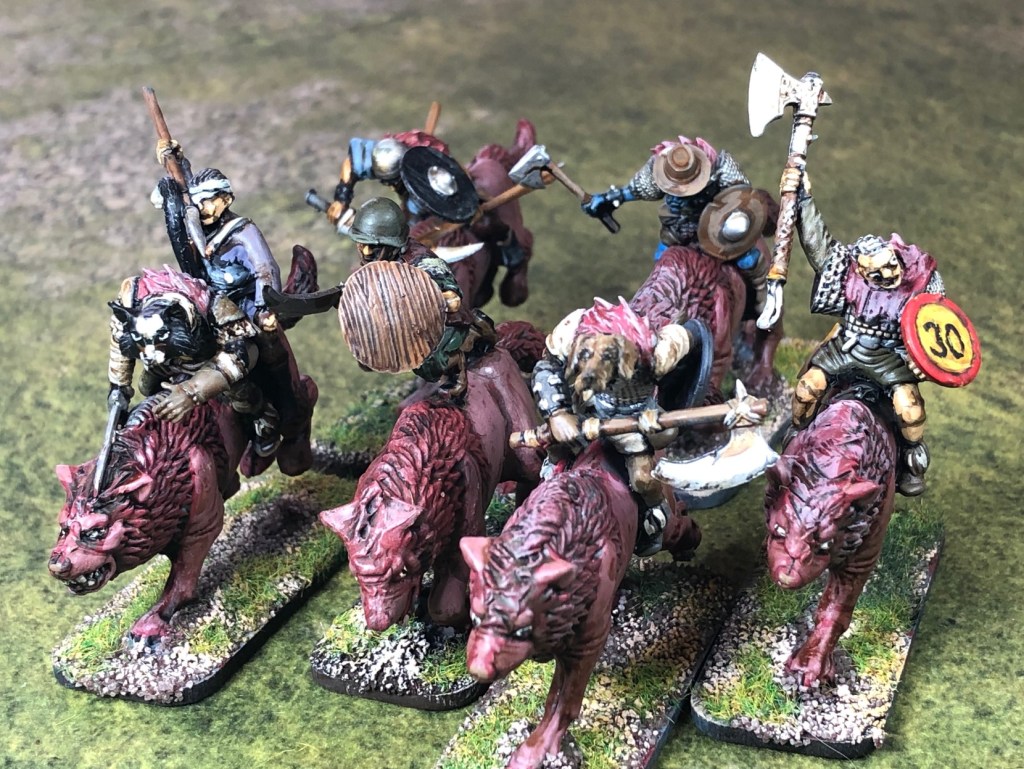
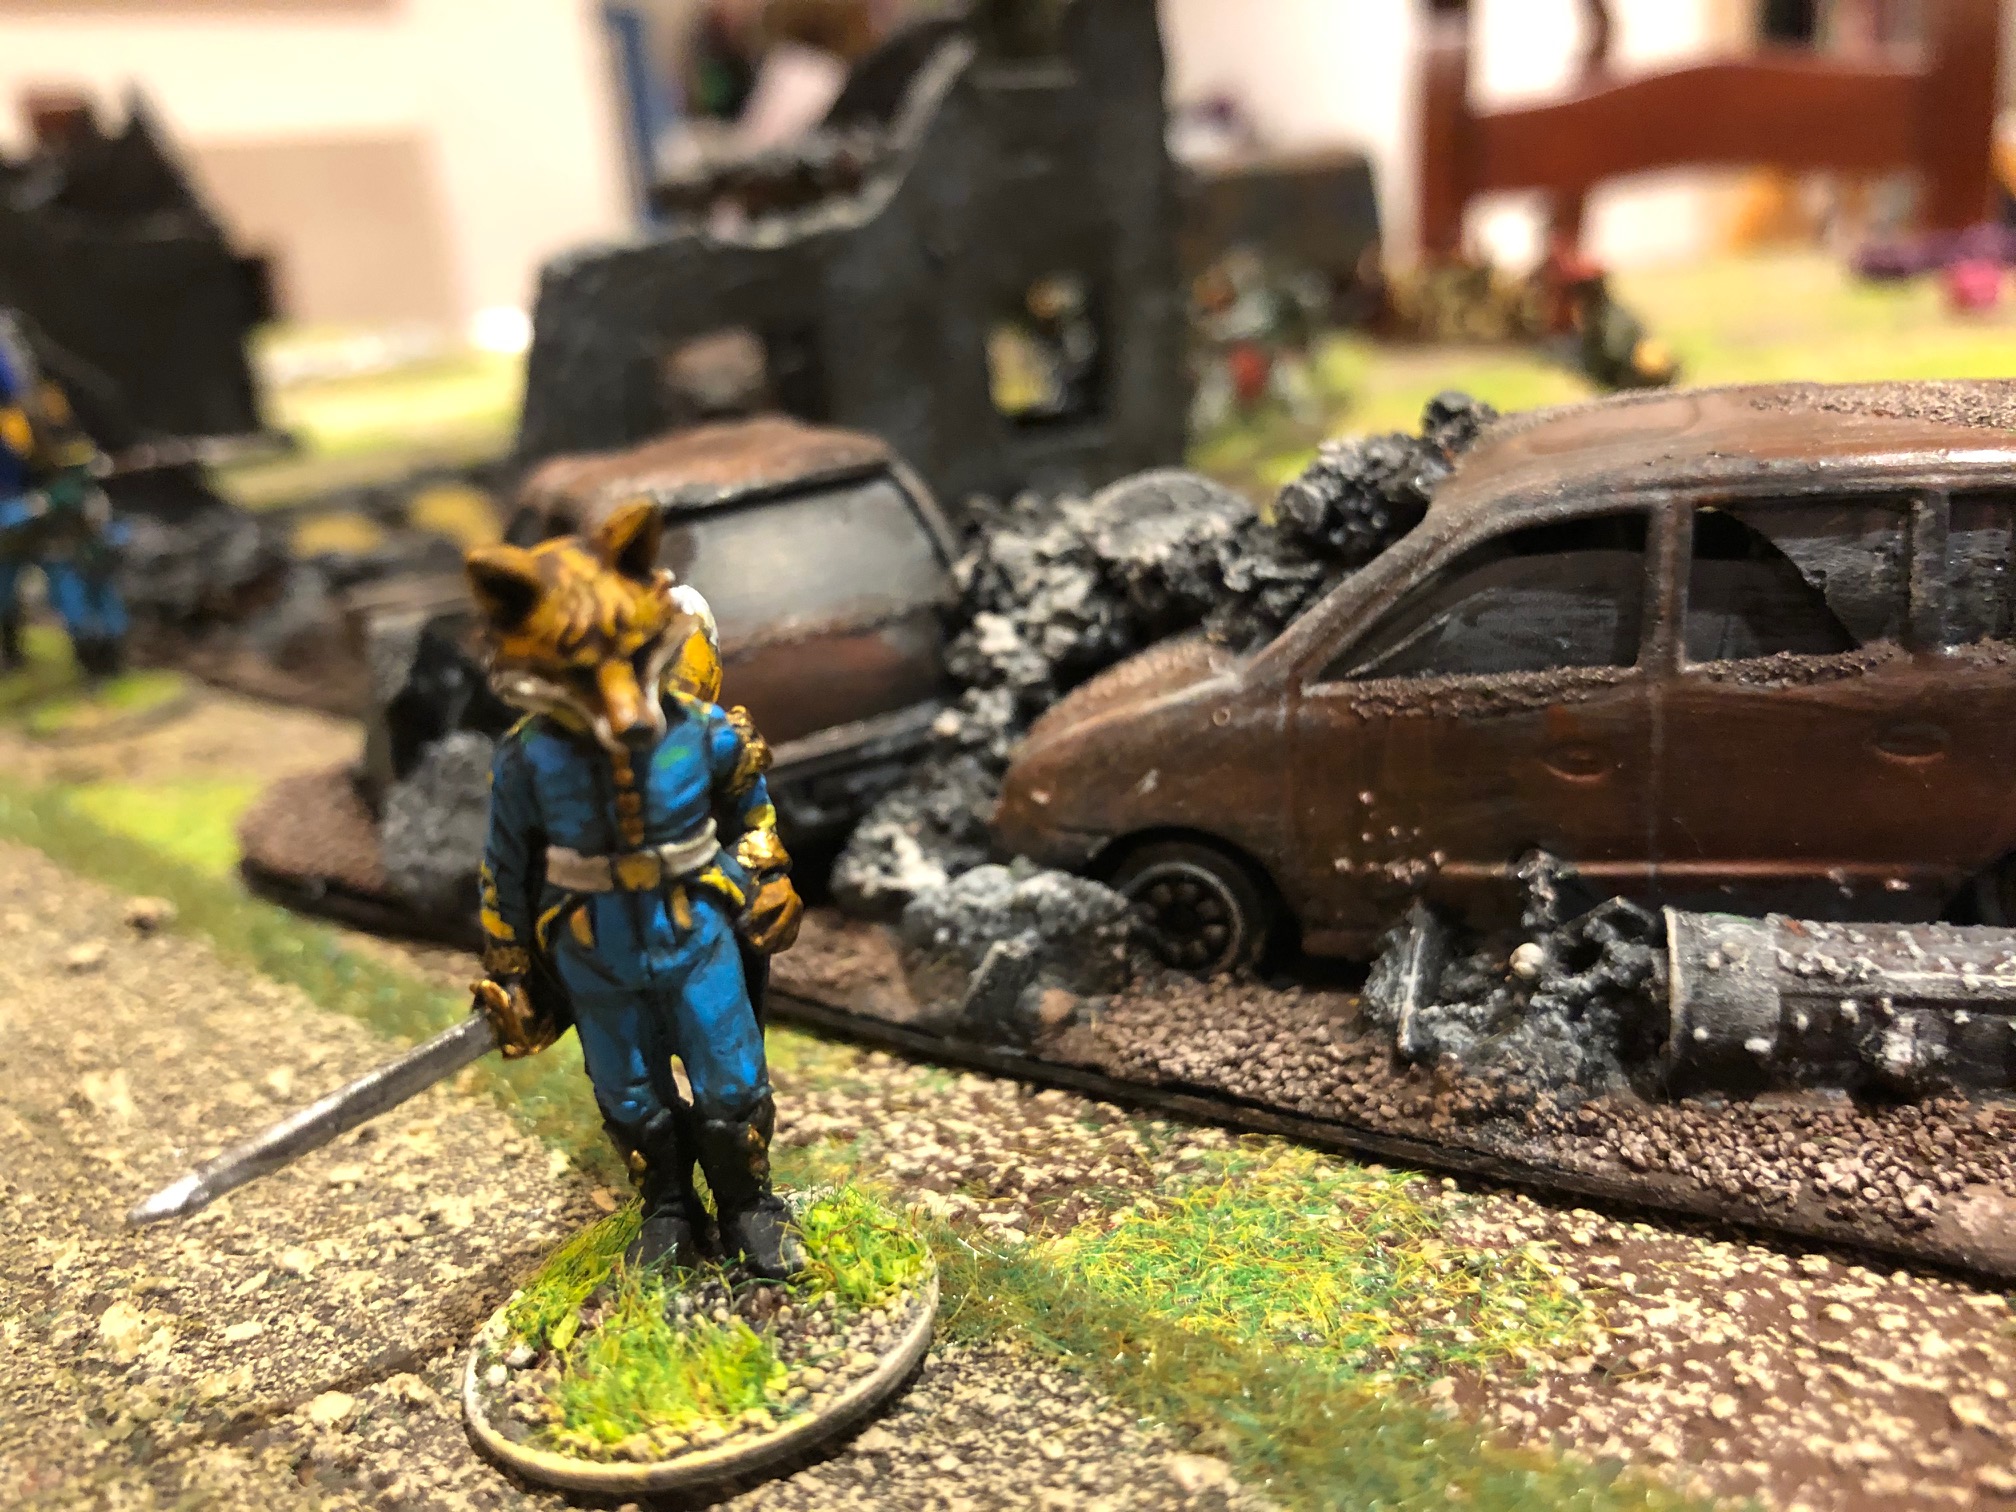
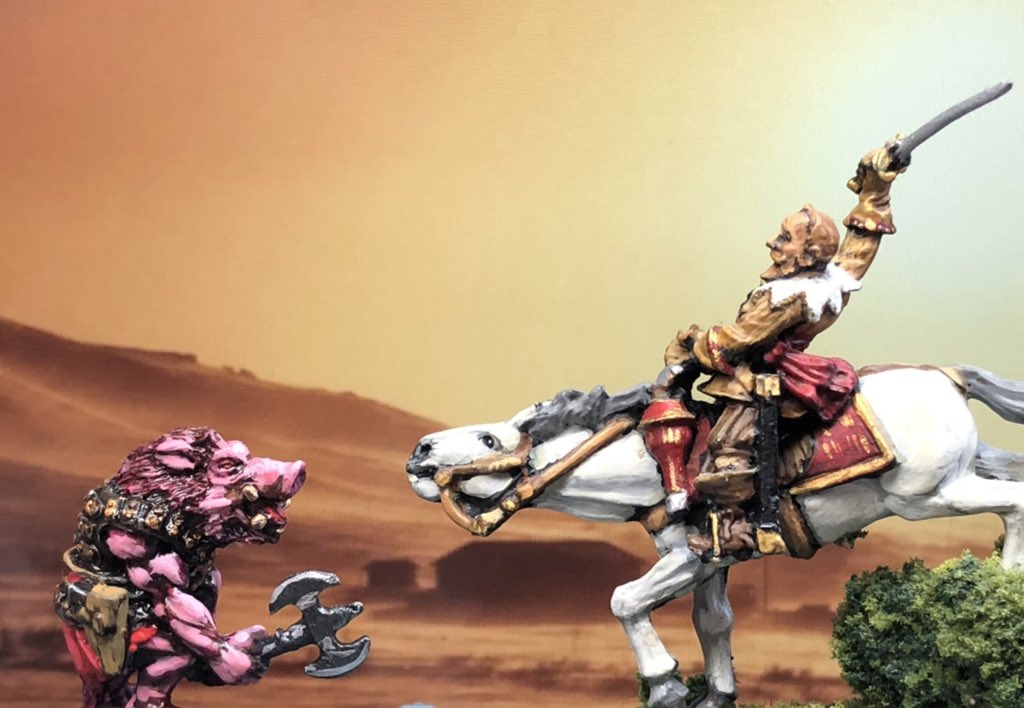
As you know I have a fascination for the Swedish Mutant RPG form 1984 (well for the whole line including the latest amazing Free League Offerings – Mutant Year 0 and Mutant Hindenburg). One of the key elements are the mutated Animals that populate the world as a result of experimentation to find resistant creatures to the world after the catastrophe – a virus infested world hiding away in enclaves then nuking each other to Kingdom come. But never mind, the resulting world is a Post apocalyptic Skandinavia populated by “pure” humans, mutants (both human and animals) and robots, etc.
These Animals are mostly anthropomorphic, in other worlds they are like humans in terms of walking on there back legs and having hands that can grip items like weapons but with the features on an animal. There are a lot of these models if you look around but not all fits in a wider setting mixing in with humans from other ranges etc (e.g. being too cartoony – is that a word?).
Sometimes there are models perfect with no modifications required, sometimes some headswaps are required. There are some fantastic ones to be found from Sally 4th (here).
Anyway here are a few from my current collection.
Anyway all in all a little bit insane, but both the Little One and I really enjoy it.
Now, back to Fenris Games who are currently on their second day of their Wyrdworld kickstarter.
Consisting of Anthromorphic Animals that will fit directly into the Mutant world and of course any Fantasy setting. If you want to take them a step further you could easily kitbash them and add the odd Traffic Sign shield (perhaps with a Moose on it), or a holster or a high tech weapons from one of those many sprues you have lying around, or a musket slung over the shoulder to add that Skandinavia Post Apocalyptic look to it all. The pictures shows two examples of this.
Lagertha from Bad Squiddo Games a Dark Ages Shield Maiden turned Post Apocalyptic by adding a traffic sign shield.Addng a holster to a fantasy chap!
The Kickstarter was funded within 24 hours and is running for another 9 days when I am writing this. Go and check it out, there are a number of different levels that you can pledge at should you wish to.
By the way here is the link to the Kickstarter (and HERE)