For me terrain is really important for a full on wargames experience and I rather play with average miniatures on a decent wargames table with immersive terrain than with top notch Golden Demon winning miniatures on a piece of felt with flat terrain features – but your Glorantha may vary.
Good friend Alex who runs the fantastic Youtube channel Storm of Steel wargaming with reviews of wargame rules, playthroughs, historical overviews, paint and chats has started an initiative on twitter #Terraintober which consist on doing terrain and post it October (for those who did not see what the did there).
You can find out more about his channel here. It is well worth a look, here is one of his many videos.
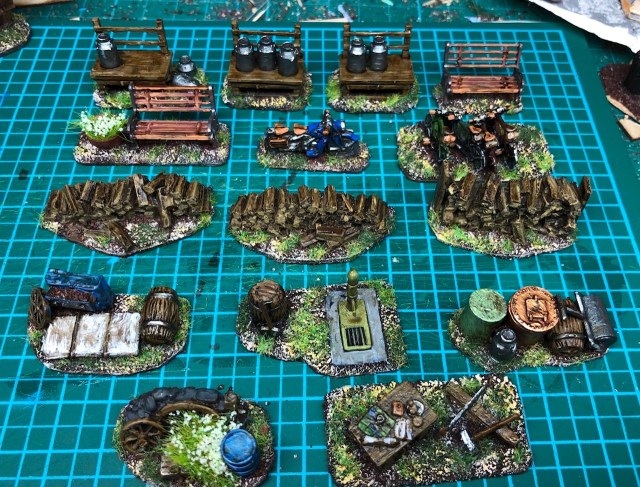
I recently decided to do some more clutter for my WW2 15mm wargaming project set in Sweden (yes long story and of course a what-if) and I wanted to take the opportunity to add some more clutter to the table. This is like the stuff you can see in the picture above. Look at the lonely barrel and the bicycle, immediately adding some immersion to the game. There are of course many other examples of this and I daily see fantastic stuff being presented by wargamers all over the world including the Too Fat Lardies, Adam Bengtsson (we game 15mm like it is 28mm mate!), Joe Bilton, Ken the Eccentric Man, Mark Morin, Adam Preston, Des Darkin, John Emmet, Gareth Lane, Alan Sheward, Dan Hodgson and all my mates from the Saturday Painting club just to randomly but with some bias mention a fair few.
These pieces of clutter more than often do not really add anything to the actual game (but sometimes could turn an area into rough going and/or break line of sight), but enhancing the experience of playing it. I call these immersion markers and I will be showing a piece of clutter every day during October and do a little blog post about it. The idea is simple projects ideally from scratch using accessible and cheap material (where I have used some commercial products like models as part of the clutter, you could easily in most cases leave these out, you do not need pigs in the pigsty, perhaps they have been taken away or are hidden by the farmer as war is raging in the land, or maybe they are inside the den having a nap). The actual pieces will vary in terms of complexity from dead easy to easy.
Below some of the clutter I have done before for the project, including more commercially available products as opposed to scratch builds.
This is the current plan, every number a date in October (as I did the various entries I have put in links here to the posts).
- Pigsty – this post
- Root cellar
- Log piles
- Pile of Planks
- Dog Kennel
- Cellar Entrance
- Composter
- Small Pond
- Planter
- Wheelbarrow
- Well
- Hunting Tower
- Road Signs
- Washing Line
- Some Boxes
- Outhouse
- Swedish Hayrack
- Haywagon
- Play house and a See-saw
- Scarecrow
- Charcoal Burner
- Bee Hives
- Chicken Coop
- Mile Stone
- May Pole
- Bushes
- Charcoal Burner’s Hut
- Big Stones
- Tree Stumps
- The Belfry
- The finale!
As stated before nothing I will be doing is particularly original or difficult to do and I hope it will have some use and give some kind of inspiration to do some immersion markers yourself. I will try to discuss how I did each piece but it is really mostly about splicing some coffee stirrers, eyeballing it and Rock and Roll a One modelling. Some items will be more specific to the theatre I am aiming for, a rural Sweden in 1943, but I think you will find most items useful as generic clutter anywhere with a few modifications. If there is something available to buy that I have found that is doing the same job I will include it in the posting, not everyone loves the idea of splitting matchstick logs and coffee stirrer planking.
If you are into 28mm, I guess you just need to double everything, well if I do give any measurements, the best way of modelling is to grab one or your miniatures and measure from there, for how high a door or a a fence needs to be to look right. For other scales you should be well versed with compromises and not needing much handholding, good luck from someone who used to do 6mm (well I still do, just waiting for the release of the new 6mm Great Northern War range from Baccus).
There is another catch and that is the total cost of the 30 items will be constrained at a maximum of £30 , but with a few exceptions not counting towards the cost (the item below I assume being a basic set of items you would have anyway).
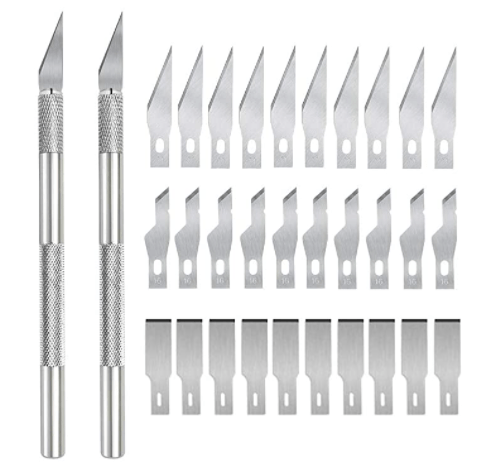
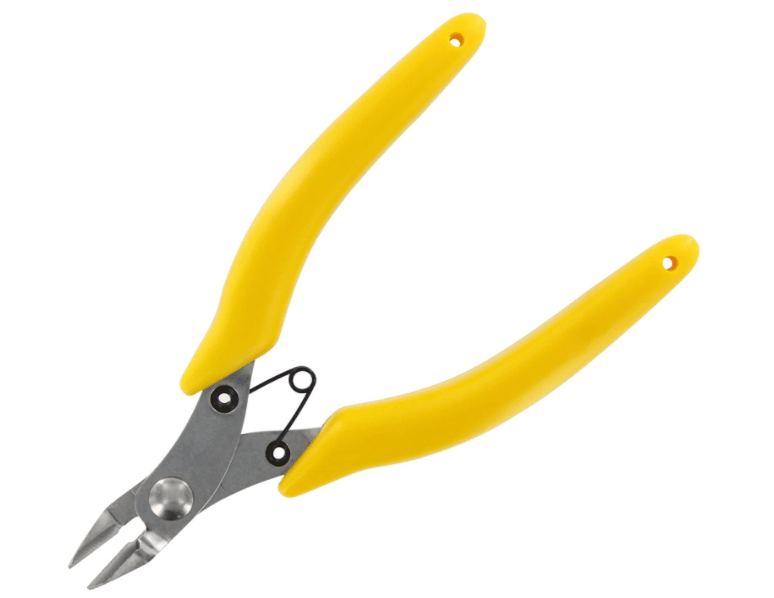
- Tools – I use a side cutter and an exacto/precision knife for all my projects, these are the types I am using. It could be worth to have a good supply of spare blades, I tend to have two running at the same time – Sharp’s Peril and Blunt trauma. Please use the tools carefully.
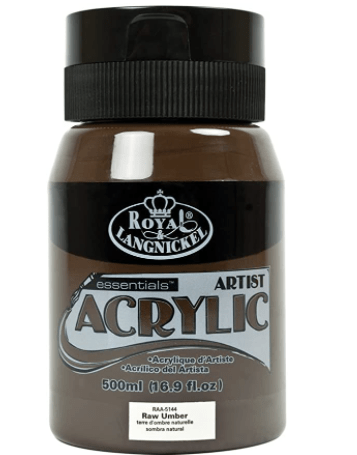
- Paints and brushes, this includes varnishes and some gloss we use for some of the projects. I tend to use a shit brown (as this come in 50 shades, it can sometimes be referred to differently with names like Chocolate Brown or Burnt Umber) as a base colour for my terrain pieces. This is the one I have been using the last few years.
- Scatter material (grass, flocks, sand or a whatever you use to base your figures with). I tend to use a base set of two static grass for all my miniatures stuff (a light and a dark one). This means it all kind of fits together.
- Superglue, I am a big fan of superglue (be careful though, with handling it and also having adequ) – I find that the gel version works (high viscosity) best rather than the runny one (general type of low viscosity superglue). I have found Everbuild’s Industrial Strenght Glue particulary useful but of course there are others. Did I say be careful?
- PVA glue, for the more civilized modeller and with more time up their a**e. Joke aside I have spent half of my life applying PVA glue to things and sprinkled sand on it. I buy it in large containers from DIY shops.
- Bases, you can use MDF bases, or self adhesive vinyl tiles or whatever else you are using, I have cut away the cover side of DVD cases sometimes or used old CDs/DVDs. I will use self adhesive tiles for a number of projects therefore I have included a pack in the cost below.
- Cardboard, Cereal packs are good and have a fine side and a rough side that you can take advantage off.
- Some items mentioned specifically for each project.
I bought the following at the start of the project
- Coffee stirrers (300 No. in wood) – £4.29
- A pack of bamboo skewers (a handful) – £1.99
- Self adhesive vinyl tiles – £4.95
So that is total of £11.23 at the starting block.
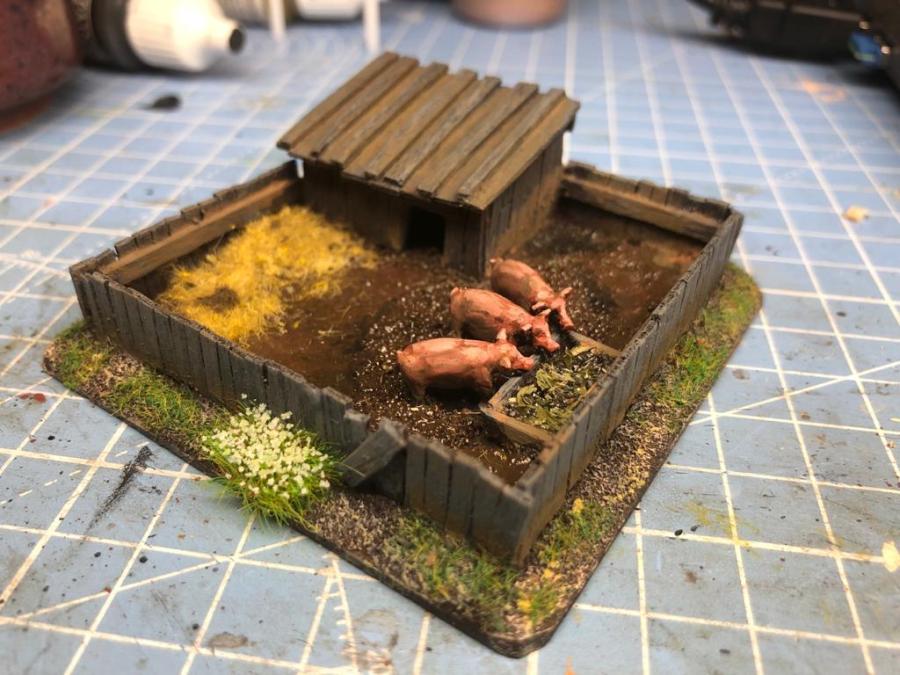
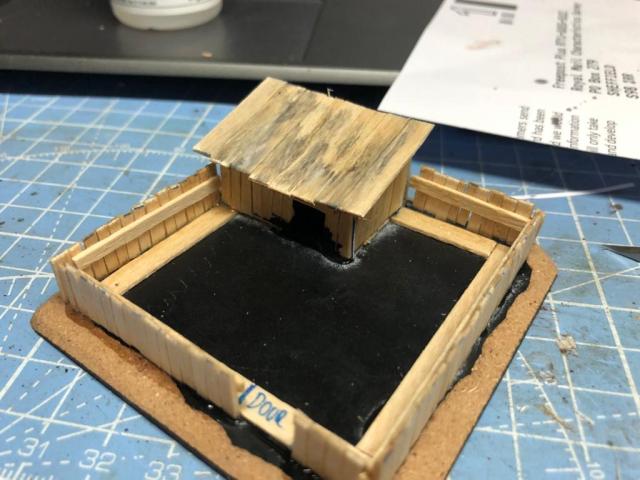
Pig Sty
On the farm where my father grew up they had many pigs but he told me about a special one he called Alfred. He had named it after the famous Swedish inventor and business man Alfred Nobel who invented Dynamite and of course of the Nobel Price fame. I asked Dad if it was a smart pig, “No way son, but he could fart as loud as a fire cracker.
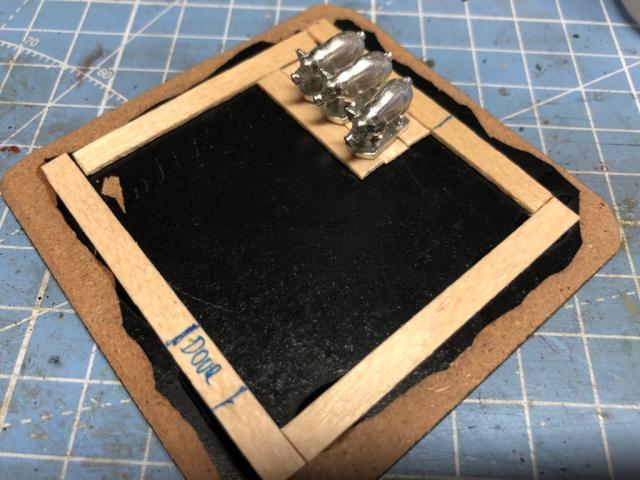
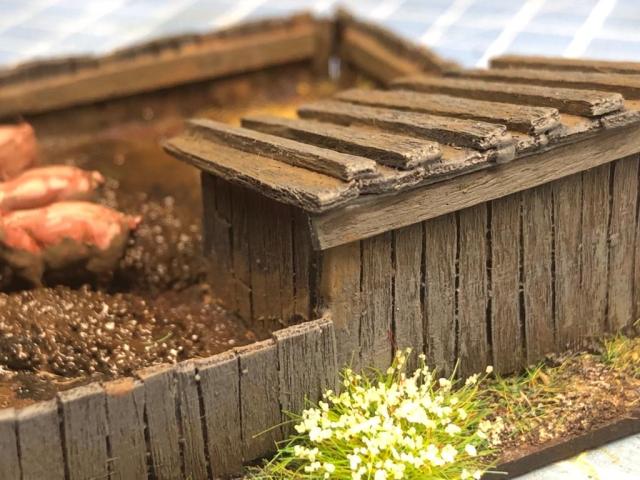
Anyway today we want to do Pig Sty to add that little bit of flair to your farm setting, you could buy these in 15mm (and other scale pig stys from various places), like these.

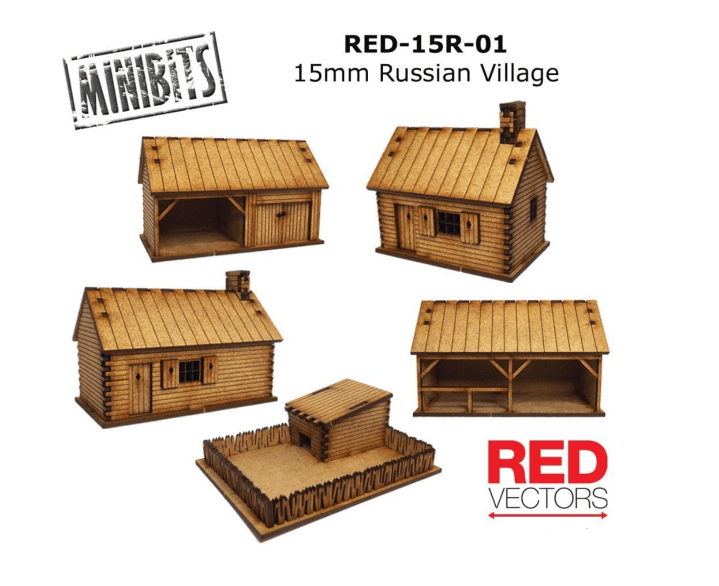
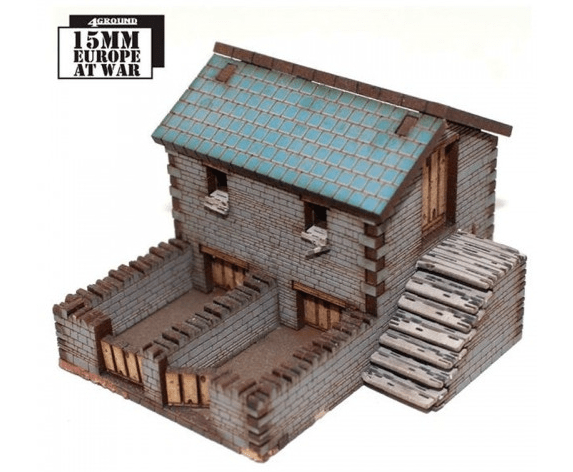
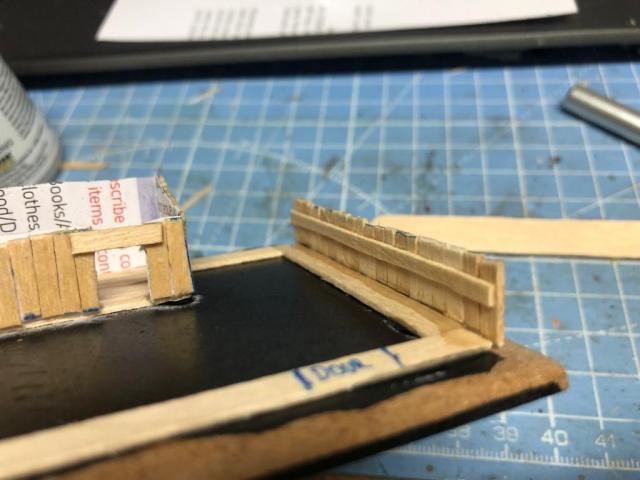
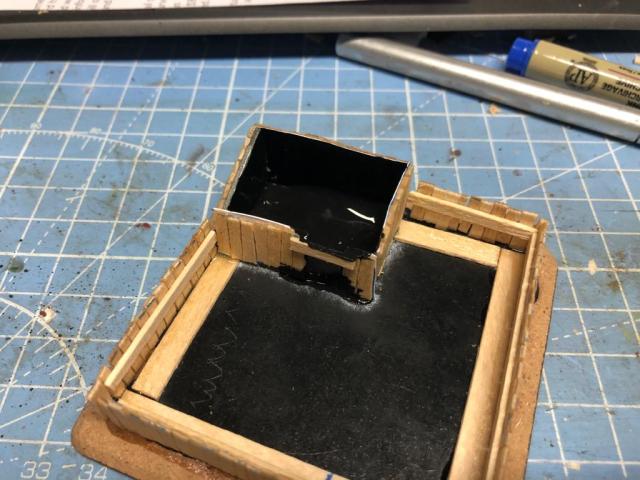
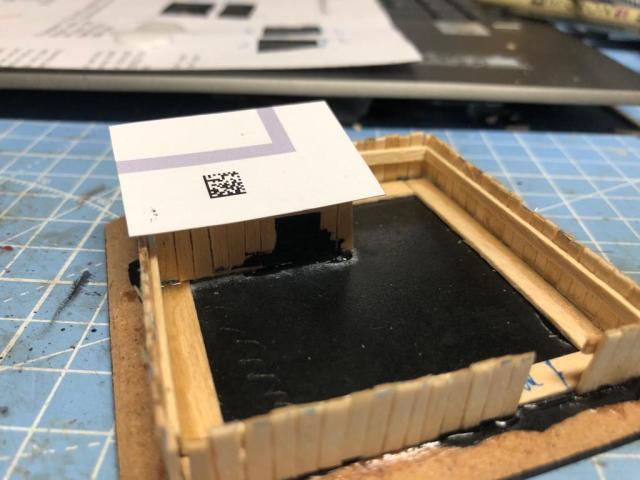
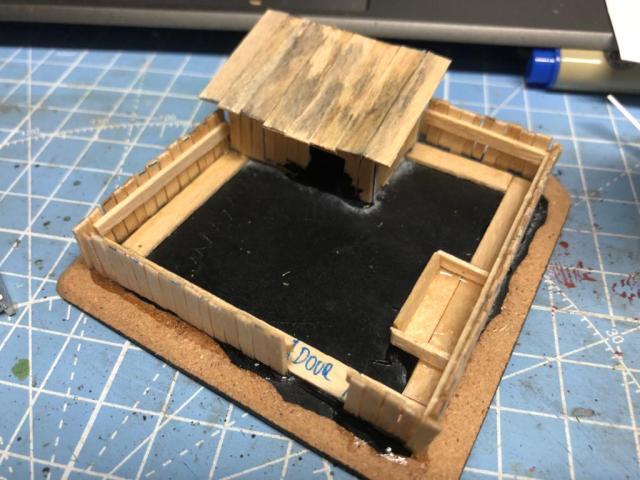
All are perfect for the job, the first two fits the “standard” pig den and sty model for the wargames table, a small fenced square base, with a fence and a building with a forward sloping roof. The 4Ground model was not really what I was looking for with regards to the Swedish 1943 table.
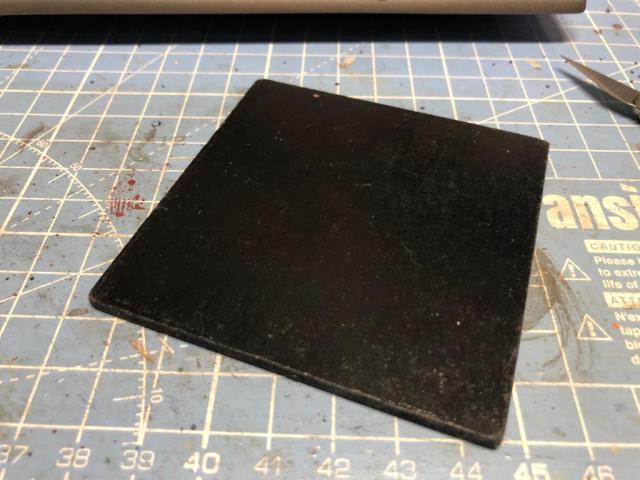
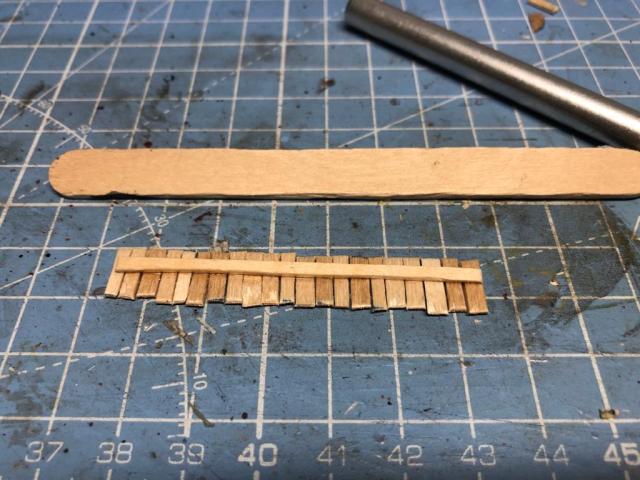
However, I am on a budget here, with a pile of coffee stirrers rotting in the back yard, so I better get my tools out and crack on with it.

Here is how I did it
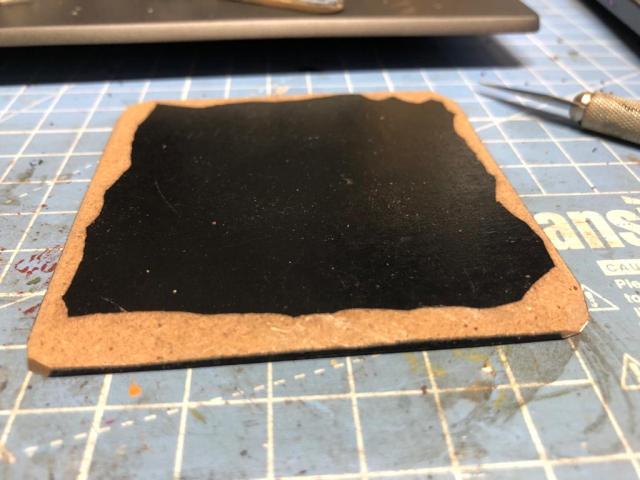
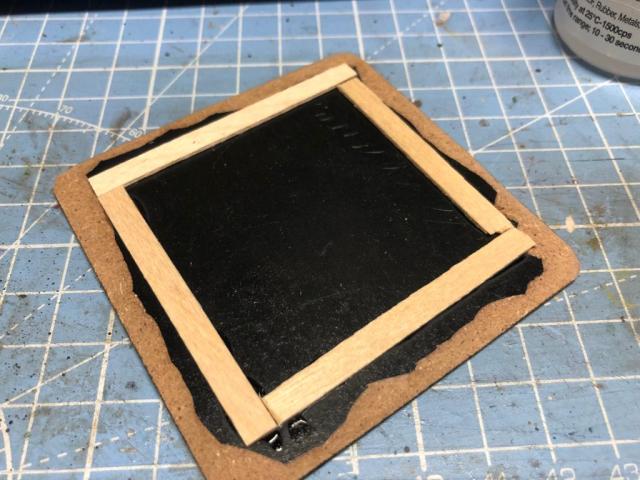
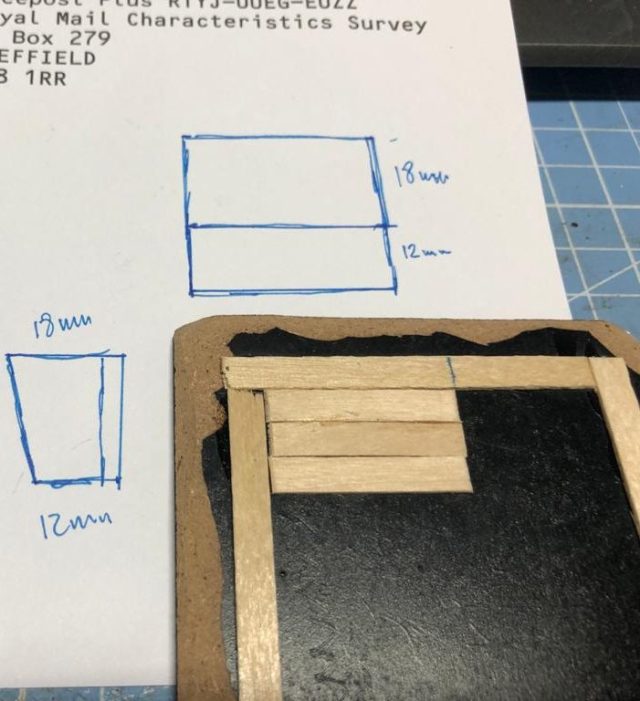
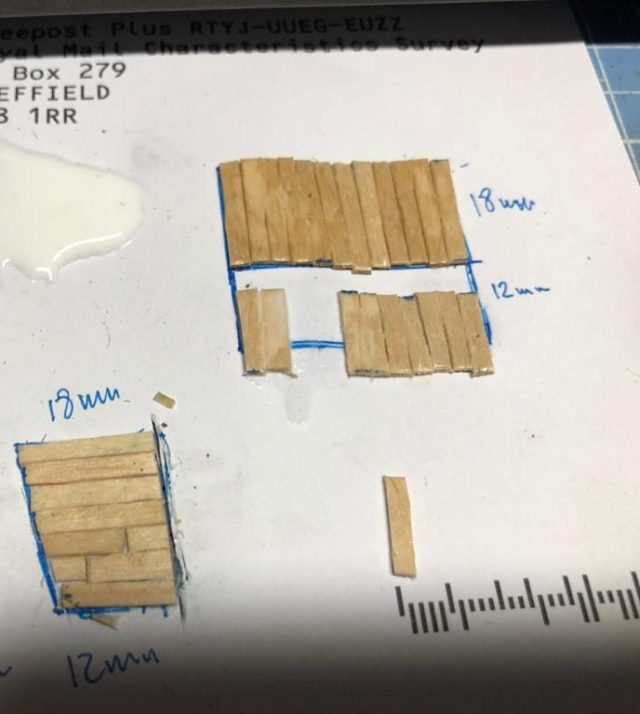
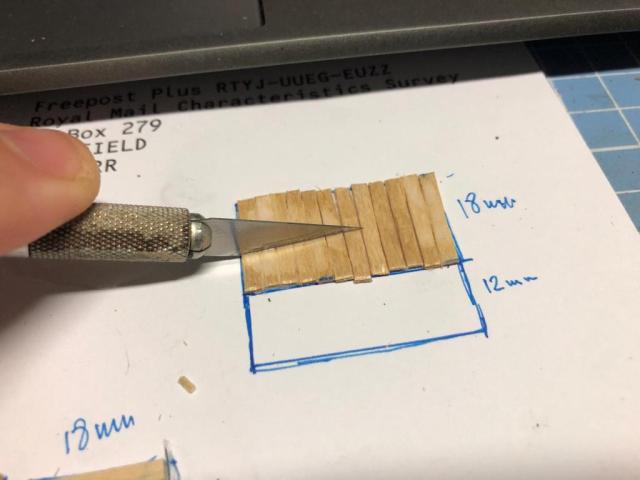
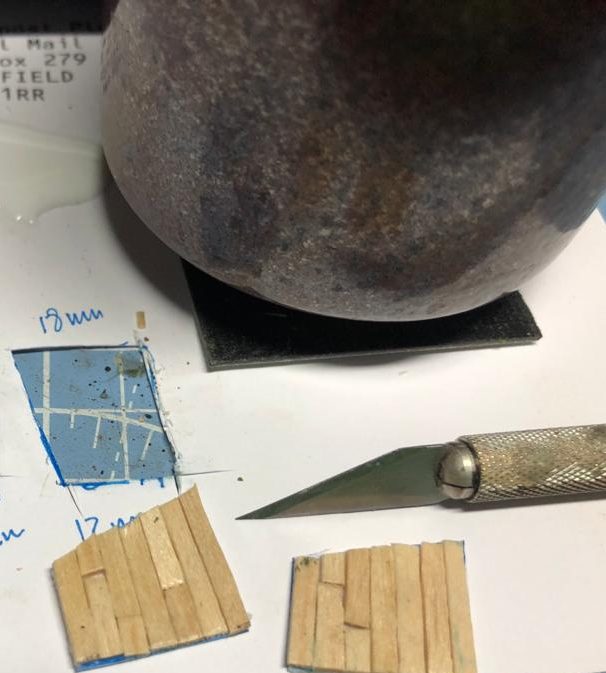
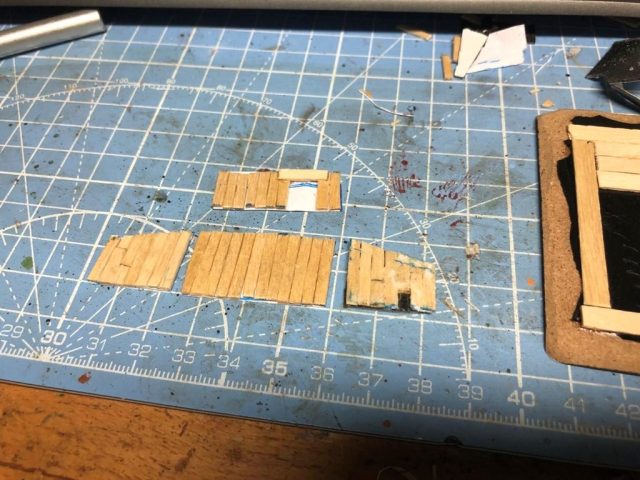
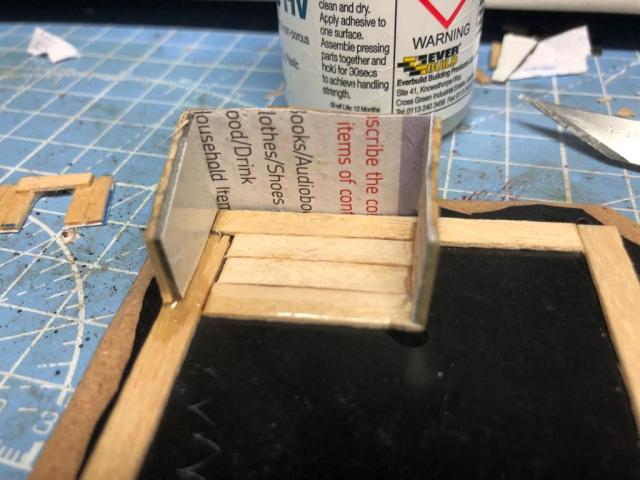
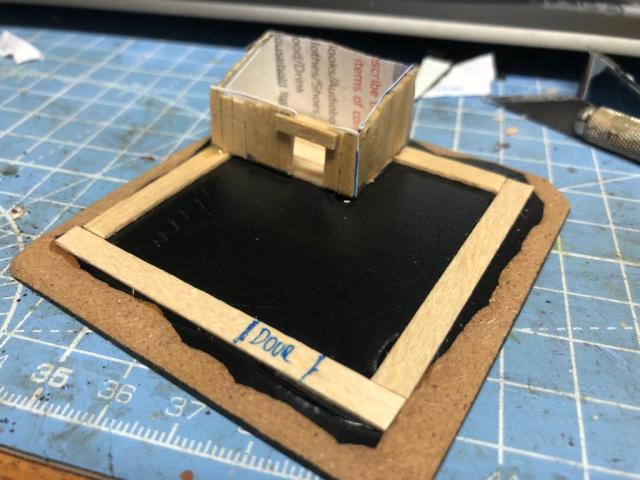
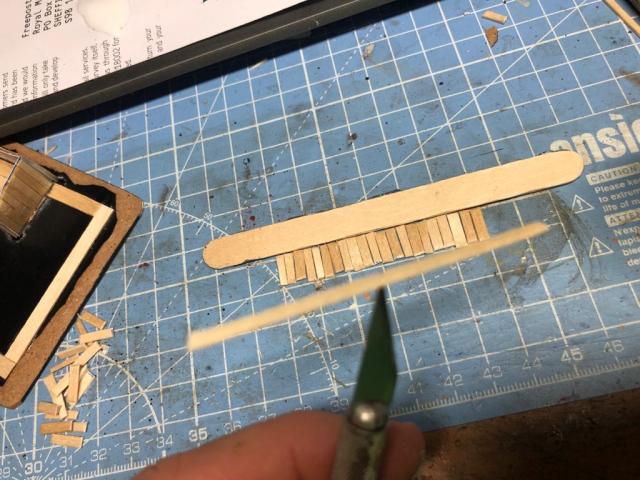
Measure up the sides and use 10mm tall pieces (again having cut the coffee stirer in half lengthwise). Cut a peice as long as the fence side and add some superglue to it (I do this whilst it being held by the knife).

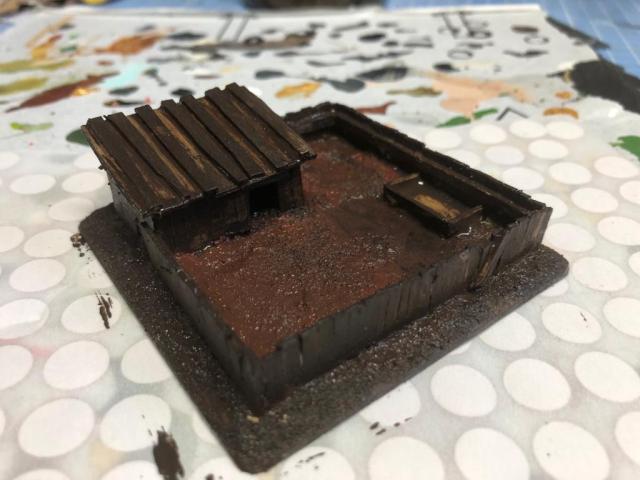
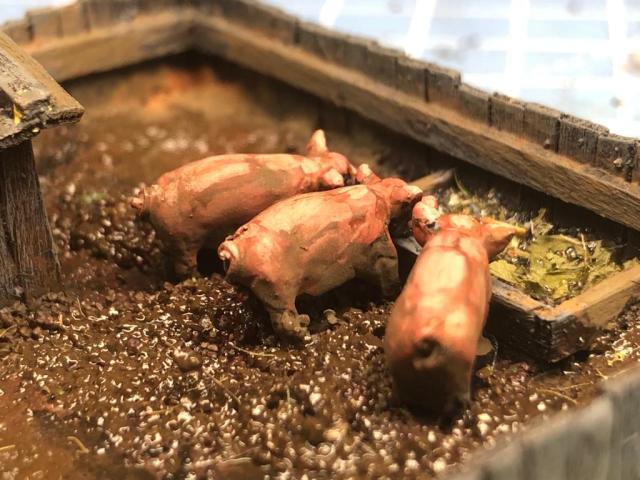
So we were at £11.23, the only additional item not part of the standard pack or the items bought are the pigs. You could of course, as said before, do it without them but to me they really need to for part of this to leave no doubt what it is. So Pigs can be bought from many places in 15mm, e.g. like Peter Pig (no pun intended), Pendraken and Museum miniatures. I used some pigs from Peter Pig and I think a full pack of 8 pigs cost about £3.70. So I suppose we need to add that to the overall cost giving us a total of £14.93 (this gives us a few more pigs to make a few of these at a later date, or painting them and basing them up to be scattered around).
In other news I have really enjoyed the Gods Own Scale podcast covering the upcoming rule set by Mark Backhouse, “Strength and Honour”,
It will be interesting to see how this gets picked up as the time to do the 2mm models will be quick in terms of painting them and getting armies ready. I have seen some of the offerings from various manufacturers and it really looks smashing with the big block of troops. But more on that some other time.
/ I hope that was of some interest, you can follow this adventure by joining on twitter, facebook or sign up here. Thanks for stopping by.
Inspiration for tomorrow’s project – the Root Cellar

Pingback: Re-Clutter your Life (#Terraintober Immersion marker Project) Part 2 – The Root Cellar – Roll a One – Wargaming Blog
That’s brilliant, Per! 🙂 I’ll look forward to following this, although I’m burnt out as far as scenery modelling goes after sticking with Dave Stone’s Season of Scenery challenge! I think I have a resin pig sty somewhere that needs painting so I’ll have to dig it out!
LikeLiked by 2 people
Thanks for that John, not sure I will sustain this to the end but will try my best. Take care a John and good luck with the Sty.
LikeLiked by 2 people
A brilliant bit of terrain. You are right – things like that really make a table.
Cheers,
Pete.
LikeLiked by 2 people
Pingback: Re-Clutter your Life (#Terraintober Immersion marker Project) Part 3 – Log Piles – Roll a One – Wargaming Blog
Pingback: Re-Clutter your Life (#Terraintober Immersion marker Project) Part 4 – A Pile of Planks – Roll a One – Wargaming Blog
Pingback: Re-Clutter your Life (#Terraintober Immersion marker Project) Part 5 – A Dog Kennel – Roll a One – Wargaming Blog
Pingback: Re-Clutter your Life (#Terraintober Immersion marker Project) Part 6 – A Cellar Entrance – Roll a One – Wargaming Blog
Pingback: Re-Clutter your Life (#Terraintober Immersion marker Project) Part 7 – A Composter – Roll a One – Wargaming Blog
One suggestion for a future article would be scratch building gärdesgård. I know yours was 3d printed, but most people probably don’t have access to a printer yet.
LikeLiked by 1 person
Pingback: Re-Clutter your Life (#Terraintober Immersion marker Project) Part 8 – A Small Pond – Roll a One – Wargaming Blog
Pingback: Re-Clutter your Life (#Terraintober Immersion marker Project) Part 9 – A Planter – Roll a One – Wargaming Blog
Pingback: Re-Clutter your Life (#Terraintober Immersion marker Project) Part 10 – A Wheelbarrow – Roll a One – Wargaming Blog
Pingback: Re-Clutter your Life (#Terraintober Immersion marker Project) Part 11 – A Well – Roll a One – Wargaming Blog
Pingback: Re-Clutter your Life (#Terraintober Immersion marker Project) Part 12 – A moose hunting tower – Roll a One – Wargaming Blog
Pingback: Re-Clutter your Life (#Terraintober Immersion marker Project) Part 13 – A Sign – Roll a One – Wargaming Blog
Pingback: Re-Clutter your Life (#Terraintober Immersion marker Project) Part 14 – A Washing Line – Roll a One – Wargaming Blog
Pingback: Re-Clutter your Life (#Terraintober Immersion marker Project) Part 15 – Some Boxes – Roll a One – Wargaming Blog
Pingback: Re-Clutter your Life (#Terraintober Immersion marker Project) Part 16 – Outhouse – Roll a One – Wargaming Blog
Pingback: Re-Clutter your Life (#Terraintober Immersion marker Project) Part 17 – Swedish Hayrack (hässja) – Roll a One – Wargaming Blog
Pingback: Re-Clutter your Life (#Terraintober Immersion marker Project) Part 18 – Haywagon – Roll a One – Wargaming Blog
Pingback: Re-Clutter your Life (#Terraintober Immersion marker Project) Part 19 – A few items for Play – Roll a One – Wargaming Blog
Pingback: Re-Clutter your Life (#Terraintober Immersion marker Project) Part 20 – Scarecrow – Roll a One – Wargaming Blog
Hey Per, thanks for the shout out, I’m honored to be mentioned in that company. And IMO you’re right, the best immersive games have the best boards. I loved the pig sty and the tutorial. Inspired to say the least, and very very realistic. Though I’m glad to look at it and not smell it! I’m looking forward to all your little pieces of magic this month (as you may be aware I’m deep into building my dream garage). Again, love, love, love your approach and most of all your excellent result here.
LikeLiked by 2 people
Thanks Mark.
LikeLiked by 1 person
Pingback: Re-Clutter your Life (#Terraintober Immersion marker Project) Part 21 – Charcoal Burner – Roll a One – Wargaming Blog
Pingback: Re-Clutter your Life (#Terraintober Immersion marker Project) Part 22 – Bee Hives – Roll a One – Wargaming Blog
Pingback: Re-Clutter your Life (#Terraintober Immersion marker Project) Part 23 – Chicken Coop – Roll a One – Wargaming Blog
Pingback: Re-Clutter your Life (#Terraintober Immersion marker Project) Part 24 – Mile stone – Roll a One – Wargaming Blog
Pingback: Re-Clutter your Life (#Terraintober Immersion marker Project) Part 29 – Tree Stumps – Roll a One – Wargaming Blog
Pingback: Re-Clutter your Life (#Terraintober Immersion marker Project) Part 25 – May Pole – Roll a One – Wargaming Blog
Pingback: Re-Clutter your Life (#Terraintober Immersion marker Project) Part 26 – Bushes – Roll a One – Wargaming Blog
Pingback: Re-Clutter your Life (#Terraintober Immersion marker Project) Part 27 – Charcoal Burners Hut – Roll a One – Wargaming Blog
Pingback: Re-Clutter your Life (#Terraintober Immersion marker Project) Part 28 – Big Stones – Roll a One – Wargaming Blog
Pingback: Re-Clutter your Life (#Terraintober Immersion marker Project) Part 30 – Belfry – Roll a One – Wargaming Blog
Pingback: Re-Clutter your Life (#Terraintober Immersion marker Project) Part 31 – Summary of it all. – Roll a One – Wargaming Blog