This Part 4 of a series of a fair few posts, Part 1 (link here) gives an overview and the philosophy applied to the series – cheap, simple and fun.
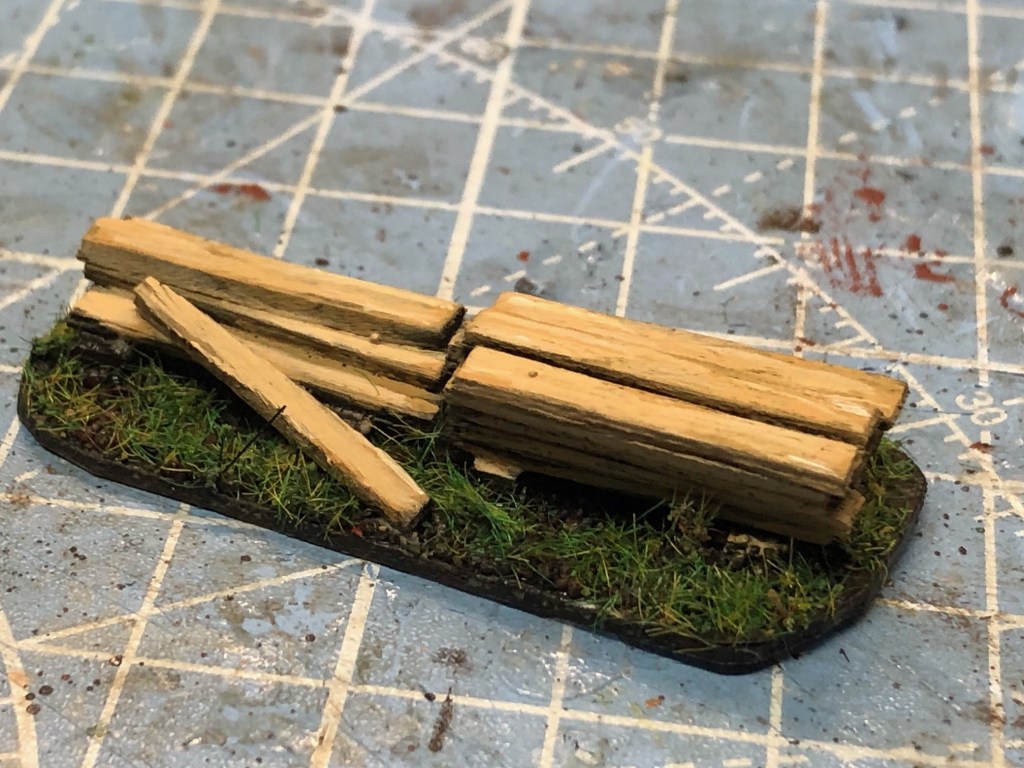
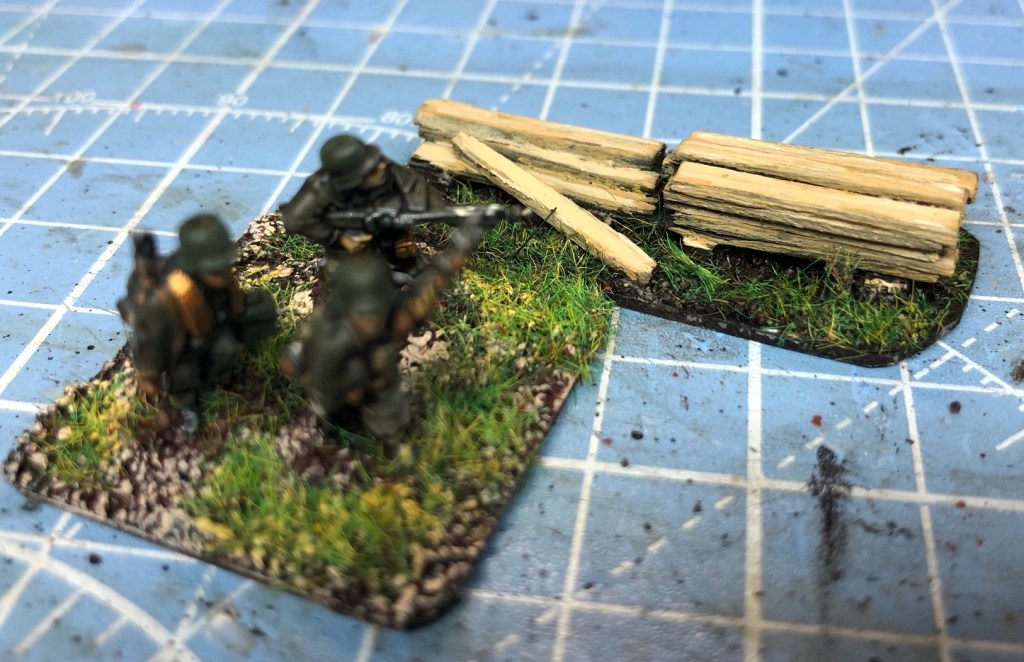
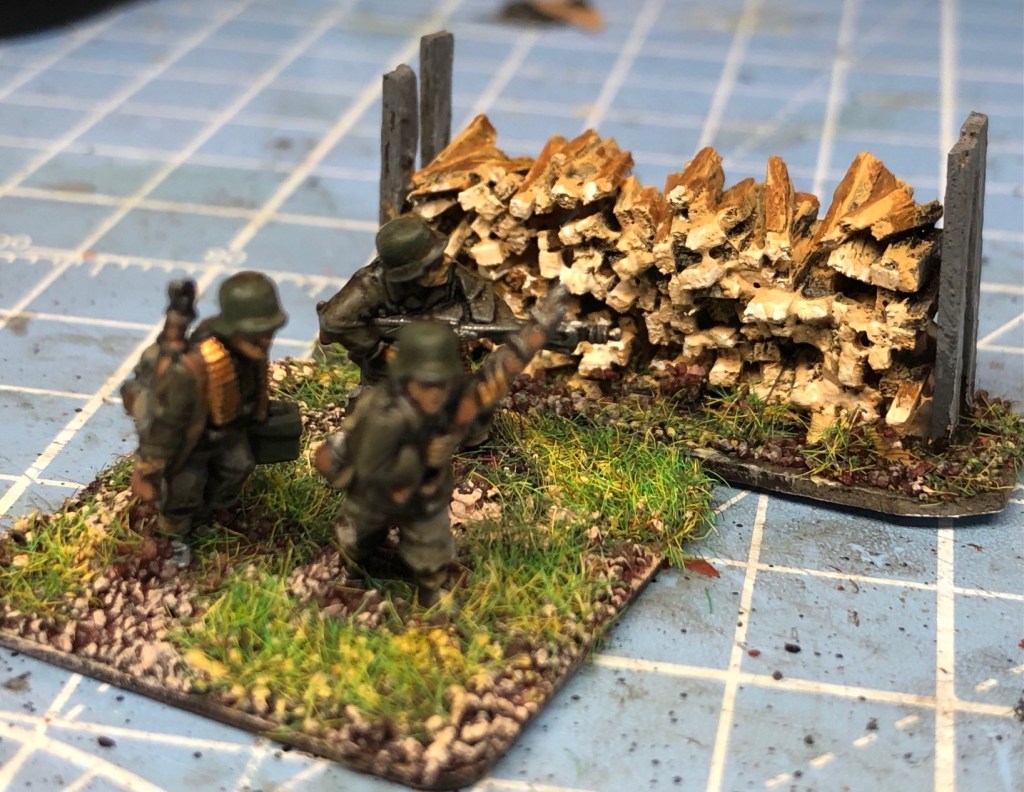
Pile of Planks
My cousin and I borrowed some planks from Dad’s pile one day and took them to the steep slope between the two parts of the garden, the Garden was on two levels and we arranged two or perhaps three 8 feet planks in a way that we could use them as a slide.
We thought it was a great idea and I had the first go. The planks were very rough and that first go became the only go as I ended up with severe splinters in the part normally in contact with the slide. It hurt and Mum was not very impressed but a good laugh in retrospect – I suppose it reinforced the idea that you should let guests have a go first, or something like that.
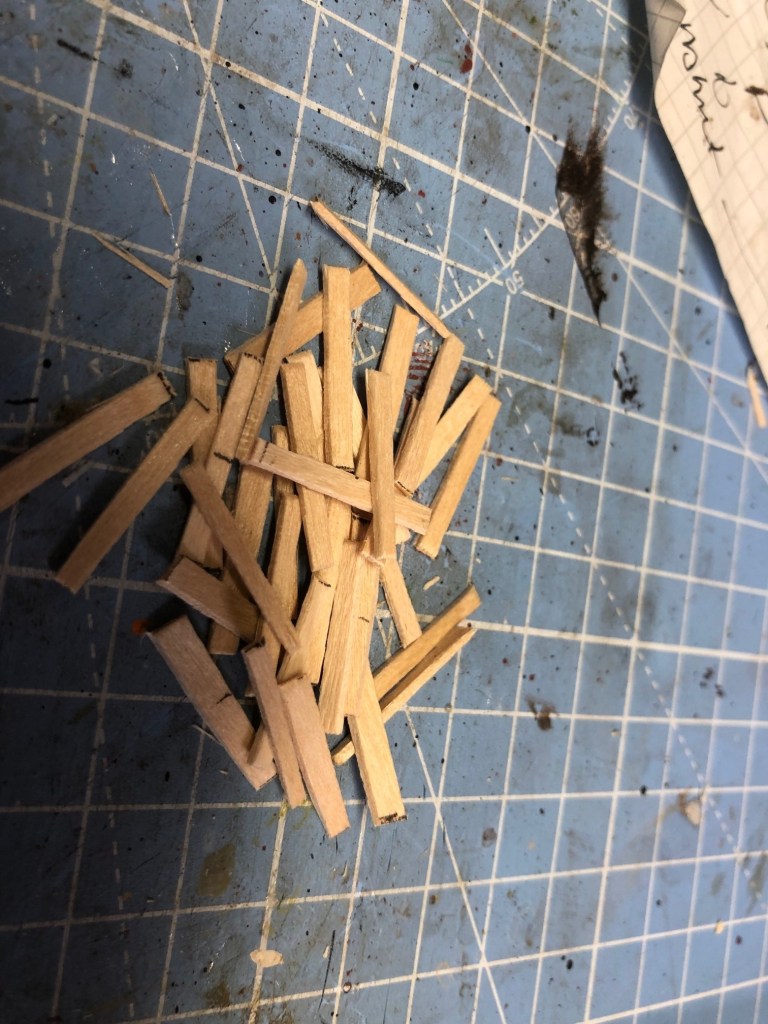
So following on Part 3 The Log Pile, we are now doing another really easy piece of clutter, this time some planks. Perhaps some repairs are being planned of the house or the barn and a pile of planks have been made somewhere on the table.
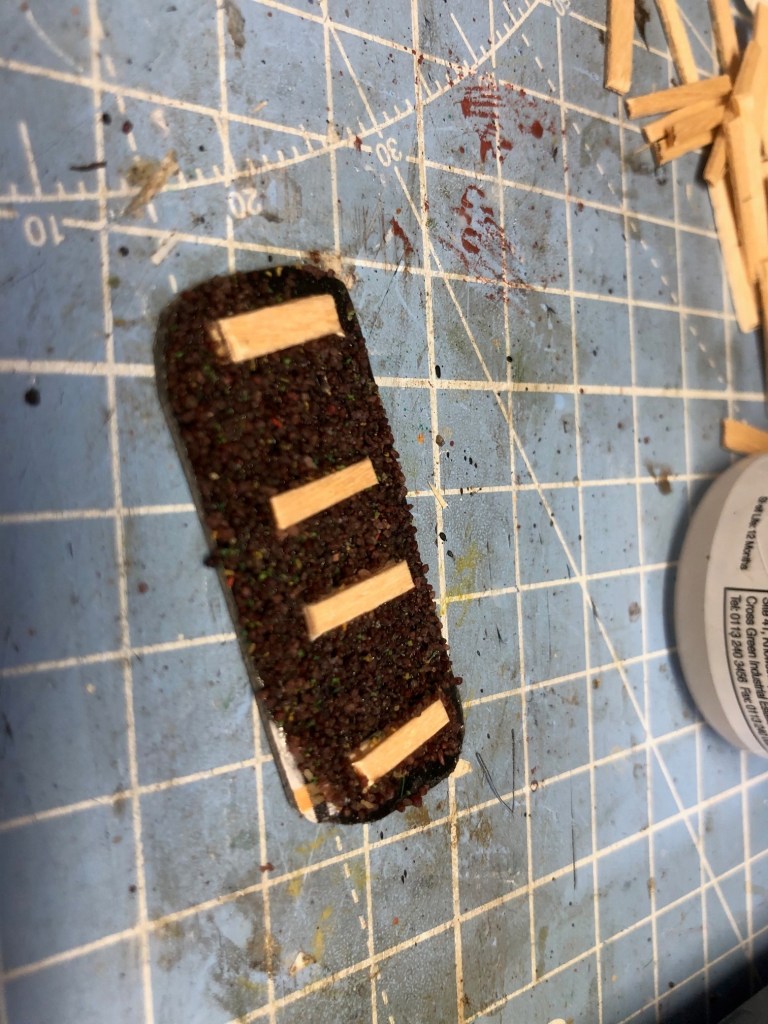
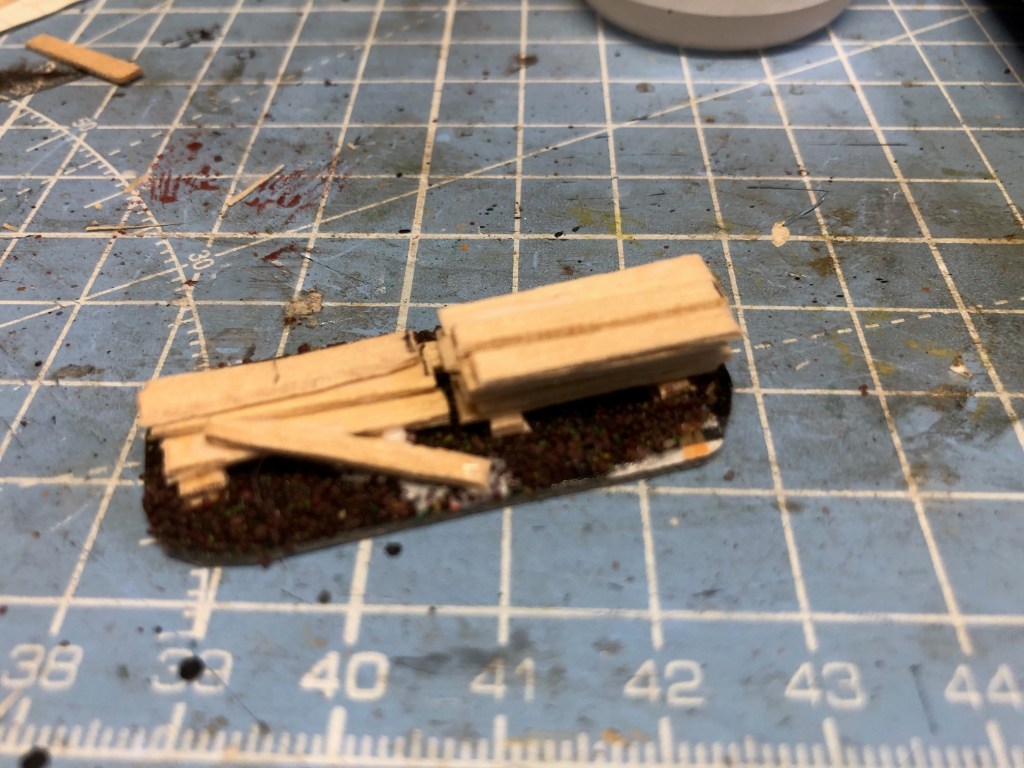
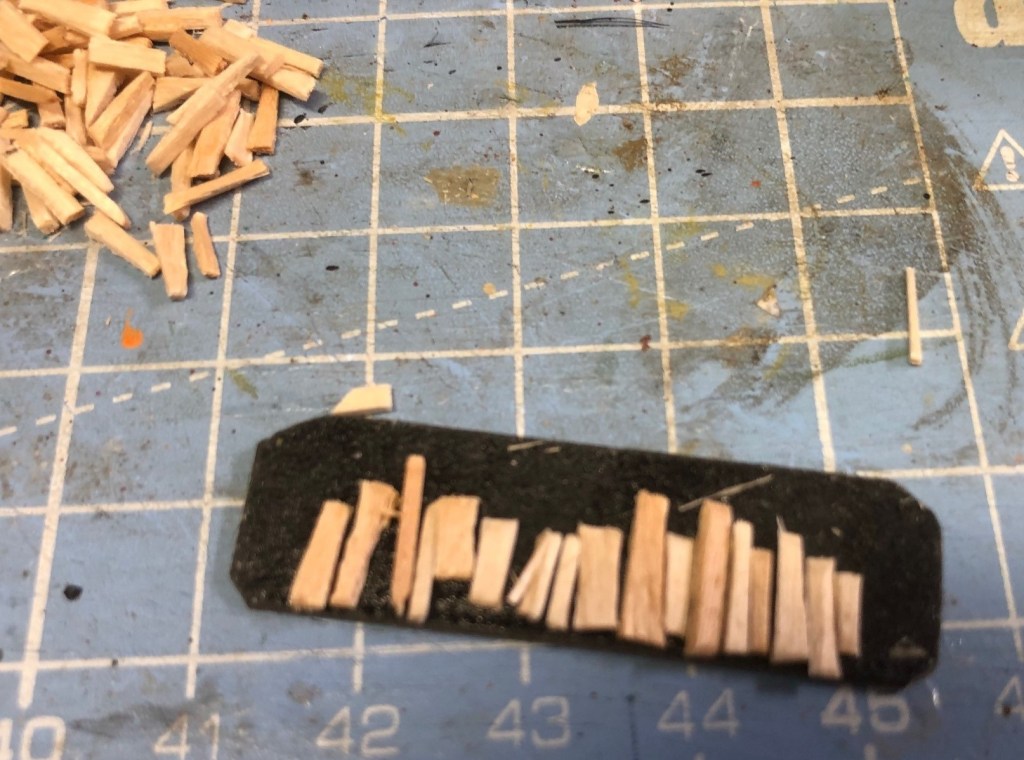
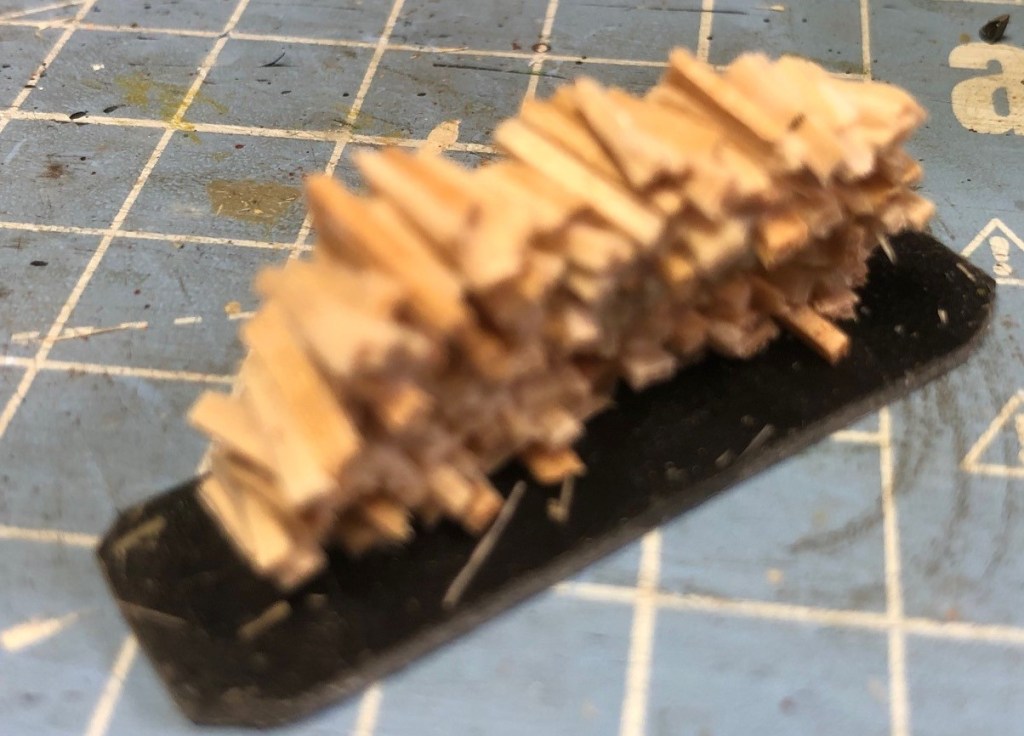
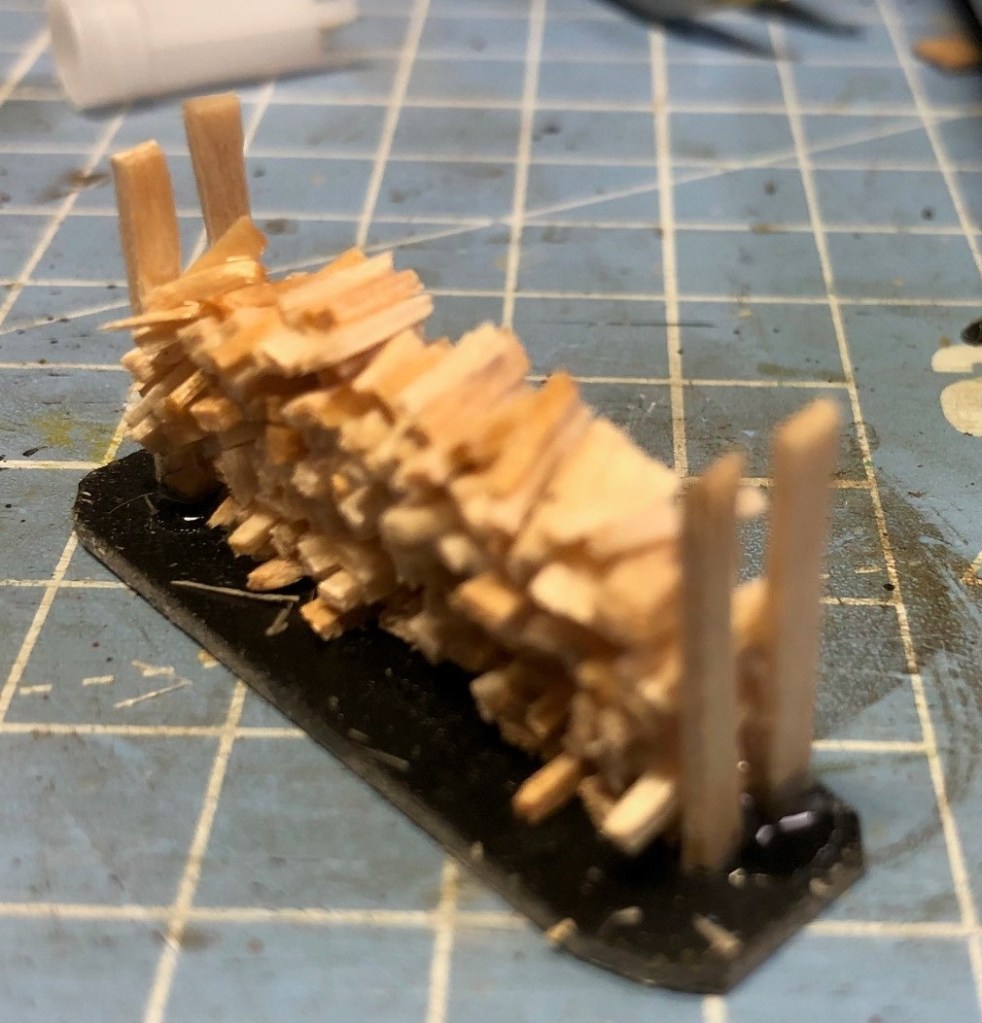
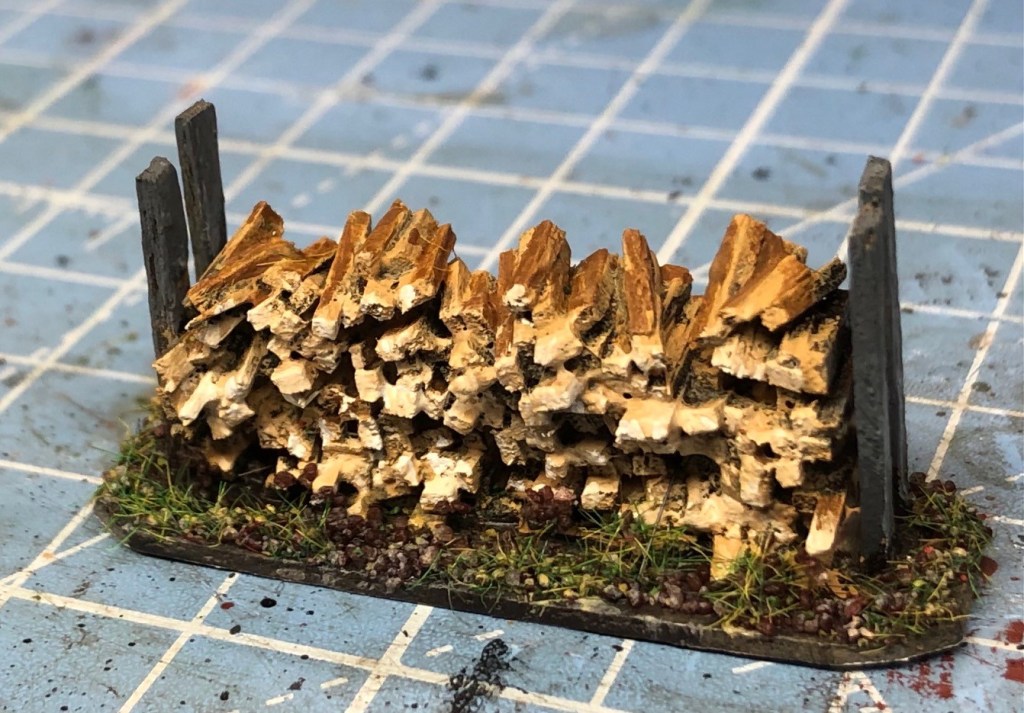
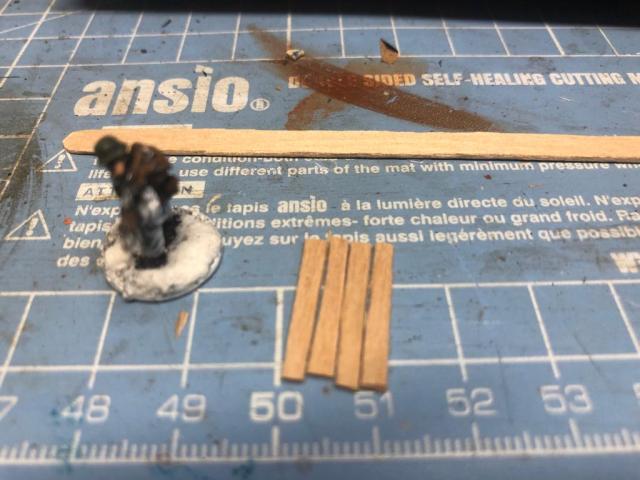
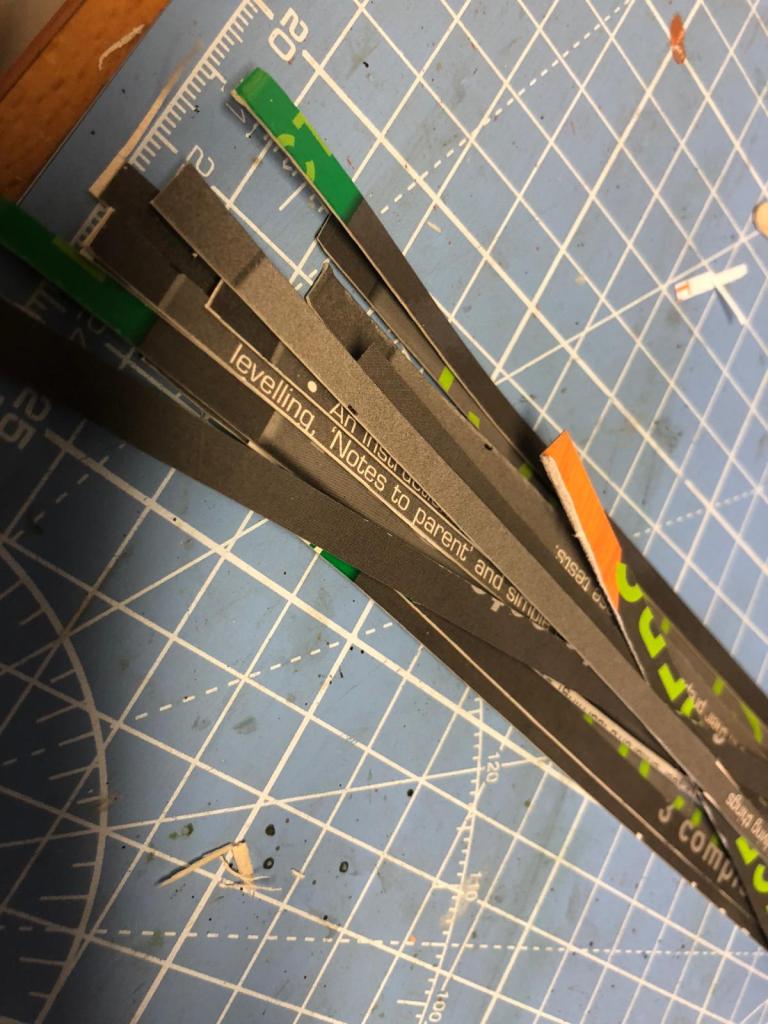
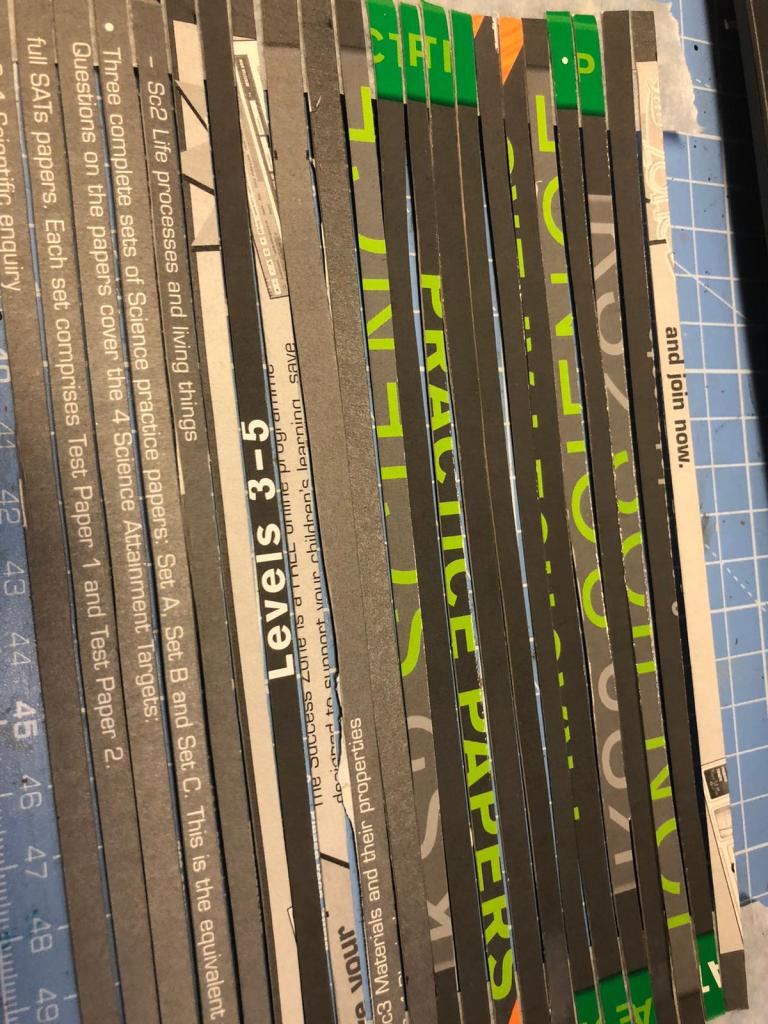
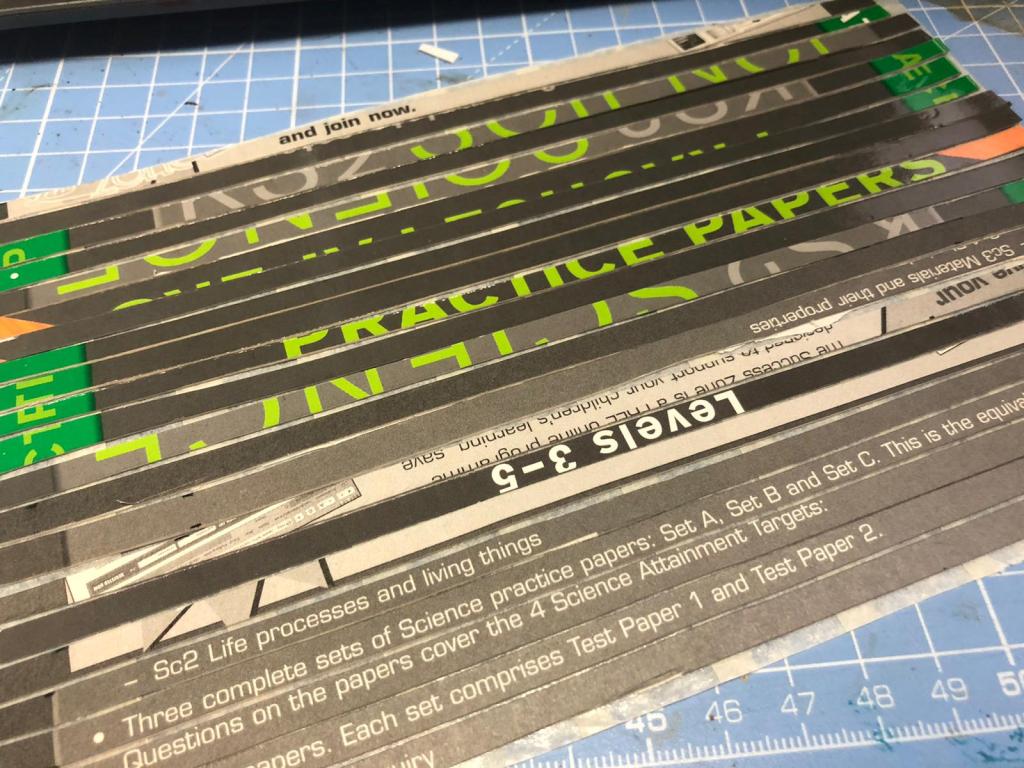
Cut Coffee stirrers lengthwise in the middle and then cut them in 20mm lengths, this gives about 2m long planks in 15mm.Just get a base and do some shorter planks as a foundationGlue them on top of each other, you can make a perfect pile, I prefer it to be a little bit wonky and plank having fallen off. More drama.I painted it up to look like fresh planks
And that budget, well we were at £14.93 yesterday and did not really spend any additional resources on this than those allowed or already bought. So we are still at £14.93.
Tomorrow we are making a dog Kennel, see you then.
This Part 3 of a series of a fair few posts, Part 1 (link here) gives an overview and the philosophy applied to the series – cheap, simple and fun.
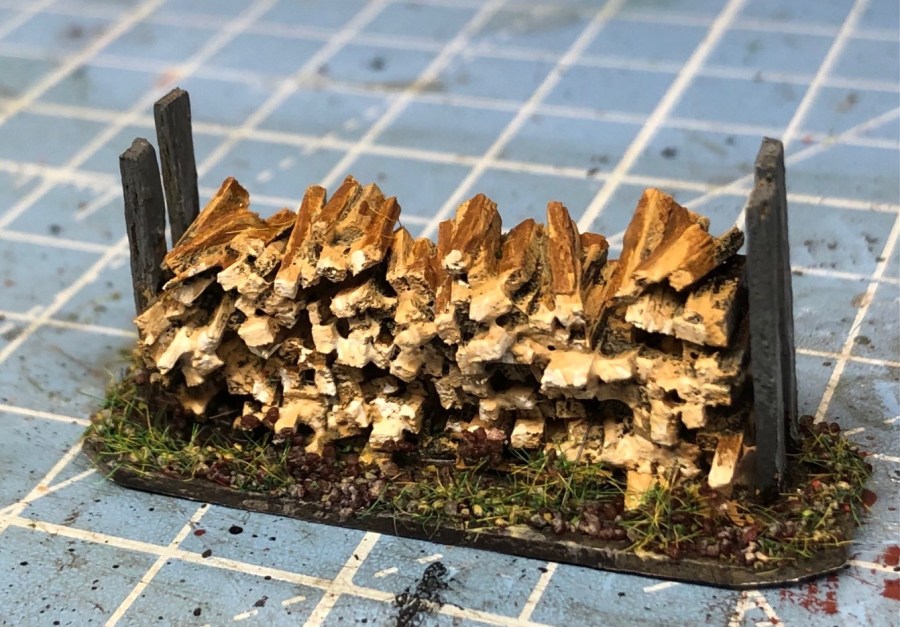
Log Piles
I found this old picture of my Dad from the end of the seventies. The Log pile was from a birch that he hated on the plot and he certainly looks happy to have taken it down and made some fire wood of it. He took great delight in chucking each log into the open fire piece by piece during the winter months, “Here another piece of you Mr Birch goes into the eternal fire!”
So after some more involved pieces in the pig sty and the Root Cellar, today we have a very simple but good addition to your clutter, the Log Pile.
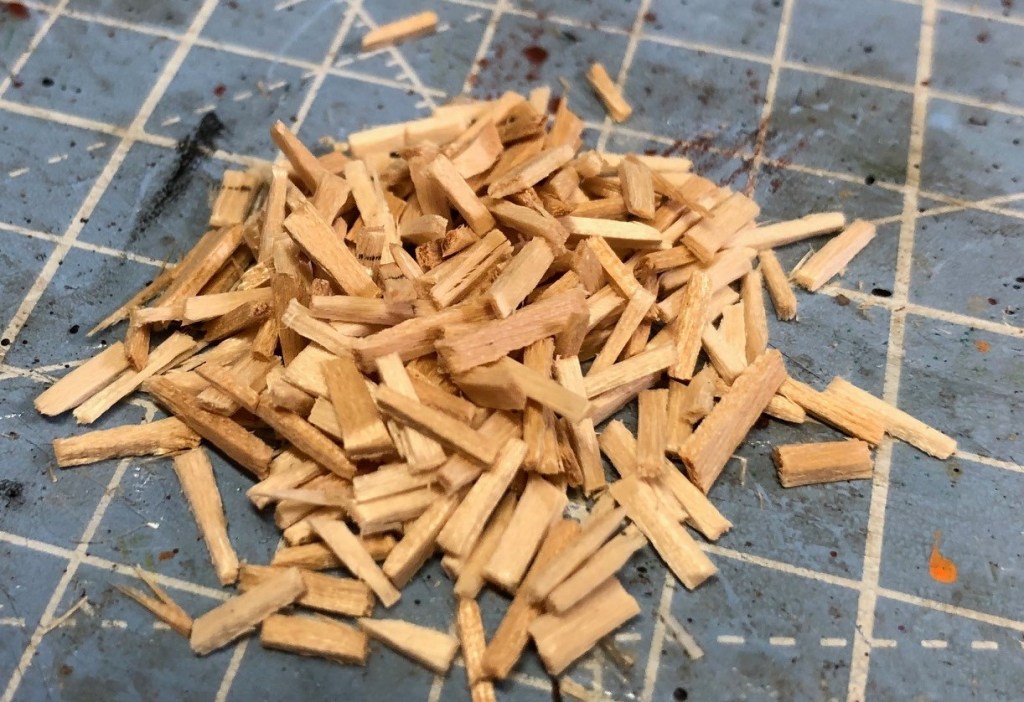
First I cut up some coffee stirers lengthwise in three parts, uniformity is not required so just do it roughly, cut them in (for 15mm scale in 3 to 6mm lengths, again roughly)
Then take or cut a base, this one is about 40mm or so, start with a bottom row and add PVA or Superglue as you add layer on layer. I recommend PVA and to take some time on this one. Note that I have the back of the base flat, this can then be put along the wall on a building.Build up the pileAdd some coffee stirrers on the side fill up the gaps, wood pile done. Ready for paiting.Painting wise I wanted the side woods to be old and the pile somewhat fresher, tried to give the look of being relatively newly cut. Ok not as nice as Dads pile but I think good enough, a very easy but pleasing project.
You could of course build a more elaborate structure around it like adding a roof.
With some 15mm soldiers next to it.
And that budget, well we were at £14.93 yesterday and did not really spend any additional resources on this than those allowed or already bought. So we are still at £14.93.
Tomorrow we are making another simple one – a pile of planks.
This Part 2 of a series of a fair few posts, Part 1 (link here) gives an overview and the philosophy applied to the series – cheap, simple and fun.
The Root Cellar
Today we are looking at a common feature in the Swedish, and other, landscapes of old and still being used in many places- the root cellar. This, like the pigsty yesterday, will be brilliant in my rural games.
A root cellar (American English) or earth cellar (British English) is a structure, usually underground or partially underground, used for storage of vegetables, fruits, nuts or other foods. Its name reflects the traditional focus on root crops stored in an underground cellar, which is still often true. A wide variety of foods can be stored for weeks to months, depending on the crop and conditions. The structure may not always be underground. (from Wikipedia, more here)
I remember at my cousins family place there was a root cellar just a little bit away from the main house, behind some bushes. It served as a command post during the fighting against the evil empire when we were rebels on the jungle planet Zargosa, or something similar, and also provided cover whilst we were fighting each others with our peashooters (have not seen anyone playing with one of those for a very long time).
So there are many versions of these and I browsed on the net and wanted to make something similar to this one.
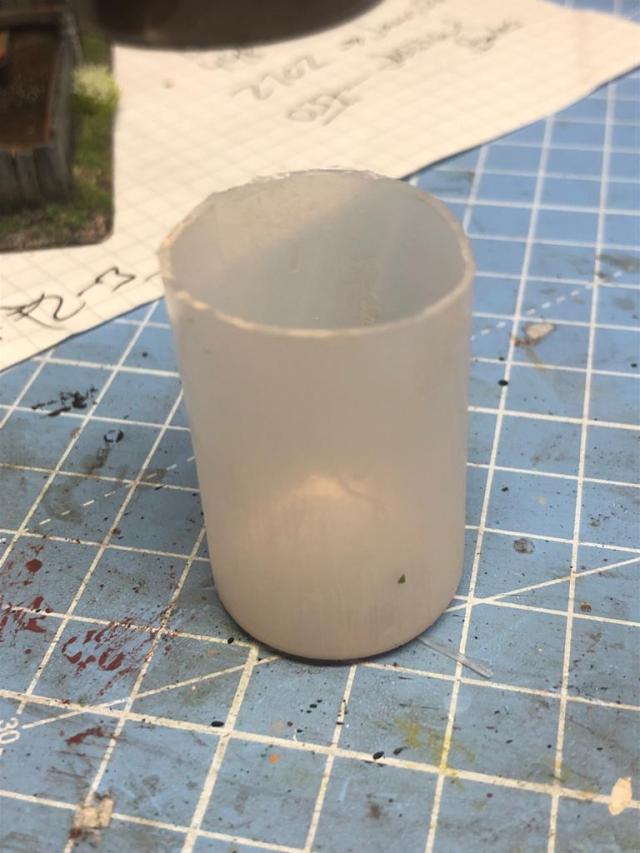
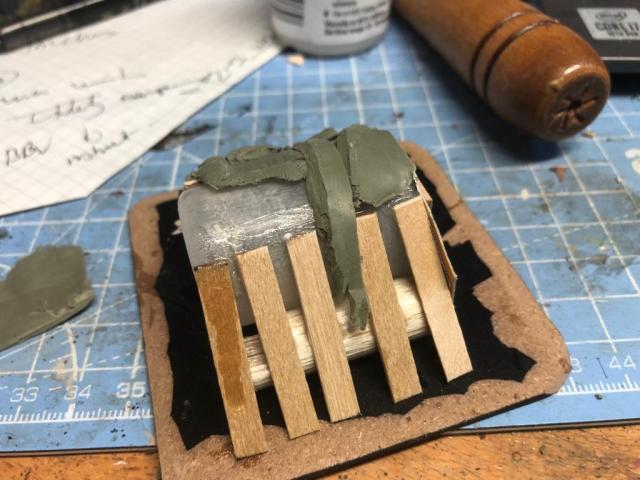
To do this project you need a cylinder of some kind, I used an old paint bottle (Vallejo type) that works brilliant at the scale I am working at 15mm (for 28mm you might want to consider using one of those new 33cl longer soda cans), some modelling clay apart from the standards stuff we discussed in Part 1.
Anyway a high level discussion on how I went about this project.
I had this old bottle that was just full of very tired paint (it has a 25mm diameter or an inch if you prefer). More or less similar to a Vallejo Paint bottle.
I cleaned it and cut of the top bit
Then I got a 75m by 75mm base that I had cut down the sides on to avoid too much of the border to be seen.
Then I glue the bottle on top
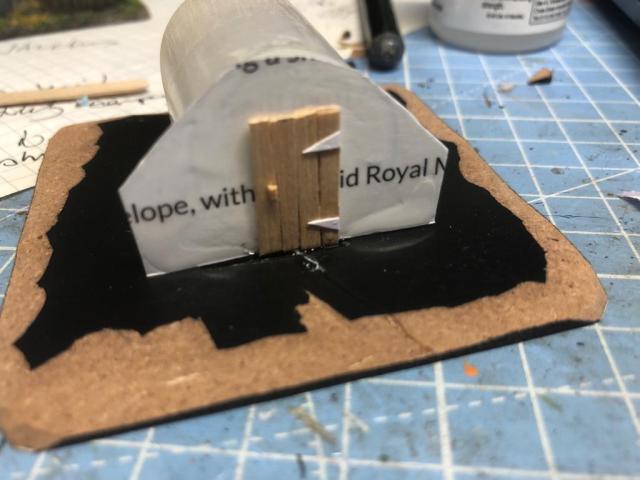
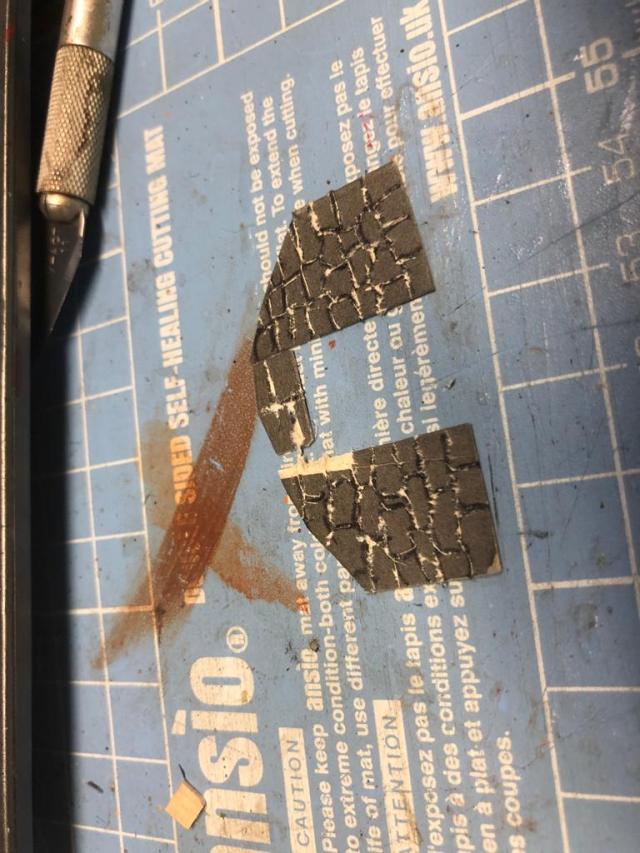
Mark out a piece like this on a piece of cardboard – the circle having the same dimensions as the bottle. I then cut out the shape and glued it on the front of the bottle.
Then using a miniature measure the height you want for the door, then cut out some pieces from a coffee stirer. Note that I cut them in half lenghtwise (in 28mm you probably get away with the width as they are).
Forgot to take photos but basically glue the cutout on front of the bottle (note I trimmed the side), then glue the planks that will form the door, I also added two pieces of cardboard to represent hinges and a little door knob (You will note it falls off later but then as by magic reappears later).
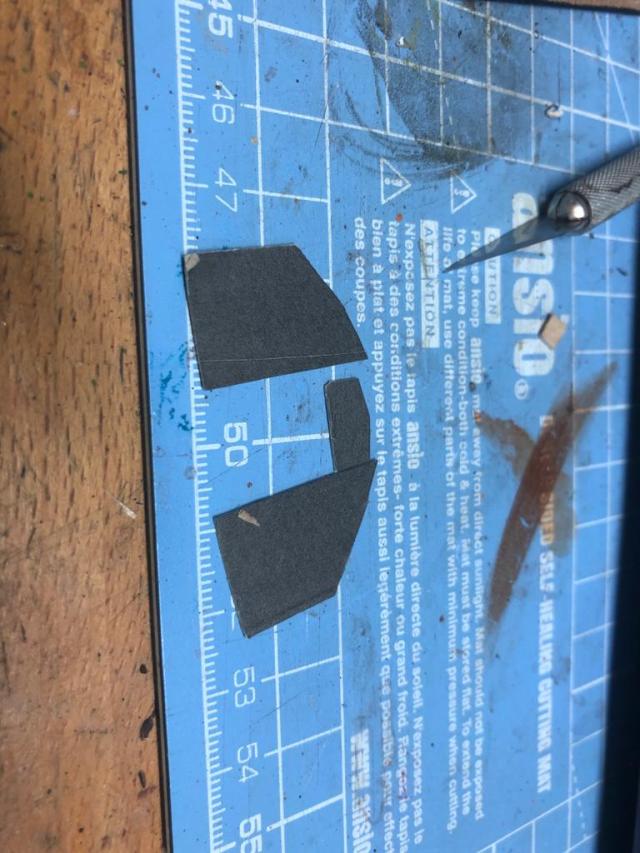
Now cut out the following pieces from the cardboard (these will go around the door)
Draw a stone pattern, make it irregular
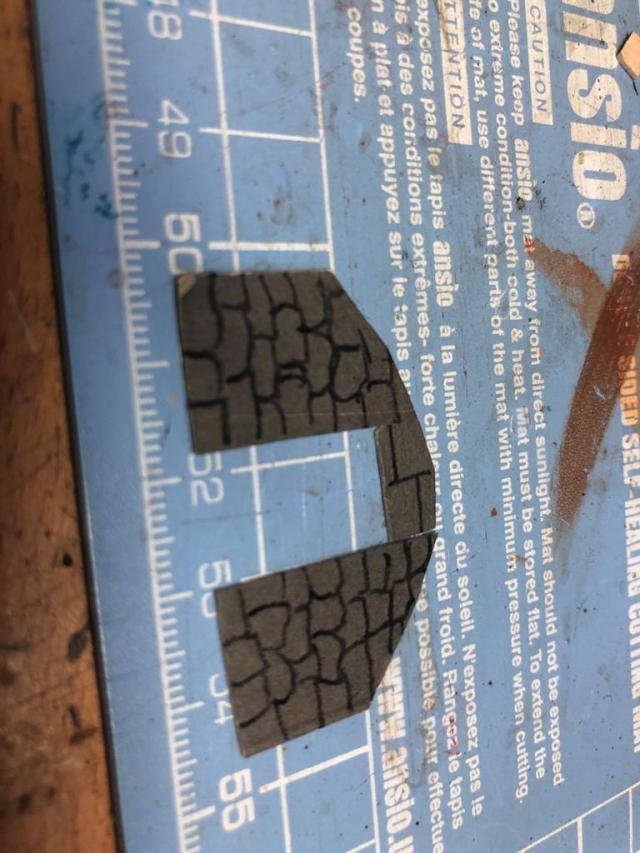
Use a knife to carefully drag along the lines to create some structure – it won’t look great now but later it will
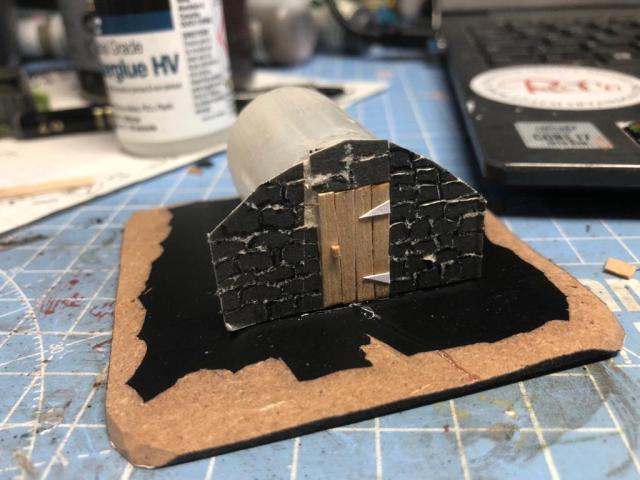
Glue the pieces on
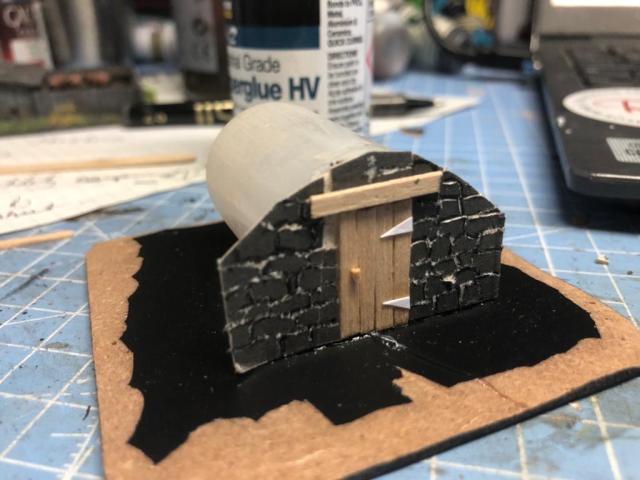
I added a beam on top (but watch that space too)
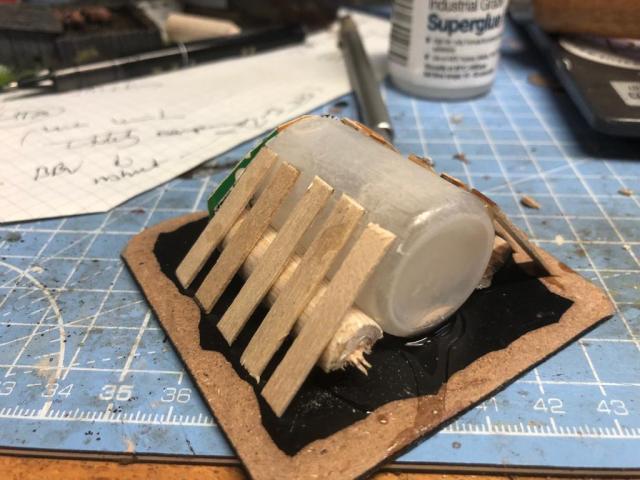
Then I add pieces of wood and coffeee stirrers all around
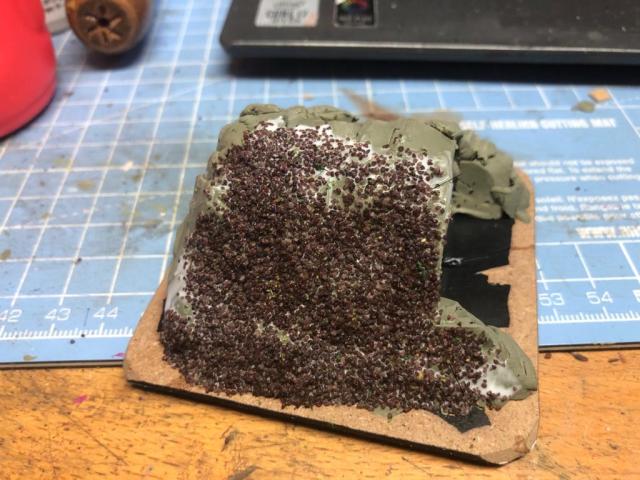
Then I covered it with clay (I have some old clay I use all the time), you could perhaps use some modelling clay like DAS or something like that (it is relatively cheap). The idea is to cover the whole thing, apart from the front.
Something like this, note the knob and the beam has fallen off (also build some natural fall on the back too),
The glue and sand everywhere apart from the stone part on the front with the door.
Ending up looking like this and the build is more or less done (just wait for it to dry).
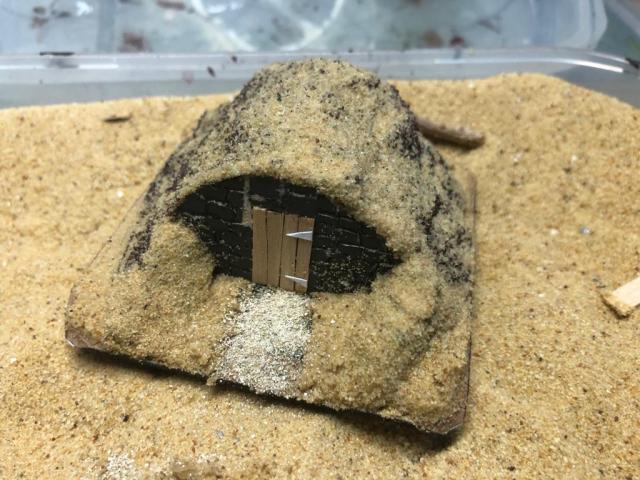
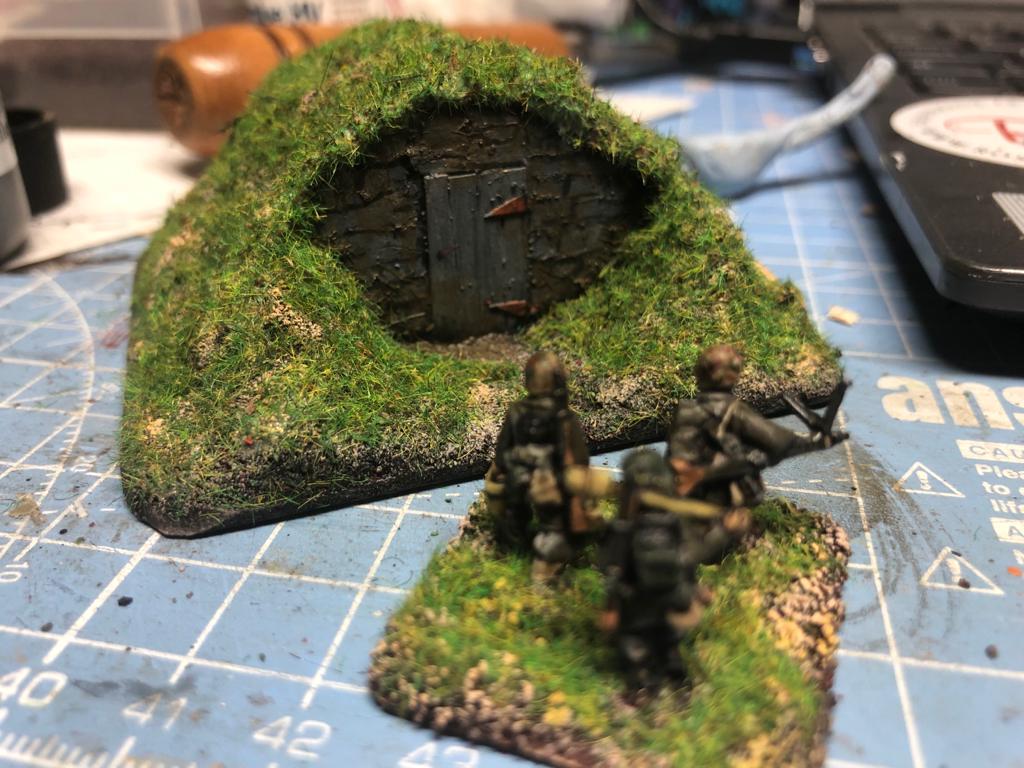
When dry just paint it brown, drybrush the front in grays, add some rust colour to the hinges and a bit of weathering, then flock it with your normal grass basing mix. Good to go. I think it will be a good thing to put on the table, and perhaps it could be used for a halfling house in 28mm?
Maybe I should have made a little more contrast between the door and the wall – well life is not over yet so maybe later.
And that budget, well we were at £14.93 yesterday and did not really spend any additional resources on this than those allowed or already bought. So we are still at £14.93.
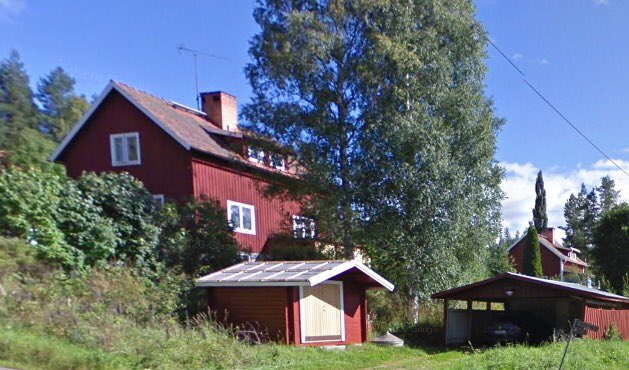
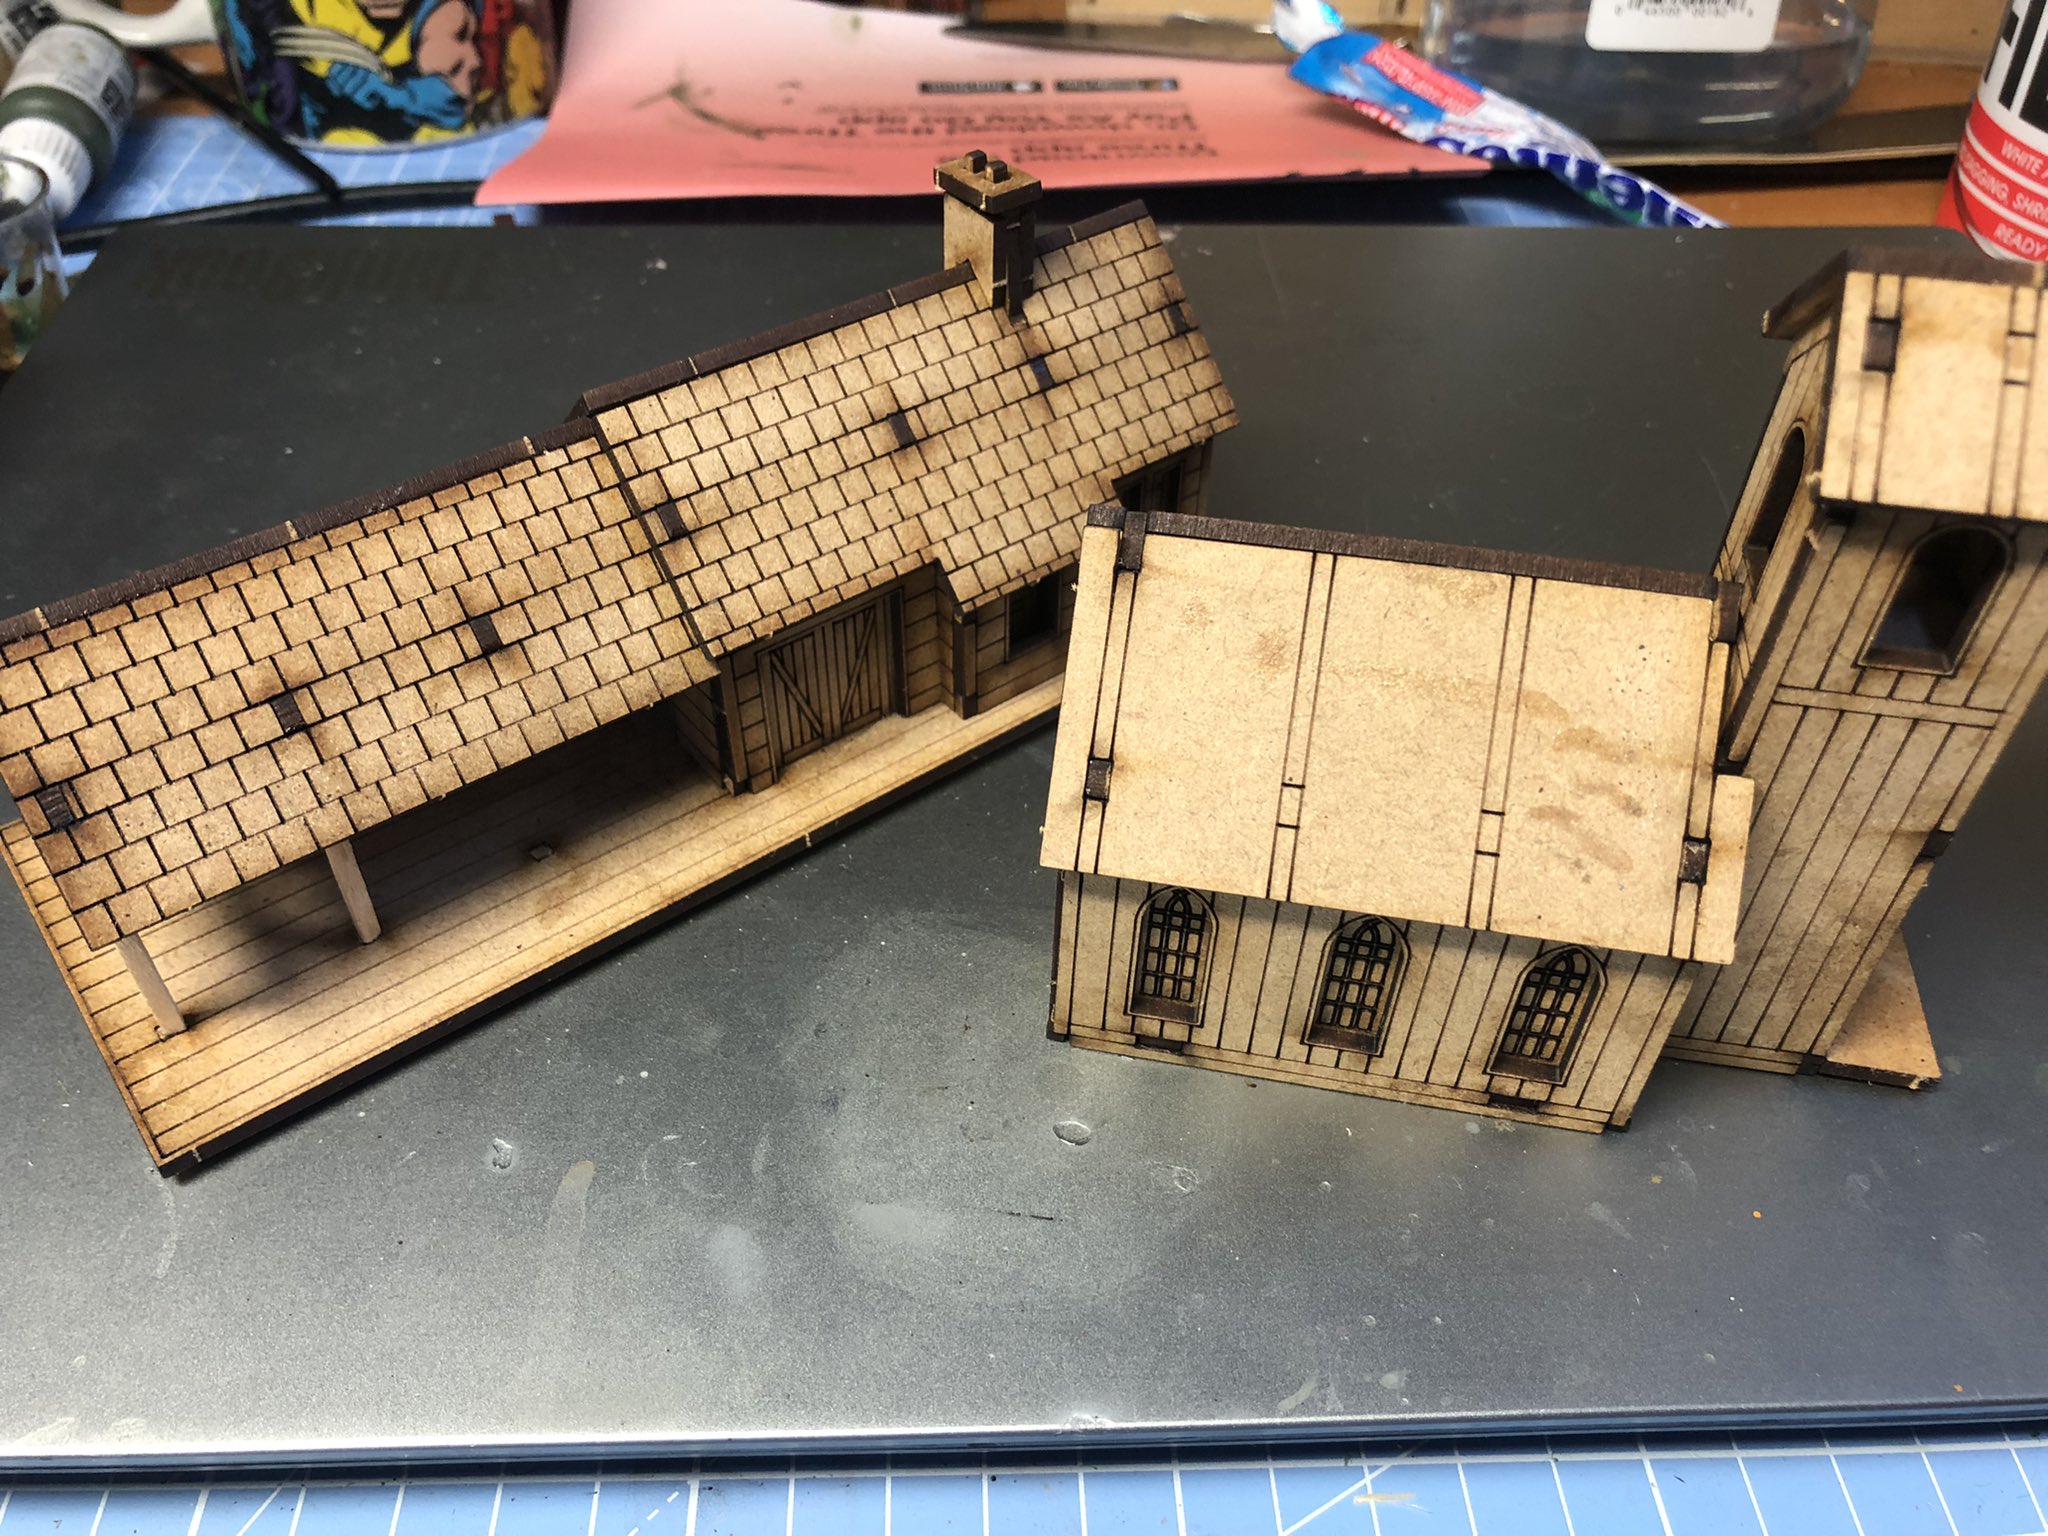
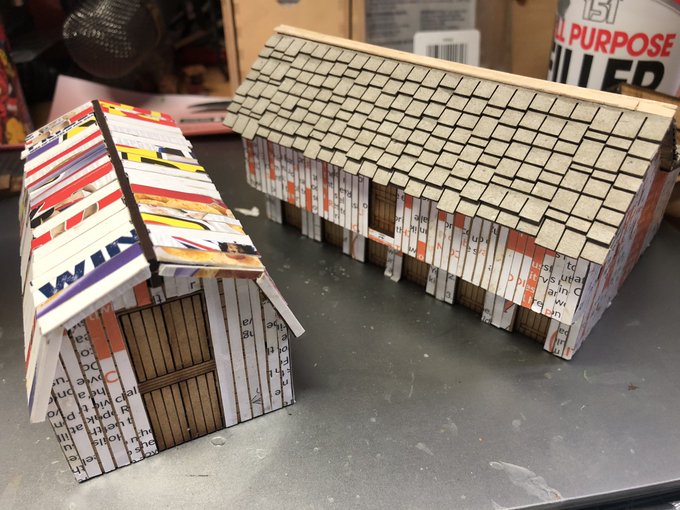
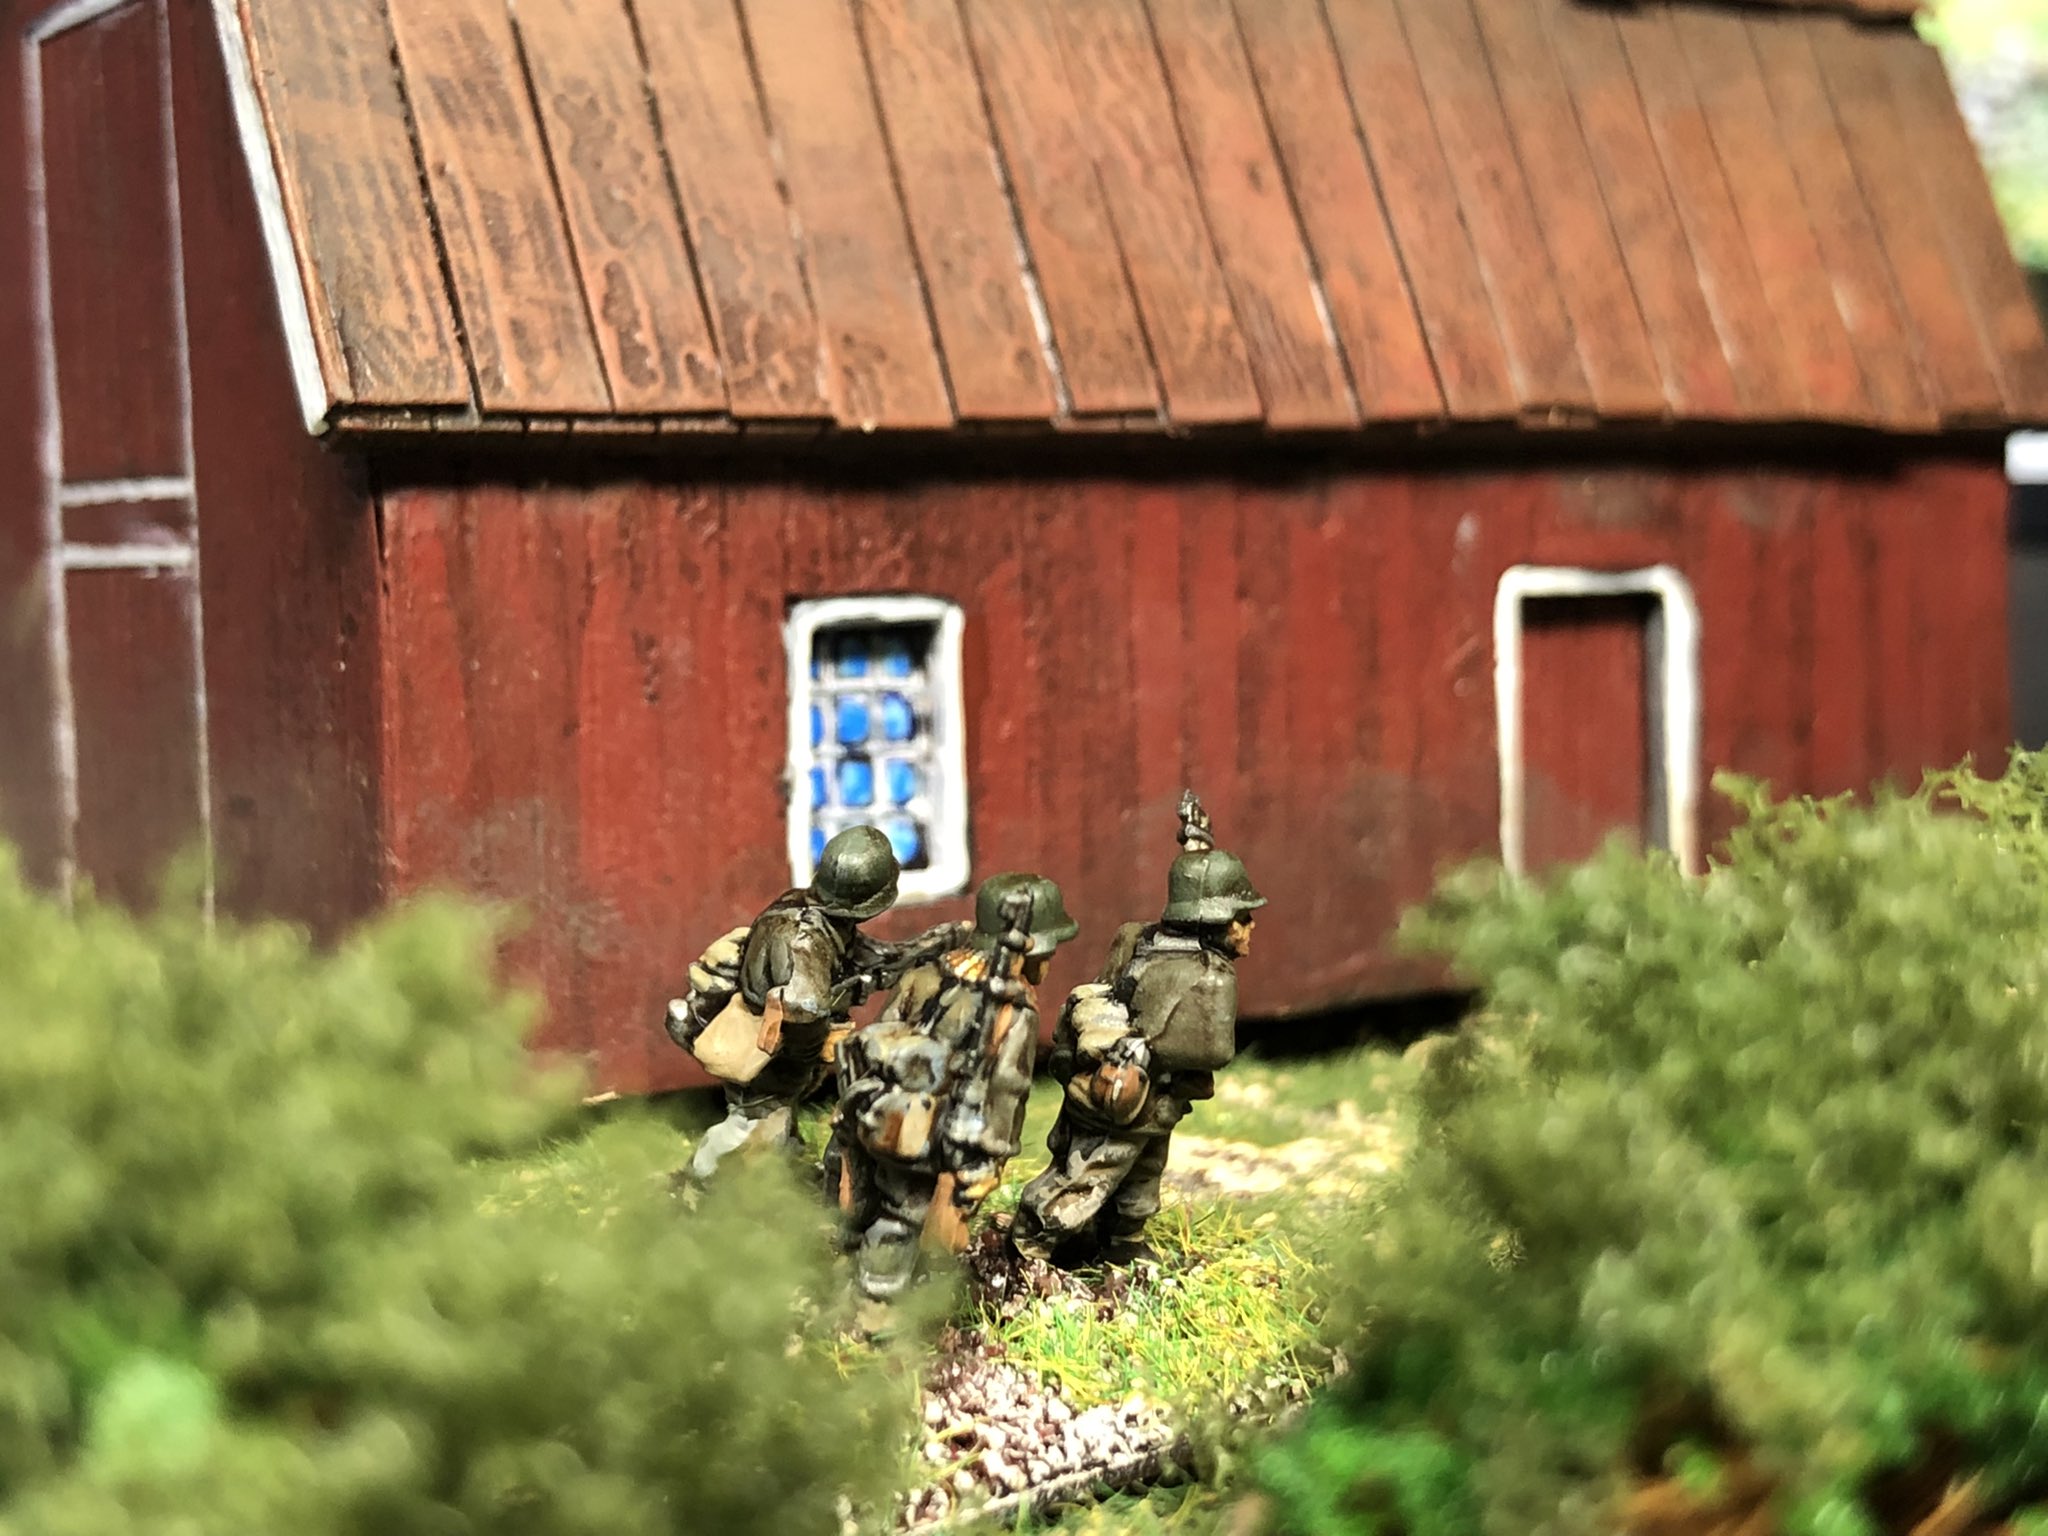
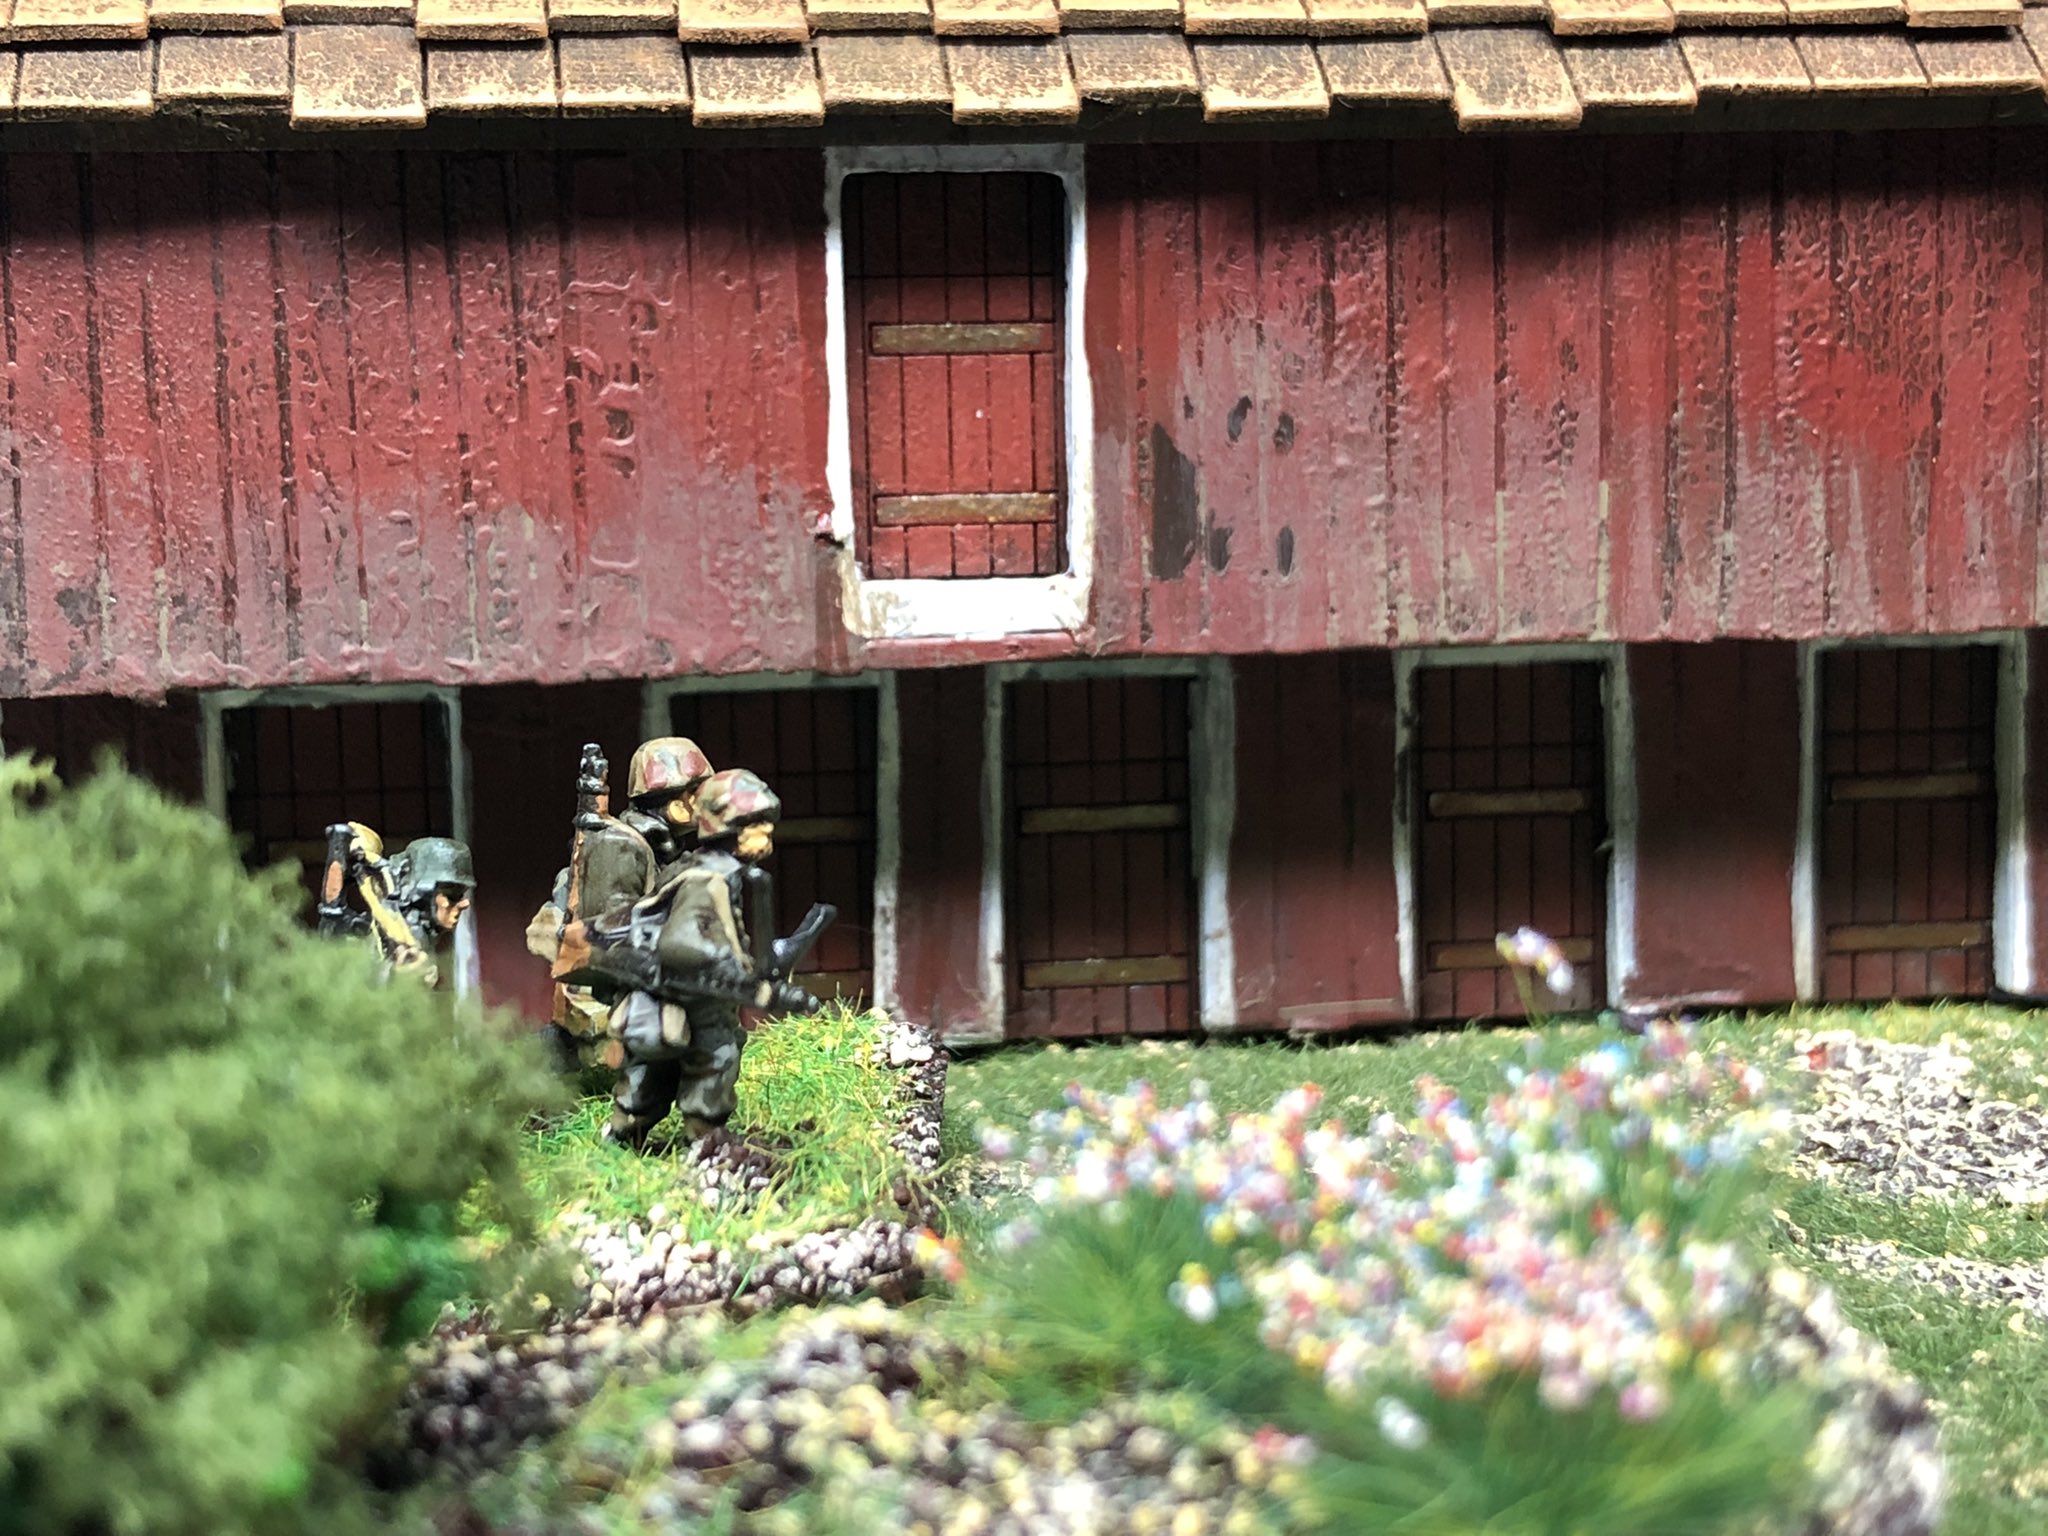
Spent this weekend pimping up some MDF buildings from Sarissa precision (more here) to fit into my Swedish 1943 project, that I have been working on slowly over the last few years – exploring a what-if invasion by Germany in 1943 through Norway. It is a passion project and I have enough buildings to create a few farms but wanted to add some more.
This is the village so far
A very immersive look for anyone with a hint of how Dalarna might have looked in 1943 (yes the number of cars is more than excessive). With the Country Shop (Lanthandel – in the bottom and the Petrol Station and some farm houses.
These were the houses I bought this time around.
A Railway Station (Wild West Range) and a Church, I think from the ACW rangeTwo houses from the ACW Gettysburg Range – first Slyder Stable Barn and Dunkers ChurchAnd a Dutch House and a Dutch Barn
As I have explained before I want to create a certain look to make the building fit into the environment so a Normandy type building will not really do. In Sweden most house at this time, and still are in Dalarna, are made of wood and painted either Red or Brown (most commonly red). I have opted to go hard on the red with white details as a unifying and most common look.
The first two buildings were the stable and the barn and the first step on these was to plank them and add tiles/roof, I did this using thick paper/card. This is just to create a little bit of structure to allow a plank pattern to show throgh as opposed to a flatish MDF surface. Note that I plank vertical.
This leaves them looking like this.
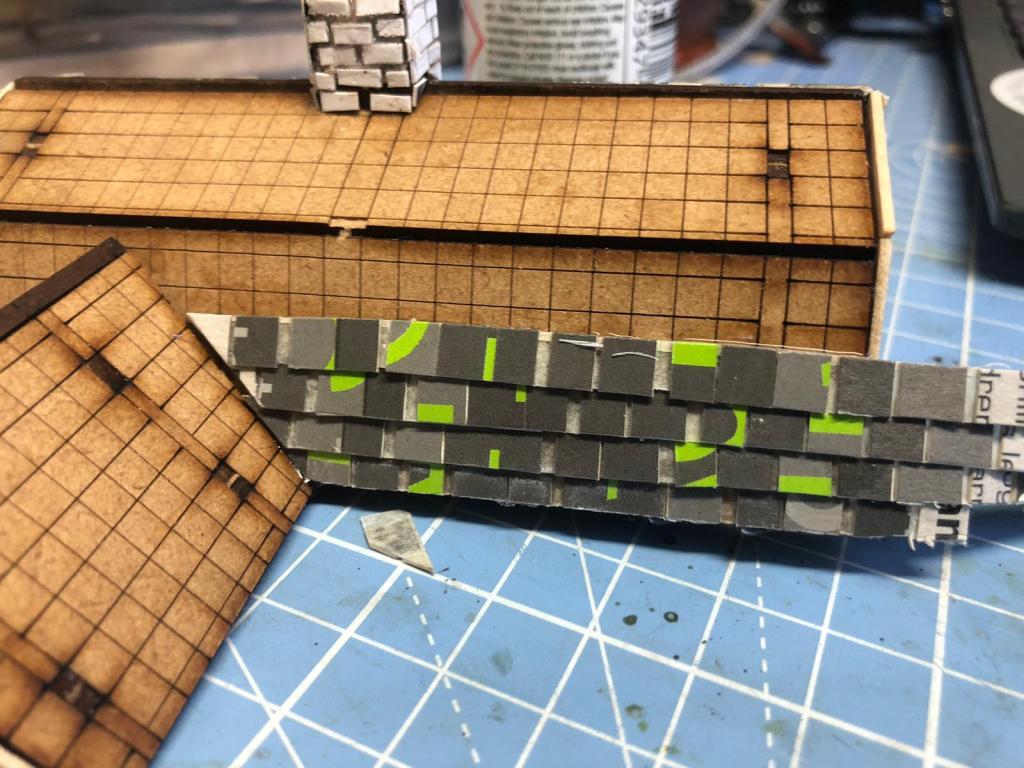
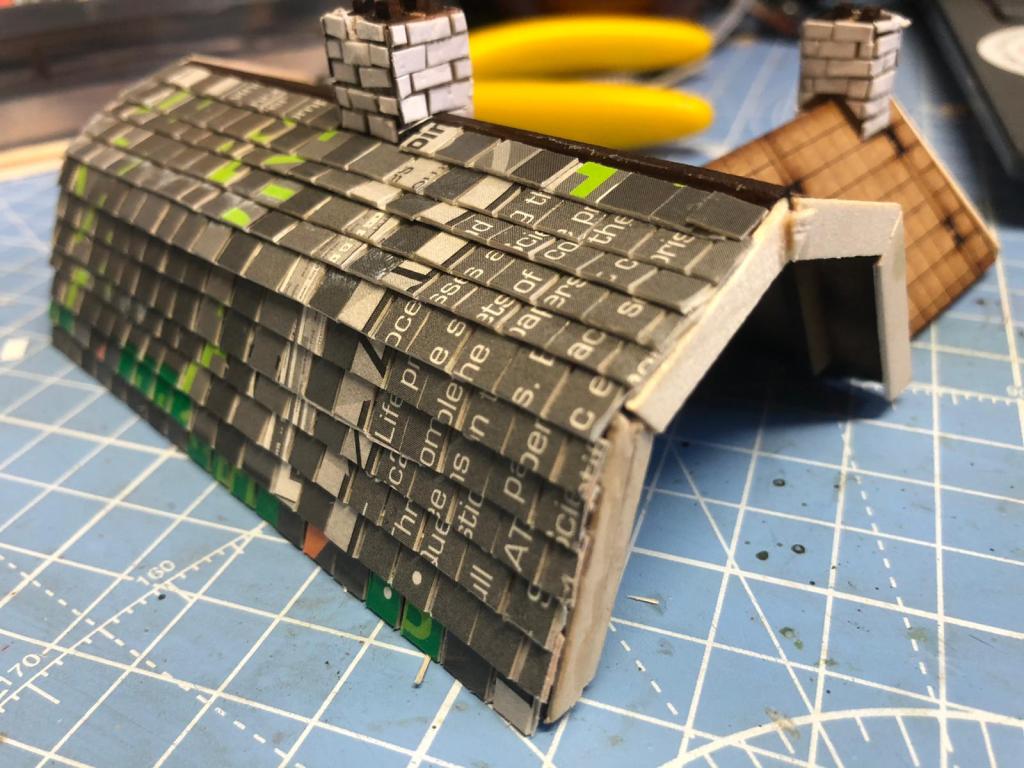
I use some harder cardboard from a cereal packet for the roof planks and for the tiles I bought a tile set from Sarissa (but there is an alternative presented lated on how to do something similar). You basically cut them with a craft knife into strips pva the building and work your way through it – it takes a while but it is really worth the time invested.
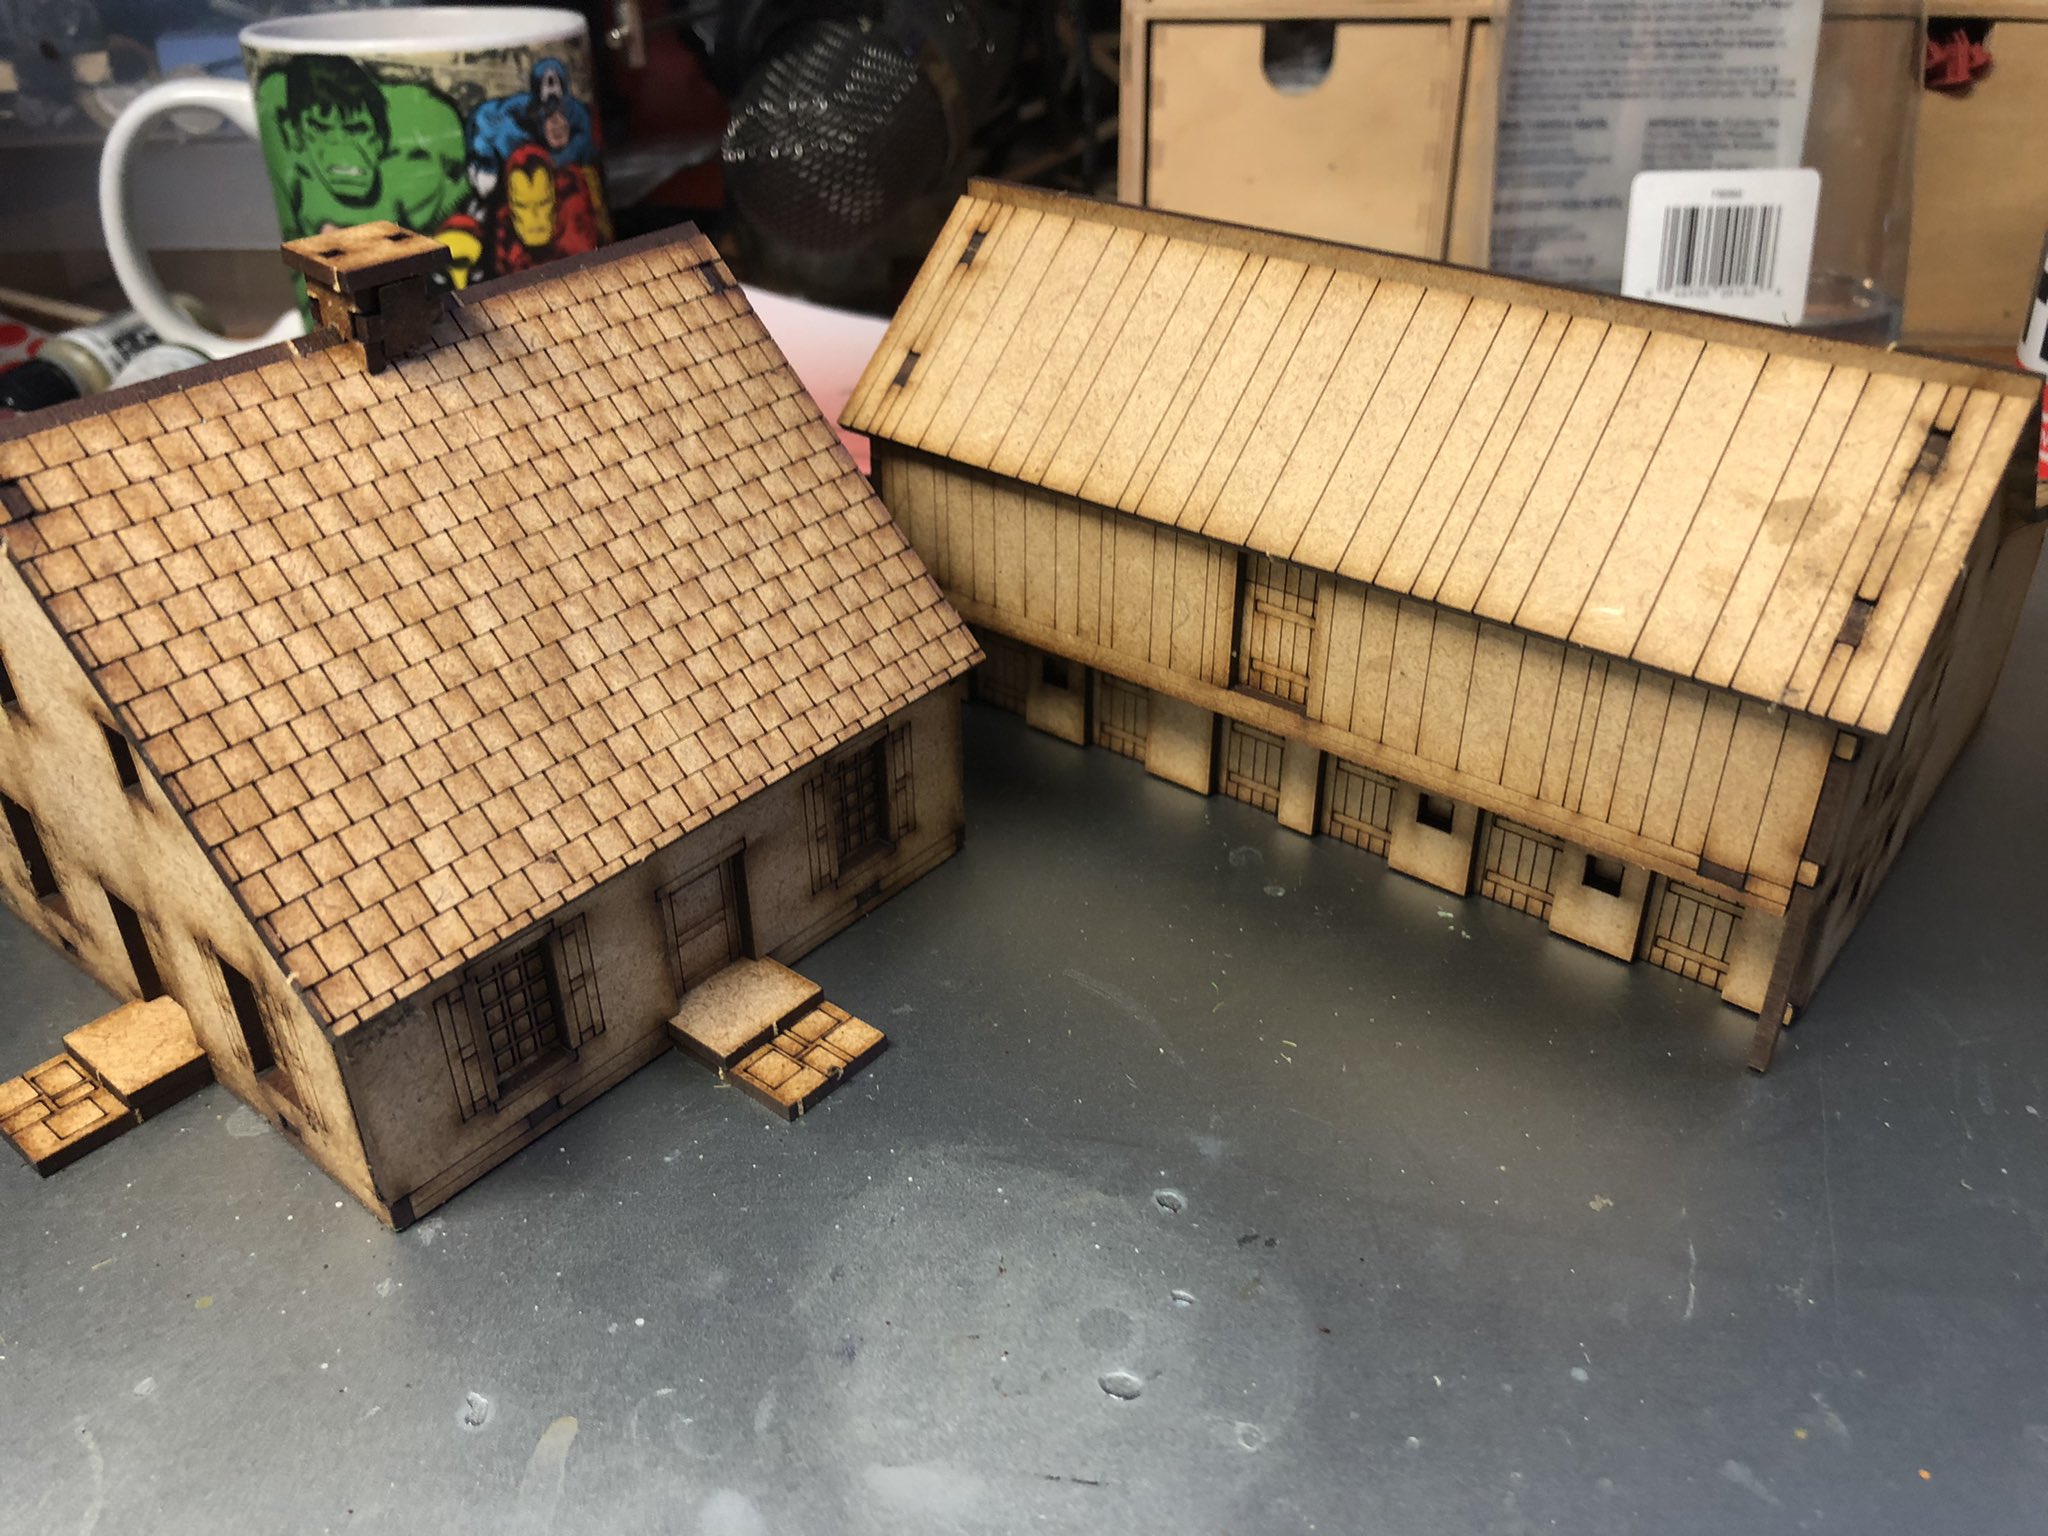
I painted them in Hull red and then another layer of red mixed with hull red (vallejo paint) added some white detail and quick weathering. They really look the deal, if I can say so myself.
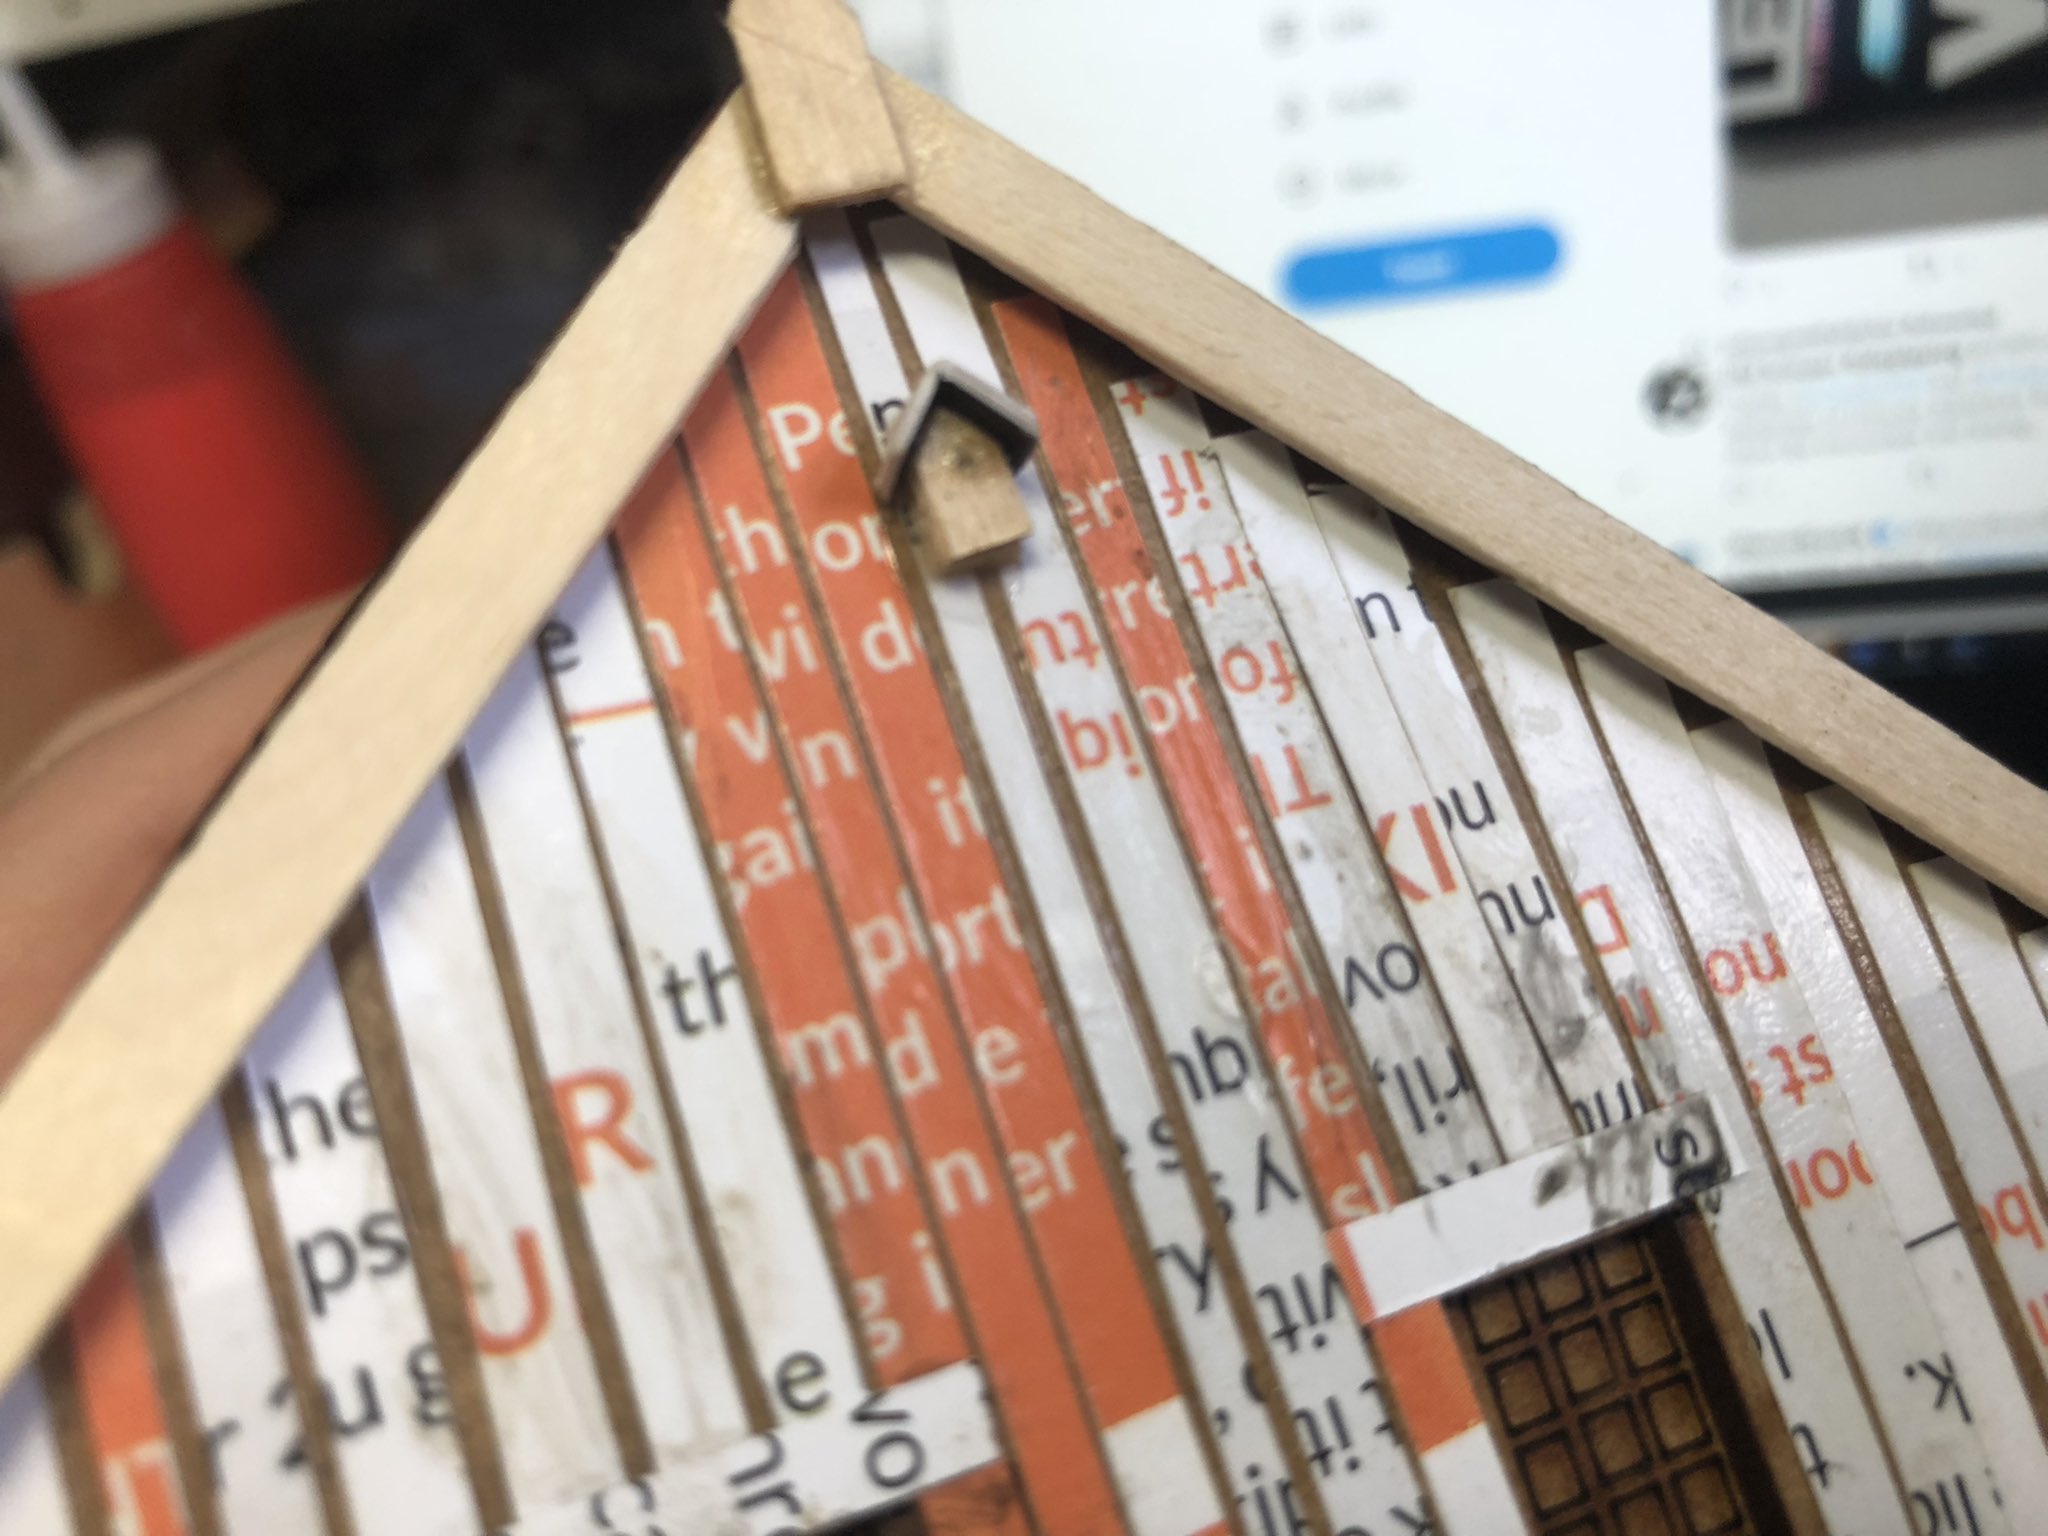
Next up the two houses
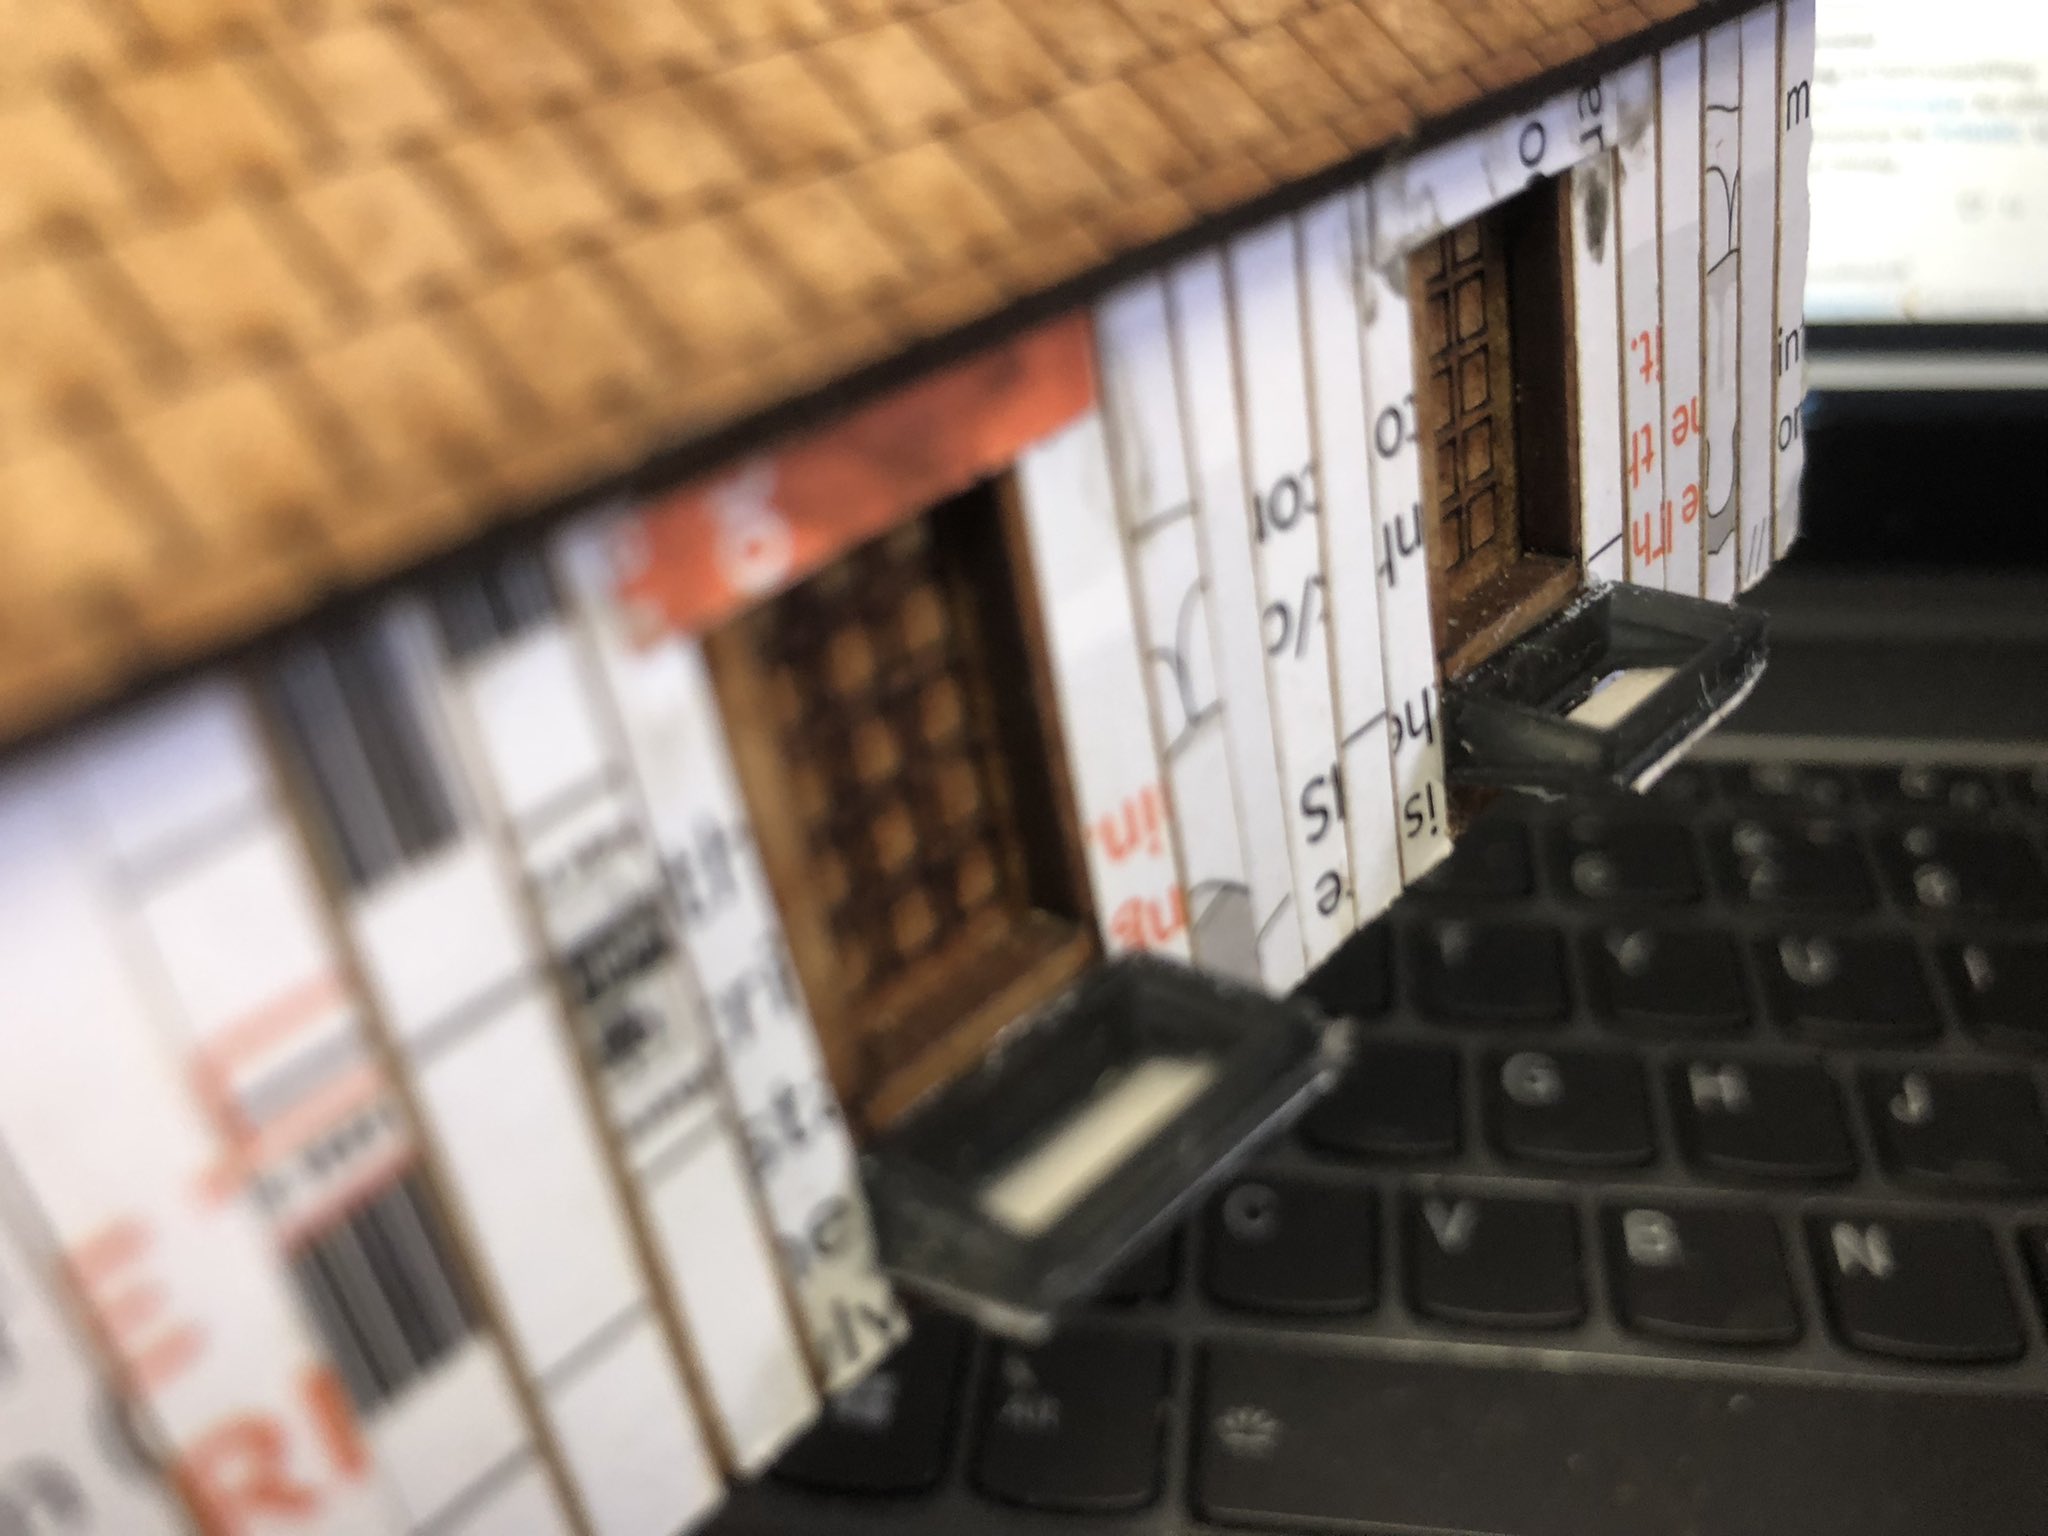
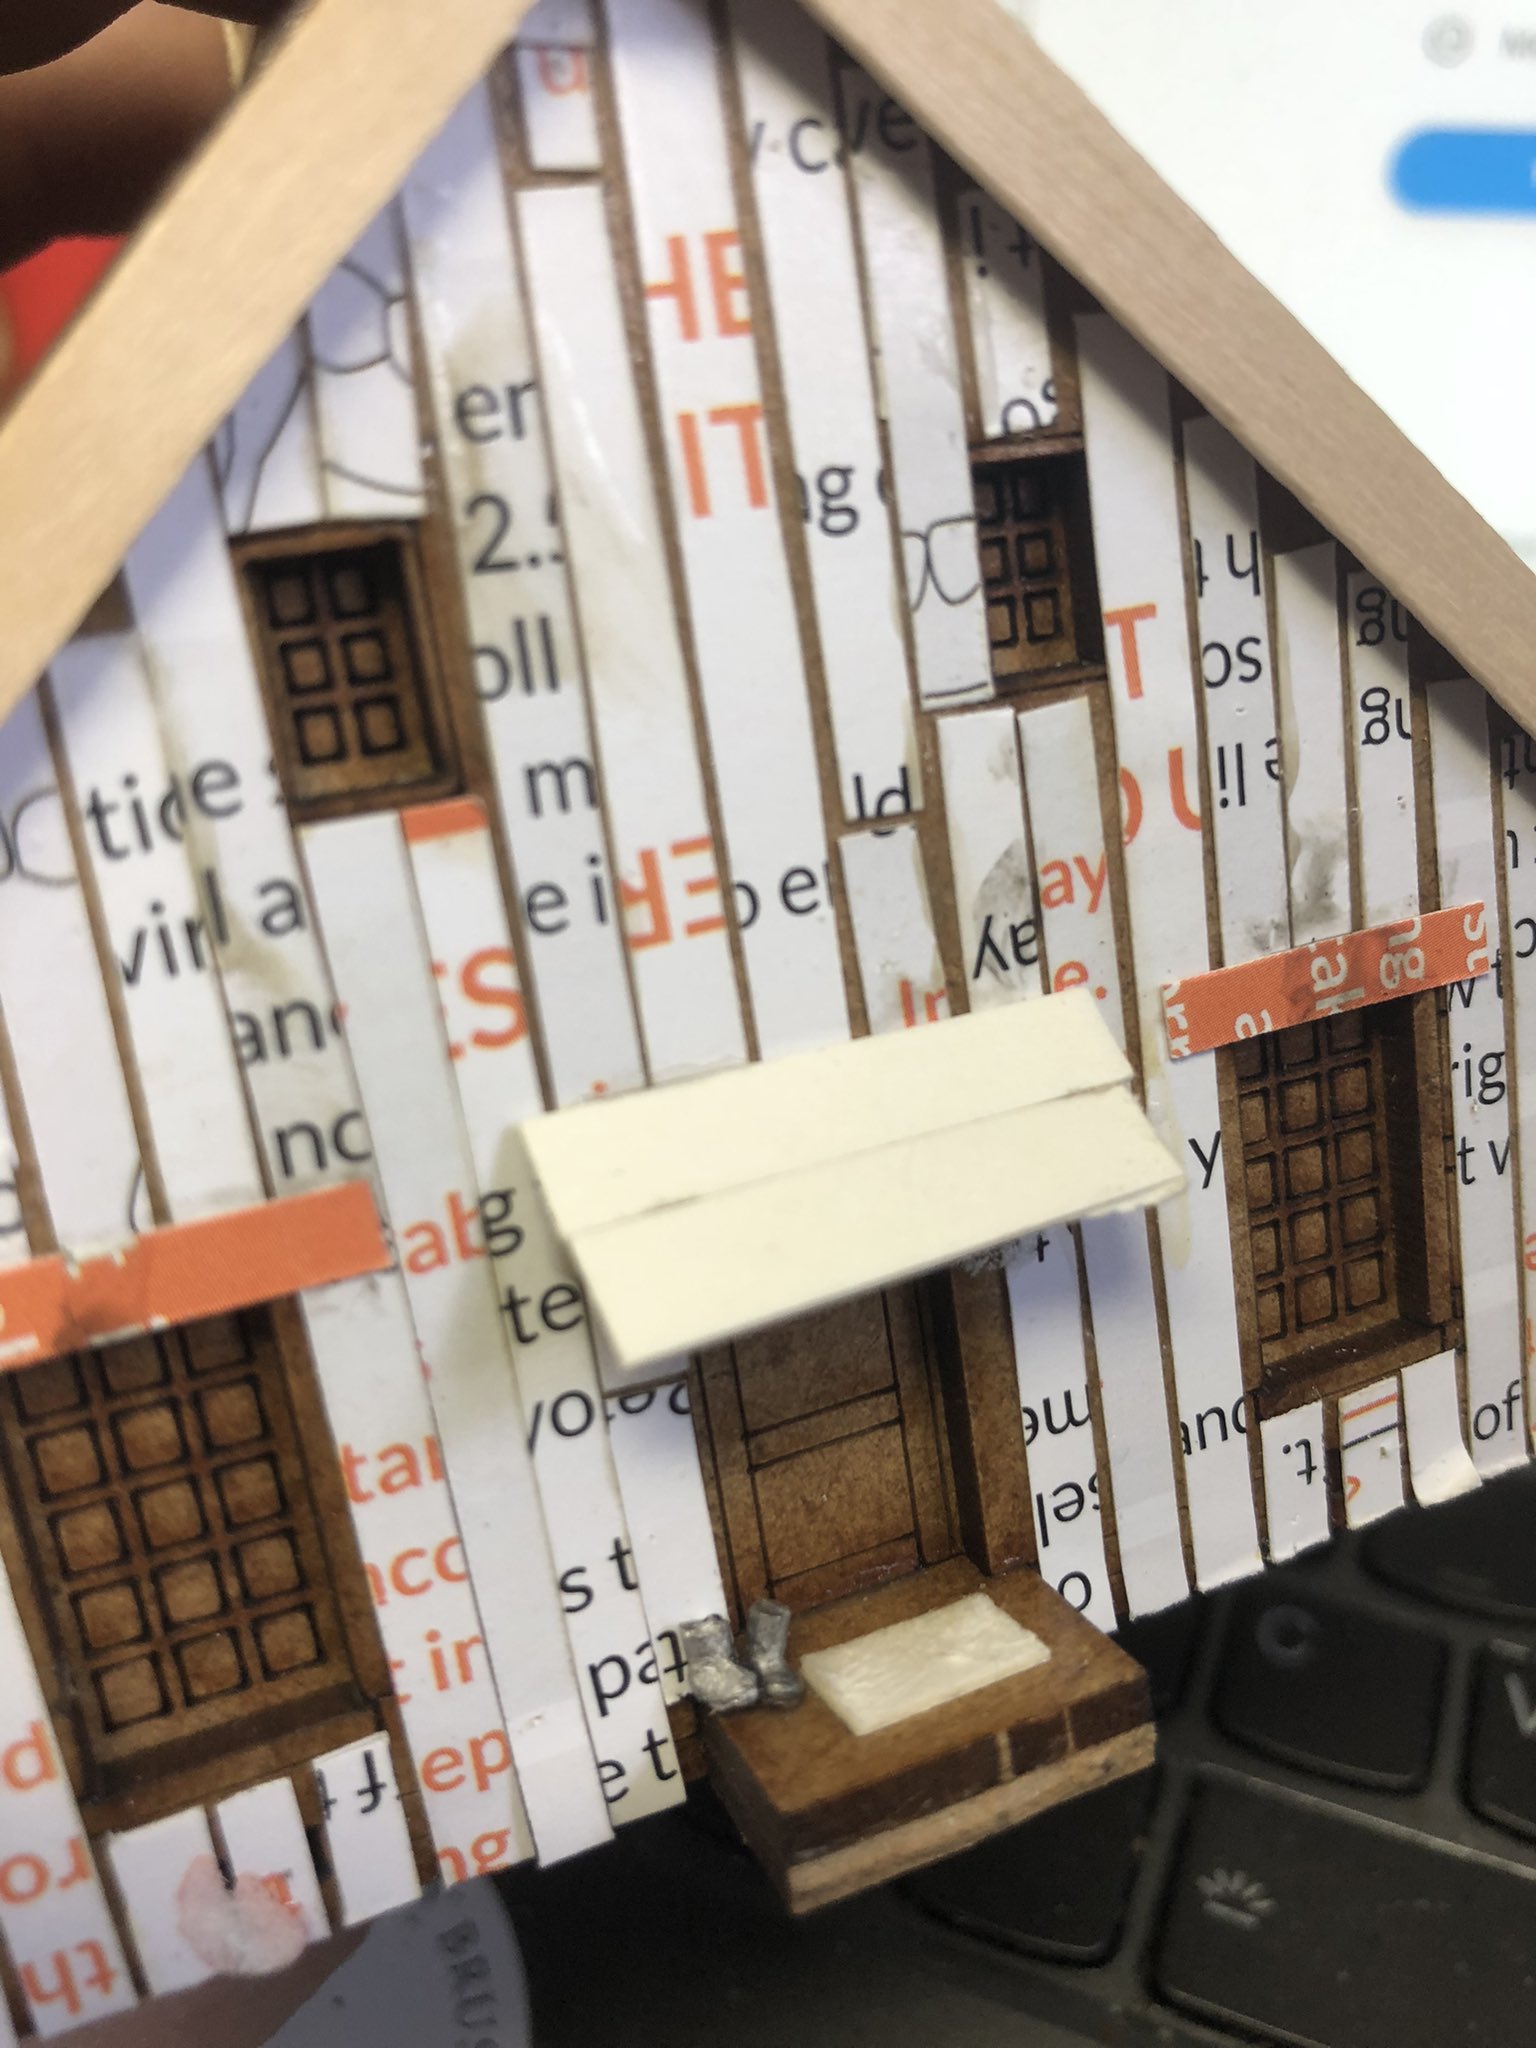
First the “Dunkers Church”, with some detail being added after planking and coffee stirer detailing, including a bird house (My great Grandad apparently had a bird house on the back of this house that he was very fond of)….
Some planters outside the windows (these will be filled with plants later).
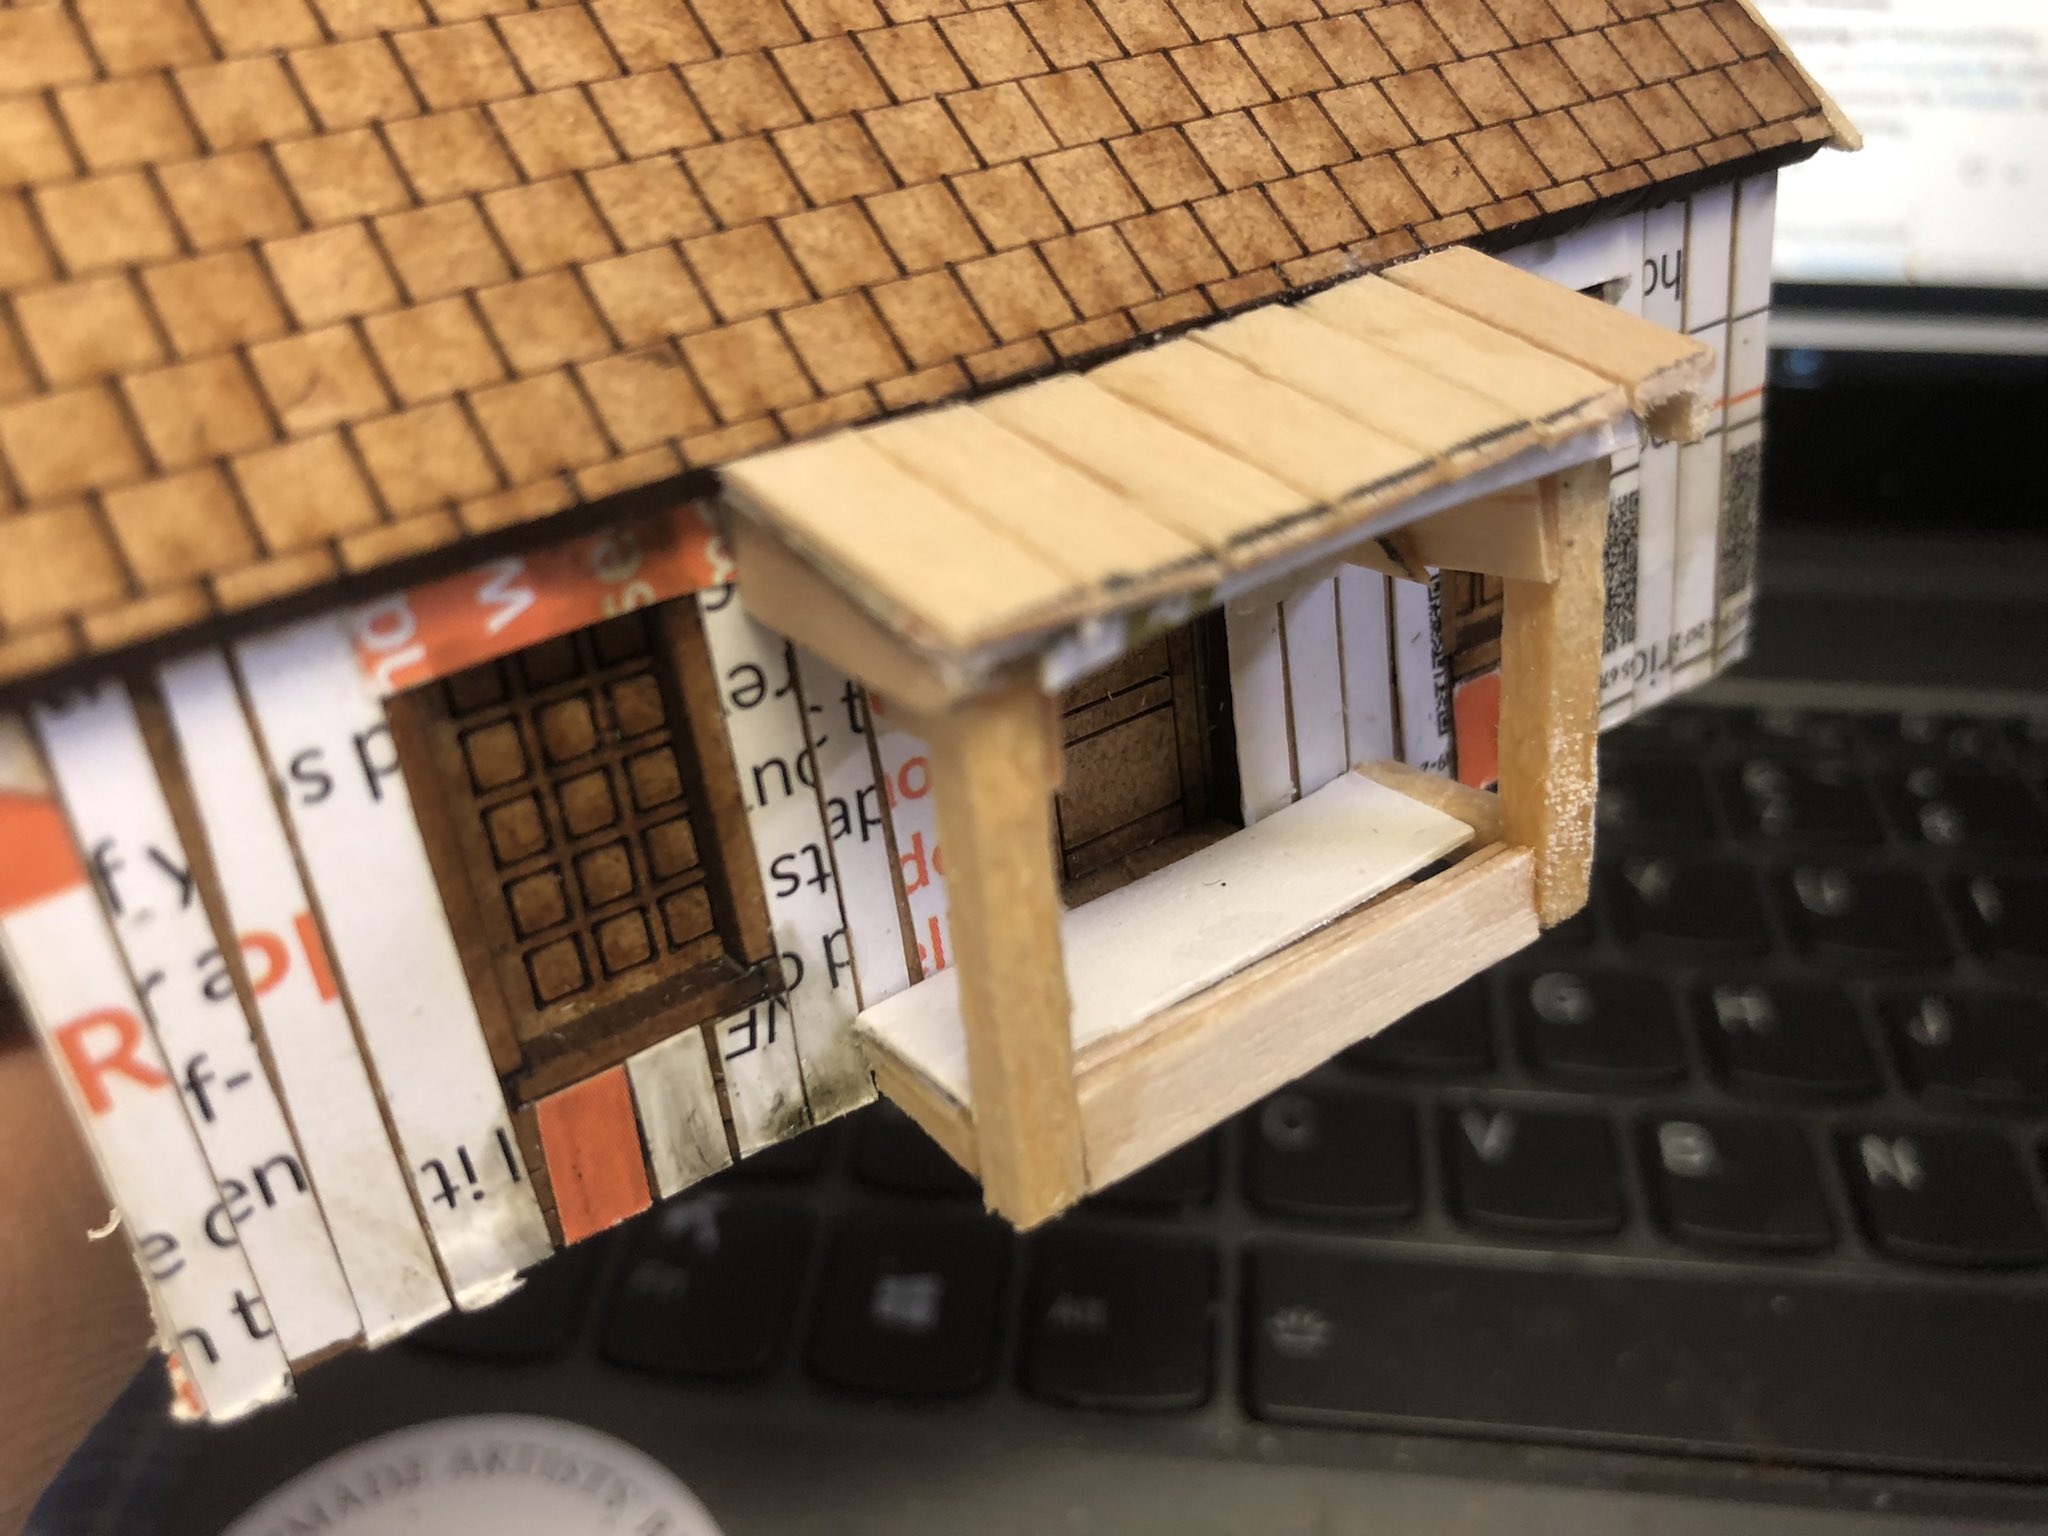
A front porchA roof on the back (well side) door and some boots and carpet to wipe them clean before entering.
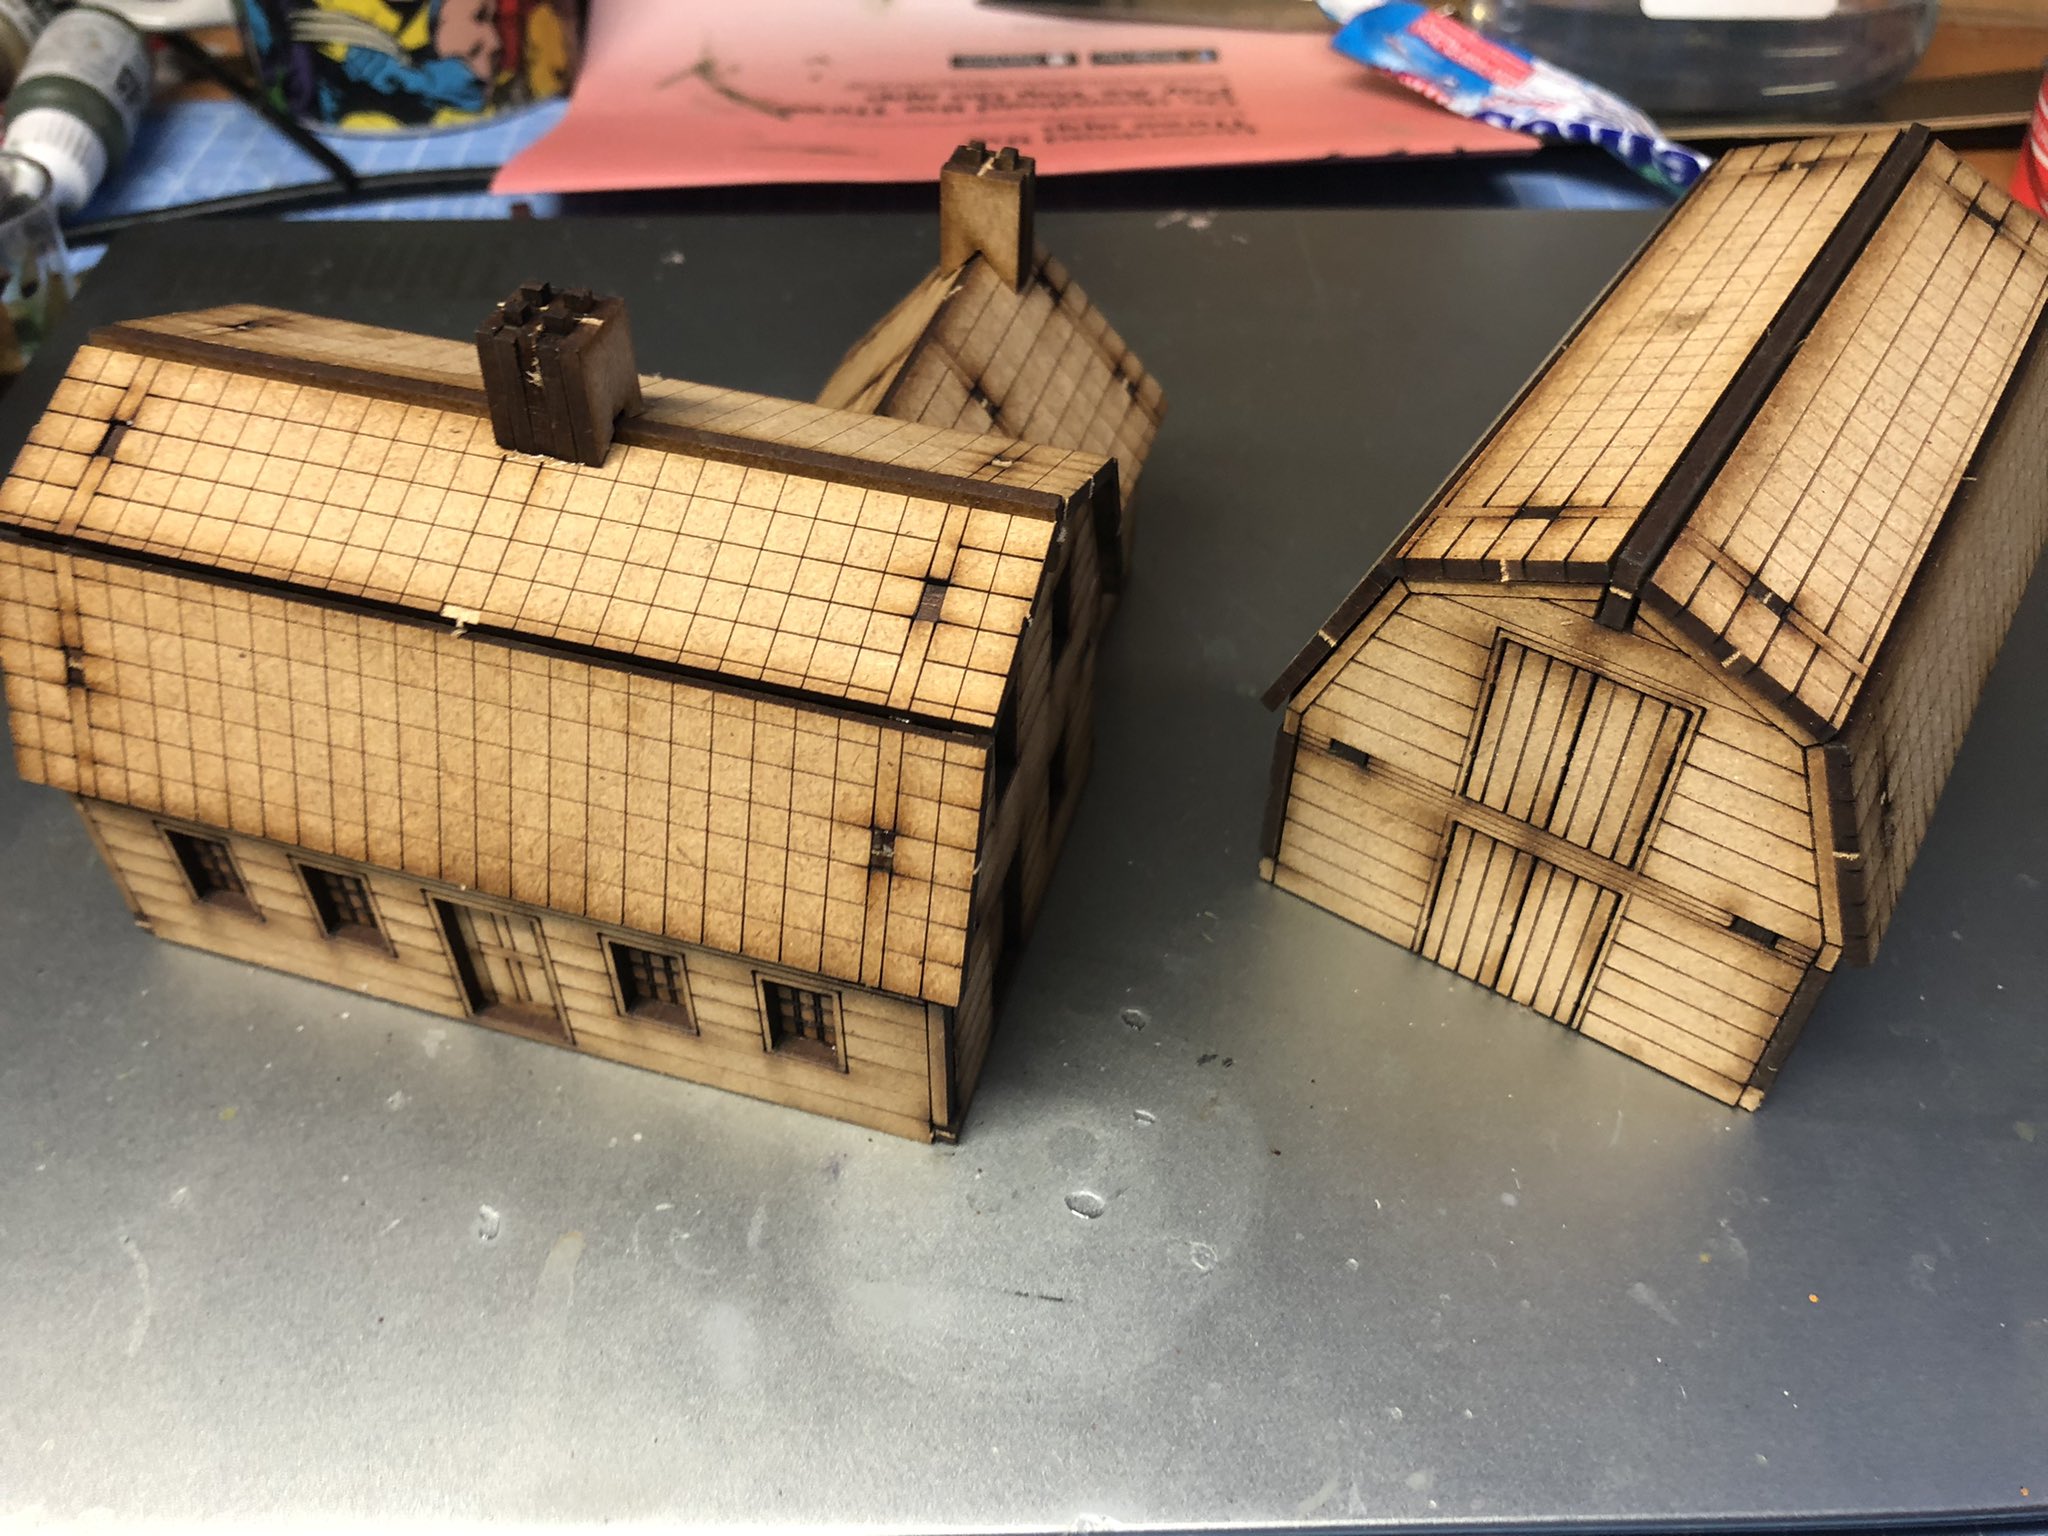
The house will need some roof tiling – I am waiting for some from Sarissa, so it will be painted next time.
As for the Dutch House (done in the same way as the others), I wanted to use this one to illustrated how you can make tiling a roof a little bit quicker than adding tile by tile, as I used to do. You can of course get tiling cardboard from Sarissa for about £4.5 per roof as was used for one of the barns as shown before. Anyway here is how I do it, you need cardboard (like a cereal pack), a sharp knife/scissors, ruler (metal works best), masking tape and a little bit of time.
First take a piece of cardboard and mark up the width of the tile you require, I used 5mm for 15mm (this is actually a 0.5 meter tile in scale but it kind of works you might want to go finer)
Cut out strips with hobby knife or scissors
Put the strips together between two strips of masking tape, leaving a very small gap between the tiles.
Thne turn it around and add tape all overTurn it around again – you now have a “sheet” of cardboard strips (I used a similar technique when I did a chess board in woodworking many years ago).
Use scissors or a sharp hobby knife with a ruler firmly pressed against the sheet and cut strips the other way to create strips like this (a row of tiles being held together by the masking tape, as shown below).
Now use this to clad your house (use Superglue due to the masking tape not being that PVA compatiable), start from the bottom and pretest each level before you glue it. DID I SAY USE SUPER GLUE. Have good ventilation with the glue.
This with trimmed borders.
It will look funny depending of what cardboard you are using but it gets all painted over in the end so it is totally irrelevant. This is how the roof looks like when finished – you could make your tiles tighter and also cut more precise than I did but the point is that the masking tape allows you to do this really quick as you add strip by strip instead of brick (I mean tile) by brick.
Next time we will paint the two houses, after I added some of Sarissa tiles on the other one.
Not really 1943, more like 1973, Dad on the left with his mates playing badminton on a nice sunny day. Note the houses in the background, that is Dalarna folks.
Well it arrived a few weeks ago – the new rule set from Two Fat Lardies (well actually Reisswitz Press) and this morning I had a read through and watched some of the videos available on the internet (Look for . It seems really interesting – new in terms of scale and some of the mechanics but familiar in terms of some elements of the Lardies rule sets I have come to like. But more about that when I have actually played the game and know what I am talking about.
Here are a few good starting points if you want to know more before you buy or getting up to speed once you got the rules.
My current WW2 collection consist of a large number of different platoons in 15mm (varying between 1 and 2 per theatre and period), including Finnish and Soviets (Winter War and Continuation War), German (Early, Mid and Late), British (early war), French (early war), Greek (early war), Italian (early war) and of course two Swedish Platoons.
Well, it took me about two minutes to decide to make this as a Sweden 1943 project and in 15mm, as I already have all the tanks, etc I would need and in essence would only need to do some more infantry on bigger bases (than the individually based I have for my platoon) which is something as was planning to do upscaling the toys to be in used for IABSM (the Company Level game by Too Fat Lardies).
Battalion Command awaiting the outcome of the Battalion O Group Dice roll – “You said how many 6s?”
I thought I share this as an example on how you could take a rule set and its army lists as a basis for developing your own for nations or theatre specific situations that are not covered by a set of base rules and also in this this case very unlikely to show up in future supplements. If you are doing a ‘What-if project’ for a German invasion of Sweden in 1943, you are probably on your own. But to me this is a lot of fun in its own right. It would be interesting to see a Finnish Continuation War Organisation at some point too.
No obstacle is too difficult for the Swedish Infantry!
The Swedish Infantry Regiment
The Swedish infantry regiment in line with the 1943M organisation consisted of the following high level elements (from April 1943).
Regimental HQ
MG Company (consisting of 3 No. MG platoons, with 2 sections of two MGs (normally the m/36))
Specialist company – heavy weapons company (AT Platoon with 6 No. Bofors m/AT guns). AAMG Platoon with 4 No. AAMG on Tripods, Pioneer Platoon (w. 5 flamethrowers), Heavy Mortar Platoon, 3 120mm m/41 mortars with FO, AA Gun Platoon, 4 No. 20mm Bofors m/40, on Tripod
1st Battalion – more detail on the battalion below, but basically, HQ, 1 No. Jager Platoon, 3 No. Rifle Company and 1 No. Heavy Company.
2nd Battalion – as above
3rd Battaltion – as above
LMG Group doing its Job
An Infantry battalion
The infantry battalion, which will form the basis of the units you will have on the table consisted of.
Battalion HQ
1 No. Jager Platoon – consisting of Platoon HQ and 3 sections
3 No. Rifle Company (Skyttekompani), each with
Company HQ
4 No. Platoons, each with
Platoon HQ
4 Rifle Sections
Specialist Section – 1 No. AT Rifle and 1 No. 47mm Mortar
Weapons Platoon
MG Section – 2 No. MGs (m/36 or m/42)
Mortar Section – 1 No. 80mm m/29 Mortar
1 No. Heavy Company (Tunga Kompaniet)
Company HQ
Mortar Platoon
2 No. Sections of 2 No. 80mm m/29 Mortars
AA/AT Platoon
AA/AT Platoon with 4 No. Bofors m/40 Guns (Tripods)
MG Platoon (Kulsprutekompani)
MG Section – 2 No. m/36 MG
So how do we translate this into the O Group Framework, well studying how for example a typical German Infantry Battalion has been structured I have come up with a first framework enough to get some miniatures done. I will flesh this out with stats and costs later but I think this is a good start. Note that the There are no Artillery support at Regimental level, the extra punch is provided by the high number of mortars, including the 120mm Mortars. I believe this would have been effective and possibly used with the same devastating effect as the Finns used theirs. I need to do further research on the Divisional support list as currently I have limited information on the organisation and operations above regimental level, but this will get me started.
The Start of a List for the O Group Infantry Battalion List for the Swedish Infantry Battalion
So, if you do have some further information or ideas, please do a comment for this post or use the contact form on the blog.
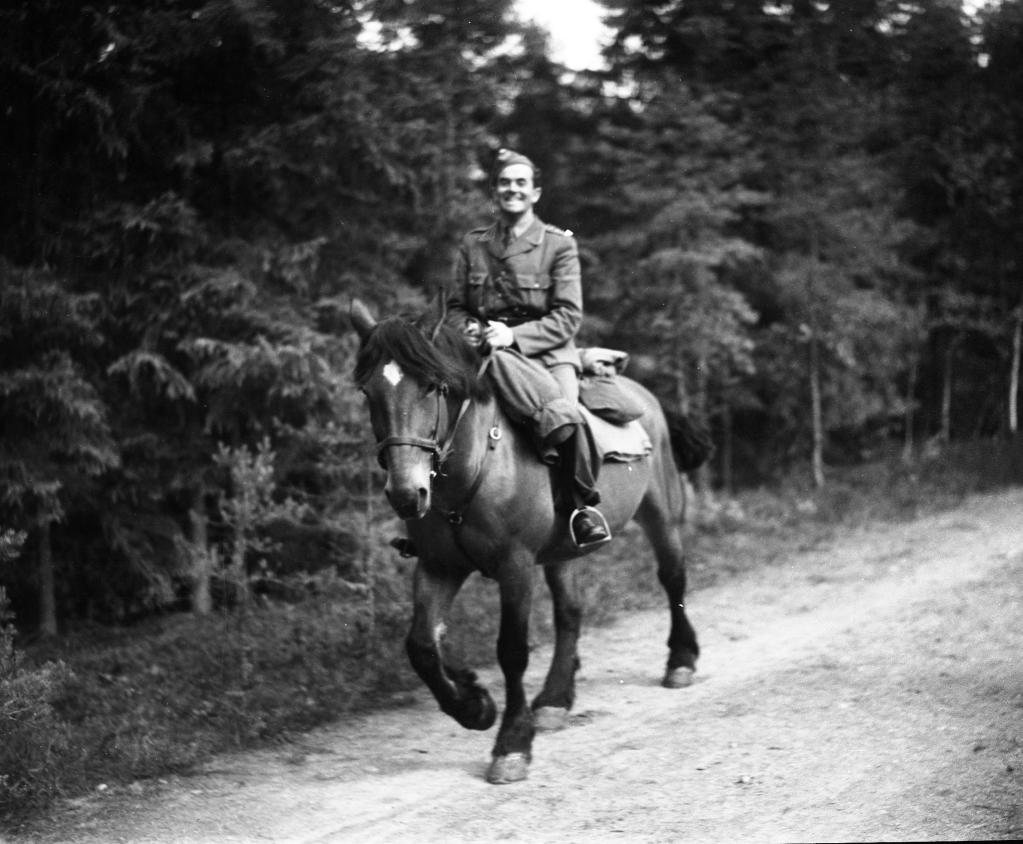
Commanders at Company Level and above were mounted
I am going to get myself some Battlefront Italians for this project right now.
/ Hope that is of some interest.
Sources
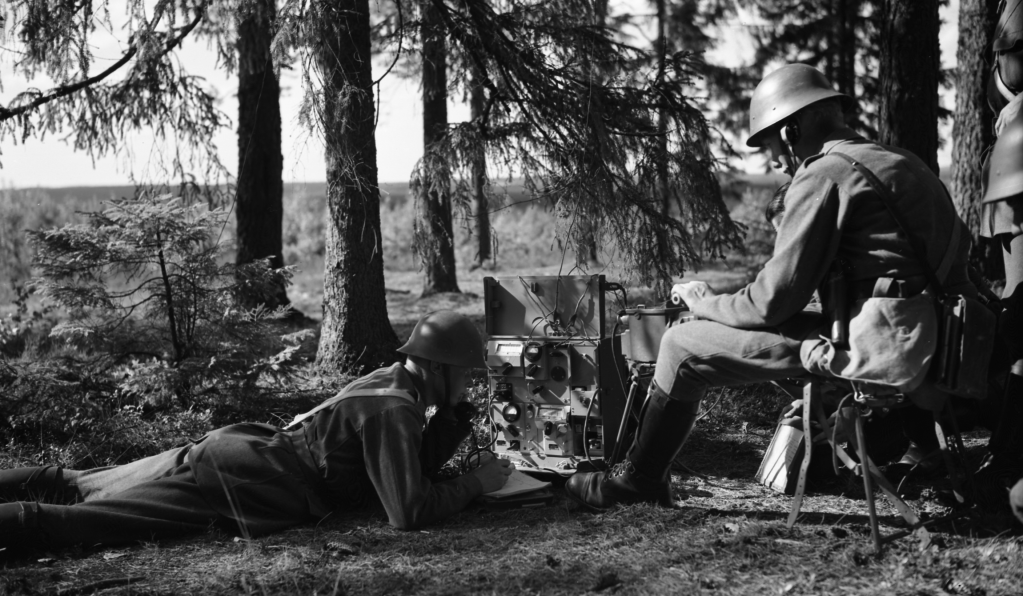
Pictures above are from Krigsarkivet (Military Archives of Sweden, link here) and I have borrowed them from the eminent page Tornsvalan about Sweden during the war years, link here.
‘O’ Group – Wargames Rules for Battalion Size Actions in World War II (2021), by David C.R. Brown, Reisswitz Press. Link here.
An Introduction to The Royal Swedish Army in WWII – really useful resource link here. I used their listing of the M1943 as a basis for the presentation above.
Infanterireglemente (InfR) – Regemente I (InfR I) – 1945 – This shows the M1943 organisation and details some of the aspects that are not covered in the link above. Difficult to get hold off but occassionally some of the regulations do show up on https://www.bokborsen.se/.
En svensk tiger : hårda fakta och siffror över svensk beredskap och upprustning 1939-1945 (2014) by Sven-Åke Bengtsson.
During the hostilities in northern Dalarna in 1943 the Germans used remote control mines (known as the Goliath) in trying to break through the fortifications of the Swedish border defences. Hauptman Pillistin of the Pioneer Company deployed a number of them during the fighting in Särna. The Hero of Skans 211 (the name of the fortification system at Särna) Corporal Davidsson managed to demobilise three of them using his Scoped Rifle and some pretty accurate shooting. This caused a significant delay to the offensive that bought necessary time at the early stages of the offensive to ready the Swedish defences at the inner lines.
Ok, it is my 1943 what-if again and one of the scenarios I am working on. The idea with the eventual set of scenarios is to provide a book with some interesting scenarios ranging from defending fortified positions, creating bridge heads positions, assaulting over water, and forest fighting. It will be set in Sweden but you could equally replace the Swedes with Polish during 1939 or the Finns (and the German with the Soviets) during the 1944 Summer offensive, etc. Interested in presenting We shall see how it goes.
The defensive system at Särna was built following the invasion of Norway in 1940, it can be see in the video below (the audio is in Swedish but the pictures could be of some interest) as it looks today.
Now what is this Goliath thing, well it is a tracked mine (German: Leichter Ladungsträger Goliath, “Goliath Light Charge Carrier”) and was disposable demolition vehicles and remote controlled (through a cable). You can read more about them on good old wikipedia (here).
So although to quote the wikipedia article “Mostly, they failed to reach their target although the effect was considerable when they did.”, I think a scenario with them in it would add some tension to the game with some slow moving Goliaths working their way through the defensive positions whilst the infantry sections are trying to stop it with small arms fire.
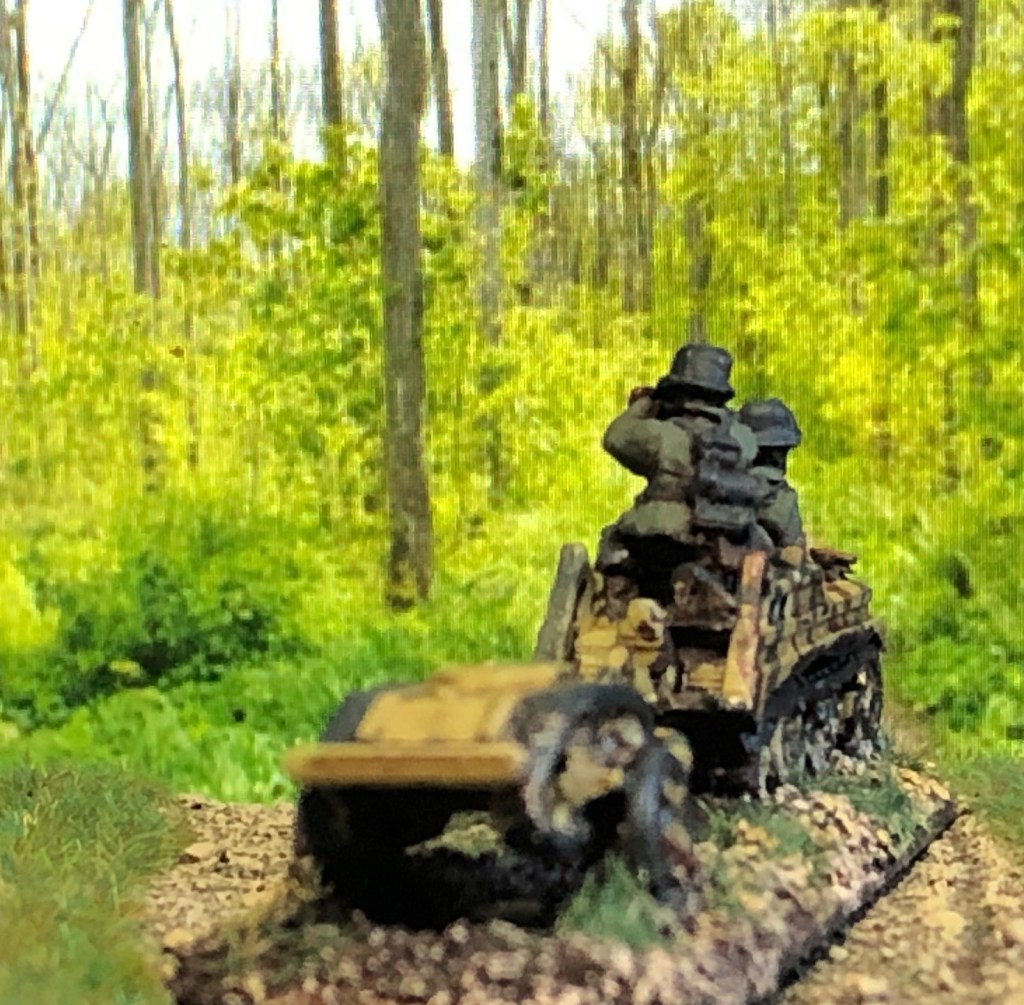
Recently I found some files on Thingyverse (here) and printed out some Goliaths with and without trolleys and added some Peter Pig Germans and two Kettenrads. Happy how they turned out.
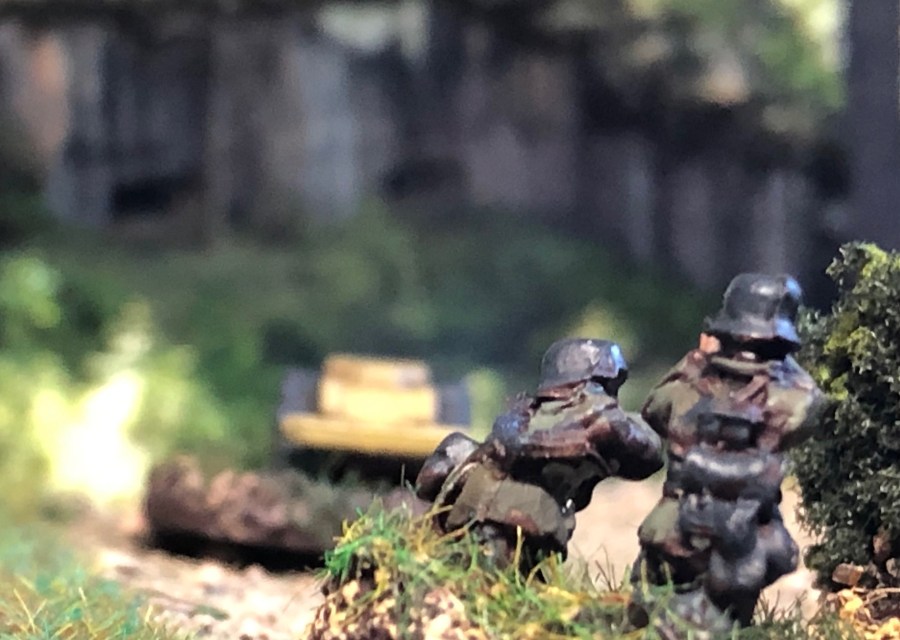
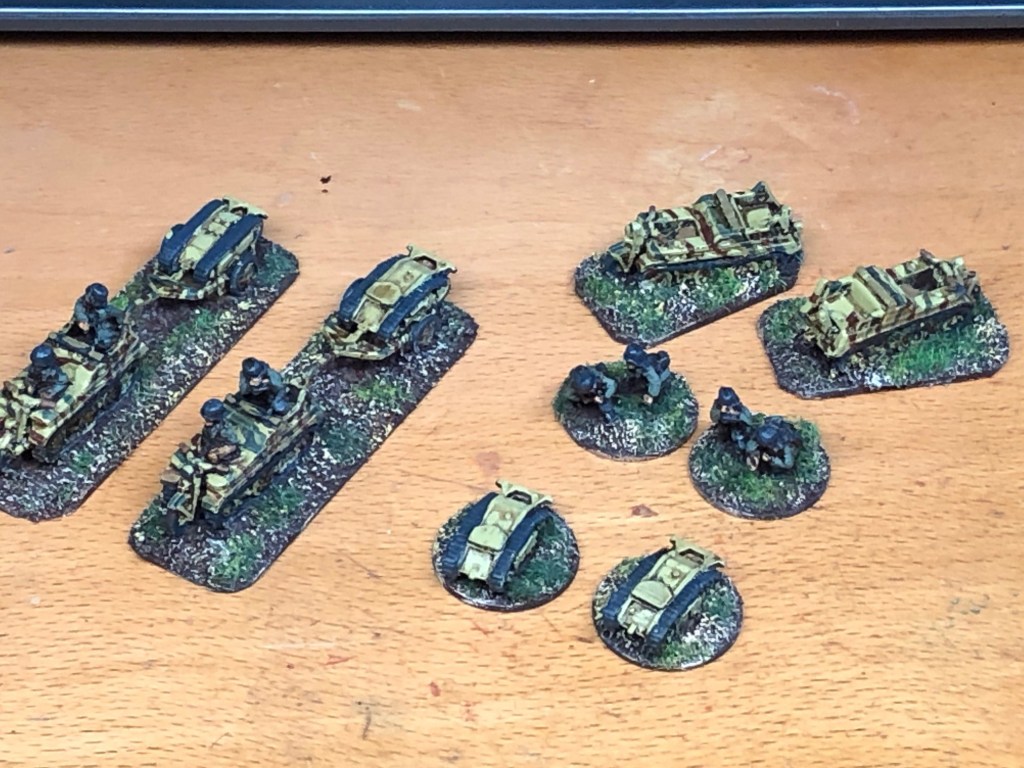
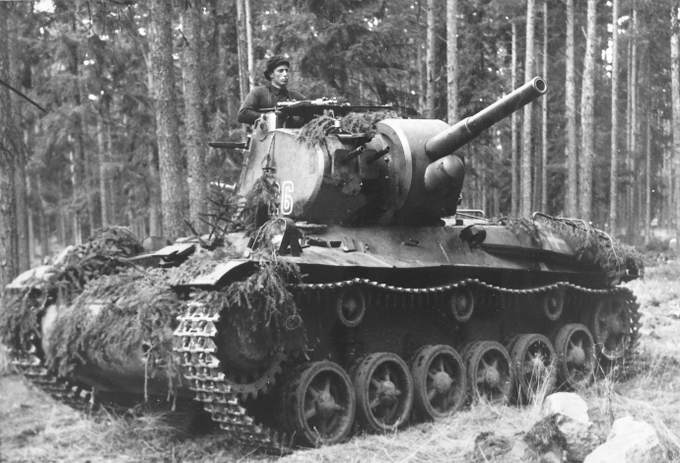
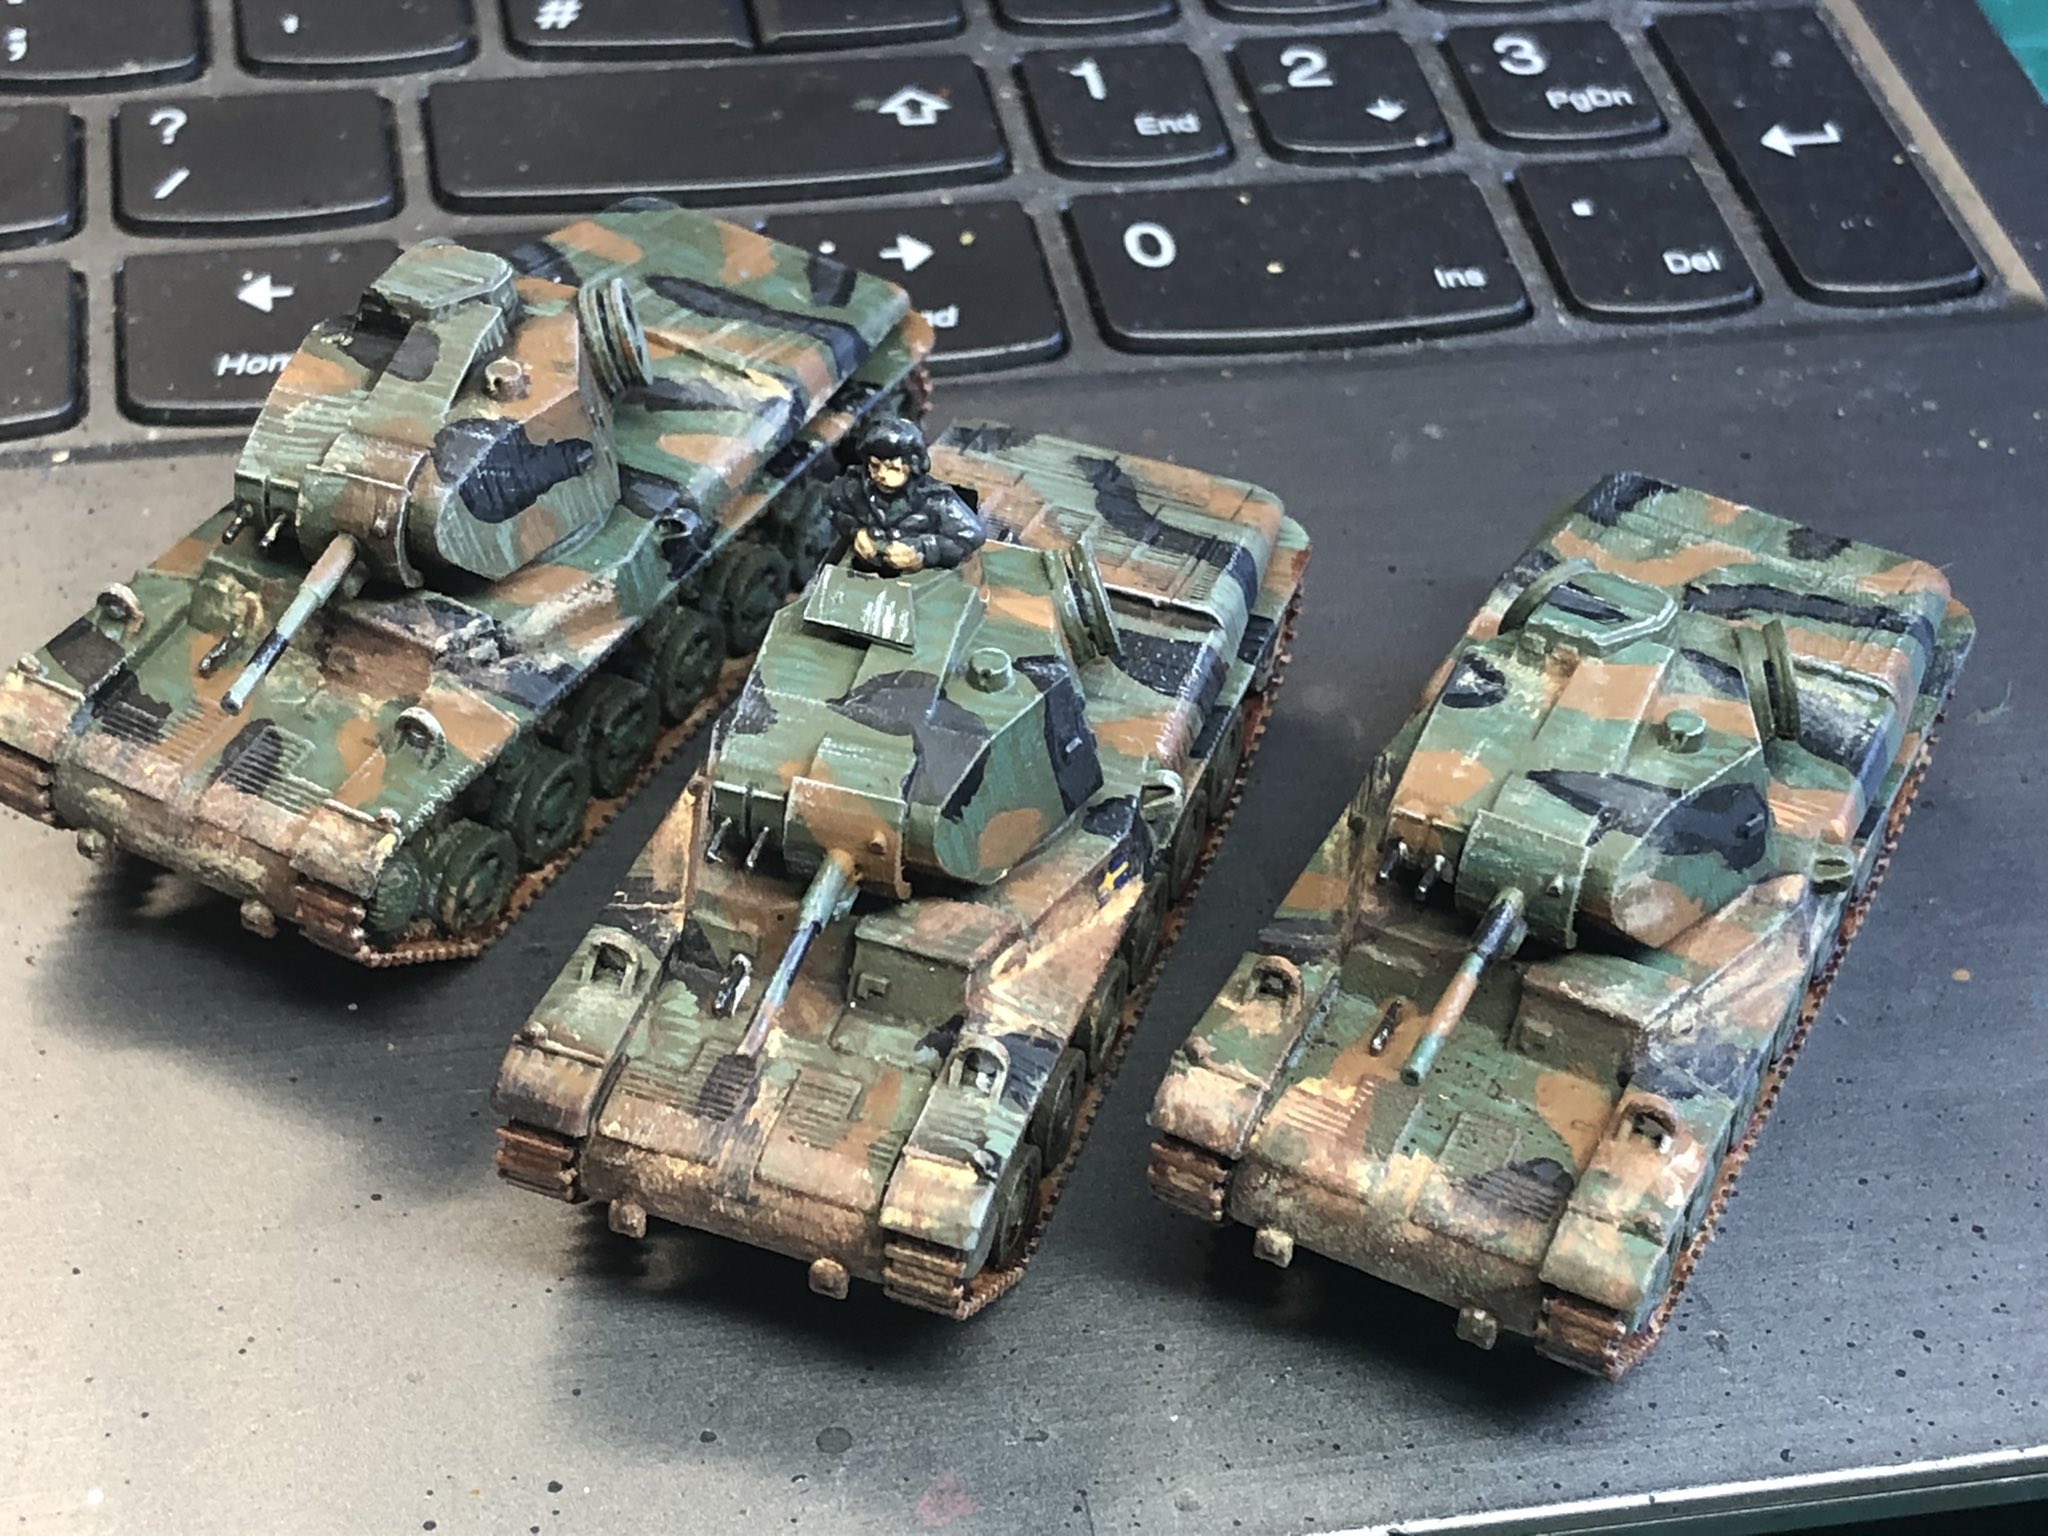
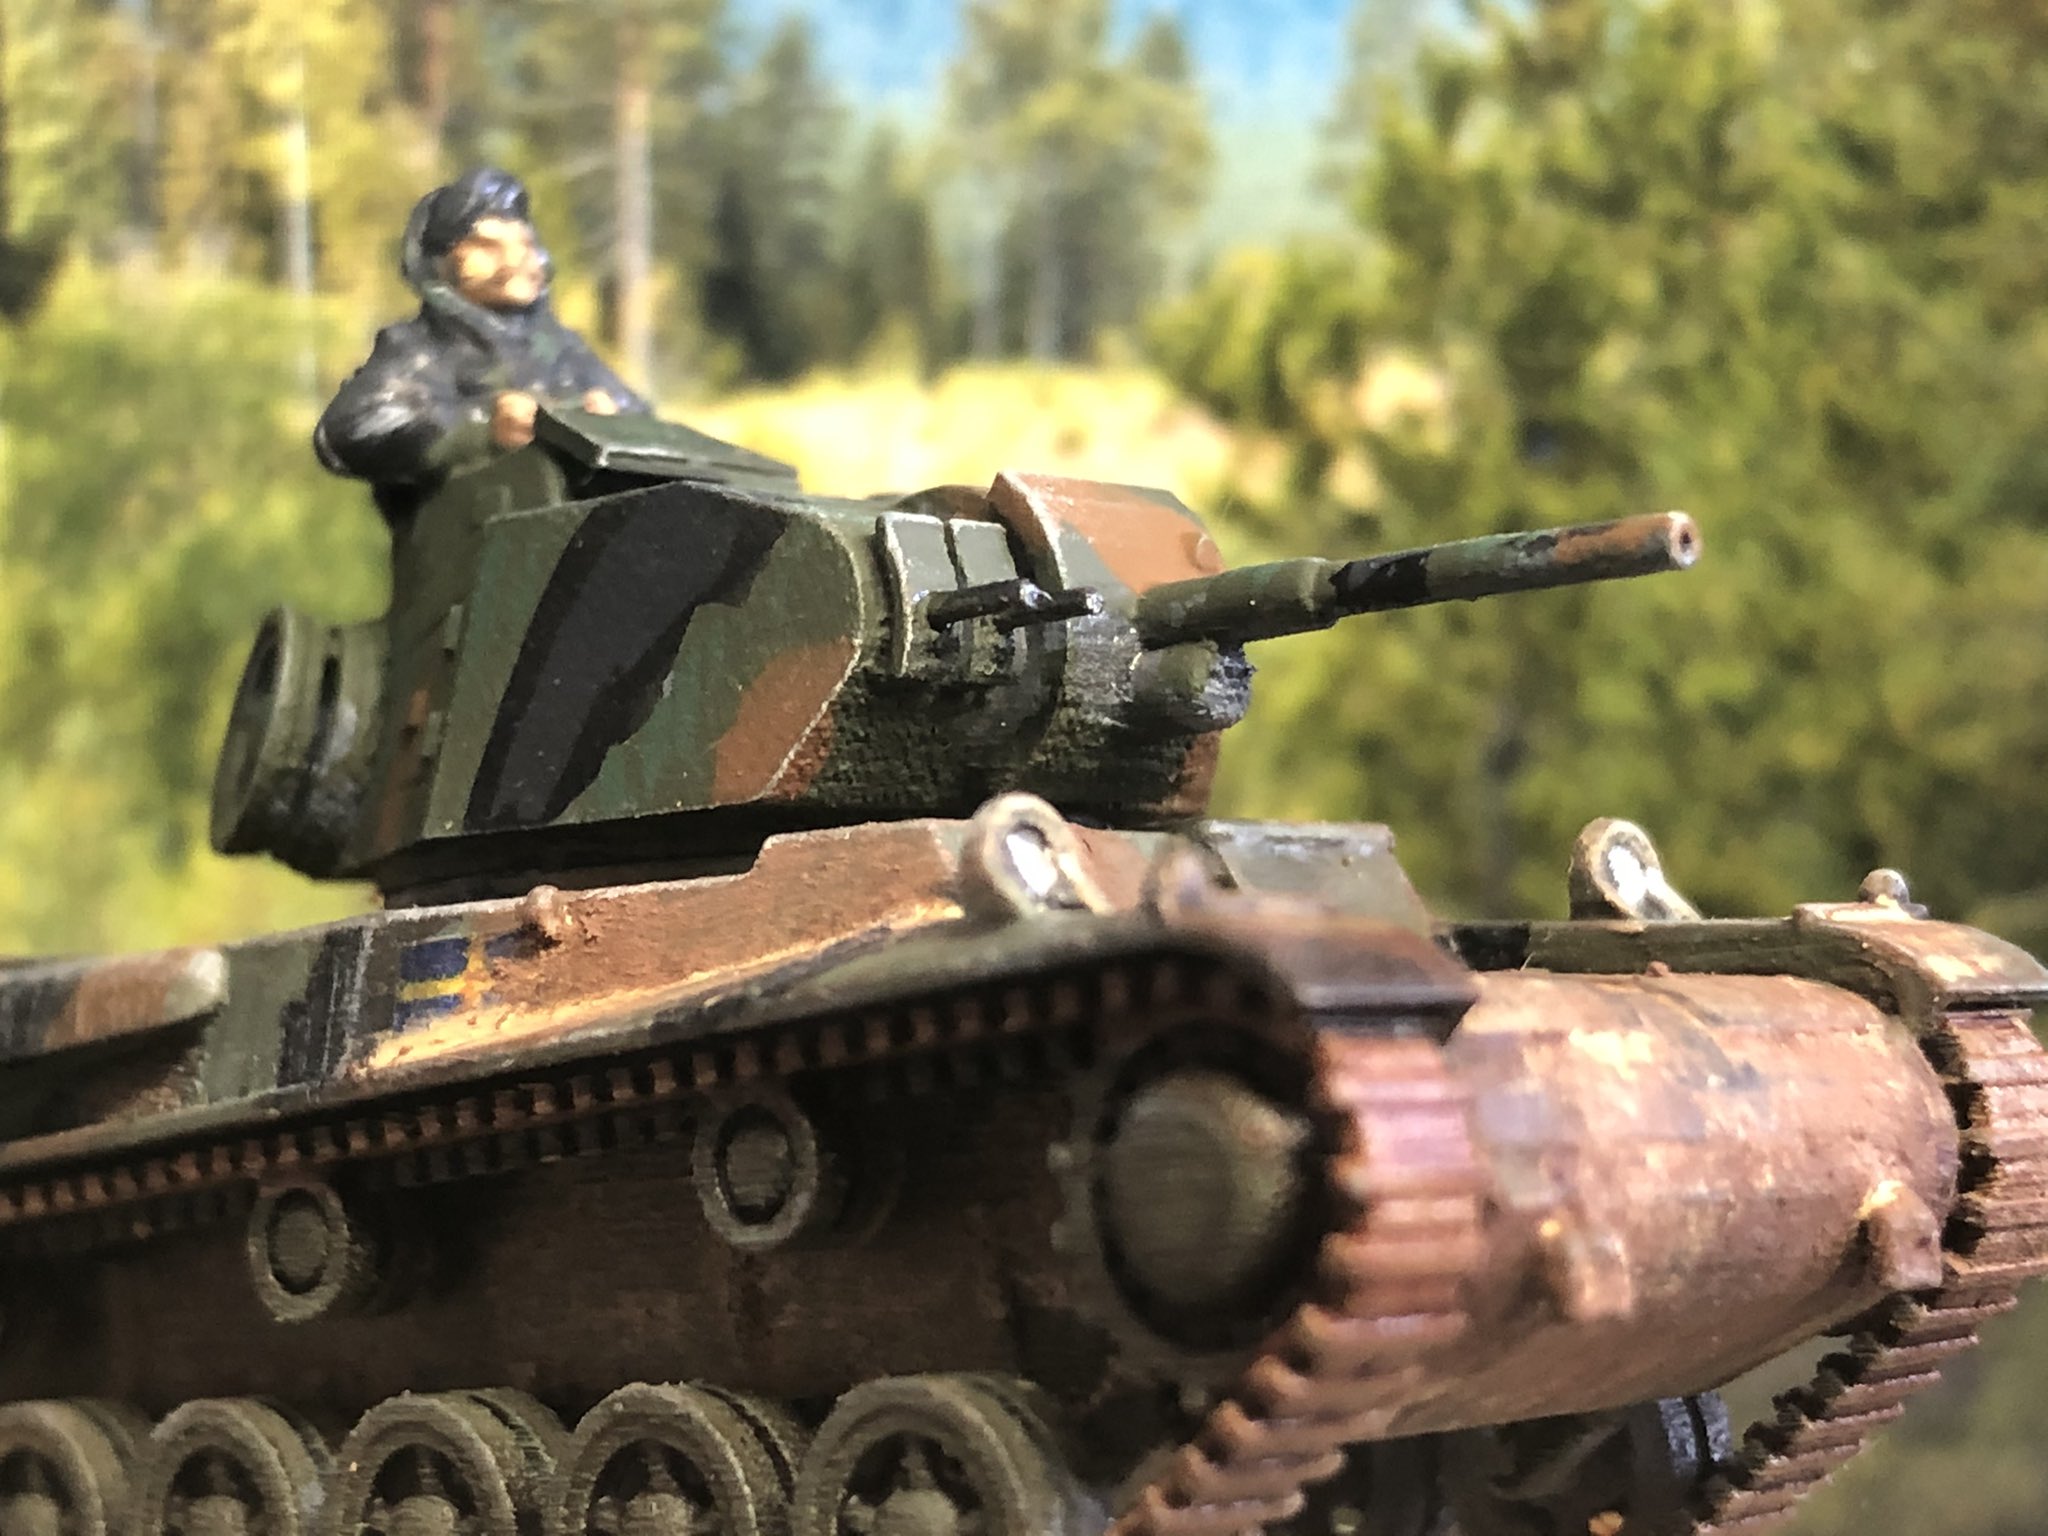
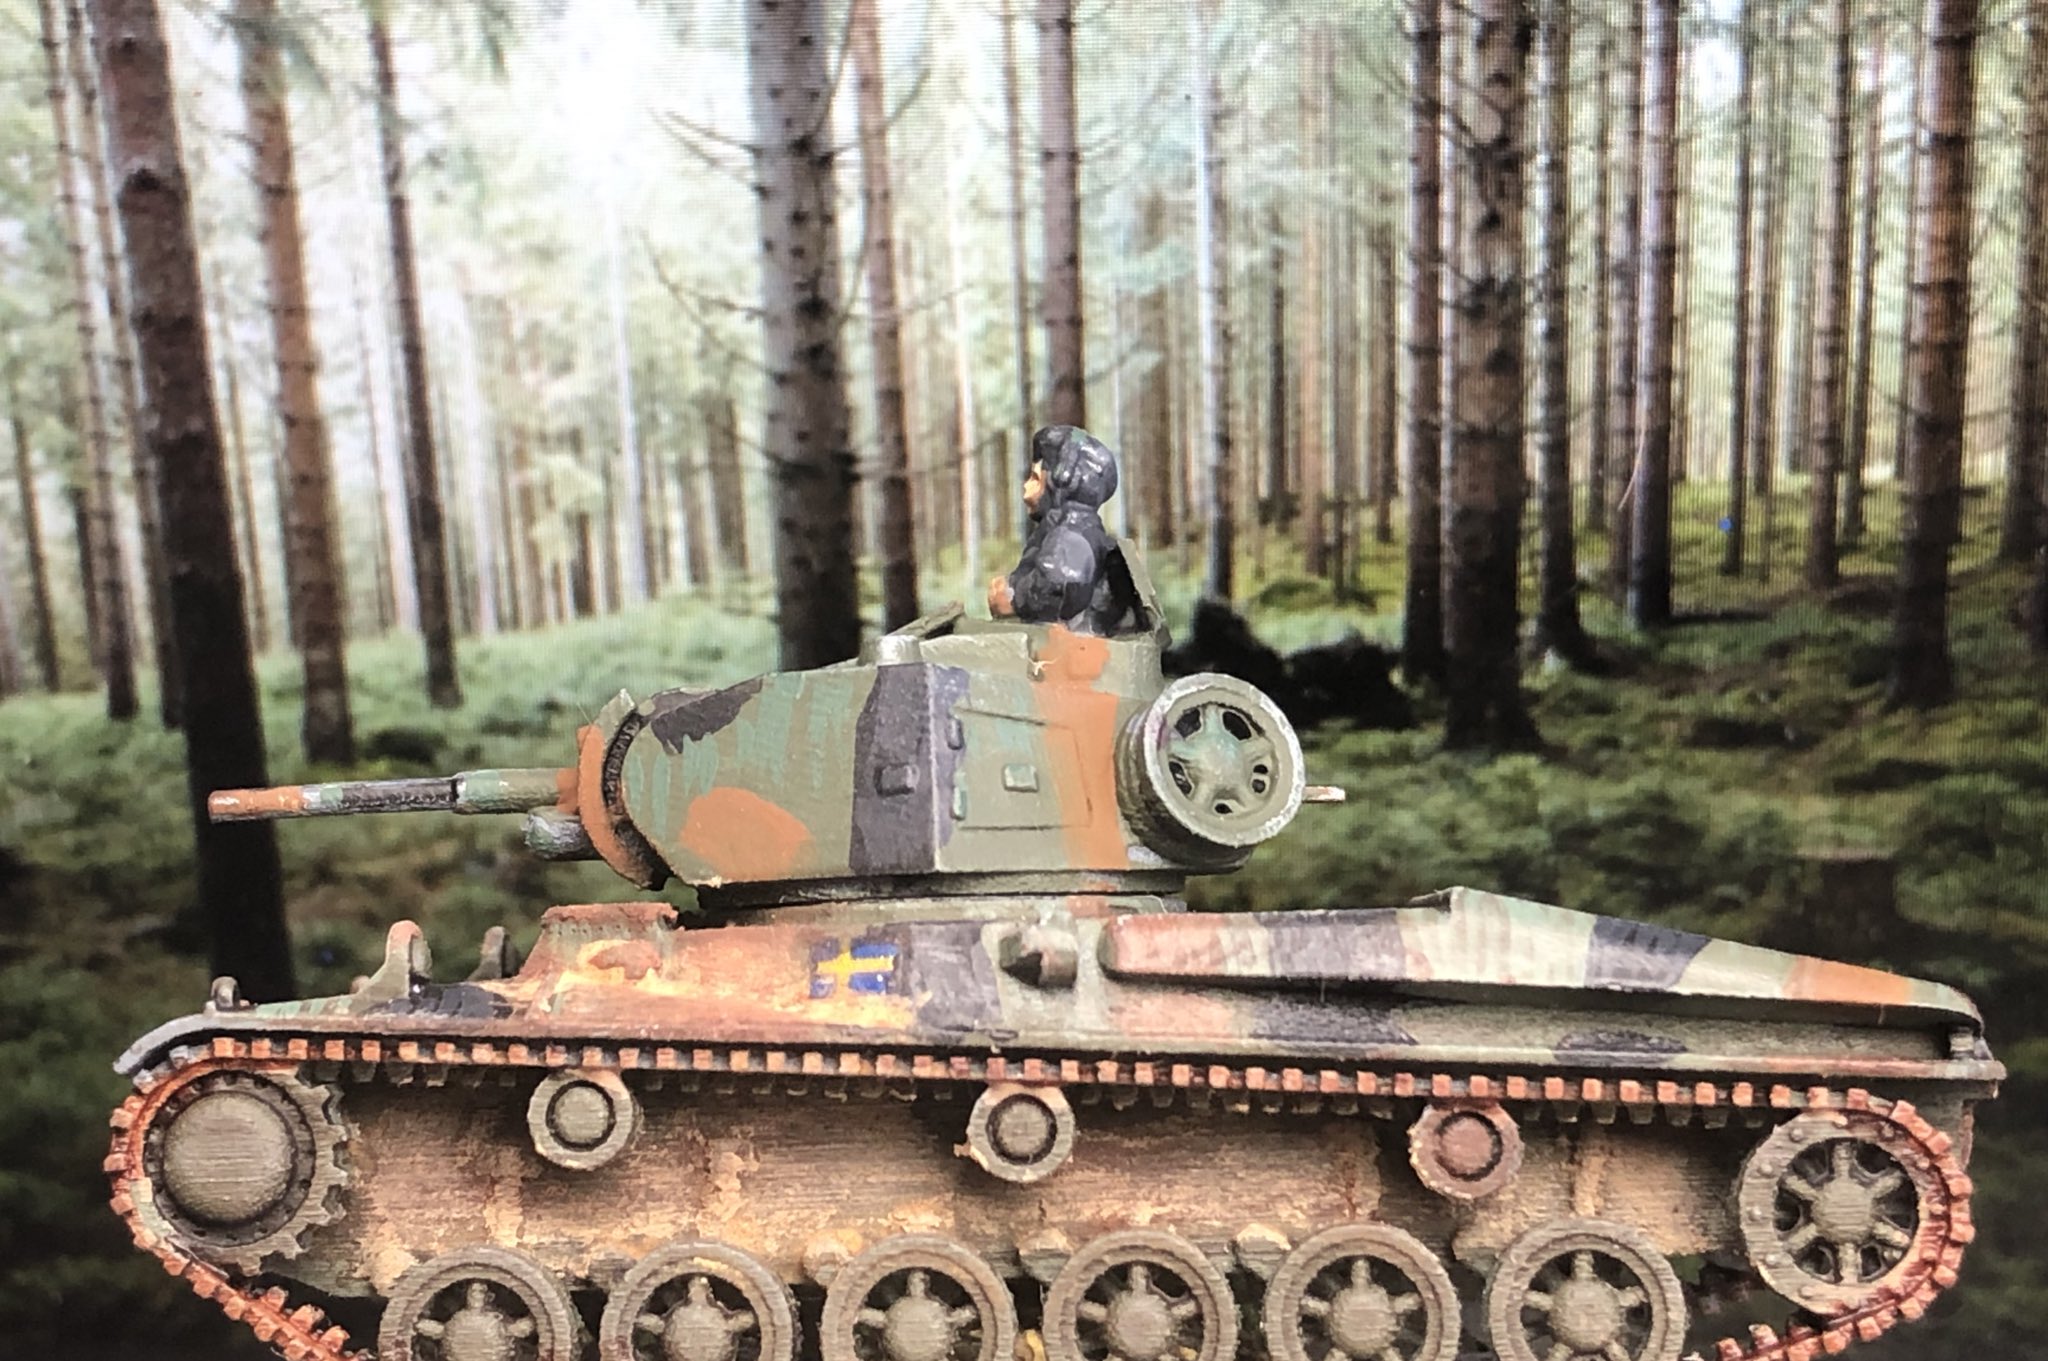
One of my favourite looking tanks is the Swedish m/42 tank, a domestic tank that was finalised in 1943 and plausable to take some kind of place in a 1943 what-if invasion of Sweden. It did initially have a lot of issues as was not very reliable and I found an interesting article here. I did have one of these in 15mm before but got another two from Shapeways some time ago – I was waiting for an alternative source but I think these are great even if they take you back about £19 each.
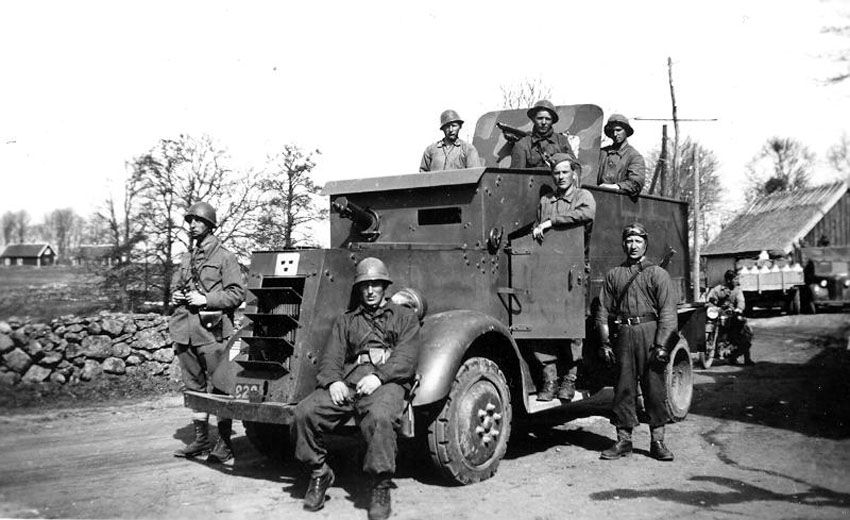
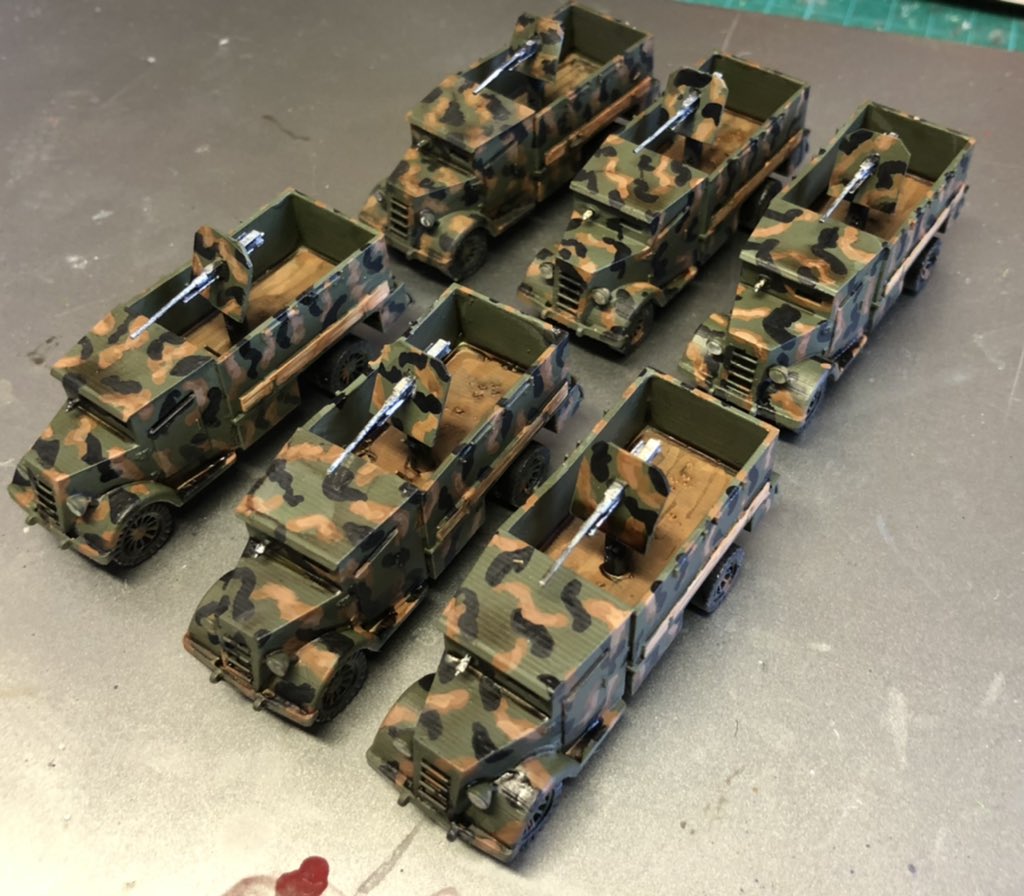
An armoured Truck – Pbil m/31
The second one is a Paul Edwards special (who runs the excellent Sabotag3d company – https://www.sabotag3d.com/). I showed Paul a picture of one and of them and off he went and designed one for me and printed out a fair few, and I have had them lying around for about a year – it was time to put some paint on them. More about this vehicle here.
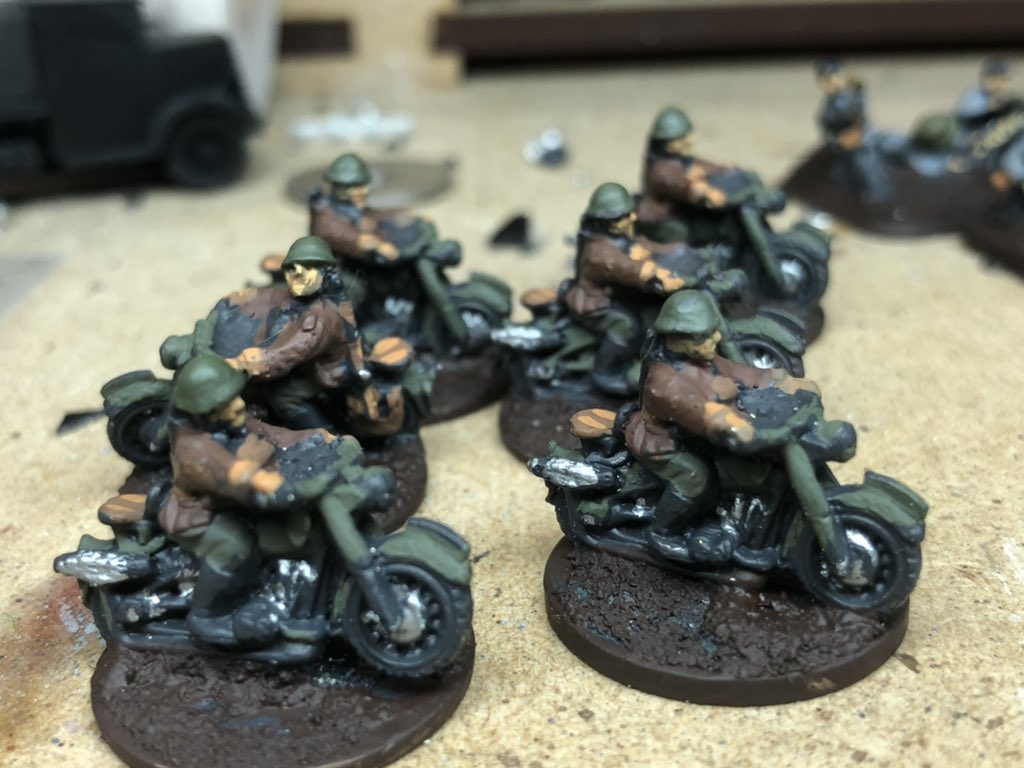
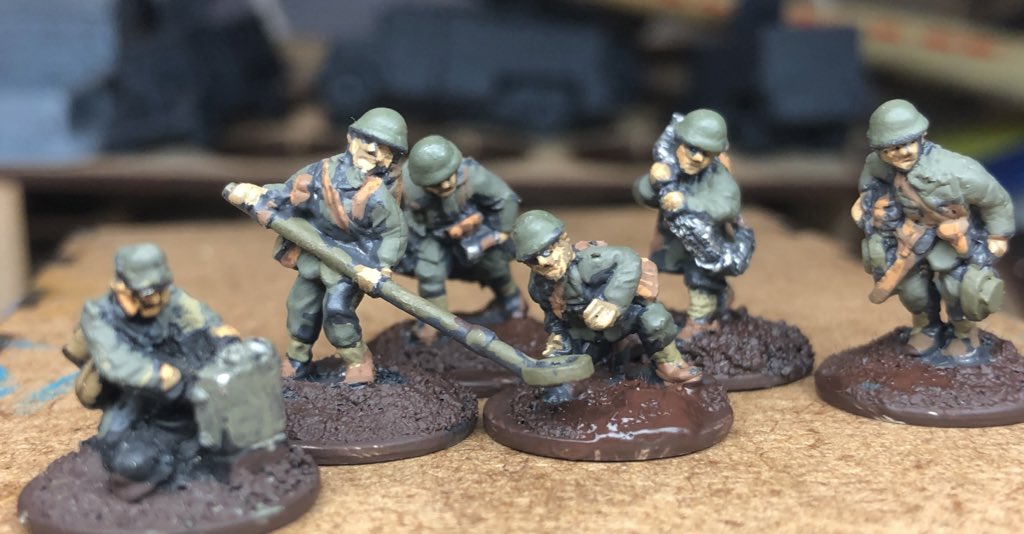
First one done, note the upgraded 1942 version had a 20mm cannon. Countryside touring in Dalarna 1943.I made Six because I had Six…and a few MC riders as escortAnd a few Swedish Engineering Types
That was all, see you in Dalarna in 1943!
Sorry one more thing, there is a new Podcast that is worth giving a listen and a follow. You may already be familiar with the excellent Yarkshire Gamer blog, Ken has decided to share not just his smooth voice but his passion in Audio, focusing in the grand spectacle stuff, big gaming.
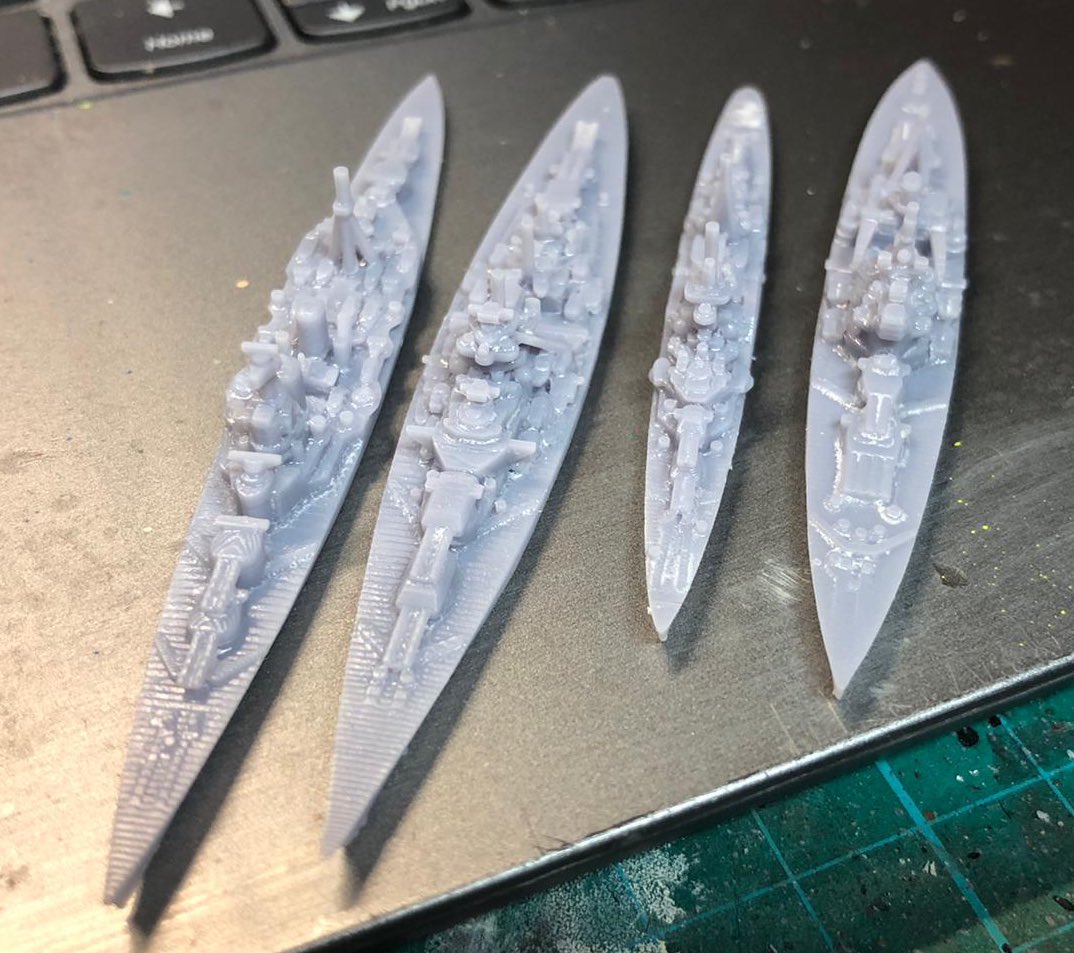
I bought a 3D printer at the end of last year but it stood doing nothing for some time. Work was crazy leading up the Christmas break and during the break I got otherwise engaged. However I recently got it all up and running and how much fun I have had with it.
So far I have printed 1/3000 ships and 1/100 tanks and a lot of 2mm city buildings and walls (but more about that some other time).
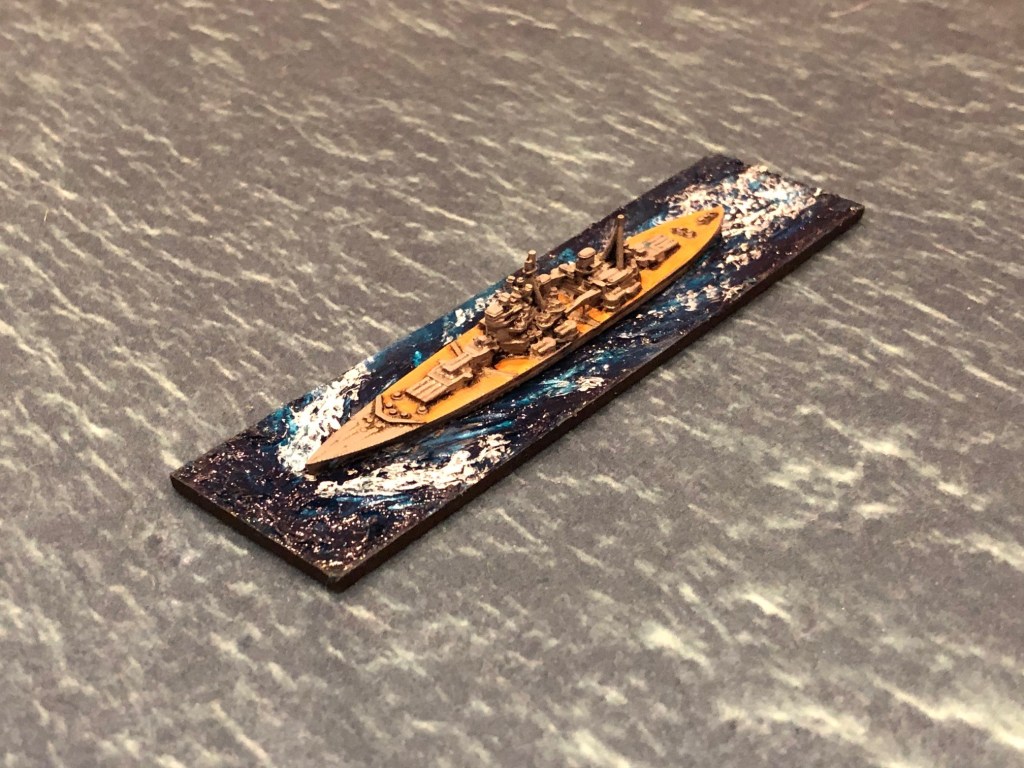
Denmark Strait
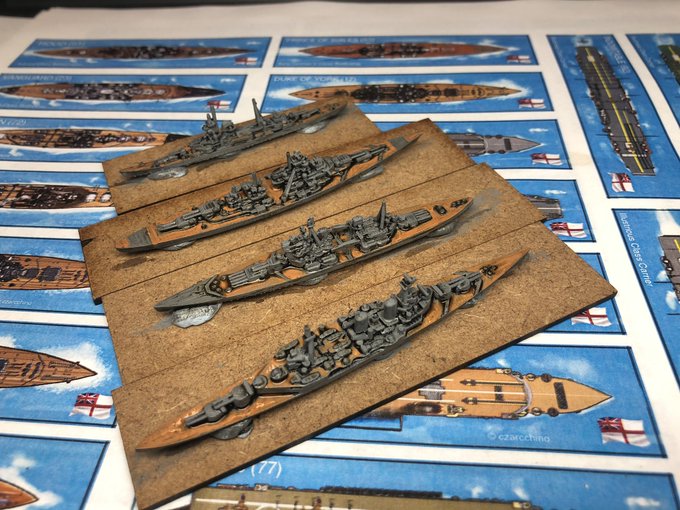
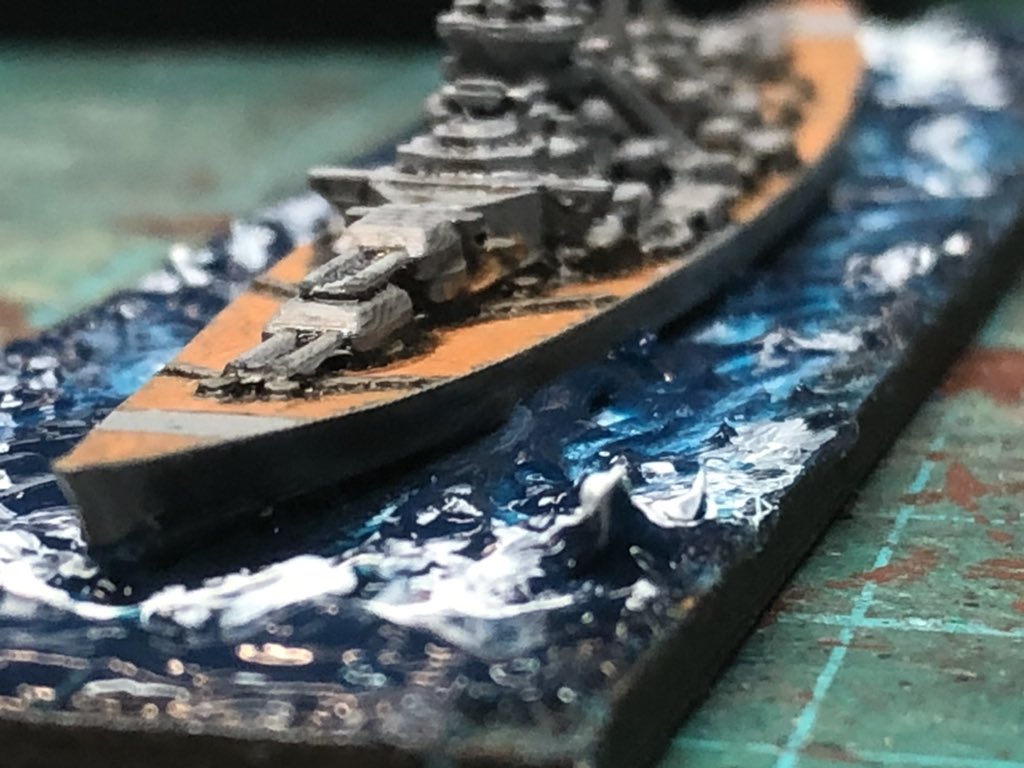
The first thing I printed was the ships for the Battle of Denmark Strait 1941, where famously HMS Hood was sank by Bismarck.
HMS Hood, Bismarck, HMS Prince of Wales and Prinz Eugen
These 3d files can be bought from Ghukek’s Miniatures,
I painted them in grey, gave them a black wash highlighted some of he detail with the same grey and painted the deck details with a light brown. I gave the decks a light wash of brown.
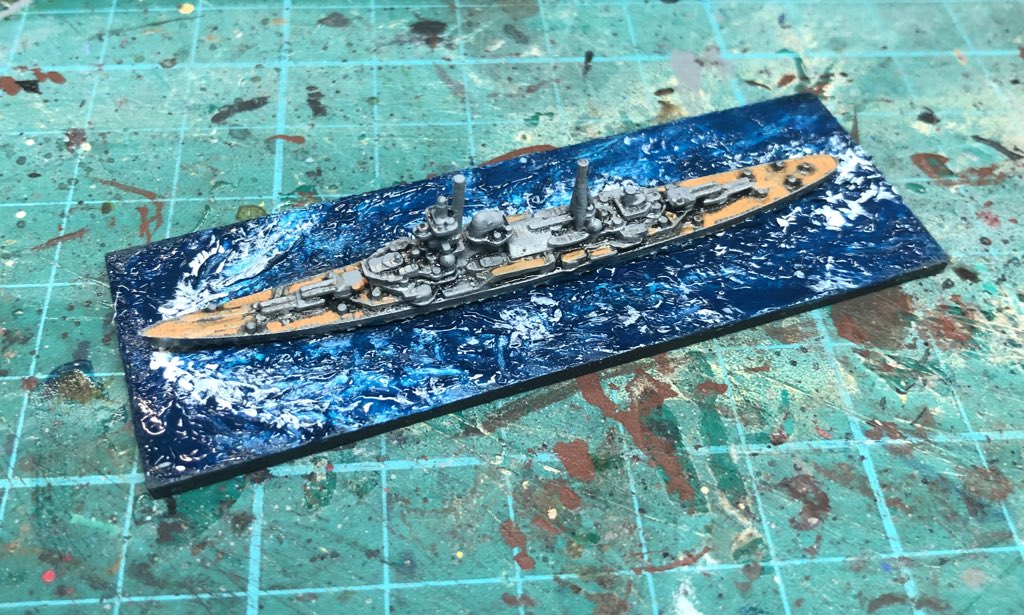
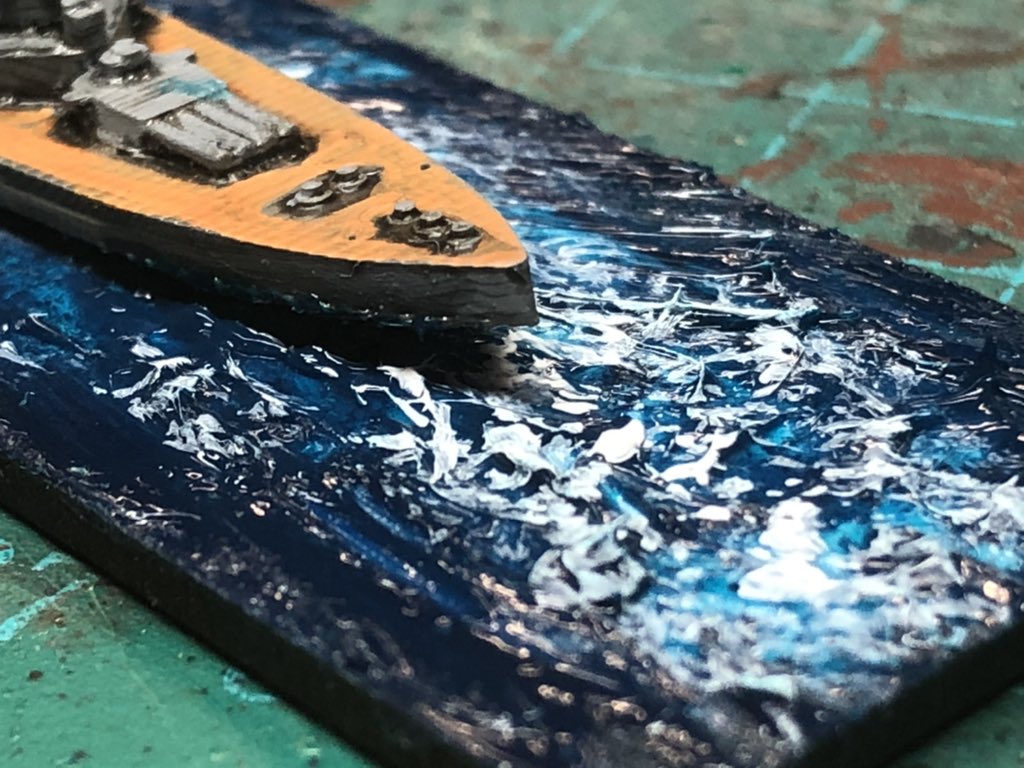
For the basing and wanted to get a quick results and painted the base in blue then outlined the bow wave in light blue and some streaks around the boat, then when dry some of the Atlantic blue from Vallejo (it is a modelling paste, link here). Let dry and carefully add some white to enforce waves and wake, and here and there. Really happy how they came out.
We will try these out in battle shortly, I will write about it then. The Little One is reading up on the Naval Thunder Rules.
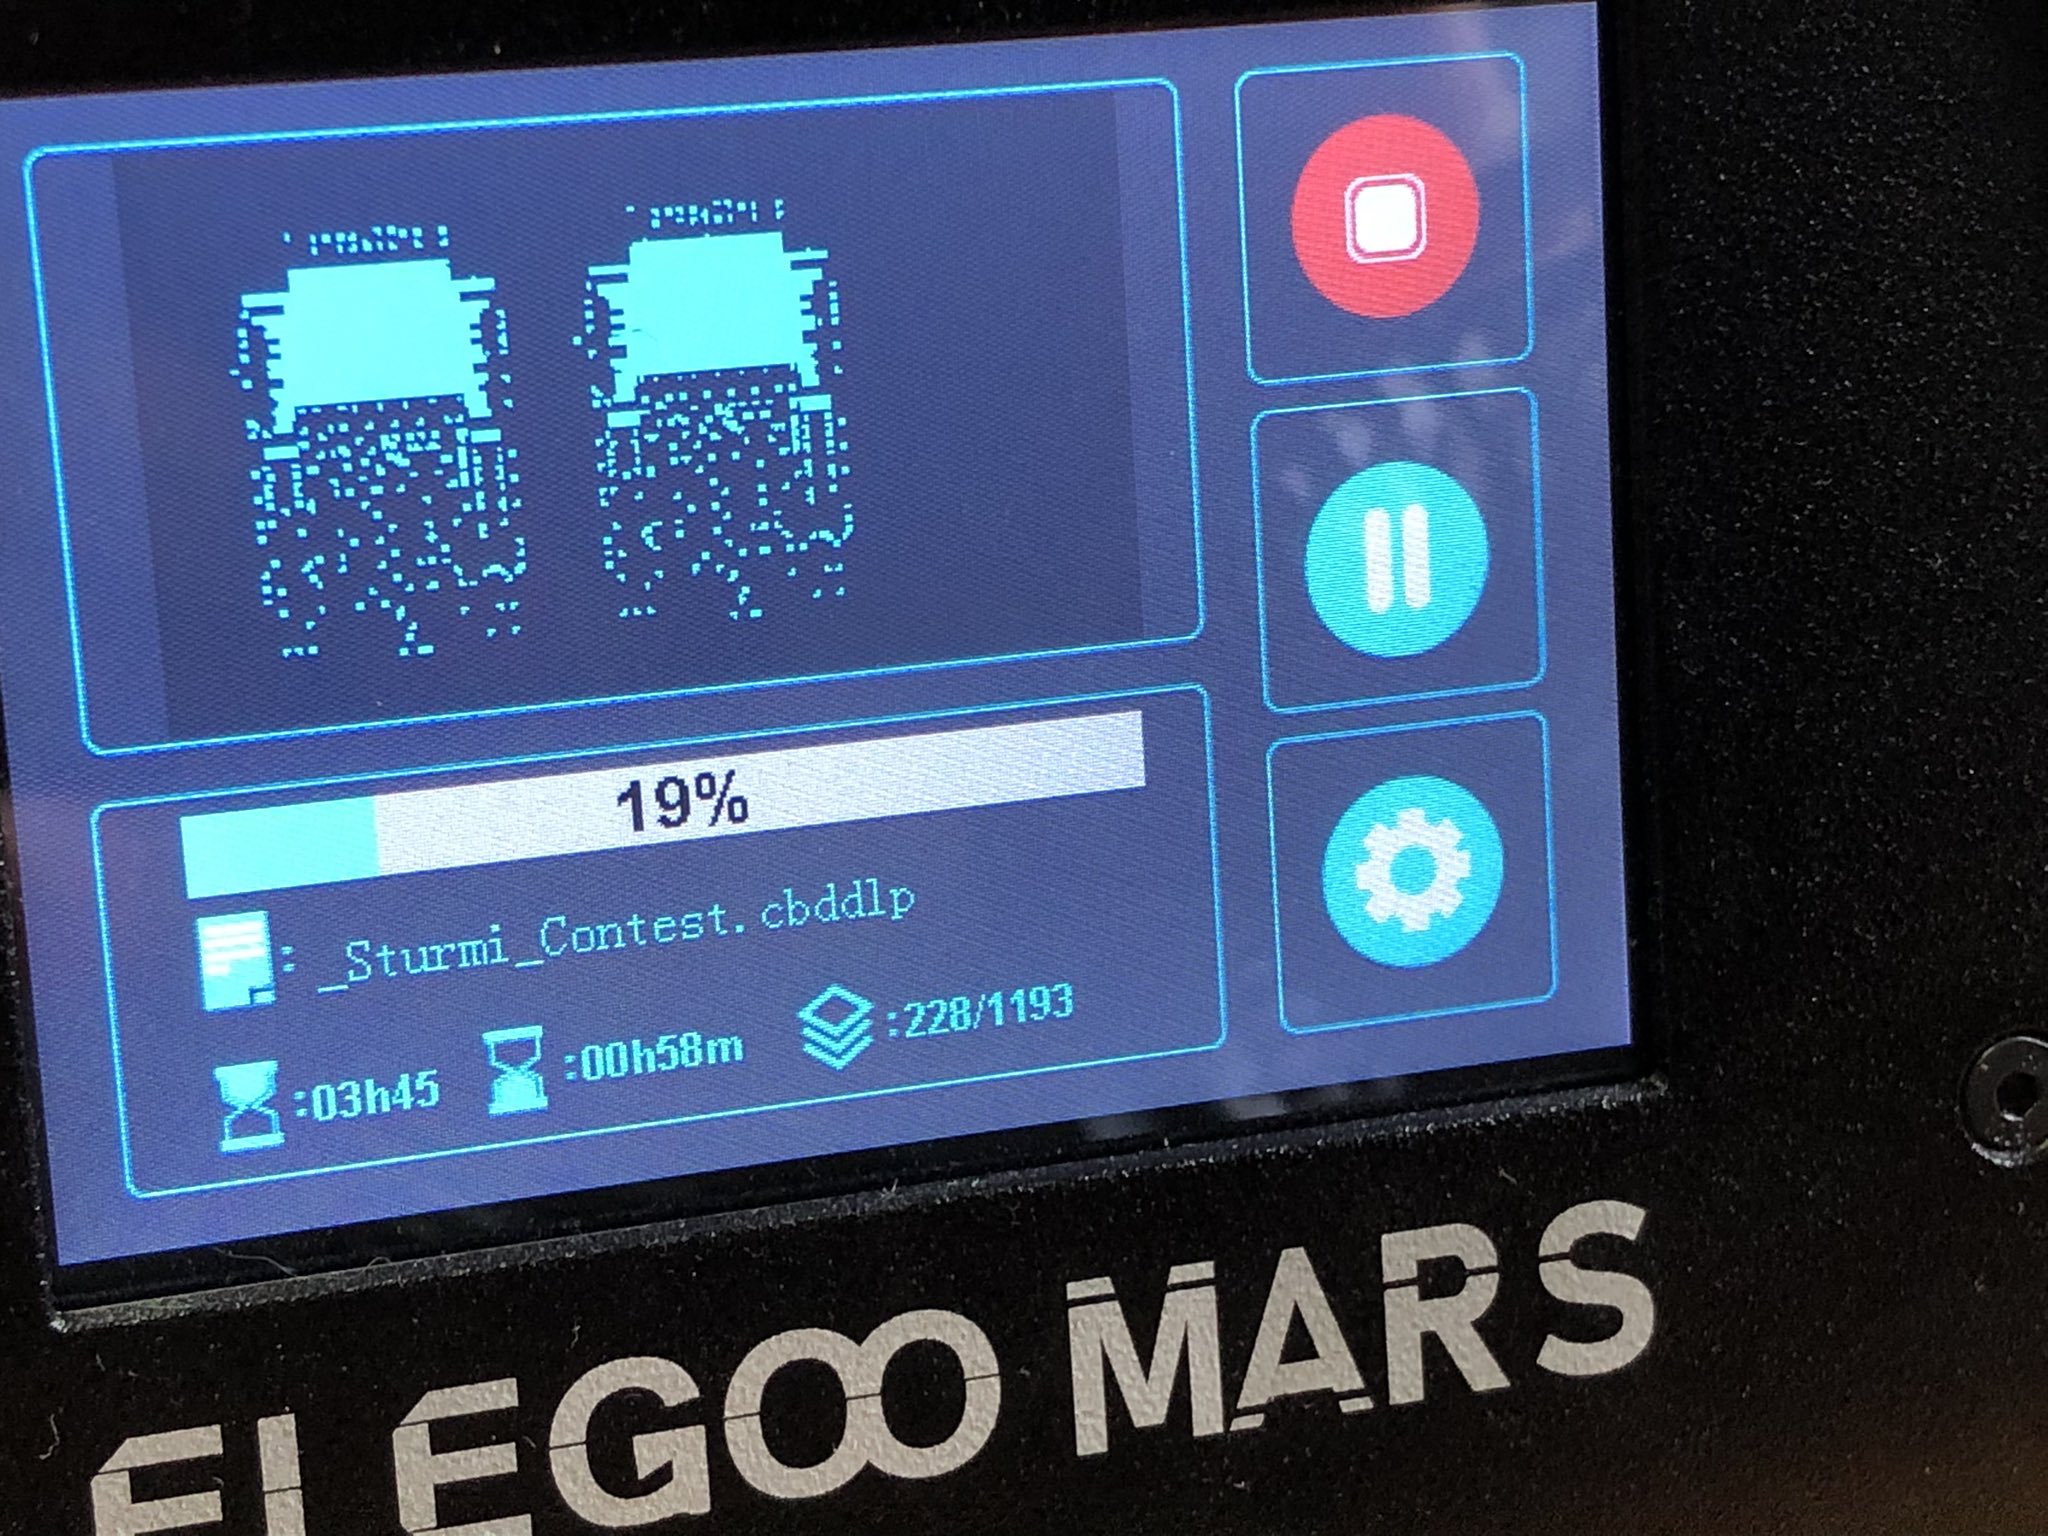
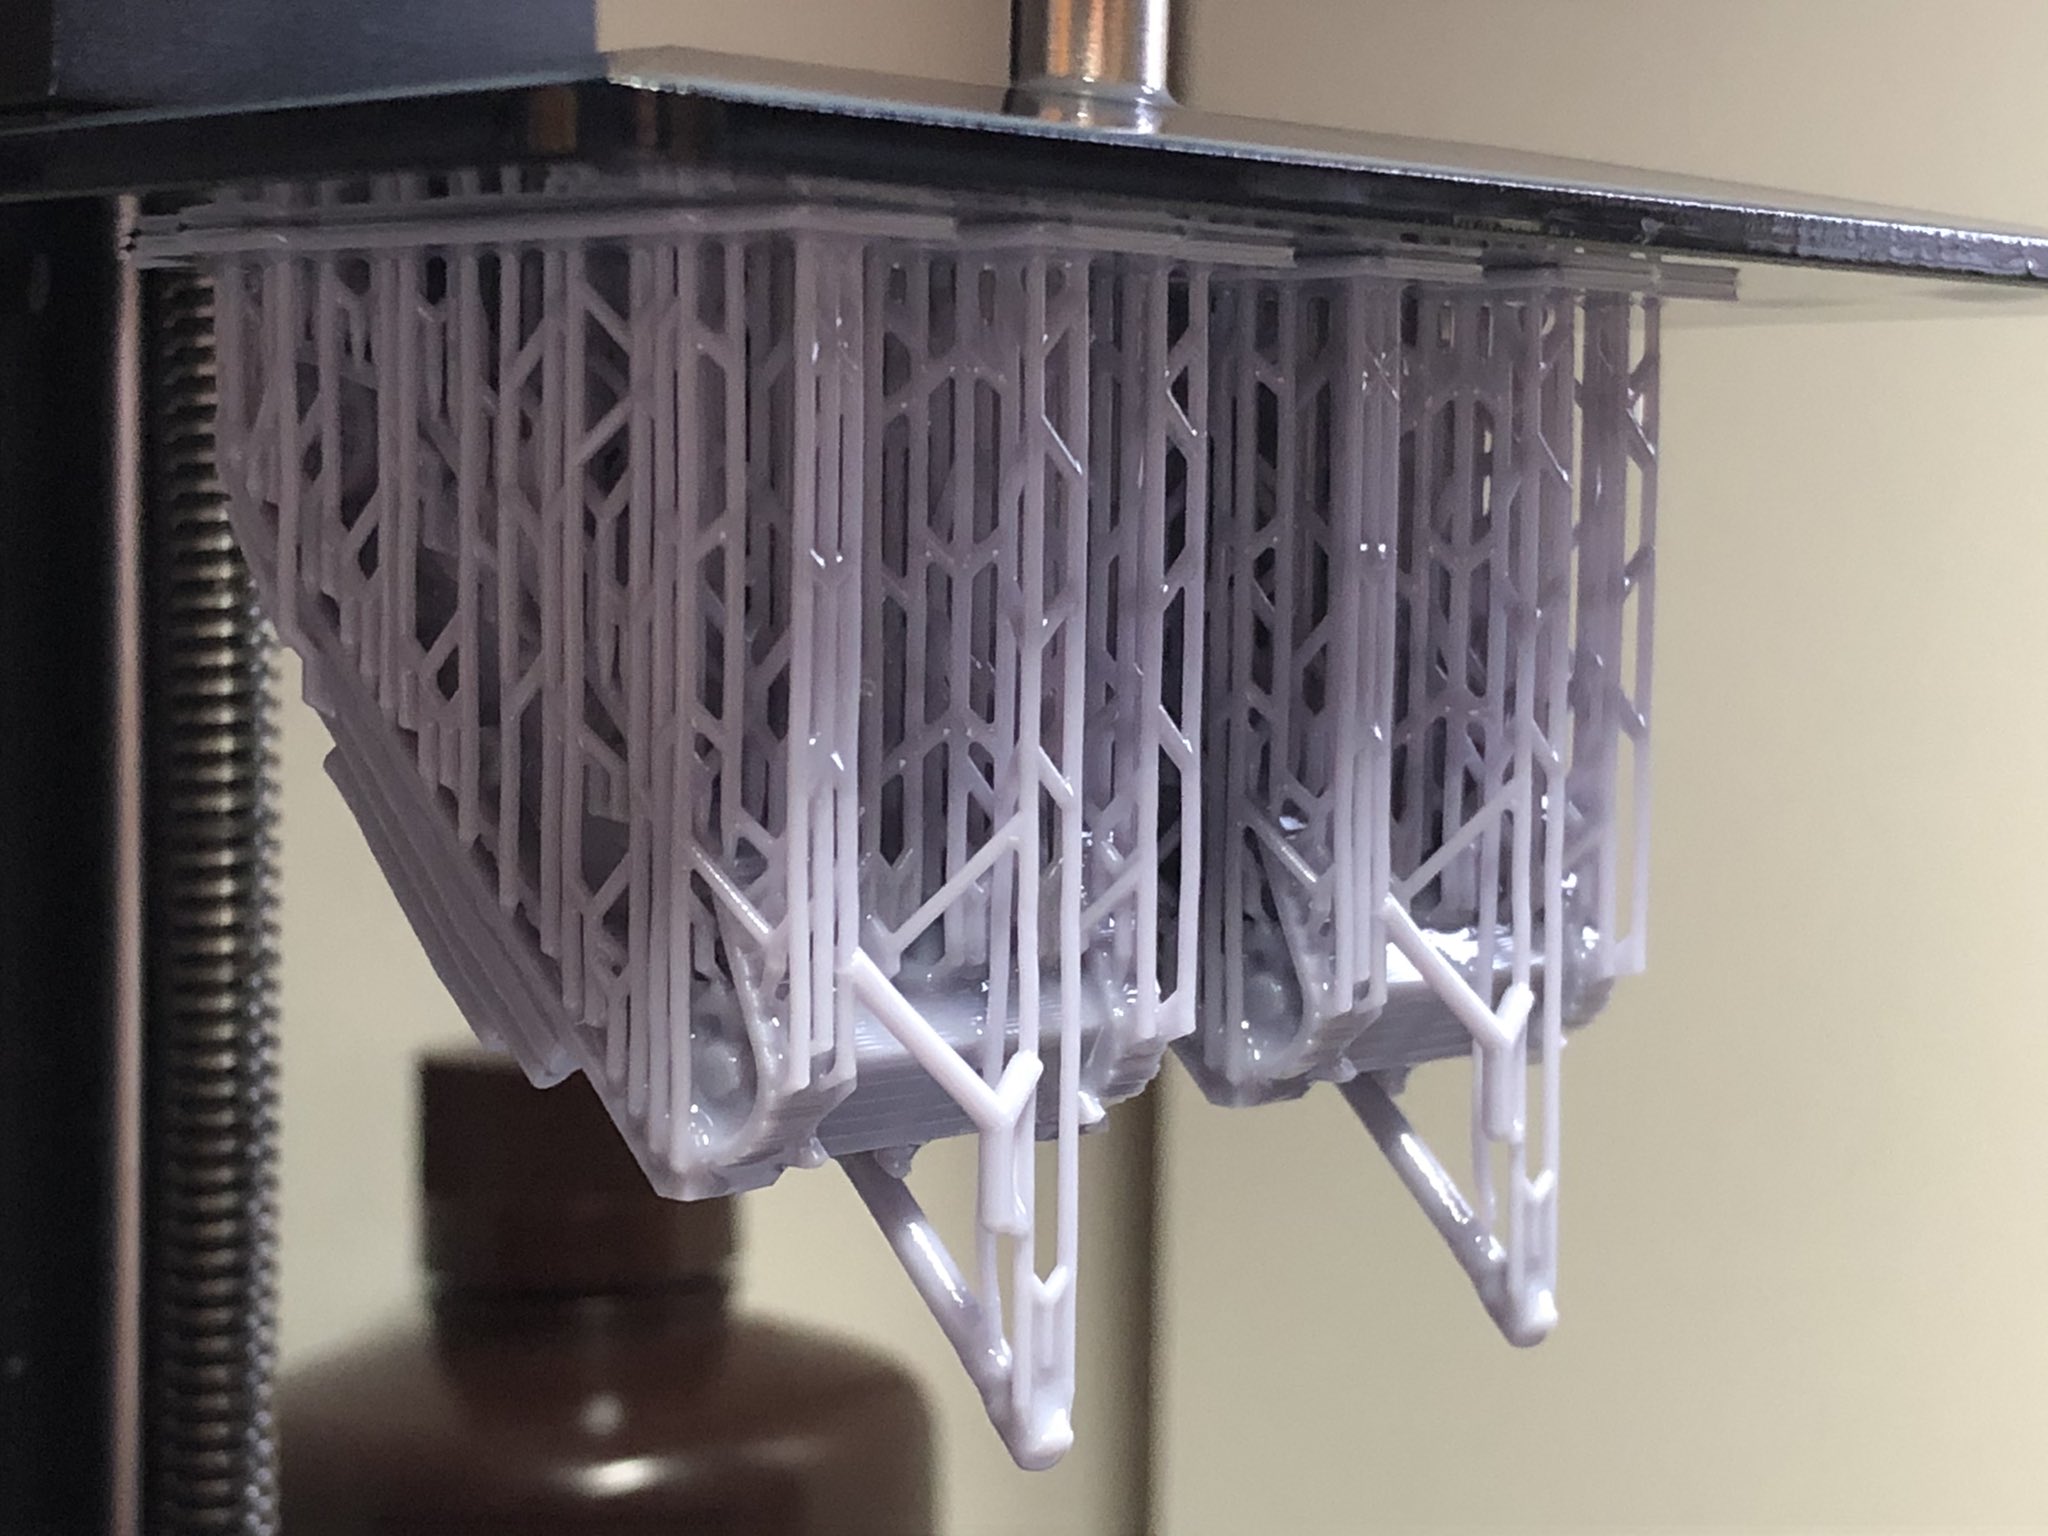
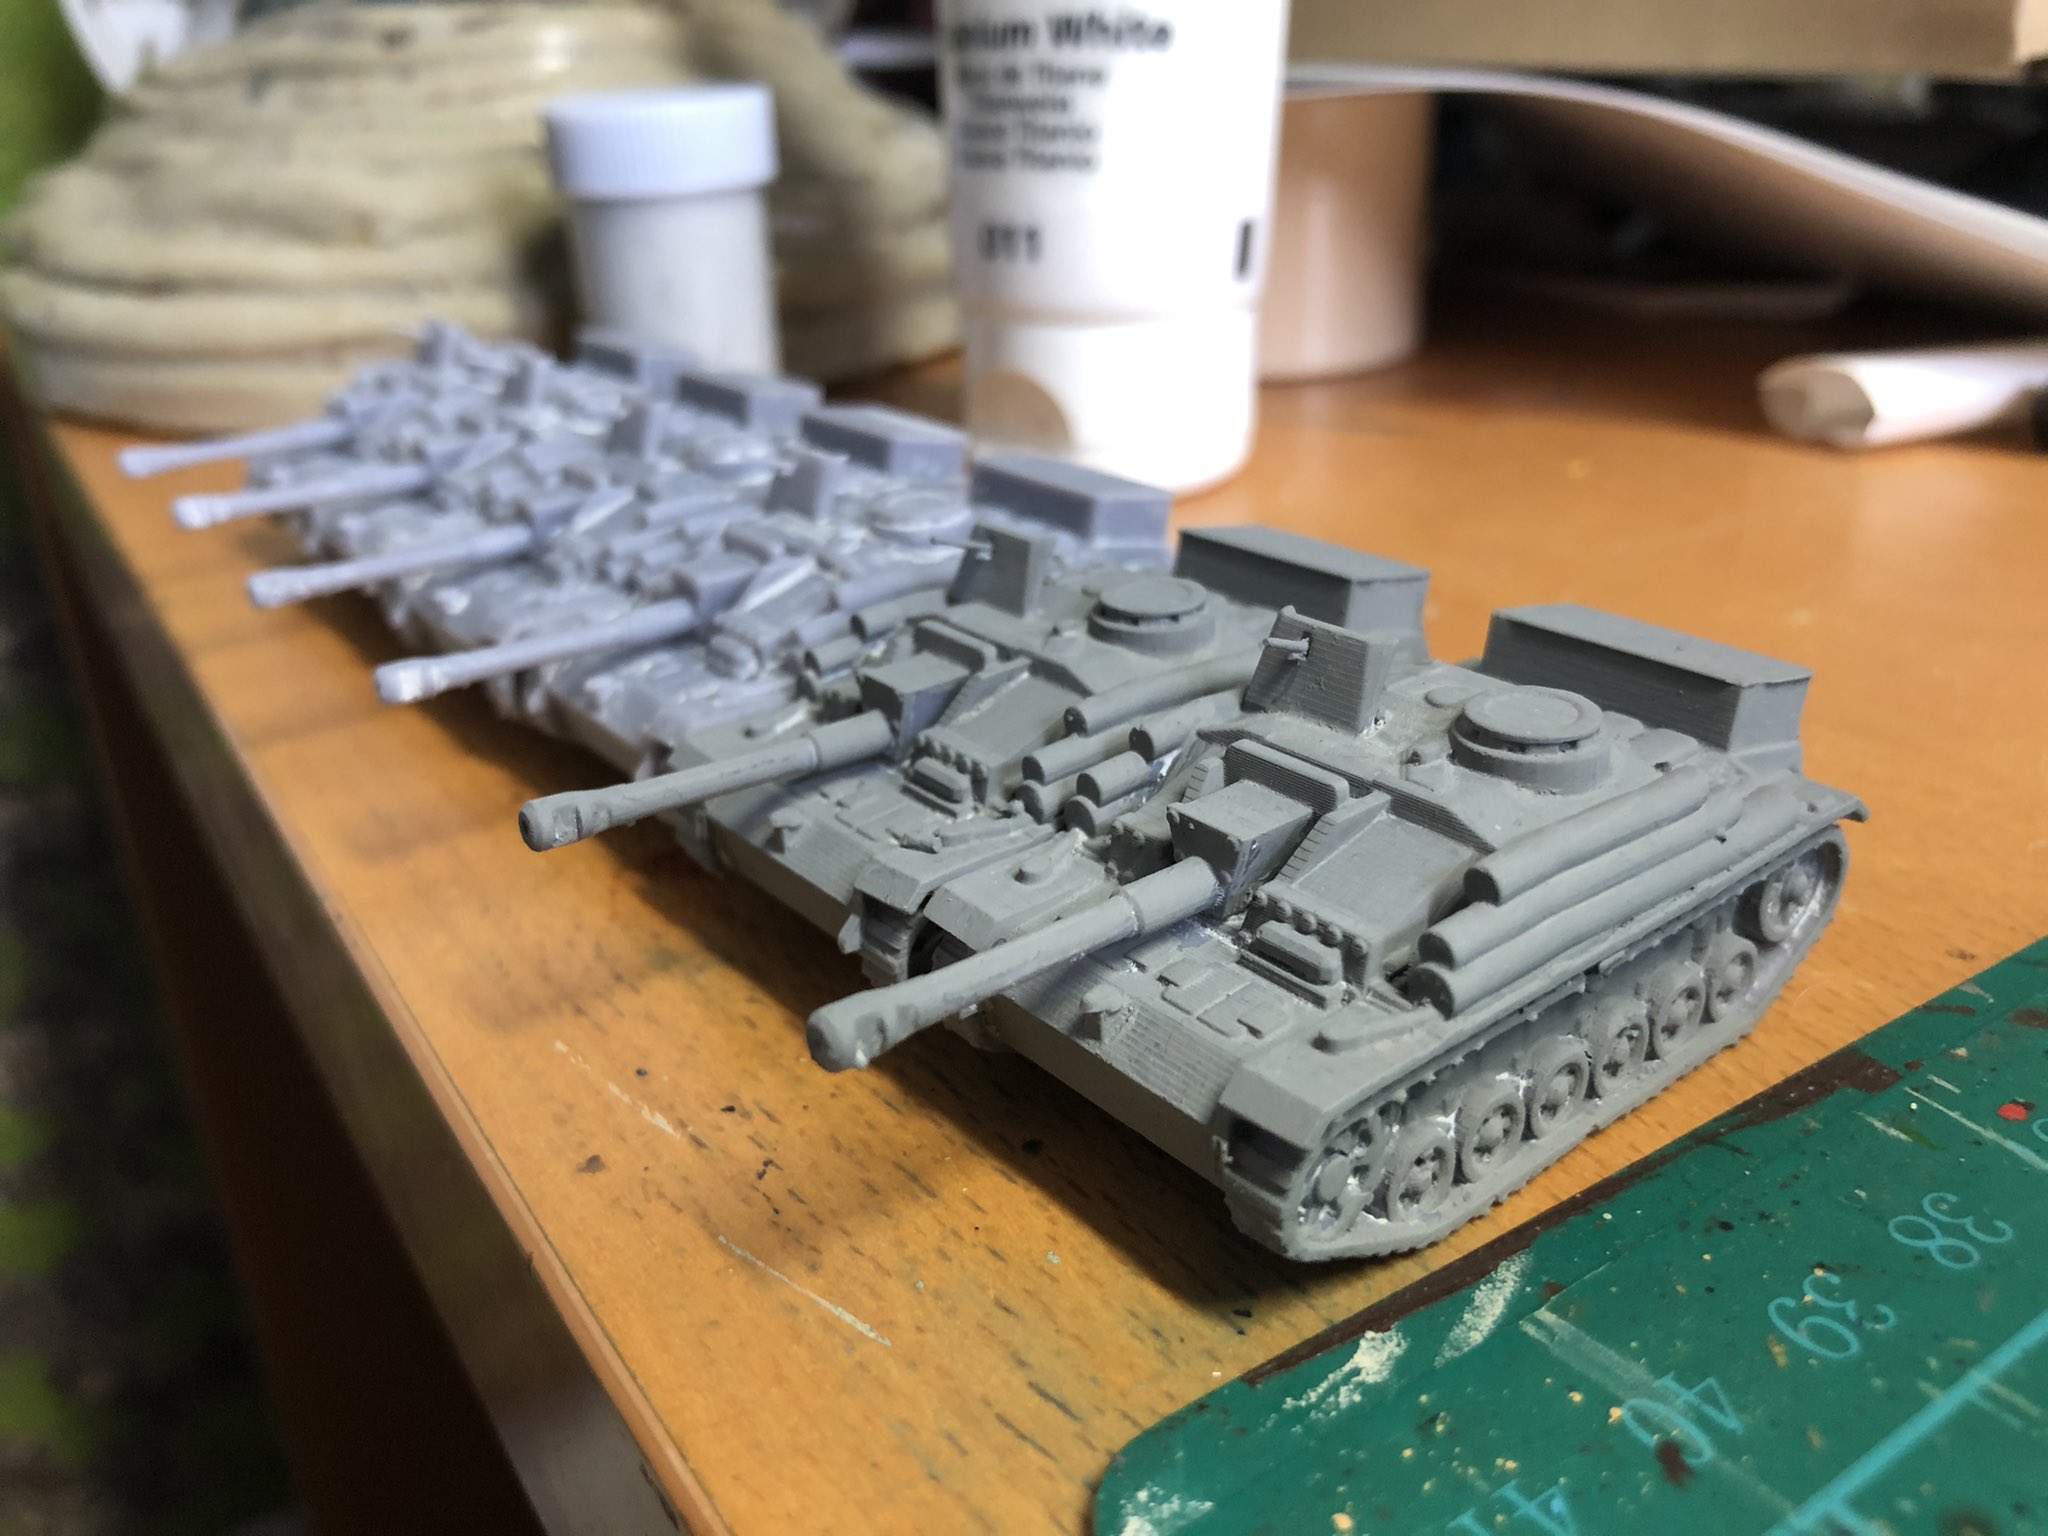
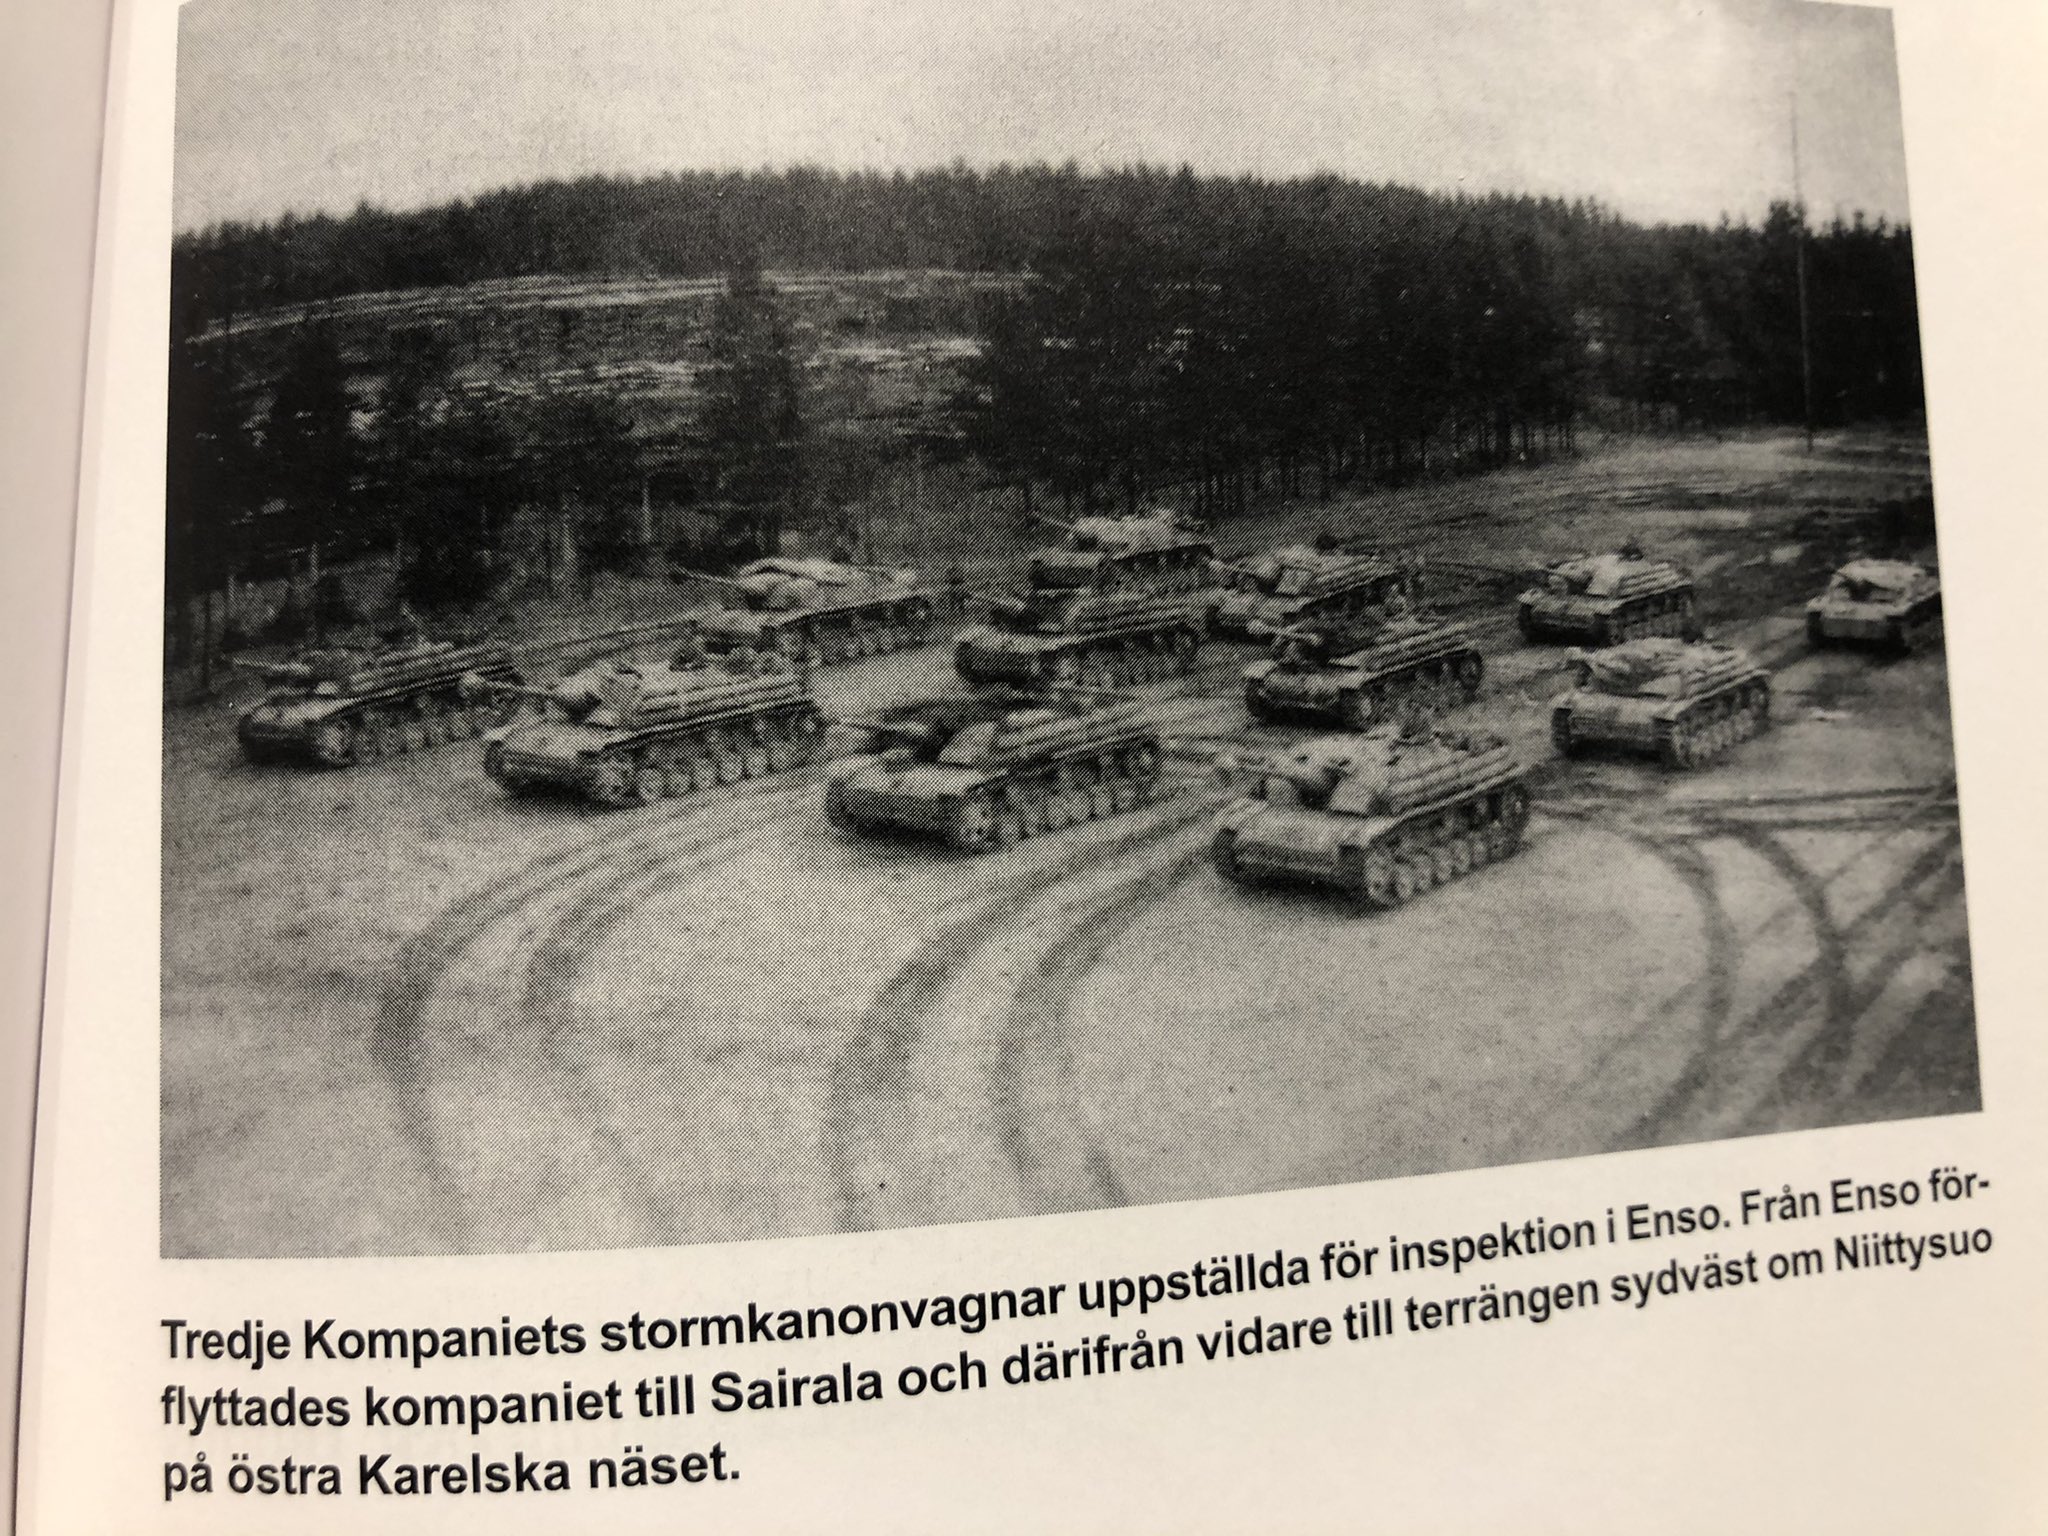
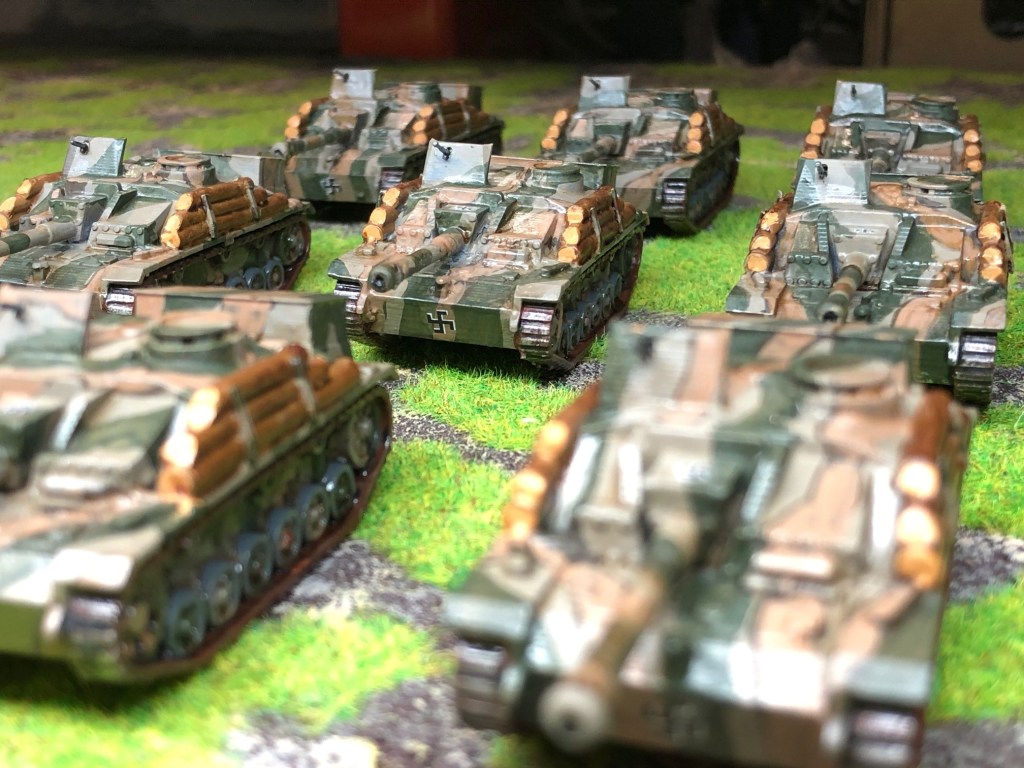
The second project was some Finnish Tanks, the Sturmi, or StuG to most of the world. I got the file for free at thingyverse, link here https://www.thingiverse.com/thing:2609688/apps – It is not a perfect model but good enough.
The wait for the print, it takes about 4 hours to print the tanksThe prints with the supports as they come out of the printers. I ended up printing a company worth of these
Really happy how they came out.
/ Hope that was of some interest, I will write about my experiences of using the printer and reflections later.
Gosh, how do you review 2020? It was a bloody miserable year from many aspects and I think better analysts will summarise the world events like COVID-19, Brexit, American Elections and whether historical wargaming is dying. This review is more personal…
Well given all the time I have had working from home rather than getting into an office my blog activity has been really poor – this is only the 24th blogpost this year, that is about half the number of blog posts I normally do. However I do a lot of mini-blogging on Twitter and sometimes wish that I could link the two in some way. The blog posts feel more permanent and perhaps more like an achievement and gives time for a little bit more thought and wider information compare to doing tweets – I do not know.
Anyway thanks to everyone who follows this blog, the facebook group (not sure what to do with it) and/or my twitter account. All your encouragement has been really helpful this year, keep it up!
In terms of the hobby it has been a fantastic year and a few highlights for me have been playing in Jeremy Short’s Runequest campaign with some great people, attended the virtual Grogmeet that was an absolute blast and again catching up with new and old friends, hosted my own RPG on Roll20 for the Gang running a 28 year old scenario I wrote for the first Dalcon in 1992 (The Dweller in Darkness). Mike Hobbs set up a virtual paint club that I have really enjoyed and again met new and old friends for some casual chat. Thanks to all of you!
The Little One and the Others
The Little One is always up for a Game and playing with him is not something new I have discovered during lock-down but we had a blast playing a lot of games including Chain of Command, What a Tanker, Twilight of The Sun King, Men who Would be Kings, Dragon Rampant and many others. We have even got the rest of the family involved in some RPG and board game fun which I have to say is an achievement, Cheers mate!
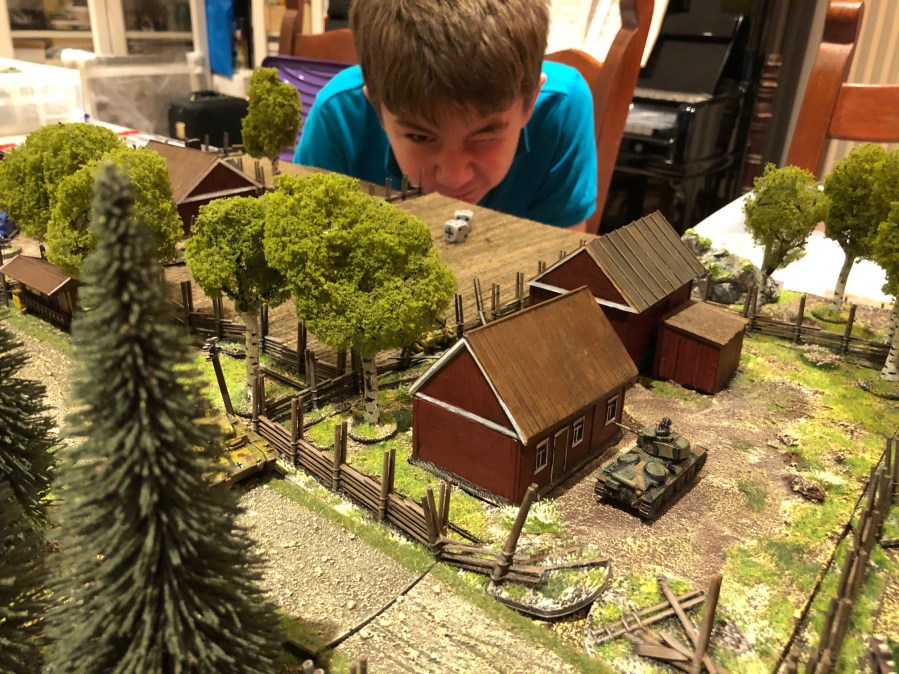
What a Tanker in Dalarna 1943 with the Little One
Painting for Charity
I also had this idea that now seems like a no brainer about paining an army together as a community projects and try to make some money for charity. Well what a total blast that was and in 2021 we will take it further. This project actually makes me really proud and I take my Tricorne, of is it floppy hat off to all the painters who participated.
Here are some links about the project, including painting guides, etc.
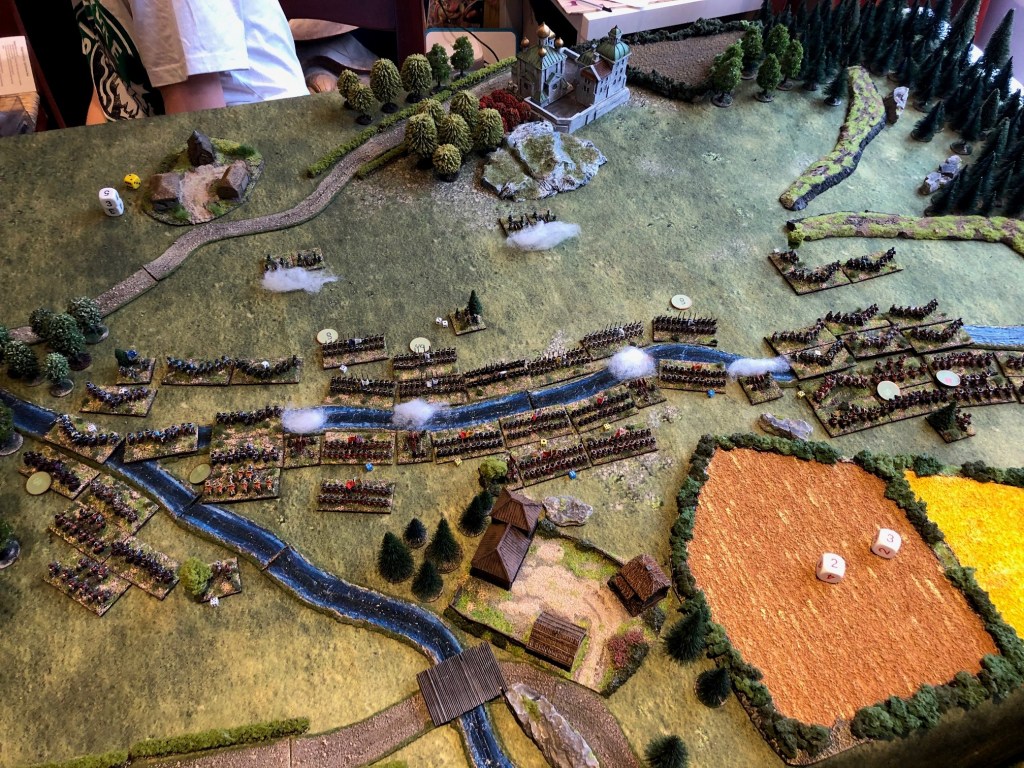
Below a few pictures when we fought a Battle using these two amazing armies, with the help of the Twilight of the Sun King rules.
The high level plan for the project moving forward is
Doing a booklet with the armies
I would like the Army to fight a Battle at a Proper wargames show
Raising monies to Combat stress by doing a Raffle to win the army
More about this in 2021, again thanks to all who participated and encouraged.
Gods Own Scale Podcast
Sean Clarke re-launched the Gods Own Scale following some, I hope positive pressure, from Peter Berry and I. Sean has a relaxed style and brings out the best in the interviews he carries out, his passion shines through and the his list of guest have been varied and some new voices not previously heard, I especially enjoyed the episodes on Irregular Miniatures and Heroics and Ros.
I was invited together with Daniel Hodgson, Alex Sotheran to the Christmas special. It was a long show and I hope it came across like a few hobbyists having a good talk in the pub, because that is how it felt.
After a long and relentless campaign of trying to get Dirk at Grognard Towers to do an episode on MERP he did TWO episodes and he even brought Legend Liz Danforth to the party – what an absolute delight. Dirk also asked me to do a “First, Last and Everything”, you can listen to it in the link below.
The project got some attention from the Dala Radio and it was fun to talk about the project and I wrote about that here. I have also made some suppression markers and jump off points here as well as some river assault boats, here. This is a great project and I will try to start playtesting some scenarios for a Swedish Half-Pint sized campaign in 2021. You can find the latest Swedish Platoon lists here.
Other Stuff
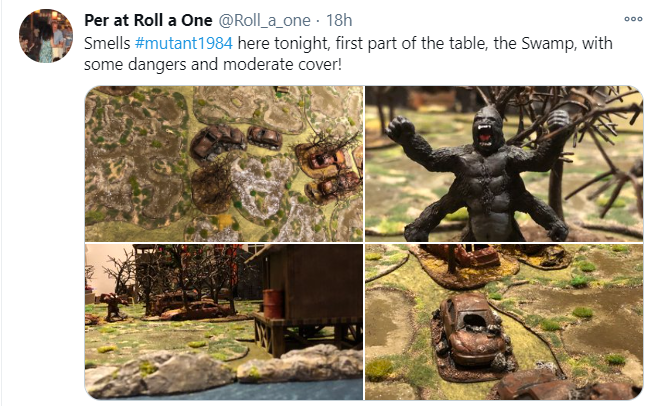
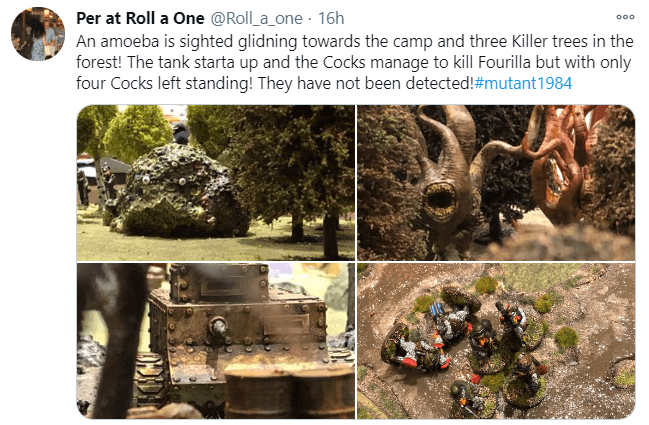
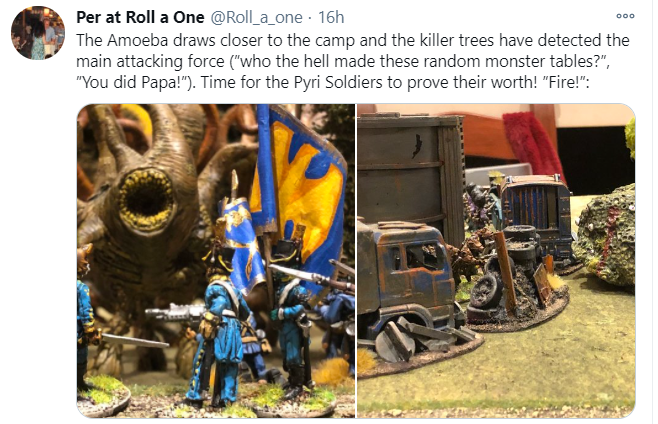
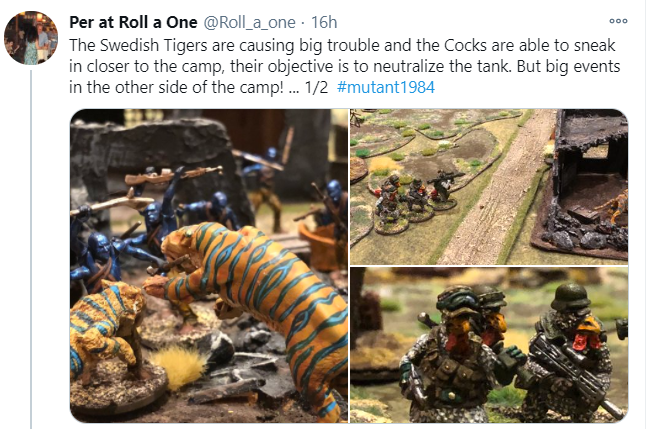
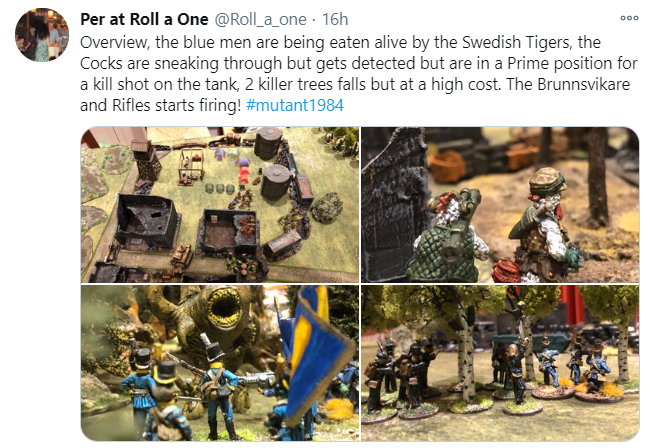
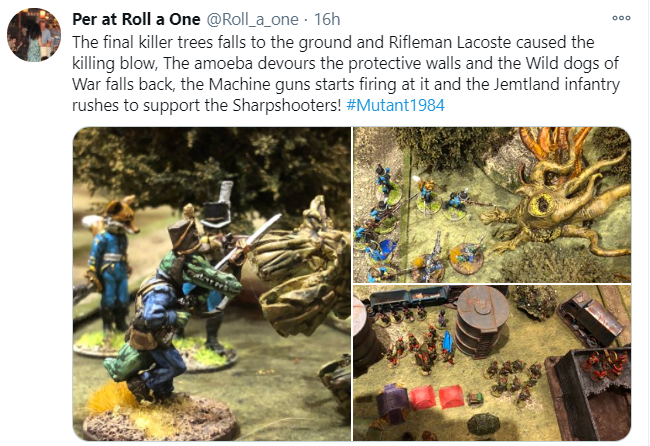
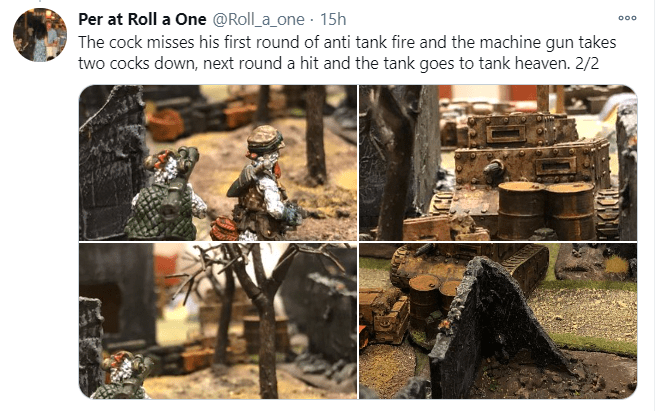
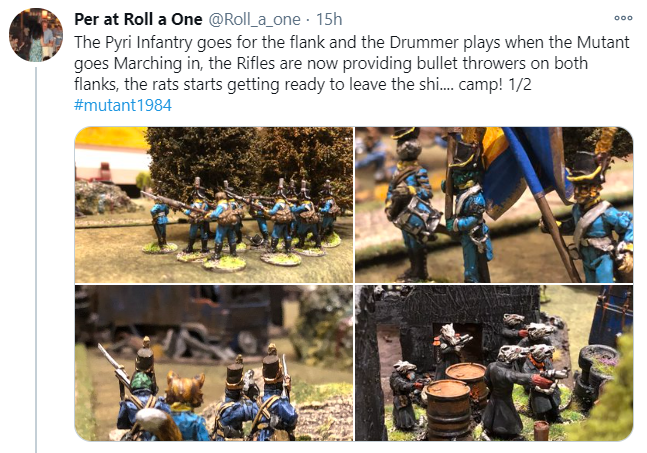
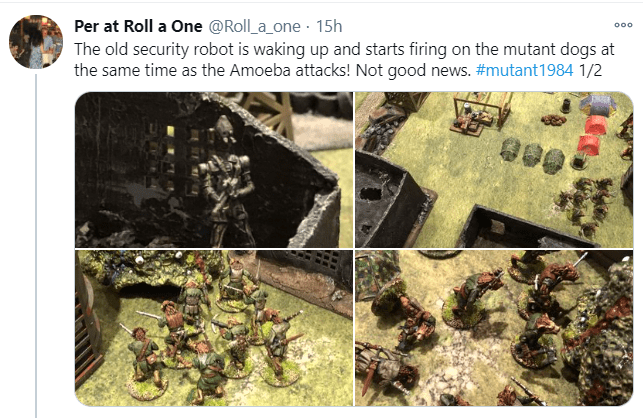
I also did some strange base forces for Infamy! Infamy!, more here. This is expanding the Mutant 1984 world in an early era.
I did some cool 2mm bases and that I will use to try out Mark Backhouse’s upcoming rule set “Strength and Honour”. More here. This will be my early 2021 focus.
So for 2021 it will be more of the same, I wish you from the bottom of my heart a fantastic 2021!
A bonus
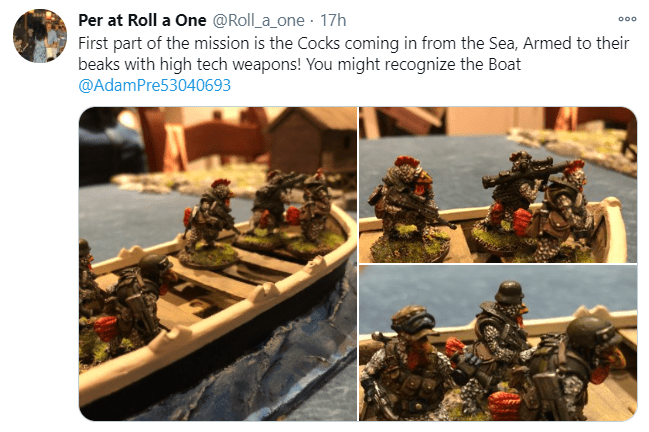
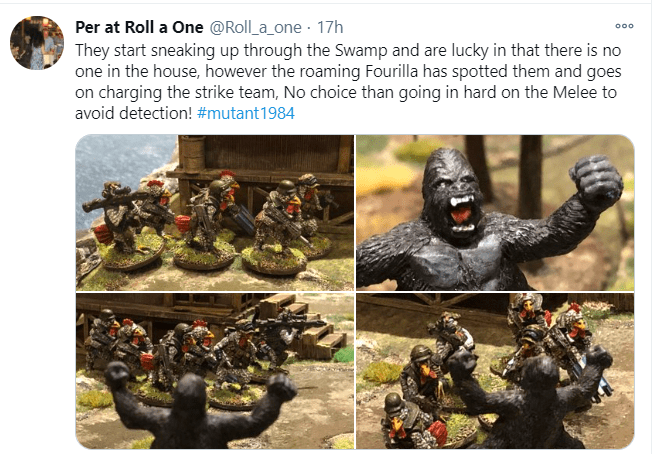
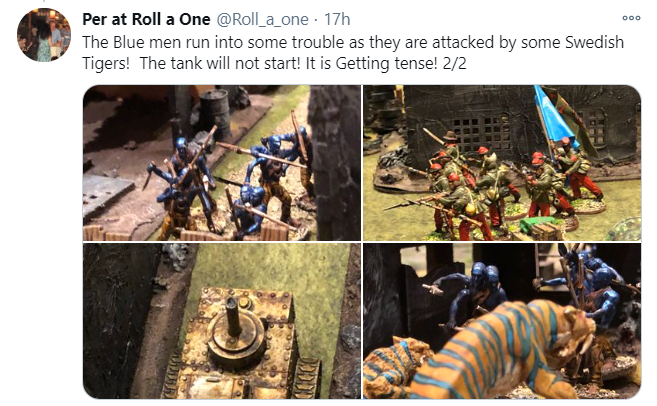
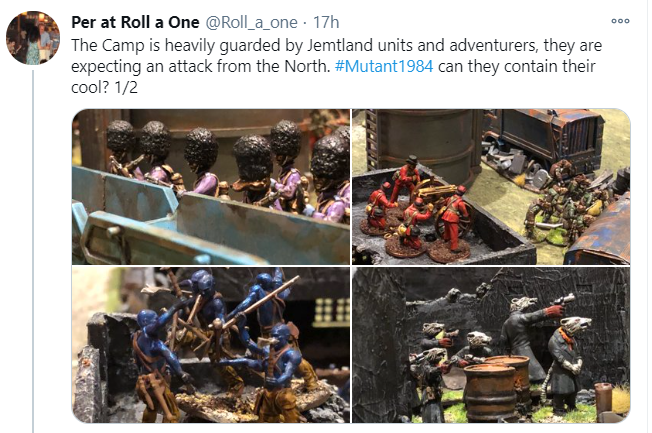
But before I go, we had a fantastic game last night and I am too tired for a write-up and there are other things to do, so a few pictures from the Twitter Feed – Another Mutant 1984 diversion using a variant of “The Men who would be Kings” rules, with some freaky events.
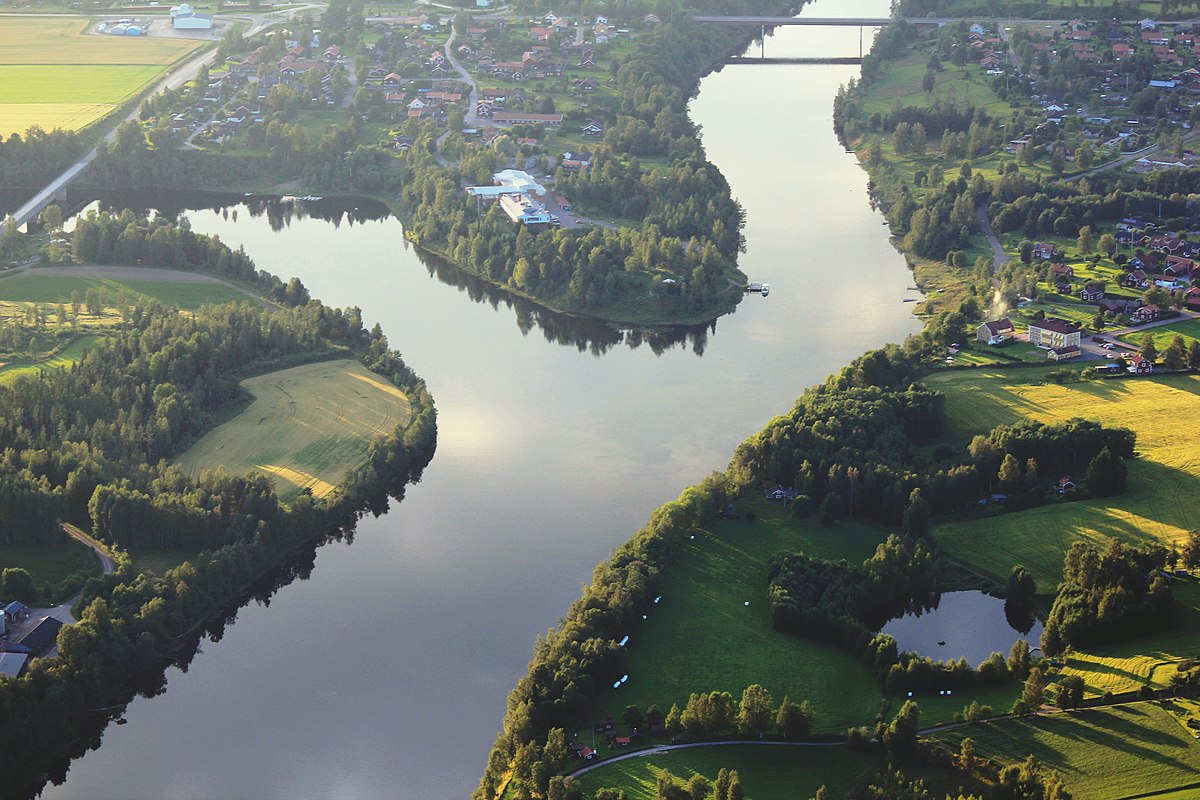
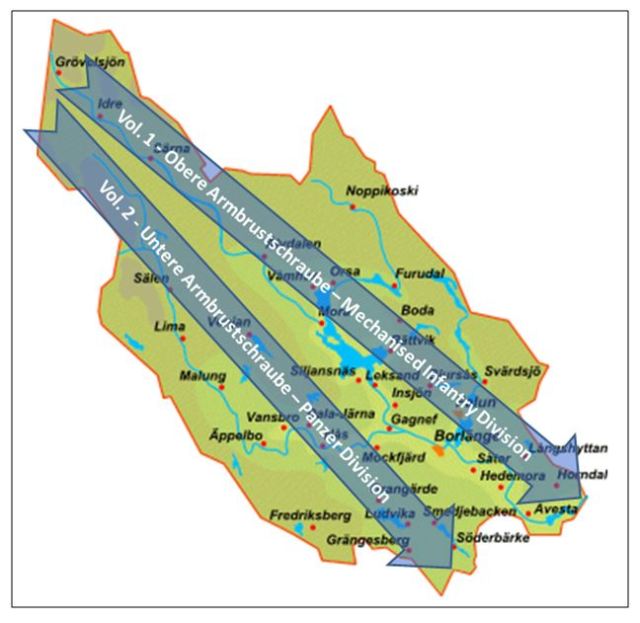
One of the scenarios I am envisaging for the “What if”German Invasion of Sweden 1943 project I am working on is a river crossing over the Dalecarlian River (Dalälven) – as it is such a central feature of the county.
Dalälven / Dalecarlia River
The high level plans for the two Campaigns I am working on.
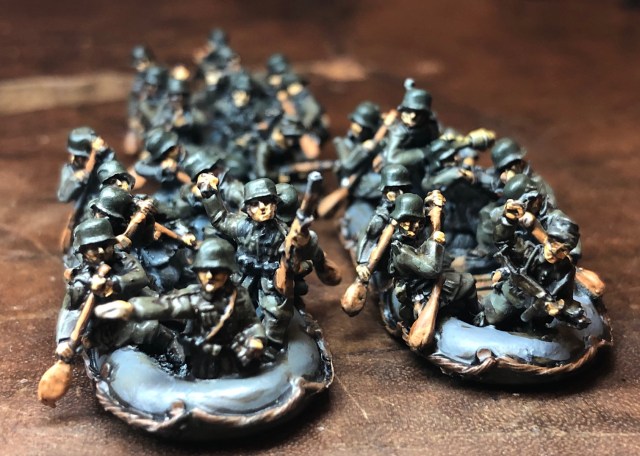
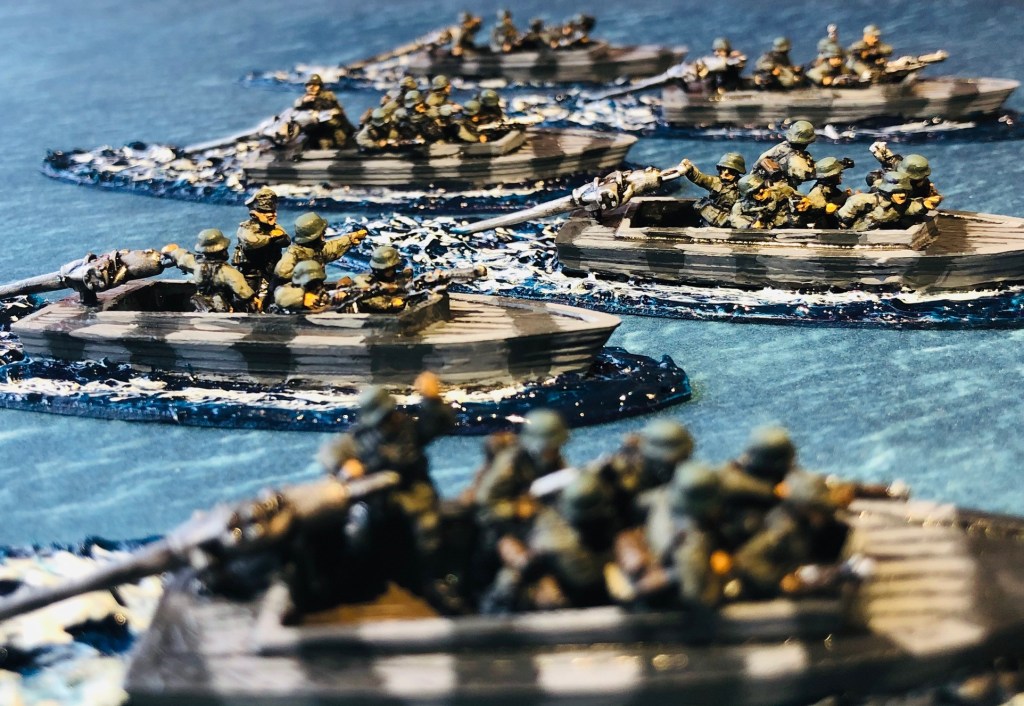
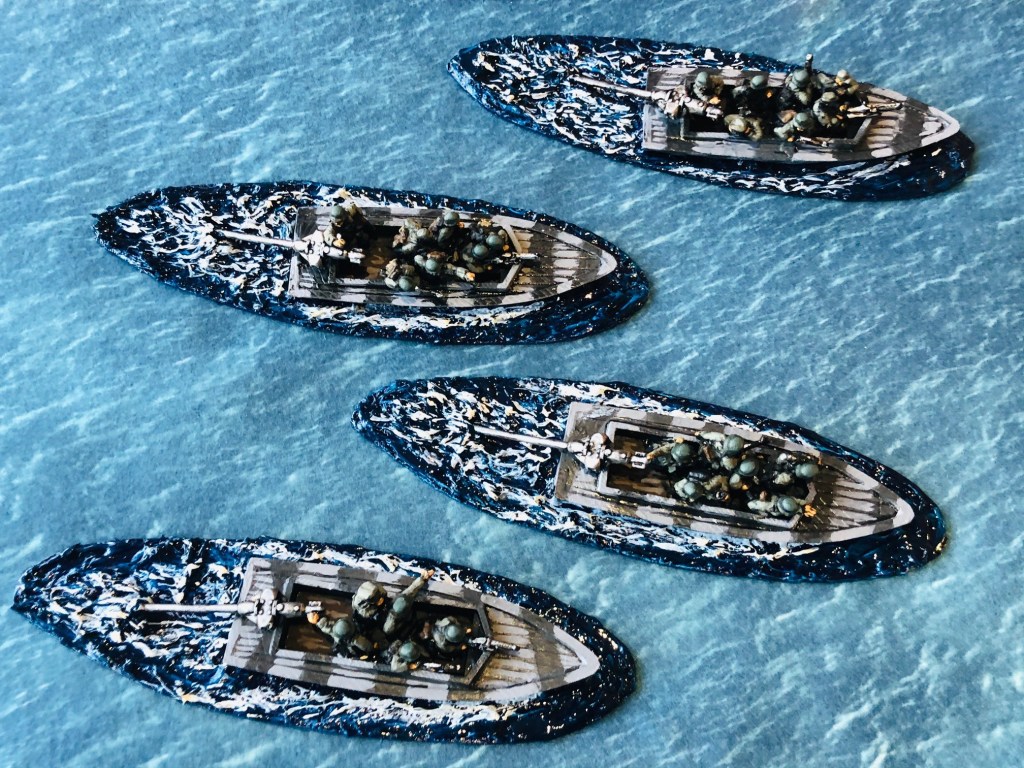
I did some rubber boats earlier that you can find in the link ( German Infantry Platoon(s) for the What-if attack of Sweden in 1943 , this link also contains a high-level painting guide I used for the German in this this campaign) but wanted to support this with some boats with engines.
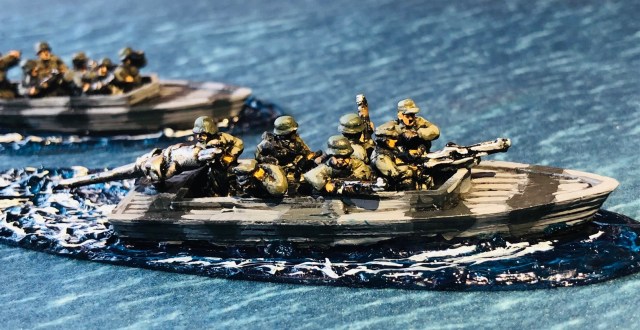
German Rubber boats from Skytrex Miniatures 15mm scale
The German army used the Leichtes Sturmboot 39 that were small high-powered assuault boats with by an 30 HP “Powered oar” outboard motor, they were used for river and small waterway assaults, crossings and to push pontoon boats. They were mainly used by Engineering typically to form a bridge head to build a pontoon bridge. Below is a small video showing them in use from Youtube.
I made a few improvised boats that I wrote about in an earlier blog for my Continuation War Finns.
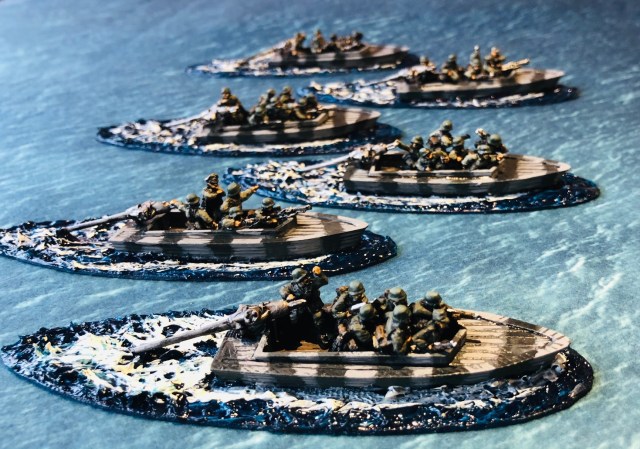
Anyway the new ones are based on the actual boats and 3d printed. You can buy the files from 3D wargaming here. You can print out two versions one is an uncovered version (open boat, as can be seen in the video above) I believe the covered versions were used by the Marine. Well in my 1943 campaign they came from some marine units in Norway just before the invasion. I also have some uncovered ones that I will use to “redo” the Finnish ones I showed above. I asked Paul Edwards at Sabotag3d (https://www.sabotag3d.com/) to print them out in 1/100 or 15mm scale.
Picture from the 3D website, these are I suspect 28mm versions
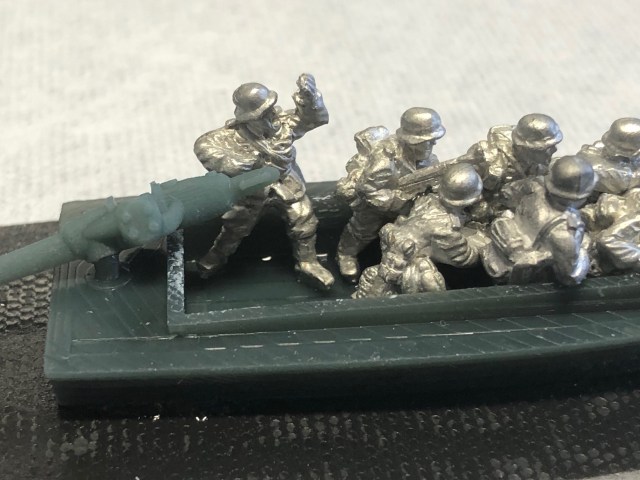
As for the crew I used some Germans from the lead mountain – yes mine is substantial. For the “drivers” I used pointing NCO or artillery models and for the others a selection of different infantry types. As the models are close together pay attention to helmet size as they tend to vary between manufacturers and can look strange next to each other. I cut most of the bases off and also the feet or parts of the legs to make some interesting positions. In reality the were probably less obvious targets when crossing in them but I think you agree that it looks nice and dramatic in the pictures below.
I added a base to them and painted the boats in a dark and light grey, most pictures indicate this type of camouflage pattern being used. I tried to create some effect of water and some foam by painting the bases dark blue, the drybrushed with a medium blue before adding some vallejo Atlantic water effet, finally I paintes some white to represent the foam. Here are the finalised pieces, I am really happy with them.