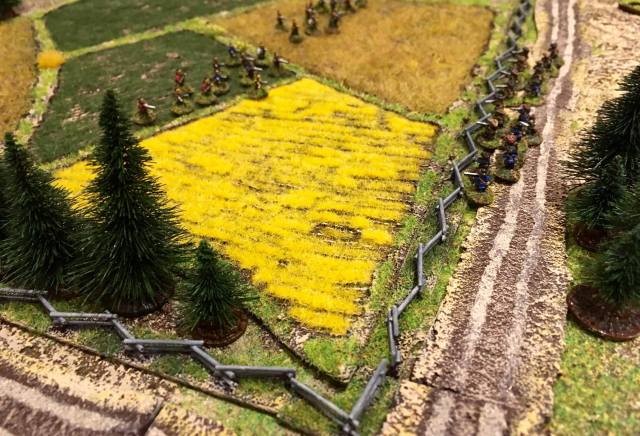
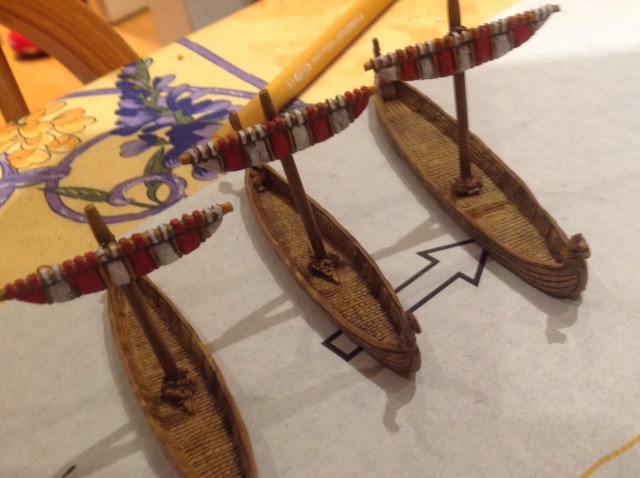
I showed an idea I had in the last Sharp Practice post of using Spaghetti to make snake/split rail fences (here is a wiki link). Well I liked the test piece results and set about to make a few more. These could of course be used for any future 6mm, never say never again, ACW (American Civil War) project. With this “risk” in mind I did a little bit more than I needed. I recently re-read Peter Riley’s Crisis of Allegiance ACW rules and got tempted but have to keep the project portfolio in control. I am currently listening to “The Civil War” edited by Don Congdon on Audible whilst doing my projects – It is a very good listen indeed.
These kind of rail fences were particularly useful in rocky ground as they do not require holes to be dug for posts. They were relatively quick to build and could be taken down and put up where they were needed. It adds that nice periodic and geographical flavour to the setting. Note these are a somewhat simplified in design, but I think they work well for my needs. In trying to learn the Sharp Practice rules we set up a little encounter where some French friendly natives are attacking two groups of militia firing behind some fences.
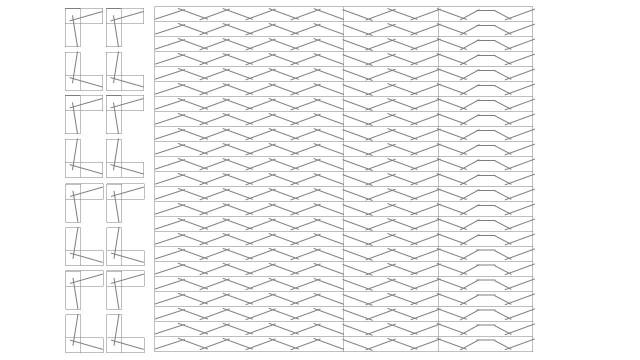
I used 10mm by 1mm wooden strips as bases and then put a magnetic strip under (poundland variety) . I then glued a template on top of each and cut the spaghetti into the required length. It becomes stronger than you think. I used PVA/Wood Glue and the only advice is to use moderate amount of glue to avoid getting the spaghetti too wet. But as a construction material it is brilliant and dead cheap compared to plastistruct or metallic rods. Get the thinnest spaghetti you can find – Angel hair or Cappelini seems to work best (he said sounding like a true veteran – go crazy explore the cupboard). Cocktail sticks feels a little to big in 6mm. On reflection I should probably have gone with 2mm thick bases as it makes in easier to pick them up.
This is the template I used. The long parts should be 100mm/10cm long and the short ones 5cm. At these lengths they are 8mm wide so fits well on top of the 10mm wooden strip. I guess you could paste the picture into PowerPoint and adjust it to fit whatever you need. It is a little bit fiddly to do them but I think it was worth it.
Warbases
I also ordered some bespoke designs from Warbases to use as movement trays for the unit – I think they worked really well. This will make movement a little bit easier. I have to say that Diane and Martin at Warbases are excellent to deal with and I recommend them for your normal and special basing needs. I have not yet painted the small “leader bases” I am using to distinguish the Leaders.
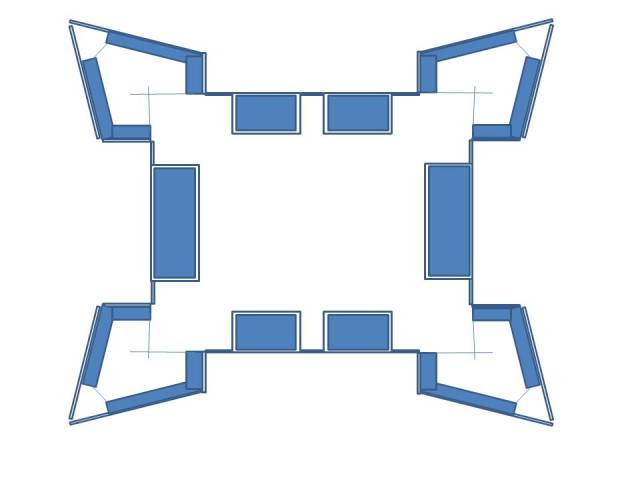
Next I am waiting for some reinforcements and stuff to finalise what I need. I am also tempted to make a little fort. A wooden palisade type with some vaubanesque feel to the corner sections optimised for the scale and basing I have for the miniatures. I have just the material for the stockade! – but will probably go for some wood supporting the spaghetti!
This rather long post officially closes the Lesnaya series that will be merged into the TMT series. I, Nick Dorrell and the very decent chums of the Wyre forest wargames club will be doing three battles (2 that took place and one that could have been) from the Great Northern War covering the, from a Swedish perspective, ill-fated Russian campaign 1708 to 1709. I will provide a brief overview here and on how many bases and figures we need for the project – there will be more historical background as we get into these projects in more detail. There is a lot to do. The Battles will be presented at the Joy of Six Shows 2017, 2018 and 2019.
I plan to do an update every 4 weeks on this particular project. I do try to update this blog on a weekly basis with other stuff I am working on or something else that takes my fancy. If you are interested in following this blog you could register your e-mail here or like the Roll a One group on Facebook or, if you prefer, come back from time to time.
Basing and Rules
As I already have thousands of 6mm GNW miniatures from previous projects I will base these new miniatures in the same way. This is in line with the GNW Polemos basing standard for 6mm figures and is done on bases measuring 60mm by 30mm. However these bases have been used to play with other good rules including Maurice (using two bases per unit which makes the column formation look funny but works), Might and Reason (the standard is two bases 50mm by 25mm per unit) and Twilight of the Sun King without any problems. There are of course other rules that can be used for the period and invariably rules, I have found, can be adapted to whatever basing you have. None of these rules are 6mm specific – so other scales works equally well. There are few things to consider when wargaming the early 18th century period in general and the Great Northern War in particular.
For Maurice there are some additional rules about more immobile artillery and pikes that needs to be included in a GNW setting and if you are using Might and Reason make sure you download the excellent (and free) module Sun King – A Module for Might and Reason 1689 to 1721 by Greg Savvinos. This module contains special rules for the Swedes as shock troops (see notes below). I think the following from the module is a spot on summary of the Swedish Army and the King from a period of history that produced some amazing military victories for the Swedish army but also its greatest defeat.
“The Swedish army of the GNW was a formidable combination of regular and militia that had been forged together to form a devastating battle field force that was able to sweep its enemies from many a battlefield. One of the great strengths of the Swedish army was the capable team of leaders it fielded, headed by the soldier king Charles XII. Unfortunately whilst Charles was a brilliant battlefield commander, he was less than mediocre as a strategist or diplomat and ultimately led his country to disaster at Poltava. The Swedish Army never recovered from that catastrophe and the rest of the war marked a steady decline in its quality. Yet Charles was willing to keep fighting to the last Swede, and very nearly did so by the time he was felled by a bullet fired from the Swedish lines whilst besieging a Norwegian fortress in 1718”.
From the Might and Reason supplement “Sun King – A module for might and Reason 1689 to 1721” by Greg Savvinos
Whilst the Great Northern war was the twilight of the Swedish Great Empire it was the dawn of the Tsarist Russian empire. I have to admit a bias in being Swedish but that does not blind me from the skillful and cautious build up and modernisation of the Russian army following the defeat at Narva in 1700. On top of the organisational changes the army had gained valuable experience from the smaller campaigns in the Baltic States and Finland. The skillful strategy adopted by the Russians during the Russian Campaign itself by using scorched earth tactics (as was later used against Napoleon and Adolf Hitler) and the successful ambush on the reinforcement supply column are amongst some of the reasons that the Battle at Poltava ended in a total disaster for the Swedes. Peter, who truly was Great, more or less on his own moved Russia from being a medieval and isolated culture to become a major european power with a strong army and navy. The Russian army fighting the Swedish army during the Russian campaign is a better trained and more experienced force.
I find this essay on Peter the Great being a good summary of his achievements. I further recommend the brilliant book by Robert K. Massie on Peter the Great if you are interested in this period of history.
Sam Mustafa, who wrote Maurice (and Might and Reason), provided the following guidelines on his Honours forum for the national advantages to be used in Maurice for early 18th century battles (for both WSS and GNW – I have just included the ones relevant to the GNW):
Swedish: a la Baionette, Steady Lads, Cavaliers, Clerics, Maison du Roi, Great Captain if Charles XII is in command
Danish: Lethal Volleys
Prussian: Steady Lads, Lethal Volleys.
Saxon/ Polish: Feudal if the army includes Poles.
Russian 1695-1702: Feudal, At least half the regular units must be conscript. Russian 1703-1707: Maison du Roi, Feudal Russian 1708-1724: Steady Lads, Maison du Roi
Ottomans: Feudal, Skirmisher, En Masse. No more than four regular Cavalry. At least 3 regular infantry must be conscript.
I think this is a good interpretation and the clerics represent the strong religious indoctrination of the Swedish army. Priests and religion were central to the Swedish Army’s development of the discipline needed to successfully implement the offensive tactics.
“Morale and discipline unites them
A common faith to keep them strong
Always on their way to heaven
In the name of Christ their enemies chastise”
You can find a link to the GNW Polemos rules here written by Nick Dorrell. Nick, amongst other things, is also working on a new version/adapatation of the Twilight of the Sun King rules for this period but these are not yet in print.
Whatever rules you are using for this period and the specific theater of war in the east in summary you need to consider some issues special to this theatre:
The use of pikes – The normal pike to musket ratio in the Swedish army was about 1 to 3 and for the Russian about 1 to 6 for the period leading up to and including the Russian campaign.
Swedish shock tactics – The use of shock tactics by the Swedish Army, both by the infantry (with pikes and swords) and cavalry (with naked steel and wedge formation charges). These attacks focusing on speed and aggression took advantage of the, still, relatively low firing rates and expected the enemy to waver and flee, which indeed happened on may occasions. I and the little one was once charged by a band of reenacting English Civil War pike men and it was indeed a scary experience.
Swedish Determination – The effectiveness of the Swedish army who seemed to win time and time again although numerically inferior to its enemies. This is elegantly solved in the Polemos rules by using a temporary determined status, giving benefit in combat, for some Swedish units where the “..opponents can work to take the ‘edge’ off the Swedish by seeking to remove this status. Also it was a useful device to show the difference between the main Swedish army and the troops available elsewhere. Often the troops in the minor armies and theatres did not have this ‘edge’”.
Troop types – including more varied cavalry units including old style Panzerni, Polish hussars as well as light horse units.
Below is a slideshow of some GNW miniatures from my collection (They are all from Baccus) as a thank you for reading this far. There are Saxons, Russians, Polish and Swedes.
This slideshow requires JavaScript.
Towards Moscow background and the Battles we will do
The campaign is the invasion of Russia by Charles XII of Sweden starting with the crossing of the frozen Vistula river in early 1708 and ends with the Swedish defeat in the Battle of Poltava in the Summer of 1709. It is the beginning of the end for Sweden as a dominant military power in north-eastern Europe.
The Great Northern War in started in 1700 when a coalition formed by the Peter the Great of Russia, Frederick IV of Denmak-Norway and Augustus II the Strong of Saxony-Poland attacked Sweden. The coalition were formed following the death of the Swedish King Charles XI and the belief was that the new and very young King (Charles the XII was 15 when his father died) would not be able to put up an organised fight. Following Swedish successful expansion during the 17th century a lot of these neighbours wanted lost territories back, limit Swedish economic dominance and gain access to the Baltic Sea.
However the King turned out to be a skilled warrior and leader of men and the preparedness, quality and efficiency of battle methods of the Swedish army built up by his father was second to none during this era. The King quickly pacified Denmark and a Peace Treaty was sign in Travendal 1700. The Russians were defeated at the Battle of Narva in 1700 but then the King turned his attention to Saxony-Poland and Augustus. It took the King 6 years to defeat the Saxon-Polish and force the abdication of Augustus the Strong from the Polish crown (1706 Treaty of Altranstädt).
I have used Nick Dorrell’s book Dawn of the Tsarist Empire that you can buy from Caliver books to derive the units present for the Battles and the bases needed (remember a base of infantry represents 400 to 600 men, about a battalion, and for cavalry 2 squadrons of about 200 to 250 men). It is probably the best book available about the full Russian campaign written with the “wargamer in mind”. I would also recommend Peter Englund’s fantastic The Battle that Shock Europe about the Poltava Battle – this is probably the best book I have ever read with regards to battles and warfare.
For painting guidance and colours/standards I have copies of the excellent books Great Northern War 1700-1721: Colours and Uniforms Part 1 and Part 2, by Lars-Eric Höglund and Åke Sallnäs. Not sure where these can be found nowadays more than the second hand market – for me these books are priced possessions. However a lot of information is readily available on the Tacitus Website (see above – with uniform detail for many battles) and is a good start. There is also a few relevant Osprey Books – Peter the Great’s Army Part 1 and Part 2 as well as a campaign book on Poltava (I will go through some other sources and provide some overviews in future installations of some of the other, including Swedish, sources I have and will be using).
Lesnaya 1708
[116 bases, excluding commanders – a total of 1,424 miniatures]
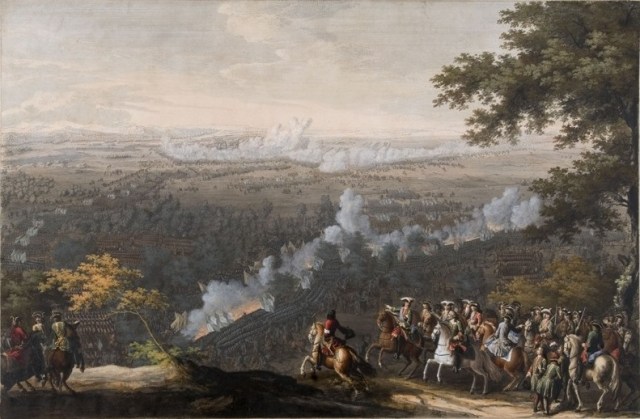
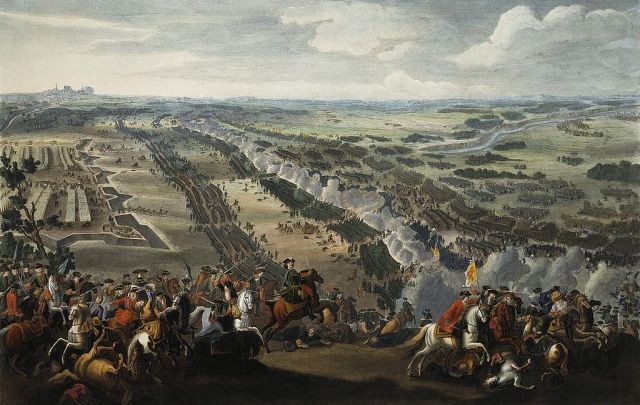
The Battle of Lesnaya (1708) by Nicolas Lamessin (1722-24)
This is an interesting Battle and in effect is an ambush by a Russian flying detachment of a smaller Swedish army led by General Lewenhaupt escorting a supply column of more than 4,500 wagons for heading for the main Army in Ukraine. From the perspective of doing the battle we need a lot of forest as well as about 40 or more bases to represent the supply column (wagons, carts, marching soldiers, etc). Please find the figure count for the Battle.
Russian Army (72 bases, excluding command bases)
Infantry – 10 bases with 24 miniatures per base (240 miniatures)
Dragoons – 60 bases with 9 miniature per base (540 miniatures)
Swedish Army (44 bases and 50+ bases to represent the convoy, excluding command bases)
Infantry – 17 bases with 24 miniatures per base (406 miniatures)
Dragoons/Horse – 22 bases with 9 miniature per base (211 miniatures)
Vallacker Light Cavalry – 1 base with 7 miniatures per base (7 miniatures)
Artillery – 2 light gun bases and 2 field gun bases (4 cannon with 14 crew)
Train/Convoy – a large number of bases, say 50+
Horka 1708
[245 bases, excluding commanders – a total of 3,296 miniatures]
We were going to do the Battle of Holowczyn but instead decided to do a “what-if” battle at Horka 1708. When Charles XII was waiting for Lewenhaupt and the supply column to arrive at Mogilev (Belarus) the Russians had occupied a strong position nearby at Horka (sometimes called Gorki). As noted in Nick’s book this could have been the site of the decisive battle of the campaign. In reality the King decided not to attack – in our scenario he decided to “Gå-På” for it.
We went for this idea for the following reasons:
Although the position was beneficial for the Russians we felt that the balance between the forces was such that it would make an interesting battle with similar strength on both sides than the more one sided battle at Poltava battle at year later.
The Holowczyn battle was fought on a wide frontage, whilst this idea offers a more solid a classical (for the time) set up with a long line of soldiers getting on with it.
Currently we will run this what-if with the following forces (but since we have some artistic freedom it could change, e.g. we have no information of Russian cavalry at the Horka):
Russian Army (137 bases, excluding command bases)
Infantry – 54 bases with 24 miniatures per base (1,296 miniatures)
Dragoons – 59 bases with 9 miniature per base (531 miniatures)
Kalmyk/Cossack Light Cavalry – 16 bases with 7 miniatures per base (112 miniatures)
Artillery – 4 light gun bases and 4 field gun bases (8 cannon with 26 crew)
Swedish Army (108 bases, excluding command bases)
Infantry – 28 bases with 24 miniatures per base (672 miniatures)
Dragoons/Horse -66 bases with 9 miniature per base (594 miniatures)
Vallacker Light Cavalry – 6 bases with 7 miniatures per base (42 miniatures)
Artillery – Artillery – 4 light gun bases and 4 field gun bases (8 cannon with 26 crew)
Poltava 1709
Battle of Poltava 1709 by Denis Martens the Younger (1726)
[354 bases, excluding commanders and a total of 4,758 miniatures]
The final installation will be the disastrous Poltava in 1709 that from a war game perspective will be a spectacle with a big table and many troops – however most of them are Russians (or fighting on their side) and it will be impossible for the Swedes to win. 42,000 men on the Russian side and 17,000 on the Swedish side. However if we can not go for playability we will go for spectacle and ensure the table is large and that units not directly involved are also included on the table. In addition the Russians had 86 cannons vs the 4 the Swedes brought to the battlefield. So if we are struggling with playability we will put on a spectacle and make the table bigger and include units in the area including the Siege at Poltava itself. This gives us the following miniature figure count for the Poltava battle, subject to review before the day of battle (July 2019).
Russian Army (266 bases, excluding command bases)
Infantry – 89 bases with 24 miniatures per base (2,136 miniatures)
Dragoons – 132 bases with 9 miniature per base (1,188 miniatures)
Kalmyk/Cossack Light Cavalry – 30 bases with 7 miniatures per base (210 miniatures)
Artillery – 11 light gun bases and 4 field gun bases (15 cannon with 47 crew)
Swedish Army (91 bases, excluding command bases)
Infantry – 18 bases with 24 miniatures per base (432 miniatures)
Dragoons/Horse – 41 bases with 9 miniature per base (369 miniatures)
Vallacker Light Cavalry – 4 bases with 7 miniatures per base (28 miniatures)
Cossack Light Cavalry – 20 bases with 7 miniatures per base (140 miniatures)
Artillery – 4 light gun bases and 4 field gun bases (8 cannon with 28 crew)
That is all for this time, I hope to show some progress on the Sharp Practice project next week.
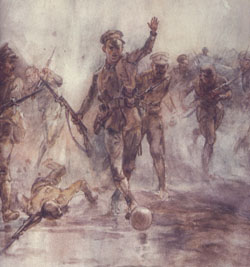
Due to the marriage of some very good friends, this week has very much been devoted to getting the clan ready for the occasion. For most of the family the question is, “do I look good in this?” to which I answer “Absolutely fantastic!” for me it is “Can I fit in this?” and if the answer is yes then I am good to go! I can report that we had a fantastic time indeed even though we were by no means in the centre of any attention. Being in the vicinity of Twickenham I wanted to go to the Twickenham Museum and the “Footballer of Loos exhibition”.
Footballer of Loos
From the museums webpage: The first Big Push of World War One took place on 25thSeptember outside the small mining town of Loos in northern France. It was kicked off with a football by rifleman Frank Edwards. After the war Frank came to live in Twickenham and died in Whitton in 1964. During his lifetime he was known as The Footballer of Loos. The story of Frank’s exploit is told by way of an action tableau accompanied by artefacts and information about the Battle of Loos and is set against a striking backdrop painted by local children. Our community audio drama The Greater Game about Football on the Front in First World War …. To listen or download go to The Greater Game.
The actual football that was kicked about by the London British Rifles appeared on the Antiques Roadshow a few years back. Here is a short article about the programme.
Anyway, I was prepare and ready for it, but we ran out of time so perhaps another time.
French Indian War further thoughts
Inspired by the skirmish based 6mm miniatures I did last week I ordered some more miniatures from Baccus for my FIW project (again from the SYW and AWI ranges):
SFR09 – French Artillery. I need this to make an artillery piece for each side but also to use some of the artillery crews to make some of the supporting miniatures options, like the physic and the holy man.
SYG – Generals; to have the option of fielding a senior officer on horse and perhaps some characters for scenarios.
AWI01 – Indians – Bare Chested, to get some more variety of
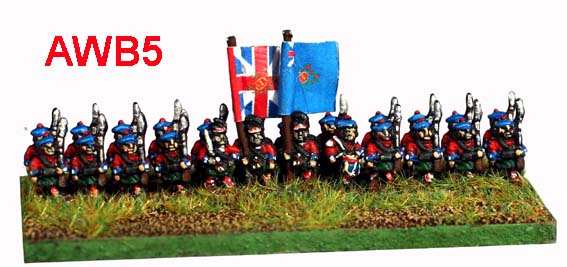
AWL02Loyalist Infantry – Skirmish; these may be a better option to use for Rangers?AWB05 – Highlanders – Formed; just because I would like to have a unit of formed highlanders and the officer in the command strip just looks brilliant, and
AWB10 – British Light Infantry- Round hat, Campaign, Skirmish. To give some line infantry options, and.
ECW23 – Scots Dismounted Dragoons, from the English Civil War range!. I may get away with these as firing Rangers. But let me verify this after I get them from Baccus.
AWB05 – Highlanders Formed from Baccus (from their catalogue)
I also ordered some buildings from Leven miniatures that I thought could be useful for doing farmsteads, small fort and village, including ACW03 – Blacksmith’s Forge, ACW06 – Blockhouse, ACW26 – Shiloh Church, ACW25 – Brotherton Cabin, ACW07 – Timber Shack, WES04 – Livery Stable and WES18 – Outbuildings. I mainly used Leven miniatures for my Saga project and I really like their products. I have included pictures from these items from Leven’s catalogue, you can find Leven’s webpage here. I sense some spaghetti is being required again for fencing and palisades.
6mm Blacksmiths Forge
6mm Blockhouse
6mm Timber Shack
I also need to dig out some horses/mules and carts I have lying around to make the other support options, including water cart, ammunition cart, mule train and the engineering groups with cart. I also need to build some barricades and breastworks I have ordered a few items that would be useful for this purpose from perfect six (including their Black powder civilians including Barricade 20mm, cannonball stacks, 2no carts complete with famers cart horses and a dog and wooden Barrels).
I like minimal battlefield clutter and for the recent Saga game I used casualty markers to represent fatigue that blended in on the battle board (See an earlier post here). I did not make these as casualty dials but as individual markers due to the fatigue markers being actively used as part of the game itself – as the fatigue markers can be spent by the opponent. I believe I would need the following markers for Sharp Practice – with my current thoughts:
Present markers – I think I will use markers similar in shape to the overwatch markers used for Chain of Command or a marker with an arrow. These will be based and with some static grass on top to blend in.
Uncontrolled markers – again I will make a shape to represent this, perhaps a simplified “chaos” symbol with arrows in four directions.
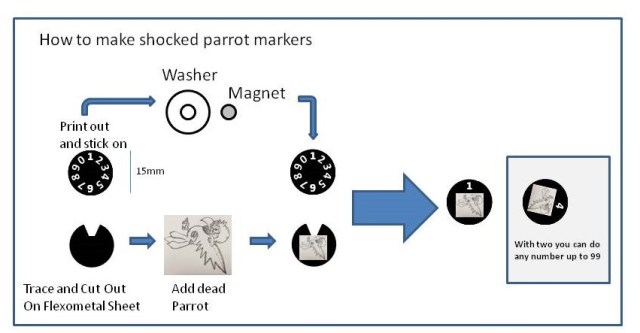
Shock markers – I will try to make some casualty markers with a dial inspired by this 10mm Napoleonic’s blog. My concept sketch for this is included below – I just need to ask Peter Berry if he can do some Parrots in 6mm. This parrot is lead! Of course you could get away without using parrots and although Baccus does not do SYW or AWI casualty packs they do them for WSS (with Tricornes) and ACW (with hats and kepis that can be made to look the part I believe).
How to make a shocked parrot marker
Ammo markers for artillery – I though I make small bases with cannon ball stacks (I have ordered these from Perfectsix) and place 3 (or more if the option have been bought) next to the artillery and take one away each time it fires.
Out of ammo markers – this is in the instances that a unit runs out of ammo as this is the exception and not the norm. Not sure what I will do for these. But I will figure something out. Perhaps you could give me an idea (as the norm is that there is ammo for the unit the marker is only useful for the “out of” situation).
I better get on with it, so we can have game and see how it goes…
Next time, if things goes to plan, I will be picking up on the Towards Moscow Trilogy (TMT) project again as I have been in some discussion with Nick Dorrell on how we do this and we also have some other plans.
However things may be temporary suppressed by a promise to the little one. I had words from Wayland games that the delayed Halo Ground Command pre-order was shipped, so I may need to clean my brushes and get on with that. He has been waiting for this since he play tested it with Spartan Derek at Salute this year.
Note: Since doing these I did rebase them using the 1-2-3 system (more here). I found this way of basing more playable – especially in 6mm.
French Indian War Skirmish in 6mm – I have some fond memories from this period and my dad read me the Last of the Mohicans about 3 times when I was little and when I was older we watched the movie with Daniel Day-Lewis together on more than one occasion. Dad left us far too early – this project is for him. I have ordered a fair few SYW/AWI from Baccus, including the new Compagnies France de la Marine and Canadian Militia. I also ordered highlanders, Indians, jaegers, continental light infantry, queens ranges and British line. This should be plenty to build a decent French and British force. I intend to use these with the Musket and Tomahawk, Sharp Practice and Songs of Drums and Tomahawk rules sets.
There is no major secret that I am fond of the 6mm scale for doing my big 6mm GNW battles and this is where the 6mm scale is arguably at its best. I did my “Saga in 6mm project” this year (you can start reading about it here if you are unaware of it) and took it to the Joy of Six in Sheffield to show that 6mm could be used for a game more commonly used with larger scales. The game worked really well and I replaced each miniatures with a 25mm square base of 4 to 10 miniatures. Following advice from the Welsh Wizard Mike Hobbs I did not change any of the rules and we just played them straight from the box. The ground scales are somewhat abstract in Saga and the only thing that in detail seemed a little bit wrong were Javelin distances.
For my next project I wanted to take yet another step and actually use individual based 6mm miniatures to do a skirmish game. I had seen some fantastic stuff done in this scale for the Napoleonic era and I thought it looked good. I decided to combine this with my itch to do something related to the French Indian war. Since then I have skimmed the three rules I identified above and decided that I would start building forces based on the Sharp Practice rule set (you can find more information here)
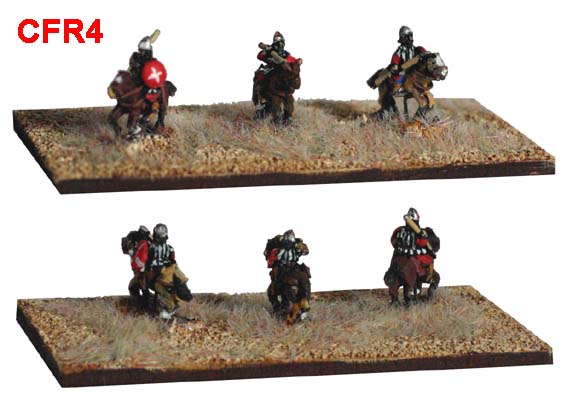
To date I have managed to paint one British and one French starting force, they are all based on a 9mm washer and are from Baccus Minatures (from their SYW or AWI range) with a small 3 by 0.5mm magnet put in the hole. I painted each force in an evening sitting and to buy them from Baccus was at a cost of £13.20-16.50 per force (and giving enough additional miniatures to at least double each unit) – what is there not to like? I boosted the British Regulars to get some “point” balance against the French Raiding Party. I have included some pictures below.
Next I will need to make the necessary markers and support list accessories, make some sabot bases, build some fences, buy some American style buidings and perhaps get some more troop options – I have already started a new shopping basket at Baccus.
British Regulars (1755) with additional Rangers and Frontier Militia Support
Leader, Status I
Leader, Status II
Three Groups of 8 Regulars, Muskets
British Regulars two leaders, I used the Baccus SYW SBR01 – British Line Infantry Code. You get 96 miniatures in a pack (for £6.60) so I have plenty room to grow my force (I used 26). The NCO is from the command strip and the Senior officer with Sword on the right is a standard bearer with the pole cut off to represent a sword.
Leader, Status II
One Group of 6 Provincial Rangers, Muskets
I then added
Leader, Status II
One Group of 6 Provincial Rangers, Muskets
Provincial Rangers, I used the Baccus AWI AWB06 – HIghlanders – Code. You get 48 miniatures in a pack (2 poses at £3.30) I used 14 miniatures . For the officers I was just going to use one of these and paint the “beret” blue but instead I used two miniatures from the AWL03 – Queen/American range pack from the AWI range.
Leader, Status II
Two Groups of 10 Frontier Militia
For the Newly formed militia I used AWR02 – Militia – skirmish from the Baccus AWO range. 48 miniatures for £3.30. I used 21 miniatures for this with the Leader being a conversion form the Indian pack (see the French below).
French (1755)
Leader, Status III
Two Groups of 8 Marine Infantry, Muskets
Marine Infantry, I used SFR10 – Comagnies france de la marine – Formed from Baccus SYW range. 96 miniatures for£6.60! – you can build 4 units like this from one pack There is also skirmish pack at £3.30 that could be used instead.
Leader, Status II
Two Groups of 6 Milice Canadiene, Muskets
For the Canadian Militia I used SFR12 – Canadian Militia Advancing and SFR13 Canadian Militia Firing (this gives you 8 different poses) from the SYW range. You could however just buy one pack (each pack £3.3o and 48 miniatures)
Leader Status II
Two Group of 12 Indians, Tribe, Muskets
For my Indians I used AW02 – Woodland Indians – shirt. You get twice this amount out of a pack for £3.30. (For my next upgrade I will get some AW01 – Woodlands Indians Barechested and make some more warlike Indians with face paintings and use these guys for the British side).
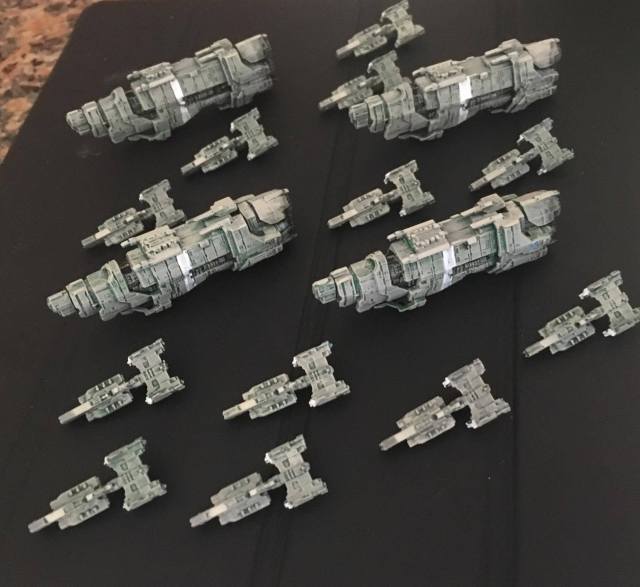
Currently enjoying some days in a nice and sunny France, I did manage to spend two mornings before the clan woke up painting the ships from the Halo Fleet Battles Ensign box – it is amazing how quick paint, washes and ink dries in hot conditions. Not used to this living in England. They are not brilliant but were rated GEFAG (Good enough for a game) by the little one. I have to admit I really liked painting these – now we have to learn the rules and I suppose buy some more ships. I have tried to make my ipod cover represent the infinity of space in the pictures below. I will get them onto their bases and onto a proper mat for some action shots later.
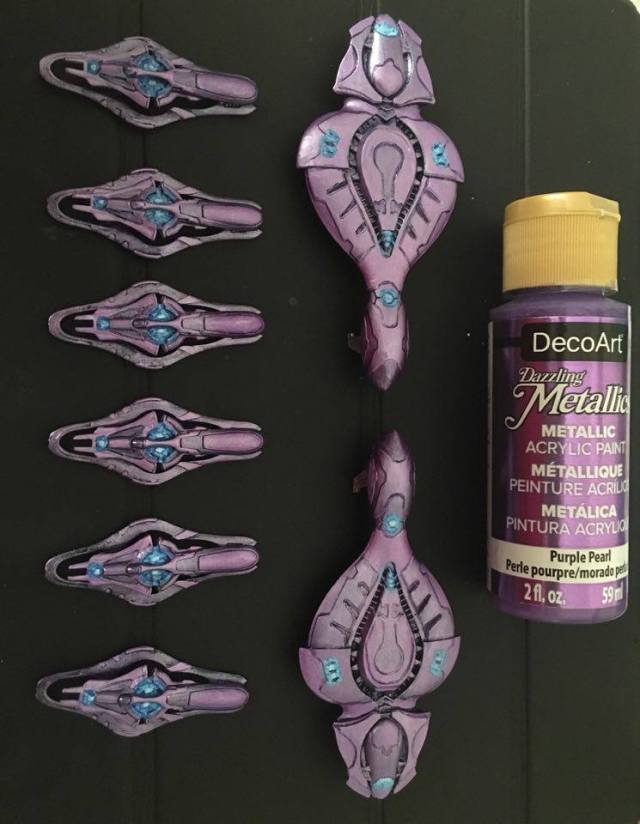
UNSC ships – I used a medium grey, then a green wash, drybrushed with deck tan (light grey) and some detailing in white. I also noted that I had assembled the two bottom Marathon Class Heavy Cruisers (the large ships) wrongly if you look at the stern (back) of the ship. I noted it after having superglued and base coated them. Well I know for next time.The Covenant – I bought the Paint in the picture (Purple Pearl from DecoArt) and painted them with this on top of a dark grey primer followed by a purple ink wash (I used one I had from Vallejo) and highlighted some parts with the same purple pearl colour. Next step a drybrush with the purple pearl all over The blue lights was done by using a light blue initially , then mix the blue with white and paint a smaller section with a final dot of white in the middle. Fast and easy. I also did the engine glow using the blue to white method on the UNSC ships.
I also had to try out the Finnish WW2 Army Paint set I bought to do my Finnish continuation war vehicles and equipment with (Look for it at ebay before you pay a tenner in postage for it though). I felt that some of the paint advice I had seen in the past (I suppose for battlefront Finns) did not, in my view, really produce convincing looking vehicles painted to blend into the Finnish forests. However, after some internet research, I felt convinced enough to give this paint set a chance and painted a bunch of Zvezda 1/100 tanks (got them from ebay at £3.50 each, good value for money). The tanks are far from completed as I do not have any decals yet and will put them on in the next step before weathering etc. I am happy with the colour and the contrasts so far and really like this little set. I now need a BF-42, a landsverk AA, some armoured cars and a KV-1 to complete the Continuation war garage.
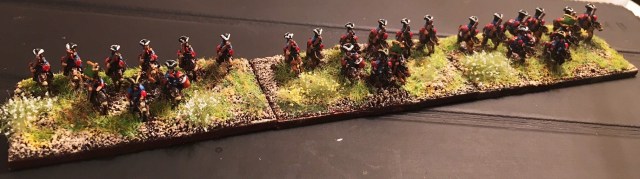
As for the Lesnaya project I only managed to complete one Russian dragoon regiment this week.
I started on the next Great Northern War (GNW) project this week, namely Lesnaya 1708. I will do a write-up of the Battle and my thoughts on how I will do this at some later date. You can read about it on Wikipedia. In the meantime here are 10 finished bases of Russian Infantry. There were only 4 infantry regiments present.
For painting guide I used the eminent tacitus webpage that have full uniform details for the battles of the era. There are some blanks for regiments we do not know what uniforms they wore, but that is not a problem for these 10 battalions of elite russian infantry. These, like all my GNW, are bases with one base representing a battalion of 400 to 600 men. I have not yet added the standards. Here we go (all miniatures by Baccus, from their 18th century GNW range).
I wanted to do a short note on some of the additional Saga factions I intend to do next. I have been diverted doing some other stuff and the good weather has been non-inspiring with regards to painting.
Senator shuttle, debris fields, satellites for X-wing from Combatzone Scenery and some laser turrets I bought off ebay ages ago. Immersion and diversion level increasing.
The following are my notes on the three factions in the SAGA supplement called Varjazi & Basileus (all reference are to Baccus figure codes):
Pagan Rus
Starting army: Warlord (EMV01 -Armoured Spearmen), 2 No. Hearthguard (EMV01 -Armoured Spearmen), Warrior (EMV01 – Armoured Spearmen) and Levy with Javelins (ALR04 – Lanciarii)
For these I would just use the Baccus Viking codes (Spearmen) for hearthguard and some later roman lanciarii for Levy Javelins (although by now I have painted more of the buggers than I would have liked to).
Byzantium
Starting Army: Mounted Warlord (CIS01 – Seljuq Turk Heavy Cavalry), Mounted Hearthguard (CIS01 – Seljuq Turk Heavy Cavalry), Mounted Hearthguard with Bow (ASS02- Armoured Horse Archers), Warriors (EMV01 – Armoured Spearmen), Warriors with Bow (ALR05 – Archer).
Seljuq Turk Cavalry from Baccus Crusade Range
This gets slightly more interesting and I thing the codes above gives a nice mixture of different troop types.
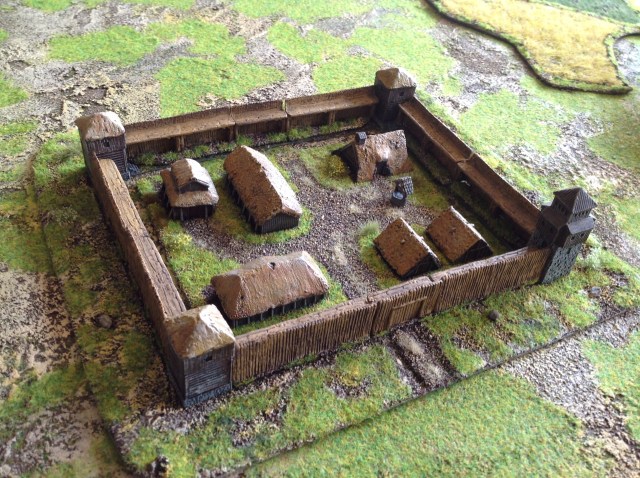
There are a fair number of companies selling 6mm buildings and terrain out there. Previously I have used buildings from Baccus, Total Battle, Irregular Miniatures, Magister Militium and Timecast for my 18th century GNW stuff. For this project (with the exception of the palisade walls of the second village that are from Irregular miniatures) I used the excellent buildings from Leven Miniatures. Leven has a very extensive range of buildings and fortifications in 6mm for all kind of periods. They will also attend Joy of Six in July together with Baccus, Total Battle and Timecast.
Big Village/Settlement
Some Anglo-Saxon manning the walls of the Settlement.
For the first village/settlement I wanted to create the feeling of a slightly larger settlement continuing off-board. I did a base to place the buildings on top to allow the ability to make it look more like paths between the buildings instead of putting them directly on the bare mat (with the perusual cocktail of some brown sand, chocolate brown paint, acrylic sealant topped up, when dry, with some dry brushing). The buildings are from Leven and are the Saxon great hall, round houses and cottages. The walls and the gatehouse is from the upcoming Palisade Fortifications set (accidentally it works very well to place my 25mm bases on top of the walls). I could have built the walls myself but really liked the Leven model and could not resist it for very long. Note the well that is from Perfect Six (you may recall from a previous posting that I got the Irish war dogs from there too). The same type of well was used in the second village (as they come in a pack of two).
The Leven Saxon collectionThe full Palisade set from Leven.
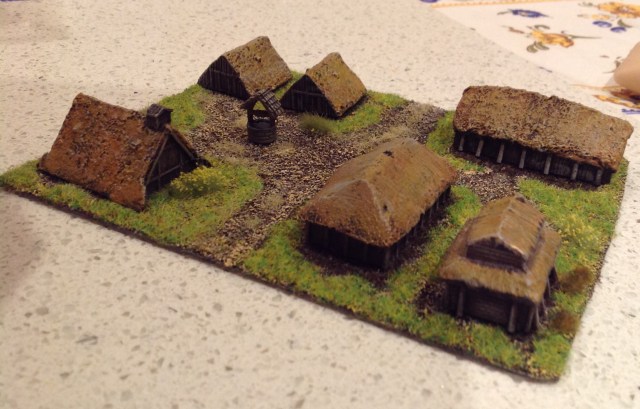
Small Village/Settlement
The small village/settlement with the Viking houses.
For the second village I used buildings from Leven’s Viking settlement range with the palisade being formed by a combination of the walls and gates from a wild west fort from Irregular Miniatures but with the corners replaced by 3 no. Leven Viking watch towers and one of their fantasy watchtowers. Again on top of a base dry brushed and with grass to make the buildings blend in.
Village base with no palisade.
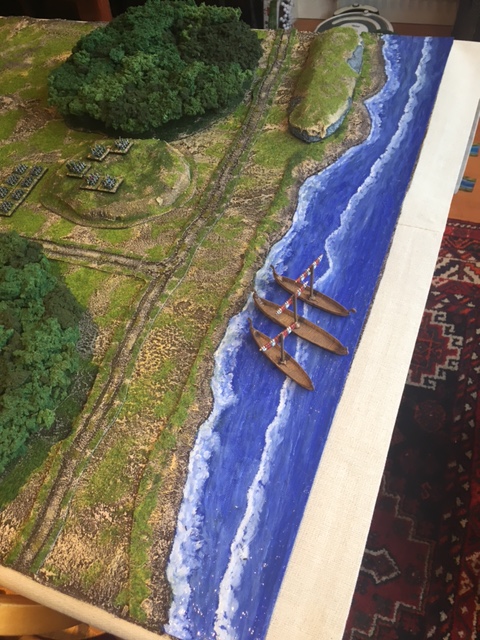
Longboats
The Vikings have arrived!
I got the longboats from Heroics and Ros. They come with the option of having the shields hanging on the outside and there are rowers and crew as well. However, I wanted to show them as being left whilst the warband is rolling Saga dice on land. They look a little bit plain, but I am not sure what the final configuration will be – so I will leave them like this for the moment and probably for the show too.
The plain boats!
Next time I will show some “in-action” pictures from some of the games we have played. Looks like Neil and Dave are getting ready for the event as well, over at the Meeples and Miniatures “island“!
As discussed in the last entry I use a base colour (chocolate brown) and dry brush 3 colours on top and then apply two different types of grass for my miniature bases. I use exactly the same approach on my terrain pieces (more or less). For me the aesthetic side is important as it helps the immersion in the game. I do not mind playing with pieces of felt but it is relatively easy and cheap to achieve something slightly more pleasing to the eye and where the pieces interplay to create a (in my opinion) more pleasant experience. For me the game itself includes the terrain and the miniatures – but I know that is not an universal opinion. [I will not drift away talking about preferring to sit in my comfortable sofa, as opposed to a camping chair, whilst watching a good movie.] By using a consistent approach you can use the terrain pieces you make for most of your game and scales. This is not a step-by-step guide but more a high level discussion/presentation with some links to sources. If you have any questions just ask here or come to Joy of Six on the 17th July 2016.
Our first test games of Saga in 6mm were held in Normandy, France. My Vikings were beaten twice by my Norman opponent. I am sure that his French version battle board had some in-built favouritism (C’est une blague). An improvised table with whatever we had available on top of an old but still serviceable mat from Terrain Mat including some Memoir ’44 river and forest tiles! – the game was brilliant but I felt that the terrain needed to take a step up!One of the two set-ups to be used at Joy of 6! A step in the right direction….
Battle Mat(s)
As we will use two tables for the Saga demonstration game at Joy of 6 I needed two 3 by 4 playing surfaces. I normally use terrain boards but wanted to allow more flexibility in setting up and the mats (as opposed to boards) are taking less space. I got inspired by this posting on the Meeples and Miniatures blog on making your own wargames mat using acrylic sealant and canvas. I followed the approach as described but (i) applied the static grass after it was all dry (this allowed me to drybrush the mat before grass was put on top – using my three colours) and (ii) made the acrylic mix dark (chocolate brown) using Brown acrylic sealant and dark chocolate brown emulsion, (iii) used plastic backed drop sheets instead of canvas, and (iv) spread the mix with an old plastic VHS tape cover. I am happy with the results. It is easier than it looks and make sure to secure the sheet when you do it with clamps as it does shrink a little.
One of the two battlemats, rolls out perfectly after having been rolled up for 3 weeks (on a 10cm diameter roll) after production.
Note: Buy the acrylic sealant (sometimes called adhesive) from places like Screwfix at about £2 or less per 310ml to use in an applicator gun (silicone based sealants do not take paint well so avoid these). Use cheap paint. Allow a weekend for this project, do not apply to thick and make sure there is sufficient amount of sand to create some graininess without making it to dry when you mix it. Also vacuum clean the mat when dry to get rid of excess static grass.
Roads, Rivers, Marshland and Shoreline
To create roads, rivers, marshland and shoreline I use “Nylon Adhesive tile planks”. They are normally 3′ (90 cm) long and allows you to create continuous looking pieces for terrain. I bought mine from Wickes. I use acrylic sealant mixed with brown paint and sand that I spread all over the road (and then use a plastic fork to create a wagon trail), create banks for the river and to do the land for the shoreline piece (work on the sticky side).
I paint the edges of the road in the normal three dry brush way, as well as the banks and the shoreline land. I painted the river and the ocean in shades of blue with some white detailing and applied Gloss Mod Podge carefully on top to create some structure as well as a gloss shine to the water. I applied the same process for the marshland, but use a darker green-blue shade for the water.
Note: Be careful with these long pieces as they snap easily if you bend them too much. If you have no space to store them make smaller lengths instead.
Hills
I use Styrofoam that I cut out and shape to taste, brown acrylic mixed with sand on top and then the normal procedure. There must be thousands of tutorials on making hills out there – pick your favourite.
Forest Sections
Mailed Fists wargames group put on a great looking participation game at JOS 2015 called “The Hungry Legions” that had some nice forest tiles that allowed the creation of pieces of forests as opposed to trees (the bases could “hide” under the trees). After some searching on the net I found something very similar here. As always I did make some changes:
(I) Instead of the Woodland scenic foliage I decide to do my own as I recalled a youtube video on making your own foam foliage that you can find here. Great stuff and cheap. I bought a budget range mixer for £10 and got a £5 bag worth of upholstery off cuts, some cheap green emulsion and mixed with some brown colour to create different colours for each little batch I made. Most blenders are designed to run for about 2 minutes continuously – any longer and they may overheat and possible stop working. Be careful and take small breaks. It needs to dry for some time so this is a slow project is terms of waiting time. It will take days for it to dry so plan for it accordingly.
(ii) I opted for removable tree trunks instead of building them into the base or the canopy. This makes it less bulky to store as well as the ability to make stumps for different scales. I did mine 30mm that will work even with the mounted based for this project. If I would use these for another scale I just need to check my tallest model that will be used and adjust the tree trunks accordingly. The tree trunks are twigs mounted on 20mm penny washers using putty pellets from poundland – I made 39 treestumps with a pack!. I also made the forest tile slightly darker than the the mat itself – i.e. more dark static grass.
Bridge(s)
I wanted bridges that could allow the 25mm square bases to sit comfortably on the top and to work with my river tiles. I could not find anything so I made some from a lolly pop stick, matches and spaghetti – “Cheap as spaghetti as they may say in Italy!”. They look alright and make a great story. The final result can be see in the picture of the river above.
Fields
I have some rectangular fields that I bought a few years back that are ok but put together on a table they look too similar and unnatural for my taste. I wanted to create some funkier looking fields and did some odd shaped nylon tiles with fields all over the place. To avoid the problem of floating bases on top of high coir mat sections (that can look a little bit overwhelming in 6mm scale) or needing to remove sections I just used different colours of short static grass. I applied a layer of browned acrylic sealant and shaped ploughed fields with a plastic fork, then let it dry and put some pva on top of the furrows (leaving a few gaps here and there) and use a different colour every day for a few days (to allow the pva glue to dry between grass applications) and you end up with some funky looking field tiles (me thinks!). Then I add some borders (brown acrylic) and brushed them up with the three colours and decorated with some static grass and tufts. Does it for me.
None of these projects are difficult if you plan carefully and take your time. Next time I will discuss the “terrain items” I did not do from scratch and where I got them from – the villages and viking ships. Bye.
I have been painting 6mm miniatures for some time and I have to admit I found it difficult at first due to (i) not having painted any miniatures for a long time and (ii) I wanted to paint more detail than I needed. I stumbled across 6mm miniatures searching for a book on the Great Northern War that Peter Berry, of Baccus, was selling at the time. I ended up buying a lot of GNW miniatures and my first attempts at painting them were dreadful. I still have one of those bases somewhere. With some experimentation (and a lot of inspiration from Dr Mike and his 6mm painting clinics and postings on the old Baccus forum) I did not give up as I felt that the scale is second to none for large mass battles and this is what I wanted to do for the GNW era.
Generally my objective is to do a big battle or a project every year and normally need to produce a large amount of miniatures to achieve this. I have been able to achieve this for the last five years due to signing up to the JOS event – it puts the right level of pressure and my half-finished projects of old justifies this approach. Here is my step-by-step approach to painting them:
Preparing to Paint
After having painted almost 2000 shields for my current Saga project I have to admit that there are days when the destination does not seem to outweigh the journey. On these days I find that listening to music and perhaps even better a podcast helps me along. I have especially enjoyed the following relevant podcasts in no particular order – Meeples and Miniatures (and View from the Veranda), Dan Carlin’s Hardcore History, Ancient Warfare Magazine, Nova Squadron Radio and In the Garage. But there is so much more good stuff out there.
Check if the miniatures are ok. Normally I paint Baccus figures that does not require any further work (i.e. filing) apart from perhaps a little bit filing on some of the older casts under the base to ensure the model stands straight when you base it later. I then mount them on ice lolly sticks with Blu Tack. I do not glue as I can reuse the Blu Tack and this gives me the ability to do stage 2 immediately. I should say something about soapy water. I tend not to wash my 6mm miniatures and do minimal prep of them – I do not feel the need. But other people say you need to – so perhaps you should listen to them.
Spray your miniatures with a grey base coat – I buy grey spray cans (Primer) from poundland (for this purpose they are brilliant!). Let it dry, ideally for 24 hours. Do it outside! You could do white or black. I used to do black but prefer grey with black ink to better see details and with my sloppy approach white does not work.
Apply a black wash (diluted ink – enough to highlight the details in the figure). This helps with the painting as it allows the detail to be seen more easily. It also creates a shading in the deeper areas. Let it dry, again ideally for 24 hours. I use a mixture of equal parts of water and pledge multisurface wax (with klear) that I drip some black artist ink into, but you may opt for a dark pre-mix wash from one of the paint producers.
Primed miniatures for the weekend Sir! – Some farmers from Baccus and Perfect Six, mules and carts from Baccus and wells and bags from Perfect Six.
Note: When doing a project try to get this done for as many miniatures as possible as you need to wait for (literary) paint to dry. Make sure you are always a few painting sessions ahead with the prep.
Painting and Shading
Block paint the miniature with a decent brush – I used to buy good quality brushes but messed up a few too many so now I buy some detailed nylon brushes from the Works – I get 24 brushes for £10 and occasionally they have even better deals. They are not brilliant and wear out, but I can paint a fair few miniatures before they give up. If you can manage your brushes better than me then go for quality. I use acrylic Vallejo paints as I like them – you will not use a lot of paint in a session. Keep the lid tight and shake them well before use – I have some that are over 10 years old!. Try to get the paint to hit the right parts of the miniature. Do not over apply the paint – less is more. Let some of the grey and black show, but not too much. I do not have time to spend much quality time with each figure so that is it. Sometimes I do some more elaborate painting on some key units. However the next stage will do the trick.
Note: I tend to paint large batches at the same time. For the Saga Project I have painted one full faction at the same time. I very often started with the shields did a few in a colour then another and so on, next ringmail and clothes, then face etc. Construction line approach!
Make sure the miniatures are dry and then go for Nutbrown ink! (can be bought from almost any art shop, Winsor & Newton drawing ink) dip in your brush and let it flow…. This is magic! Be generous. Move your brush over some tissue paper and dip it at areas where too much of the ink have stayed, e.g. around the shield boss. Try it out on a few miniatures first and learn how to get it to work for you. Let it dry.
Paint the bottom of the strip in chocolate brown. . Do not use Vallejo paint for this as it far too expensive and unnecessary for this purpose – buy a cheap acrylic hobby paint or even a tester paint pot. Let it dry.
Step-wise process with some pack mules – was Mad Jack’s mule not called No. 7 in that Grizzly Adams show from the seventies?
Basing your miniatures
Cut the strip of miniatures if required, normally cavalry and skirmishers.
Put a mixture of 25% paint (same brown as before), 25% water and 50% PVA glue (bought in bulk from Screwfix or cheap from Poundland) on the base.
Put the miniatures on the base
Sprinkle sand on top – I use chocolate brown sand that used to be available from hobbycraft – not any more. And let them dry safely. Be careful when you handle the base so the minatures do not fall of.
Paint the sand chocolate brown watered down a bit so it flows nicely (unless you used coloured sand). At this stage I also apply more glue and sand if I can see the base of the miniature too clearly. I hate seeing the small squarish bases through the sand.
Drybrush the ground – I use three colours – first one goes on the whole base the second and third goes on “randomly” on the base – covering less and drybrushing lighter. I have used this combo for the last few years on all my (non-winter) bases. I also use the same scheme for my terrain. Make sure it is dry before next step.
Apply random dots of watered down pva glue (50/50) and apply static grass Grass (I use Busch Spring Meadow and Marsh Green, with an emphasis of Spring Meadow with a little bit of Marsh Green). Shake off.
When it is all dry I use the vaccum cleaner whilst holding each model firmly to get rid of any excess grass and glue a strip of adhesive magnetic tape on the bottom. Again I get this from poundland. Job done.
Note: Develop and approach and stick to it with regards to basing. Next week I will discuss terrain and it is nice when the base on a miniature blends into your table – it helps with the immersion aspect – that for a moment or two it looks like an army marching or attacking on your table.
By the way I did use those farmers, carts and mules for something as I needed a few bases for the Saga Escort! scenario! I hope you like them.