
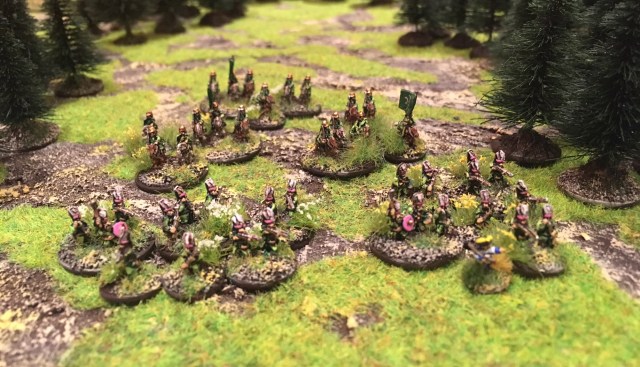
The Little One and I were eager to have a go and test the Pikeman’s Lament (PL) rules, here is a write-up of it. For some background on this diversion see here (initial thoughts and overview) and here (painting up the units). 6mm miniatures played on a brand new 2 by 2 feet board (that we made the day before) played using centimeters instead of inches so in relative terms it would have been as playing with on 5 by 5 feet board using 28mm and inches. It is not a roll-for-roll account but a summary how it all played out.
Forces
We selected 24 points for each side resulting in the following two forces:
Ottomans
2 units of Veteran Shot @ 6 points each (Janissaries; may form Close Order)
3 Gallopers @ 4 points each (Sipahis cavalry, I changed my mind of these from being Trotters)
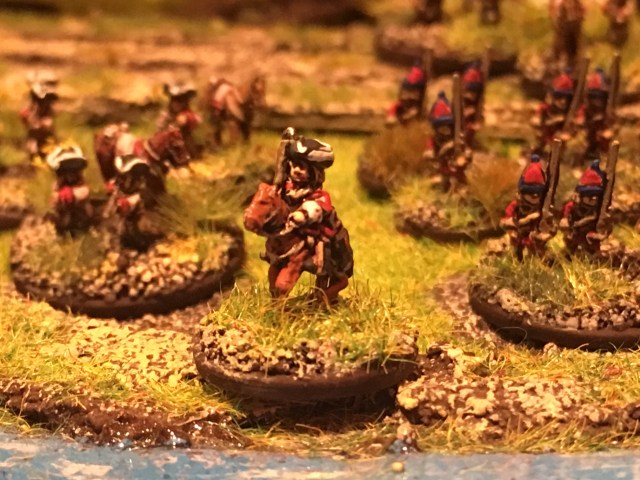
For the Ottoman officer we rolled Mercenary Officer, representing a foreigner with some renown but not fully trusted bythe men (offering no morale bonus for units within 12”) We decided that he was a French officer and we used the French officer from our Sharp Practice French Marine unit to mark his unit – one of the Janissary units. We named him Lieutenant Dupont, a young commander disgraced in his home country turned mercenary and eager to get promoted through the ranks by impressing the Pasha.
Russians
3 Dragoons @ 4 points each
2 Forlorn Hope @ 6 points each (Grenadiers)
For Officer background trait we rolled the result Hothead indicating an officer with difficulties with his superiors but, leading from the front, with the full trust of his men. This gives him the ability of Strong – a re-roll for an attack/defence die during every attack. We decided that he was Podporuchik Alekseyev (Podporuchik was a rank introduced by Peter the Great in 1703, equivalent to a second Lieutenant). We used one of the other Dragoons as a marker for this leader in the battle (not counting him as a figure).

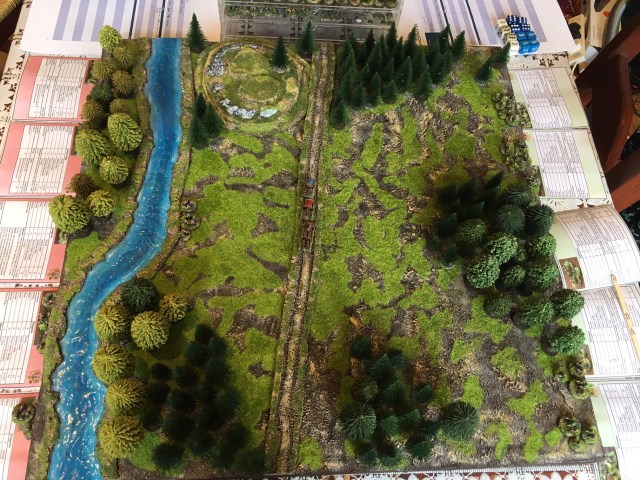
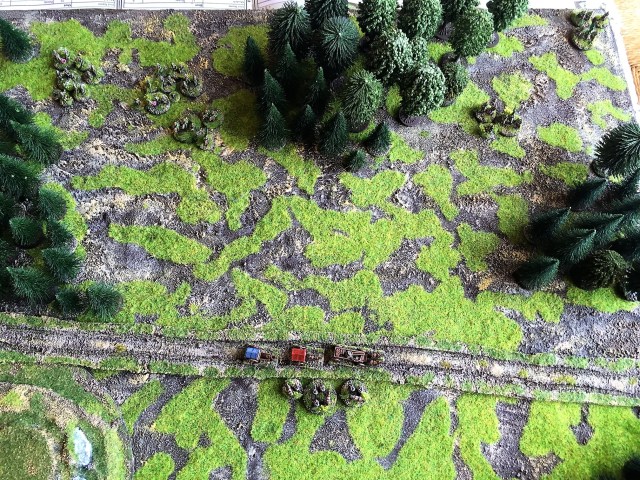
The Scenario and Set-up
We opted for the scenario C: King’s War Chest. The Russian’s are defending and at the Start of the Scenario have one of the Dragoon units taking a bath in the river with 3 No. war chest wagons on the road. The rest of the force are off-board but can enter (if successful at activating in Turn 2) The Ottoman strike force is aware of the important cargo and are coming from the South (right in the picture below) – this would be a good way for the young Lieutenant DuPont to get some recognition from the Pasha. The Russia commander has just been made aware of the approaching danger and need to reinforce the Dragoon unit (that has just finished its bath and geared up) and get the wagons out of danger, either to the east or west. The French Ottoman Lieutenant will seek to take the wagons down the way he came (South).


We now rolled for who is playing what and the Little One rolled highest on both dice and chose to attack and to be the Ottomans. I hoped that was the last of his high rolls today!
The Battle
The Little One set out the onslaught by successfully managing to activate most of his units and my Dragoons got their act together and rode towards the Wagons.
The Ottoman pressed forward further and the Dragoons failed to activate a shoot action to reduce some of the oncoming impact. But, by a miracle, I decided to get all the Russians on the table – the Dragoons on one flank and the Forlorn Hope on the other.


One of the Gallopers did the first attack of the day and with the follow-up attack managed to disable the Dragoons in one round. Lucky, but what a nice way to start the battle. He then spent the following round routing them off the table.

After this the Little One got one of his other Gallopers to get onto attacking the Forlorn hope units – I could see him being “Charged up!”.

However they opened fire and knocked out two of the six models making the unit wavering (we used ammo box markers for this!).

Meanwhile on my Left flank the Dragoons had advanced and used the skirmish feature attacking the Shot unit with the commander and managed to get it wavering too. It looked like a had regained some control.

However two rounds later the Gallopers who routed the first Dragoon unit had forced the Dragoon unit with the Russian Commander to evade straight into the jaws of the enemy.

Shorty afterwards the Officers Dragoon unit was destroyed and the other Dragoon unit having sustained heavy fire from the Shot units withdrew toward the river. Meanwhile one of the Forlorn Hope units had snatched one of the wagons and I hoped to do the same with the other unit.

However the second Forlorn Hope was decimated by the remaining Ottomans and I had no longer a feasible chance of doing anything more than drag some of the total war chest out of the Enemy’s hand.
The result
With only a Forlorn Hope unit left but with control of one of the War Chest wagons we agreed a 4 -2 victory to the Little One. Fair enough.
That means that Lieutenant Dupont could add 4 Honour to his roster, whilst the Russian got 2. We also rolled on the table to see the impact of his health being a casualty in this battle – we found (following a low roll – of course) that he had manage to escape the battle field and hidden (in some honour unfriendly manner) and got captured loosing 5 points of honour.
So the honour tally of our Protagonists’ are 19 to the Ottoman and 7 to the Russian.
Afterthoughts
These were our observations:
Managing the Resource of Luck
The tests for actions (move, attacks, etc.) are good as it creates a fog of war situation, it is also interesting that a failed test for one unit stops the overall activation phase for the player. It is irritating when it happens but not a bad rule feature – like being scared whilst watching a horror movie (I do not like it, but I like horror movies!). The activation values for the units we used were in ranges between 5+ and 7+ (i.e. success on a role of the value or higher) or 4+ to 7+ if considering that an officer within 12″ (or cm in our case, give a -1 to the roll), the probabilities for success of doing the action, and doing anything else that round, are:
4+ – 92%, 5+ 83%, 6+ 72% and 7+ 58%.
So it gives a nice balance between trying to optimize the order in which you activate. If there are no other considerations they you should do them in the lowest activation roll order. However this indirectly decreases the chance of being able to activate a unit that may be critical for that particular round. Luck is a finite resource and it is important to manage that resource well!
Cool Units
We found the Gallopers being very powerful and the follow-on attack was devastating – it would have helped to have some Pike available. The Dragoon ability to evade was interesting and worked really well in the game (but I did fail to activate it a few times, and the Little One outsmarted me in using it). We also like the Shot First Salvo rule as it makes the Shot very potent (especially the Veterans we used).
Officers
As for the Men Who Would be King rules (see more here) there are the officer traits (although there is an overall officer as opposed to unit commanders) that we found interesting – that the Little One talked with a French Accent whilst commanding his Ottomans made the game more enjoyable.
Next time we will try the special orders (i.e. sub-mission to give more glory – or to loose some) and see how it goes.
Simple but not simplistic
As for the other rules in the Series the rules are relatively simple but there is more to it and with the special abilities, activation considerations it has sufficient depth to make it interesting and very playable.
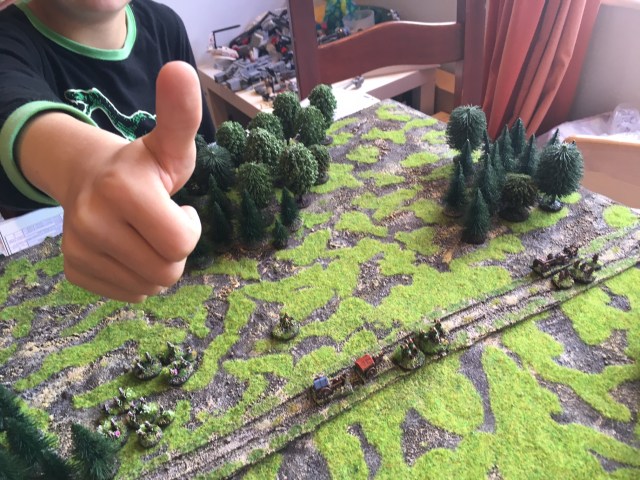
But as we say in Sweden “till syvende och sist” (at the end of the day) it is not over until the Little One’s thumb has had its say. We both had a good time this afternoon and are looking forward to the next session.
Very well, it seems like we have another game we can play together.
/ Take care

Exellent AAR matey!
Like the look of your small game very much, the firest really look like a Forest 🙂
Glad that you liked the rules even you got beaten by the little 1;)
Best regards Michael
LikeLiked by 1 person
Thanks Michael, I really enjoyed your rules and I have Swedish GNW pike and shot ready for some action for the next time. The Little One will get some real Swedish steel to deal with. As for forest, well it was all I ever could see during those formative years! Take care.
LikeLike
Pingback: (Pruth Campaign) Skirmish Action in 6mm using Pikeman’s Lament – Part 4: The Swedes, another Game and rebasing the FIW stuff – Roll a One
Pingback: Dragon’s Rampant in 6mm – Part 1: Is this the real life? Is this just fantasy? – Roll a One
Pingback: Getting Ready for Sam Mustafa’s Rommel – Part 1 – Roll a One
Pingback: Towards Moscow Trilogy (TMT) – Horka 1708 – Russians and the Field of Battle, GNW Stuff and Podcasts – Roll a One
Pingback: 2017 ending 2018 coming! – Roll a One
Pingback: GNW Horka 1708 update, Tiny Tin Troops, 2nd Edition Saga and Helion Books – Roll a One
Pingback: Gaslands in 6MM – out of sight but not out of mind – Roll a One